Evacuation Queue Simulation Tutorial Content Introduction - MATSim
Evacuation Queue Simulation Tutorial Content Introduction - MATSim
Evacuation Queue Simulation Tutorial Content Introduction - MATSim

You also want an ePaper? Increase the reach of your titles
YUMPU automatically turns print PDFs into web optimized ePapers that Google loves.
<strong>Evacuation</strong> <strong>Queue</strong> <strong>Simulation</strong> <strong>Tutorial</strong><br />
This tutorial is based on <strong>MATSim</strong> Version 2007-10-06<br />
This documentation is an introduction to the <strong>Evacuation</strong> <strong>Queue</strong> <strong>Simulation</strong>. The reader is expected to<br />
have successfully managed the basic <strong>MATSim</strong> tutorial ('Getting Started with <strong>MATSim</strong>') that is located<br />
at http://matsim.org/node/64. The evacuation simulation is demonstrated on the well known Sioux Falls<br />
network. But it is planned to eventually apply the system to the Indonesian city of Padang, to simulate a<br />
pedestrian evacuation in case of a Tsunami warning. Because of the early stage of the project (October<br />
2007), this tutorial refer to an evacuation of Sioux Falls by car.<br />
<strong>Content</strong><br />
<strong>Introduction</strong><br />
Requirements<br />
<strong>Evacuation</strong>QSim package<br />
Day-to-day re-planning evacuation simulation<br />
<strong>Introduction</strong><br />
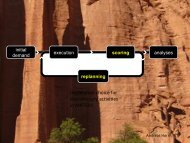
In the current version of <strong>MATSim</strong> it is possible to run evacuation simulations. – <strong>Evacuation</strong> <strong>Queue</strong><br />
<strong>Simulation</strong>. EQSim is being developed in context of the “Numerical 'Last-mile' Tsunami Early<br />
Warning and <strong>Evacuation</strong> Information System” for simulating mobility flow and traffic patterns of<br />
Padang in case of a tsunami warning/evacuation. EQSim fits quite well into the <strong>MATSim</strong> architecture<br />
and is part of the <strong>MATSim</strong> <strong>Queue</strong> <strong>Simulation</strong>.<br />
This tutorial will show how to run basic evacuation simulations in a particular test case namely Sioux<br />
Falls. In the last 35 years the Sioux Falls network has become a standard reference in transportation<br />
science. Because of its topology it is also well suited for a demonstration of an evacuation simulation.<br />
Since we integrate the EQSim into the <strong>MATSim</strong> framework, we want to keep as many parts of<br />
<strong>MATSim</strong> untouched as possible. The EQSim modifies the agents’ plans in such a way that an<br />
evacuation plan only consists of 2 activities (home, save place). While simulating, these plans will be<br />
optimized to achieve Nash equilibrium. For the router it is not clear where the target of the shortest<br />
path calculation should be, as the agents have more than one safe place to run to. Instead, in the<br />
underlying domain every node outside the evacuation area is a possible destination for an agent that is<br />
looking for an escape route. In order to use the Dijkstra router, the network has to be extended in a way<br />
that from all locations in the evacuation area only one evacuation destination exists. This is done by<br />
connecting all links, which lead out of the evacuation area, using virtual evacuation links with infinite<br />
flow capacity und zero length to a special “evacuation node”. Doing so, Dijkstra's algorithm will<br />
always find the shortest route from any node inside the evacuation area to this evacuation node. A<br />
sketch of the Sioux Falls network including the evacuation links/nodes is given in the figure below.
Requirements<br />
For EQSim three different input files are needed. At first the config file: For the most part it is<br />
conforming to a common config file and only one additional module has to be added:<br />
<br />
<br />
<br />
This module defines the location of the evacuation-area file. This XML-file contains the ID of all links<br />
within the evacuation area and the evacuation time information for this links (latest point in time when<br />
a link has to be evacuated). At the moment the information about the evacuation time is ignored and<br />
will become important for the projected within-day re-planning simulation.<br />
The actual position, capacity and free speed of all the links and the position of the corresponding nodes<br />
are defined in the network file. As already mentioned, we choose to use the Sioux Falls network in this<br />
example. To generate an evacuation scenario we additionally need a population. The population is<br />
defined in a common plans file with a slightly difference. Since we only need the position of the agent<br />
for a given time all other information like routes can be neglected. Therefore for every agent only one<br />
plan with only one act (contains actual position) is stored in the plans file. The population in this case is<br />
a 10 percent sample of randomly generated an uniform distributed population of 50000 agents.<br />
Therefore, the flow capacity and storage capacity factor was set to 0.1.<br />
The needed input files are stored in the ./data directory. You can open these files with your favorite<br />
text editor. An editor that supports syntax highlighting for XML is recommend.
The evacuation package<br />
The evacuation package consists of following classes:<br />
<strong>Evacuation</strong>AreaFileReader – a XML-file reader for the evacuation-area file<br />
<strong>Evacuation</strong>AreaFileWriter – a XML-file writer for the evacuation-area file<br />
<strong>Evacuation</strong>AreaLink – a evacuation area link holds the ID and the evacuation time of a link in<br />
the network<br />
<strong>Evacuation</strong>PlansGeneratorAndNetworkTrimmer – generates the initial evacuation plans for<br />
agents and removes all nodes and links outside the evacuation area besides such nodes that are<br />
direct reachable from inside the evacuation area.<br />
<strong>Evacuation</strong>QSimControler – derived from Controler<br />
Day-to-day replanning evacuation simulation<br />
java org.matsim.evacuation.<strong>Evacuation</strong>QSimControler ./examples/evacuationtutorial/evacuationConf.xml<br />
This will run so many iterations as in the config file specified. Per default there are 100 iterations,<br />
however you can change this if you want. I suggest, to run at least 50 iterations, so that all agents have<br />
good chance to be drawn several times for re-planning. Doing so, the system should move towards<br />
Nash equilibrium. Because of the limited size of the evacuation area you will see that the simulation is<br />
very fast. On current hardware it takes about only a few second per iteration.<br />
After the run is finished you will find the results in the ./output directory in the same manner as you<br />
know it from other iteration. Additional, you will find file that is called evacuation_net.xml in this<br />
directory. The file represents the modified network with the virtual evacuation links. This file has no<br />
particular importance, since the modified network will be create on the fly when you start up the<br />
evacuation simulation. But if you open this file in the visualizer you get an idea how the evacuation<br />
scenario looks like.<br />
Visualization<br />
You can start NetVis with the following command:<br />
java org.matsim.utils.vis.netvis.NetVis<br />
For detailed description how to use the visualizer please consult the 'Getting Started with <strong>MATSim</strong>'<br />
tutorial. For example you could open t./output/ITERS/it.0/SnapshotCONFIG.vis to view the<br />
initial evacuation of Sioux Falls.