- Page 1 and 2: J-Link / J-Trace User Guide Softwar
- Page 3 and 4: Revision Date By Explanation V4.51e
- Page 5 and 6: Revision Date By Explanation 74 090
- Page 7 and 8: Revision Date By Explanation 43 080
- Page 9 and 10: Revision Date By Explanation 17 070
- Page 11 and 12: About this document This document d
- Page 13 and 14: 13 Table of Contents 1 Introduction
- Page 15 and 16: 5.3.4 JTAG Speed ..................
- Page 17 and 18: 9.15.6 OMAP3530....................
- Page 19 and 20: Chapter 1 Introduction This chapter
- Page 21 and 22: 1.2 Supported OS J-Link/J-Trace can
- Page 23 and 24: 1.3.1 Model comparison The followin
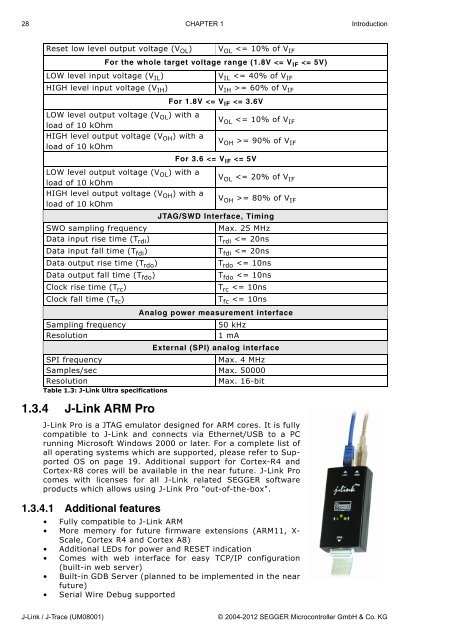
- Page 25 and 26: LOW level input voltage (V IL ) V I
- Page 27: 1.3.3 J-Link Ultra J-Link Ultra is
- Page 31 and 32: 1.3.6.1 Specifications The followin
- Page 33 and 34: 1.3.7.3 Download speed The followin
- Page 35 and 36: Clock fall time (T fc ) Max. 10ns 1
- Page 37 and 38: Target supply current Max. 300mA LO
- Page 39 and 40: 1.5 Supported CPU cores J-Link / J-
- Page 41 and 42: 1.6.2.1 Limitations of PC-side impl
- Page 43 and 44: 1.6.3.2 Older models The table belo
- Page 45 and 46: Chapter 2 Licensing This chapter de
- Page 47 and 48: 2.2 Software components requiring a
- Page 49 and 50: 2.3.2.1 Entering a key-based licens
- Page 51 and 52: Manufacturer Name Licenses NXP LPC1
- Page 53 and 54: Manufacturer Name Licenses NXP LPC1
- Page 55 and 56: Manufacturer Name Licenses NXP LPC2
- Page 57 and 58: 2.4 Legal use of SEGGER J-Link soft
- Page 59 and 60: 2.5.3 J-Link Pro J-Link Pro is a JT
- Page 61 and 62: 2.6 J-Link OEM versions There are s
- Page 63 and 64: 2.6.6 IAR: J-Trace IAR J-Trace is a
- Page 65 and 66: 2.8 Illegal Clones Clones are copie
- Page 67 and 68: Chapter 3 J-Link and J-Trace relate
- Page 69 and 70: J-Link GDB Server J-Link GDB Server
- Page 71 and 72: -If Selects the target interface J-
- Page 73 and 74: When passing all necessary informat
- Page 75 and 76: eturn; } // // Check if ITM_TRC is
- Page 77 and 78: 3.2.5 J-Link STM32 Commander (Comma
- Page 79 and 80:
3.2.7 J-Mem Memory Viewer J-Mem dis
- Page 81 and 82:
3.2.9 J-Link RDI (Remote Debug Inte
- Page 83 and 84:
3.3 Dedicated flash programming uti
- Page 85 and 86:
3.3.5.2 Purchasing the source code
- Page 87 and 88:
3.5 Using the J-LinkARM.dll 3.5.1 W
- Page 89 and 90:
Chapter 4 Setup This chapter descri
- Page 91 and 92:
2. The Welcome dialog box is opened
- Page 93 and 94:
4.2 Setting up the USB interface Af
- Page 95 and 96:
(jlink) USB and click the Change/Re
- Page 97 and 98:
The Network configuration page allo
- Page 99 and 100:
4.5 J-Link Configurator Normally, n
- Page 101 and 102:
4.6 J-Link USB identification In ge
- Page 103 and 104:
Chapter 5 Working with J-Link and J
- Page 105 and 106:
5.2 Indicators J-Link uses indicato
- Page 107 and 108:
5.2.2 Input indicator Some newer J-
- Page 109 and 110:
SEGGER J-Flash configuration dialog
- Page 111 and 112:
5.3.3 Determining values for scan c
- Page 113 and 114:
5.4 SWD interface The J-Link suppor
- Page 115 and 116:
5.5 Multi-core debugging J-Link / J
- Page 117 and 118:
6. Choose Project|Options and confi
- Page 119 and 120:
5.6 Connecting multiple J-Links / J
- Page 121 and 122:
5.7 J-Link control panel Since soft
- Page 123 and 124:
Flash download and flash breakpoint
- Page 125 and 126:
Available function calls to log: Re
- Page 127 and 128:
5.8 Reset strategies J-Link / J-Tra
- Page 129 and 130:
5.8.2 Strategies for Cortex-M devic
- Page 131 and 132:
performs a reset of the CPU and per
- Page 133 and 134:
5.10 J-Link script files In some si
- Page 135 and 136:
5.10.2.7 JTAG_WriteIR() Description
- Page 137 and 138:
5.10.2.18CORESIGHT_AddAP() Descript
- Page 139 and 140:
EMU_ETB_UseETB EMU_ETM_IsPresent EM
- Page 141 and 142:
• ARM966ES • ARM968ES • ARM11
- Page 143 and 144:
5.10.7.2 In debugger IDE environmen
- Page 145 and 146:
5.11.1.1 device This command select
- Page 147 and 148:
5.11.1.8 map ram This command shoul
- Page 149 and 150:
5.11.1.16 SetSysPowerDownOnIdle Whe
- Page 151 and 152:
On the Extra Options page, select U
- Page 153 and 154:
5.13 Cache handling Most ARM system
- Page 155 and 156:
Chapter 6 Flash download This chapt
- Page 157 and 158:
6.2 Licensing No extra license requ
- Page 159 and 160:
6.4 Setup for various debuggers (in
- Page 161 and 162:
Then J-Link has to be selected as d
- Page 163 and 164:
6.4.5 J-Link RDI The configuration
- Page 165 and 166:
Save the settings file and restart
- Page 167 and 168:
6.6 Using the DLL flash loaders in
- Page 169 and 170:
Chapter 7 Flash breakpoints This ch
- Page 171 and 172:
7.2 Licensing In order to use the f
- Page 173 and 174:
7.4 Setup & compatibility with vari
- Page 175 and 176:
Chapter 8 RDI RDI (Remote Debug Int
- Page 177 and 178:
8.2 Licensing In order to use the J
- Page 179 and 180:
Driver option to RDI. 3. Go to the
- Page 181 and 182:
8.3.2 ARM AXD (ARM Developer Suite,
- Page 183 and 184:
8.3.3 ARM RVDS (RealView developer
- Page 185 and 186:
4. Now select Add DLL to add the JL
- Page 187 and 188:
9. Now the RealView Debugger is con
- Page 189 and 190:
2. Click Method | New in the Connec
- Page 191 and 192:
8.3.5 KEIL MDK (µVision IDE) 8.3.5
- Page 193 and 194:
After finishing configuration, the
- Page 195 and 196:
8.4.4.1 General tab Connection to J
- Page 197 and 198:
Comands in the macro file Command D
- Page 199 and 200:
8.4.4.4 Flash tab Enable flash prog
- Page 201 and 202:
8.4.4.6 CPU tab Instruction set sim
- Page 203 and 204:
8.5 Semihosting Semihosting is a me
- Page 205 and 206:
8.5.5 Unexpected / unhandled SWIs W
- Page 207 and 208:
Chapter 9 Device specifics This cha
- Page 209 and 210:
• Analog ADuC7026x62 • Analog A
- Page 211 and 212:
• AT91SAM7XC512 • AT91SAM9XE128
- Page 213 and 214:
RDI Sample SetJTAGSpeed(30); // Set
- Page 215 and 216:
9.4 Ember J-Link has been tested wi
- Page 217 and 218:
9.6 Freescale J-Link has been teste
- Page 219 and 220:
} // Check current data flash & EEP
- Page 221 and 222:
9.8 Itron J-Link has been tested wi
- Page 223 and 224:
9.9.1 Unlocking LM3Sxxx devices If
- Page 225 and 226:
9.10.1 LPC ARM7-based devices 9.10.
- Page 227 and 228:
9.11 OKI J-Link has been tested wit
- Page 229 and 230:
9.13 Samsung J-Link has been tested
- Page 231 and 232:
9.14.1 STR91x 9.14.1.1 JTAG setting
- Page 233 and 234:
Disabling the hardware watchdog In
- Page 235 and 236:
9.15 Texas Instruments J-Link has b
- Page 237 and 238:
9.15.6 OMAP3530 Needs a J-Link scri
- Page 239 and 240:
Chapter 10 Target interfaces and ad
- Page 241 and 242:
PIN SIGNAL TYPE Description 15 RESE
- Page 243 and 244:
10.1.2 Pinout for SWD The J-Link an
- Page 245 and 246:
10.2 38-pin Mictor JTAG and Trace c
- Page 247 and 248:
PIN SIGNAL Description 22 Trace sig
- Page 249 and 250:
Parameter Min. Max. Explanation Tsh
- Page 251 and 252:
PIN SIGNAL TYPE Description 16 18 2
- Page 253 and 254:
10.5 Adapters There are various ada
- Page 255 and 256:
Chapter 11 Background information T
- Page 257 and 258:
11.1.4 The TAP controller The TAP c
- Page 259 and 260:
11.2 Embedded Trace Macrocell (ETM)
- Page 261 and 262:
11.2.3.2 Code coverage - Source cod
- Page 263 and 264:
11.3 Embedded Trace Buffer (ETB) Th
- Page 265 and 266:
11.4.4.3 Flash loader of compiler /
- Page 267 and 268:
Use an application (for example JLi
- Page 269 and 270:
Chapter 12 Designing the target boa
- Page 271 and 272:
12.2 Terminating the trace signal T
- Page 273 and 274:
Chapter 13 Support and FAQs This ch
- Page 275 and 276:
13.2 Troubleshooting 13.2.1 General
- Page 277 and 278:
13.3 Contacting support Before cont
- Page 279 and 280:
Chapter 14 Glossary This chapter de
- Page 281 and 282:
ID Identifier. IEEE 1149.1 The IEEE
- Page 283 and 284:
TDO The electronic signal output fr
- Page 285 and 286:
Chapter 15 Literature and reference
- Page 287 and 288:
A Adaptive clocking ...............