USER MANUAL MP 1260 R - Oslo Hi-Fi Center
USER MANUAL MP 1260 R - Oslo Hi-Fi Center
USER MANUAL MP 1260 R - Oslo Hi-Fi Center

Create successful ePaper yourself
Turn your PDF publications into a flip-book with our unique Google optimized e-Paper software.
�<br />
<strong>USER</strong> <strong>MANUAL</strong><br />
<strong>MP</strong> <strong>1260</strong> R<br />
Software Version V 1.0 Order No. 9103-0397 UK
Welcome.<br />
We are delighted that you have decided to purchase a ���� product. With your new <strong>MP</strong> <strong>1260</strong> R you have acquired a<br />
top-quality piece of equipment which has been designed and developed with the wishes of the audiophile music lover as<br />
absolute top priority.<br />
This system represents our very best efforts at designing practical electronic equipment incorporating solid quality, userfriendly<br />
operation and a specification and performance which leaves nothing to be desired.<br />
All these factors contribute to a piece of equipment which will satisfy your highest demands and your most searching<br />
requirements for a period of many years. All the components we use meet the German and European safety norms and<br />
standards which are currently valid. All the materials we use are subject to painstaking quality monitoring.<br />
At all stages of production we avoid the use of substances which are environmentally unsound or potentially hazardous<br />
to health, such as chlorine-based cleaning agents and CFCs.<br />
We also aim to avoid the use of plastics in general, and PVC in particular, in the design of our products. Instead we rely<br />
upon metals and other non-hazardous materials; metal components are ideal for recycling, and also provide effective<br />
electrical screening.<br />
Our robust all-metal cases exclude any possibility of external sources of interference affecting the quality of<br />
reproduction. From the opposite point of view our products’ electro-magnetic radiation (electro-smog) is reduced to an<br />
absolute minimum by the outstandingly effective screening provided by the metal case.<br />
Our range of accessories includes high-quality cables and connectors<br />
We would like to take this opportunity to thank you for the faith you have shown in our company by purchasing this product,<br />
and wish you many hours of enjoyment and sheer listening pleasure with your <strong>MP</strong> <strong>1260</strong> R.<br />
� elektroakustik GmbH & Co KG<br />
� All<br />
2<br />
the components we use meet the European safety norms and standards which are currently valid. The operation<br />
instructions, the connection guidance and the safety notes are for your own good - please read them<br />
carefully and observe them at all times.<br />
This product complies with the Low Voltage Directive (73/23/EEC), EMV Directives (89/336/EEC, 92/31/EEC) and CE<br />
Marking Directive (93/68/EEC).
Contents<br />
Operation<br />
Front panel controls ........................................................................................................ 4<br />
Remote Control ............................................................................................................. 8<br />
Basic Functions of the <strong>MP</strong> <strong>1260</strong> R ............................................................................... 10<br />
System Settings (System Configuration menu) ............................................................. 10<br />
Network Settings ........................................................................................................... 10<br />
D/A Converter Settings .................................................................................................. 11<br />
Operating the Streaming Client ................................................................................. 12<br />
Access to Media Content via the Main Menu (Home Menu) ......................................... 13<br />
Accessing Media Content using the Favourites List ...................................................... 14<br />
The <strong>MP</strong> <strong>1260</strong> R as D/A Converter ................................................................................. 15<br />
Operating the Tuner .................................................................................................... 16<br />
Using the system for the first time<br />
Back panel connections ................................................................................................. 20<br />
Installation and wiring .................................................................................................... 22<br />
Safety notes ................................................................................................................... 24<br />
FCC Information to the user .......................................................................................... 25<br />
Network Configuration ................................................................................................ 26<br />
The vTuner Premium Service ..................................................................................... 31<br />
Assigning a Device Address .......................................................................................... 33<br />
General<br />
Trouble-shooting ............................................................................................................ 34<br />
Glossary / Supplementary Information .......................................................................... 39<br />
Network Terms .............................................................................................................. 41<br />
Appendix<br />
Wiring diagram .............................................................................................................. 44<br />
Specification .................................................................................................................. 47<br />
About these instructions<br />
All the controls and functions of the <strong>MP</strong> <strong>1260</strong> R which are frequently used are described in the first section of these<br />
operating instructions.<br />
The second part - 'Basic settings, Installation, Using the system for the first time' covers connections and settings<br />
which are very seldom required; they are generally required only when the machine is set up and used for the first time.<br />
Here you will also find a detailed description of the network settings required for connecting the <strong>MP</strong> <strong>1260</strong> R to your<br />
home network.<br />
For newcomers to networks we have prepared explanations of some of the important terms used in this technology and<br />
other background information in the Chapter 'Network Terms'.<br />
Symbols used in these instructions<br />
� Caution!<br />
Text passages marked with this symbol contain important information which must be observed if the<br />
machine is to operate safely and without problems.<br />
�<br />
This symbol marks text passages which provide supplementary notes and background informations; they<br />
are intended to help the user understand how to get the best out of the machine.<br />
3
4<br />
Front panel controls<br />
All the important functions of the <strong>MP</strong> <strong>1260</strong> R can be operated using the buttons on the front panel. Direct-acting buttons<br />
are provided for fundamental functions such as source select and track select. Functions used not frequently are<br />
operated by menues which can be accessed by the ���� / ���� buttons.<br />
All information relating to the machine’s state, the current track and the associated transmitting station are displayed on<br />
the integral screen. The main information is displayed in a larger font to be readable more easily. The following section<br />
explains the functions of the buttons on the machine, and the information provided on the screen.<br />
���� (On / Off switch)<br />
A brief press on the ���� button switches the unit on and off. When the<br />
machine is switched on, the indicator light above the button glows.<br />
���� Caution!<br />
The mains button is not a mains isolation switch. Even when the LED is not<br />
glowing, some parts of the machine are still connected to mains voltage. If<br />
the machine is not to be used for a long period, we recommend that you<br />
isolate it from the mains by pulling out the plug at the wall socket.<br />
���� Selects the <strong>MP</strong> <strong>1260</strong> R’s Streaming Client function (Internet radio, access to<br />
music server, iPod playback)<br />
���� Selects the FM tuner of the <strong>MP</strong> <strong>1260</strong> R.<br />
���� Selects the <strong>MP</strong> <strong>1260</strong> R’s digital inputs 1.<br />
���� Selects the <strong>MP</strong> <strong>1260</strong> R’s digital inputs 2.<br />
���� Brief press: Opens the 'Source Select' menu, enables selection of the<br />
listening source<br />
Long press: Opens a context-sensitive menu<br />
���� Brief press: Opens the System Configuration menu (see Chapters<br />
'System settings (System Configuration Menu)')
Navigation<br />
� Back to the previous point / change button<br />
� Confirms input / change button<br />
� Selects the next point within a list / select button<br />
� Selects the previous point within a list / select button<br />
���� Confirm button / Starts playback / halts playback (pause) / resumes playback<br />
after a pause<br />
� Ends playback<br />
���� Halts playback (pause) / resumes playback after a pause<br />
���� / ���� Repeat functions (not possible with all media)<br />
Brief press: Repeat Track, Repeat ALL, 'Normal'<br />
Long press: Mix-Mode (Shuffle)<br />
Brief button presses in MIX mode: Mix, Repeat Track, Reapeat Mix<br />
If Streaming Client is selected, and the main menu is displayed:<br />
Brief press: Toggle switch between inputs USB 1 and USB 2<br />
���� / ���� Brief press: Adds a favourite to the Favourites list created on the<br />
<strong>MP</strong> <strong>1260</strong> R<br />
Long press: Removes a favourite from the Favourites list created on the<br />
<strong>MP</strong> <strong>1260</strong> R<br />
���� / ���� Brief press: During Streaming Client operation:<br />
Toggles the display between the ‚Now Playing‘ view and track<br />
list / station list navigation.<br />
During tuner operation:<br />
Toggles between Mono and Stereo<br />
Long press: Displays the Favourites list created on the <strong>MP</strong> <strong>1260</strong> R<br />
���� / ���� Brief press: Switches between the Digital filters<br />
Long press: Only when connected to a WLAN network: switch display to<br />
field strength indicator (for WLAN antenna adjustment)<br />
5
Display<br />
6<br />
All information relating to machine status, the current music track and<br />
navigation in lists is displayed on the <strong>MP</strong> <strong>1260</strong> R’s graphic screen. The display<br />
is context-sensitive, and varies in part according to the capabilities and facilities<br />
of the service to which you are currently listening.<br />
The most important pieces of information are displayed in a bigger font.<br />
Additional information is displayed by symbols. The meaning of the symbols is<br />
explained in the following table.<br />
e. g.<br />
The screen functions and symbols vary according to the currently active<br />
function (SCL, Digital IN), and according to the type of music being played.<br />
The basic areas of the screen:<br />
• Display field (a) shows information relating to the piece of music being<br />
played. The essential information is displayed enlarged in the main line.<br />
• The bottom line (b) displays supplementary context-sensitive information and<br />
operating notes:
The screen can display the following symbols:<br />
Making connection (Wait / Busy)<br />
The rotating symbol indicates that the <strong>MP</strong> <strong>1260</strong> R is processing a command, or<br />
is making the connection to a service. These processes may take a little while,<br />
depending on the speed and current load of the network.<br />
During this period the <strong>MP</strong> <strong>1260</strong> R may be muted, and may not respond to<br />
commands. If this should happen, please wait until the symbol disappears.<br />
Indicates a playable music track or a playback list (Playlist)<br />
Indicates a folder, concealing further folders or lists.<br />
Indicates that the <strong>MP</strong><strong>1260</strong>R is connected to the network by cable LAN.<br />
Indicates that the listen source is connected by wireless WLAN.<br />
Indicates that the <strong>MP</strong> <strong>1260</strong> R is playing a station or a music track.<br />
Pause indicator<br />
Buffer display (full indicator, memory indicator) and<br />
(if supporterd by the source) indication of bit-rate of the stream.<br />
The higher the bit rate, the better the audio quality will be.<br />
Time display: elapsed playback time.<br />
This display is not available for all services.<br />
Indicates that it is possible to switch to a higher menu level or select menu<br />
using the ���� button.<br />
0 / 0 Position indicator in Select lists. The first figure indicates the current position in<br />
the list, the second figure the total number of list entries (list length).<br />
ABC or<br />
123 or<br />
abc<br />
1 or<br />
2<br />
Indicates that the selected menu point / list point can be activated by pressing<br />
the ���� button.<br />
Character input mode indicator<br />
� Stereo indicator<br />
� Mono indicator<br />
Indicates which USB socket is selected<br />
7
General Information<br />
8<br />
Remote Control<br />
In general terms the remote control buttons have the same function as the corresponding buttons on the <strong>MP</strong> <strong>1260</strong> R’s<br />
front panel.<br />
The following tables show the remote control buttons and their functions when operating the machine.<br />
���� For the remote control handsets F11 and F12 a sticker with the alpha-numeric symbols is supplied with the<br />
accessories of the <strong>MP</strong> <strong>1260</strong> R to convert the printing of the number block to the F6a print.
F6a F11 / F12 F1<br />
Source buttons (eg. ����) Switch ON the <strong>MP</strong> <strong>1260</strong> R with the assigned source button (eg. ����)<br />
See chapter 'Basic Functions of the <strong>MP</strong> <strong>1260</strong> R, System Settings<br />
(System Configuration menu), Menu item Divice Adr' for details.<br />
���� (red) ���� (red) ���� (red) Switches the <strong>MP</strong> <strong>1260</strong> R off<br />
���� ���� ���� - Starts a piece of music<br />
- Selects an Internet radio station<br />
- Confirm buttons during input process<br />
- Halts playback (pause) / resumes playback after a pause<br />
���� ���� ���� Ends playback<br />
���� ���� ���� Halts playback (pause) / resumes playback after a pause<br />
���� ���� ���� - In a list or menu: selects the next item<br />
- During playback: next title (playlist) / next station (station list)<br />
���� ���� ���� - In a list or menu: selects the previous item<br />
- During playback: previous title (playlist) / previous station (station list)<br />
���� ���� ���� - Back to the next higher menu level<br />
- IPod only: Hold button pressed in for rewind<br />
���� ���� ���� - Opens a folder<br />
- Starts a piece of music<br />
- Selects an Internet radio station<br />
- iPod only: Hold button pressed in for fast forward<br />
����<br />
����<br />
abc<br />
...<br />
����<br />
xyz<br />
����<br />
����<br />
����<br />
(blue)<br />
����<br />
(not<br />
possible<br />
with all<br />
media)<br />
����<br />
����<br />
...<br />
����<br />
����<br />
����<br />
����<br />
...<br />
����<br />
����<br />
���� ����<br />
(right)<br />
����<br />
(not<br />
possible<br />
with all<br />
media)<br />
- Direct alpha-numeric input, e.g. track number, fast station select, radio station.<br />
- The ���� and ���� buttons are also used for non-standard<br />
characters.<br />
During text input you can switch between numeric and alpha-numeric input,<br />
and between capitals and lower case by pressing the ���� button.<br />
- Storing and calling up a Preset<br />
Brief press: Calling up a Preset<br />
Long press: Storing a Preset<br />
Brief press: Opens the source select menu<br />
Long press: While navigating through lists:<br />
Calls up the Search function (Alpha search)<br />
During playback: Calls up oversampling filter menu<br />
The menu points are called up using the � / � button, and can<br />
be altered using the � / � buttons.<br />
During character input operations:<br />
when pressed repeatedly this button toggles between numeric and alphanumeric<br />
input, and between capitals and lower case<br />
Repeated brief presses cycle through the repeat functions:<br />
� Rpt Trk The current piece is repeated<br />
� Rpt All All pieces in the current folder / the current playlist are<br />
repeated<br />
� Normal Repeat function switched off<br />
Long press: Switches Mix mode (Shuffle) ON and OFF<br />
Subsequent repeated brief button presses cycle through the shuffle functions:<br />
� Mix, � Rpt Trk, � Rpt Mix<br />
If Streaming Client is selected, and the main menu is displayed:<br />
Brief press: Toggle switch between inputs USB 1 and USB 2<br />
���� Brief press: During Streaming Client operation:<br />
Toggles the display between the ‚Now Playing‘ view and<br />
track list / station list navigation.<br />
During tuner operation:<br />
Toggles between Mono and Stereo<br />
���� ���� Long press: Displays the Favourites list<br />
���� ����<br />
(F12 only)<br />
���� ����<br />
(F12 only)<br />
���� Brief press: Adds a favourite to the Favourites list created on the<br />
<strong>MP</strong> <strong>1260</strong> R<br />
If the memory is full the display shows the message 'Favorite List Full'.<br />
���� Long press: Removes a favourite from the Favourites list created on<br />
the <strong>MP</strong> <strong>1260</strong> R<br />
9
10<br />
Basic Functions of the <strong>MP</strong> <strong>1260</strong> R<br />
There are a few basic functions of the <strong>MP</strong> <strong>1260</strong> R which are always available regardless of the selected source<br />
(Streaming Client, …). For example, these include the System Configuration menu, in which device settings such as<br />
screen brightness and language can be carried out.<br />
System Settings (System Configuration menu)<br />
In the System Configuration menu general device settings are adjusted. This menu is described in detail in the following<br />
chapter.<br />
Calling up and operating<br />
the menu<br />
Menu item<br />
Display Brightness<br />
(Screen brightness)<br />
Menu item<br />
Language<br />
Menu item<br />
Device Adr<br />
• The menu is called up by briefly pressing the ���� button on the front<br />
panel<br />
• When the menu is opened, the following select points appear on the screen:<br />
• Display Brightness (Screen brightness)<br />
• Language<br />
• Device Adr<br />
• Use the ���� / ���� to select a menu point.<br />
• To change a selected menu point, first press the ���� button, then change<br />
it using the � / � buttons.<br />
• To accept the setting, press the ���� button after completing the change.<br />
• You can press the ���� button at any time to interrupt the procedure, i.e. to<br />
conclude without accepting a change.<br />
• Press the ���� button again to leave the menu.<br />
At this point you can adjust the brightness of the integral screen to suit your<br />
personal preference. Available settings are:<br />
• Off<br />
• Medium<br />
• <strong>Hi</strong>gh<br />
This menu item lets you select the display language for the <strong>MP</strong> <strong>1260</strong> R.<br />
The language of data received from external sources (eg. iPod, UPnP-AVserver)<br />
depends on the settings of the external device and can not be selected<br />
in <strong>MP</strong> <strong>1260</strong> R’s language menu.<br />
Here you can assign the source button which selects and activates the<br />
<strong>MP</strong> <strong>1260</strong> R as listening source.<br />
The <strong>MP</strong> <strong>1260</strong> R must be connected to the corresponding audio inputs of your<br />
� amplifier or receiver.<br />
Network Settings<br />
The operation of this menu is described in detail in the chapter Installation / Using the system for the first time,<br />
Network Configuration.<br />
Entering the network<br />
settings menu<br />
• To enter this menu keep the ����-button on the front panel pressed until<br />
the menu opens on the display.
Calling up and operating<br />
the D/A converter options<br />
D/A set-up option<br />
OVS<br />
(not with iPod)<br />
D/A set-up option<br />
Output<br />
(not with iPod and Tuner)<br />
D/A Converter Settings<br />
A number of special settings are available for the <strong>MP</strong> <strong>1260</strong> R’s D/A converter;<br />
they are designed to fine-tune the characteristics of your amplifier to suit your<br />
listening preferences.<br />
To enter the D/A converter options press the ���� button on the front panel<br />
briefly.<br />
During playback alternatively you can enter the D/A converter options by a long<br />
press on the ���� button of the remote control.<br />
This action opens a set-up window in which the various options are displayed.<br />
• Now use the ���� / ���� buttons to select a set-up option.<br />
• In each case the displayed option can be altered using the ���� / ����<br />
buttons.<br />
• If no further action is taken for a period of a few seconds, the set-up window<br />
disappears again from the screen.<br />
Pressing this button causes the currently active digital filter to be displayed on<br />
the screen for a period of about one second, e. g.: 'FIR lang'.<br />
During this period pressing the ���� / ���� button repeatedly calls up and<br />
selects the five available digital filters in turn. For more information on filters<br />
please refer to the Section 'Glossary / Supplementary Information, Digital<br />
filters'.<br />
Note:<br />
A continuously glowing code number (1 ... 4) on the screen indicates the active<br />
filter.<br />
At this point it is possible to toggle between normal and inverted phase in the<br />
signal.<br />
With particular instruments or voices the human ear is certainly capable of<br />
detecting whether absolute phase is correct or not. However, absolute phase is<br />
not always correctly recorded. The problem can be corrected by pressing this<br />
button to invert the signal (i.e. turn it through 180°).<br />
The correction is carried out at the digital level, and has absolutely no adverse<br />
effect on sound quality.<br />
11
General Information on<br />
the Streaming Client<br />
Select Lists<br />
12<br />
Operating the Streaming Client<br />
The � <strong>MP</strong> <strong>1260</strong> R includes what is known as a 'Streaming Client'. This is a<br />
new class of playback devices for media content, providing a means of playing<br />
music which is stored on a vast variety of sources. These sources may be an<br />
iPod or a USB hard disc connected directly to the <strong>MP</strong> <strong>1260</strong> R, but they may<br />
also be thousands of miles away (e.g. Internet radio station). The Streaming<br />
Client can access such remote sources via a home network and the Internet.<br />
���� The network configuration is explained in the Chapter 'Network Con-figuration'.<br />
The <strong>MP</strong> <strong>1260</strong> R’s Streaming Client can access the following sources:<br />
Local sources<br />
(direct connection)<br />
Remote sources<br />
(via home network or Internet)<br />
USB memory sticks and<br />
Internet radio<br />
USB hard discs<br />
iPod NAS server (with UPnP-AV server)<br />
PC (with UPnP-AV server)<br />
The media content formats which the <strong>MP</strong> <strong>1260</strong> R can reproduce are very wideranging,<br />
and extend from compressed formats such as <strong>MP</strong>3, WMA, AAC and<br />
OGG Vorbis to high-quality non-compressed data formats such as FLAC and<br />
WAV, which are thoroughly audiophile in nature. A full listing of all possible<br />
data and playlist formats is included in the Specification, which you will find in<br />
the Appendix to these instructions.<br />
Since virtually no read or data errors occur when electronic memory media are<br />
accessed, the potential reproduction quality is even higher than that of CD. The<br />
quality level may even exceed that of SACD and DVD-Audio.<br />
The <strong>MP</strong> <strong>1260</strong> R can also play back high-resolution audio formats (FLAC 96/24,<br />
WAV 96/24). <strong>Hi</strong>gh-resolution audio files can be played back from a USB hard<br />
disc connected to the unit, or via a network connection. However, if you wish to<br />
use a network for 96/24 reproduction, a cable network must be used since a<br />
WLAN network is not generally sufficient for the high data rates (see also the<br />
note in the chapter entitled 'Network configuration').<br />
The music content to be played is chosen from Select Lists. These lists are<br />
operated using the navigation buttons (cursor buttons) which you will find on<br />
the remote control handset and on the front panel. All content can be accessed<br />
via the main menu. Internet Radio in particular offers a huge number of<br />
stations, which can result in long searches or periods of navigation. We<br />
therefore recommend that you store your preferred stations in a Favourites<br />
List, as this makes them easy and fast to access, with no protracted searching.<br />
The media content can be listed according to various criteria - Internet radio<br />
stations e.g. by country of origin, genre or alphabetical, music from media<br />
servers e.g. by artiste, album, track, genre, etc.<br />
���� The exact form of the displayed list and the preparation of the content also<br />
depend to a large extent on the capabilities of the server, i.e. the full facilities of<br />
the <strong>MP</strong> <strong>1260</strong> R cannot be exploited with all servers or media. You may<br />
therefore find that in many cases not all the functions described in these<br />
instructions can be used.
�Main Menu<br />
��<br />
(Home-Menu)<br />
Selecting and Playing<br />
Media Content<br />
Alpha-Search<br />
(Letter Search Function)<br />
Access to Media Content via the Main Menu (Home Menu)<br />
When you call up the Streaming Client by pressing the ���� button on the<br />
front panel or the ���� button on the remote control (brief press, opens the<br />
source select menu), the front panel screen displays a list of accessible<br />
media sources:<br />
- USB / iPod *1)<br />
- Internet Radio<br />
- UPnP-AV Server (Media server) in the local network *2)<br />
- Favorites<br />
���� *1) Only the selected USB input is displayed.<br />
Use the ���� button to switch between the USB inputs.<br />
���� *2) To play back media files that are stored on PC’s or NAS storage devices on<br />
your home network, a UPnP-AV server software must be installed on these<br />
devices to make the media content accessible through the network.<br />
You can now select a device or a service using the ���� / ���� buttons.<br />
The selected list point is shown enlarged, and can be called up by pressing the<br />
���� button.<br />
The content of the device is displayed in the form of a list. The individual list<br />
entries are followed either by a folder symbol ( ) or a note symbol ( ).<br />
You can now again move to the individual list points using the ���� / ����<br />
buttons, and open them with the ���� button.<br />
If the list entry you open is a folder, the screen displays the contents of the<br />
folder: you can now navigate further within the new folder.<br />
If the entry is followed by a note symbol, this indicates that the content is<br />
playable (pieces of music, playlists, radio station etc.). If you open an entry of<br />
this type, its content will be played.<br />
���� The lists and music tracks you can see when you select a device vary<br />
according to the machine and the transferred data.<br />
When you are navigating through lists you can call up the <strong>MP</strong> <strong>1260</strong> R’s letter<br />
search function at any time by briefly pressing the ���� button. The screen<br />
now displays the message ‘Search’. While this is on the screen, enter a letter<br />
or a numeral using the remote control handset; the letters assigned to the<br />
numeric buttons are printed below the buttons. To obtain a particular letter,<br />
press the appropriate button repeatedly until the correct letter appears on the<br />
screen. If you make no further entry, after a brief delay the <strong>MP</strong> <strong>1260</strong> R moves<br />
to the first entry in the list which starts with the letter you entered.<br />
13
14<br />
Accessing Media Content using the Favourites List<br />
The Favourites List The Favourites list can be used to store your preferred Internet radio stations<br />
and the paths to your preferred music tracks. At any subsequent time you can<br />
then very quickly access these stations and tracks using the 'Favorites' entry in<br />
the Home Menu.<br />
Adding Favourites to the<br />
List<br />
If you are currently enjoying a particular Internet radio station, simply press the<br />
green ���� button on the F100 handset: this adds the station to the<br />
Favourites list.<br />
���� In principle you can also add pieces and playlists on a NAS server or a USB<br />
hard disc to your Favourites list, but we only recommend this if the content of<br />
the relevant storage medium is available at all times (e.g. permanently<br />
connected USB hard disc).<br />
Calling up Favourites Open the Favourites list using the ���� button, then select an entry from the<br />
list using the ���� / ���� buttons. Start the track or the station by pressing<br />
the ���� / ���� button.<br />
Erasing Favourites Entries are removed from the Favourites list by first selecting the entry to be<br />
erased using the ���� / ���� buttons, and then holding the red ����<br />
button on the F100 handset pressed in for several seconds.<br />
���� Caution!<br />
Erase the paths to files on USB hard discs or UPnP-AV servers from the<br />
Favourites list using the ���� button before you erase or move files.<br />
Using Presets<br />
Preset function You can store Internet radio stations as Presets using the process familiar from<br />
FM radio. These stations can subsequently be called up directly using the<br />
numeric buttons on the remote control handset.<br />
Storing a Preset <strong>Fi</strong>rst select an Internet radio station (e.g. using the Home menu / Internet<br />
radio). When you hear the station, hold a key ���� to ���� pressed until<br />
the massage 'Px stored' appears. The station is now stored under this number.<br />
It is possible to store a total of ten Presets under the numbers ���� to<br />
����.<br />
Calling up a Preset Briefly press one of the numeric buttons ���� to ����. The associated<br />
Preset is now called up, and after a brief delay you will hear it.<br />
Adding Internet Radio<br />
Stations<br />
���� Presets are particularly useful when the front panel screen is not in view, but<br />
you wish to call up stations (e.g. when operating the system from an adjacent<br />
room, or when operating it via a domestic control system).<br />
The lists of Internet radio stations displayed by the <strong>MP</strong> <strong>1260</strong> R are very<br />
complete and comprehensive, but since new stations are constantly being<br />
added you may find that one of your favourite stations is not (yet) included in<br />
the Select lists.<br />
In this case you can add the stations using the vTuner service (see also the<br />
Chapter 'vTuner Premium Service'). The station added can then be accessed<br />
from the <strong>MP</strong> <strong>1260</strong> R’s main menu under the Internet Radio / Added Stations<br />
point.
General Information on<br />
D/A Converter Operation<br />
D/A Converter Operation<br />
Selecting a<br />
D/A Converter Source<br />
The <strong>MP</strong> <strong>1260</strong> R as D/A Converter<br />
The � <strong>MP</strong> <strong>1260</strong> R can be used as a high-quality D/A converter for other<br />
devices such as satellite receiver, digital radio etc. which are fitted with poorquality<br />
converters or no converter at all. The <strong>MP</strong> <strong>1260</strong> R features two digital<br />
inputs on the back panel to allow this usage.<br />
���� Devices with an electrical co-axial output or an optical light-pipe output can be<br />
connected to the digital inputs of the <strong>MP</strong> <strong>1260</strong> R. The <strong>MP</strong> <strong>1260</strong> R accepts<br />
digital stereo signals conforming to the S/P-DIF norm, with sampling rates of 32<br />
to 96 kHz.<br />
Select the <strong>MP</strong> <strong>1260</strong> R as listening source on your amplifier.<br />
Now press the ���� or ���� button on the front panel to select one of the<br />
digital inputs. Alternatively you can open the source select menu by a brief<br />
press on the ���� button on the remote control. In this menu you can select<br />
the digital input which is to be played.<br />
As soon as the source device delivers digital music data, the <strong>MP</strong> <strong>1260</strong> R<br />
automatically adjusts itself to the format and sampling rate of the signal, and<br />
you will hear the music.<br />
Screen Display ���� During D/A converter operations the <strong>MP</strong> <strong>1260</strong> R’s integral screen displays the<br />
characteristics of the digital input signal.<br />
15
16<br />
Operating the Tuner<br />
���� <strong>Fi</strong>rst select the integral tuner as source using the ���� button on the front<br />
panel, or the ���� button on the remote control handset (Select source<br />
menu).<br />
Front panel display<br />
Station Search<br />
Favourites List and<br />
Presets<br />
When you select a station, the integral screen initially shows the reception<br />
frequency or the RDS station name.<br />
The screen on the front panel displays all information in a clear form.<br />
<strong>Fi</strong>eld strength display:<br />
a) When you are listening to a radio station in Tuner mode, the message<br />
'Radio' appears in the top line of the screen.<br />
b) Here the music type or style is displayed, e.g. Pop Music.<br />
This information is only displayed if the transmitting station broadcasts it as<br />
part of the RDS system. If you are listening to a station which does not<br />
support the RDS system, or only supports it in part, these information fields<br />
remain empty.<br />
c) The frequency and / or the station name is displayed in enlarged form. If a<br />
station name is displayed, its frequency is shown at the end of the line.<br />
d) These lines display information which is broadcast by the station (e.g.<br />
Radiotext).<br />
e) The field strength and therefore the reception quality to be expected from<br />
the set transmitting station can be assessed from the field strength.<br />
f) Display of Stereo '����' / Mono'����'<br />
Selecting a station using the Favourites list:<br />
a) The selected station is displayed in enlarged form, and can be called up<br />
using the ���� / ���� button.<br />
b) Press the ���� button to return to the station previously selected.<br />
c) Position display in the Favourites list.<br />
d) Press the ���� / ���� button to select the station displayed in<br />
enlarged form.<br />
Holding one of the ���� / ���� buttons pressed in initiates a station<br />
search in the upward or downward direction. The station search stops<br />
automatically at the next station.<br />
In addition to manual tuning and searching, the tuner of the <strong>MP</strong> <strong>1260</strong> R also<br />
features a Favourites list and Presets, which provide a fast, convenient<br />
method of managing your preferred stations and calling them up at any time.<br />
You can edit the Favourites list to suit your preferences (see section 'Adding<br />
stations to the Favourites list / Erasing stations from the Favourites list').<br />
It is also possible to store the stations under a station number (Preset), and<br />
then to call it up directly by entering the station number. Presets are particularly<br />
useful if you wish to call up stations when the screen is not in sight (e.g. from<br />
an adjacent room), or via the domestic control system.
The Favourites List<br />
Creating the Favourites list Once you have called up the Favourites list with a long press of the ����<br />
front panel button / ���� remote control button, you can call up the<br />
Favourites menu with a long press of the ���� front panel button. In the<br />
Favourites menu you can use the ���� / ���� buttons to select the<br />
following points:<br />
Select the menu point 'Scan for stations' and initiate the station search with<br />
the ���� button. The screen displays the message 'Auto Store active', and<br />
the <strong>MP</strong> <strong>1260</strong> R now automatically stores up to sixty receivable stations in the<br />
Favourites list.<br />
Sort function The Favourites list can be sorted according to various criteria; these are<br />
selected in the menu point 'Sort Favourites by':<br />
Selecting radio stations<br />
from the Favourites list<br />
Adding stations to the<br />
Favourites list<br />
Erasing stations from the<br />
Favourites list<br />
Presets<br />
Calling up a Preset<br />
Frequency / Station name / Program ID<br />
Now use the ���� / ���� buttons to select the desired sort criterion, and<br />
confirm your choice by pressing the ���� button.<br />
• Call up the Favourites list with a long press of the ���� front panel button /<br />
���� remote control button, then use the ���� / ���� buttons to<br />
select a stored station from the Favourites list, and confirm your selection with<br />
the ���� / ���� button.<br />
• You can also select stations directly, without calling up the Favourites list as<br />
described above, by briefly pressing the ���� / ���� buttons.<br />
<strong>Fi</strong>rst set the desired station manually (by briefly pressing the � / �<br />
buttons) or using a search (holding the ���� / ���� buttons pressed in).<br />
As soon as you hear the station, you can include it in your Favourites list with a<br />
brief press of the ���� button.<br />
Open the Favourites list. Select the station you wish to erase from the list, hold<br />
the ���� button pressed in for a few seconds: the station is now removed<br />
from the Favourites list. After the erasure the tuner automatically switches to<br />
the next station in the Favourites list.<br />
At any time you can quickly call up a station stored as a Preset by entering its<br />
Preset number using the remote control’s numeric buttons ���� to ����.<br />
Storing a Preset • Select a station, either using the � / � buttons, or from the<br />
Favourites list.<br />
RDS functions<br />
• A long press of a numeric button (���� to ����) stores the Preset. The<br />
front panel screen briefly displays the message 'Preset Stored at' to confirm<br />
this.<br />
If the station being received is broadcasting relevant RDS data, the following<br />
information will be displayed on the screen:<br />
• Station name<br />
• Radiotext<br />
• Programm type (genre)<br />
Mono / Stereo You can toggle the tuner of the <strong>MP</strong> <strong>1260</strong> R between stereo and mono reception<br />
by briefly pressing the ���� button. The reception mode is shown on the<br />
screen by the following symbols:<br />
'����' (Mono) or '����' (Stereo):<br />
If the station you wish to listen to is very weak or very distant, and can only be<br />
picked up with severe background noise, you should always switch to MONO<br />
mode as this reduces the unwanted hiss significantly.<br />
���� When you store the station in the Favourites list, the settings you enter for this<br />
station are also stored, and are automatically restored the next time you call up<br />
the station.<br />
17
Installation<br />
Using the system for the first time<br />
Safety notes<br />
This section describes all those matters which are of fundamental importance when setting up and first using the<br />
equipment. This information is not relevant in daily use, but you should nevertheless read and note it before using the<br />
equipment for the first time.<br />
19
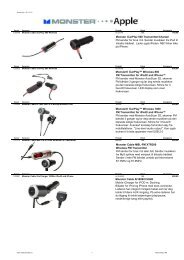
ANALOG OUT<br />
ANT<br />
DIGITAL OUT<br />
DIGITAL IN<br />
WLAN<br />
LAN<br />
USB 1<br />
USB 2<br />
20<br />
Back panel connections<br />
Analogue output<br />
The output sockets should be connected to the appropriate input sockets of the<br />
pre-amplifier, integrated amplifier or receiver in accordance with their markings<br />
(L / R). Select the input sockets of the amplifier or receiver which correspond to<br />
the device address set in the ‘Device address’ configuration menu (chapter<br />
‘Basic functions of the <strong>MP</strong> <strong>1260</strong> R’) (in most cases the address AUX1 should<br />
be used for the <strong>MP</strong> <strong>1260</strong> R).<br />
Space for input sockets of optional add-on modules (applies only to particular<br />
model variants).<br />
Digital co-axial output for connection to an external digital/analogue converter<br />
with an co-axial cable.<br />
Inputs for digital source devices with optical or coaxial digital audio output.<br />
Input socket for WLAN antenna<br />
���� Automatic Activation of the WLAN Module<br />
After powering on the <strong>MP</strong> <strong>1260</strong> R detects if it is connected to a wired LAN<br />
Network. If no wired LAN connection is found, the <strong>MP</strong> <strong>1260</strong> R will automatically<br />
activate ist WLAN module and it will try to get access to your WLAN network.<br />
���� Attention!<br />
When WLAN shall be used, the LAN socket must be left unconnected.<br />
Socket for connection to a wired LAN (Ethernet) home network.<br />
���� If a LAN cable is connected this will have priority over wireless WLAN networks.<br />
The WLAN module of the <strong>MP</strong> <strong>1260</strong> R will automatically be disabled.<br />
Socket for USB memory sticks and external hard discs<br />
The storage device must be formatted with a FAT16 or FAT32 filesystem.<br />
The USB device (example 2,5 inch HDD) can be supplied with power from the<br />
<strong>MP</strong> <strong>1260</strong> R via the USB socket provided the power consumption of the USB<br />
device conforms to the USB standard.<br />
Socket for iPods (use the original lead supplied with the iPod for this)
RS 232<br />
RC-IN<br />
R LINK<br />
Mains input<br />
Interface for firmware upgrades<br />
���� In a � R-System the connection to a home automation system is<br />
accomplished through the RS 232 Interface (type MRA/C-K which is available<br />
as an optional accessory).<br />
If the <strong>MP</strong> <strong>1260</strong> R is operated outside a � R-System, this interface can also<br />
be used for control of the <strong>MP</strong> <strong>1260</strong> R – for example in combination with a<br />
CRESTRON or AMX home automation system.<br />
To enable device control via the RS232 interface, the <strong>MP</strong> <strong>1260</strong> R must be<br />
equipped with a special firmware. A description of the control interface and the<br />
control protocol can be found in the download section of the � website<br />
(http://www.taelektroakustik.de).<br />
Control input for older � systems with RC control interface.<br />
Connect this socket to the control output of your � amplifier – eg. The AUX1<br />
control output (see chapter 'Appendix A, Wiring diagram: <strong>MP</strong> <strong>1260</strong> R in a �<br />
system with RC control').<br />
���� If your � amplifier or receiver is equipped with a R LINK control output,<br />
please use the R LINK control. In this case the RC-IN socket may not be used.<br />
Direct remote control with remote control set FBS6a (optional accessory)<br />
If the <strong>MP</strong> <strong>1260</strong> R shall be operated ‚stand-alone‘ outside a � system, the<br />
remote control receiver type E2000 from the remote control set FBS6a can be<br />
conected to the RC-IN socket.<br />
Control input / output for � R LINK – systems:<br />
Both sockets are equivalent – one is used as input, the other one serves as<br />
output towards other R LINK devices<br />
(see chapter 'Appendix A, Wiring diagram: <strong>MP</strong> <strong>1260</strong> R in a � system with<br />
R LINK control').<br />
The mains cable is plugged into this socket.<br />
For correct connections refer to the sections 'Installation and wiring' and<br />
'Safety notes'.<br />
21
22<br />
Installation and wiring<br />
Carefully unpack the <strong>MP</strong> <strong>1260</strong> R and store the original packing materials<br />
carefully. The carton and packing are specially designed for this unit and will be<br />
needed again if you wish to move the equipment at any time.<br />
Please be sure to read the safety notes in these instructions.<br />
If the unit gets very cold (e. g. when being transported), condensation may form<br />
inside it. Please do not switch it on until it has had plenty of time to warm up to<br />
room temperature, so that any condensation evaporates completely.<br />
Before placing the unit on a sensitive surface, please check the compatibility of<br />
the lacquer and the unit’s feet at a non-visible point.<br />
The unit should be placed on a rigid, level base. When placing the unit on<br />
resonance absorbers or de-coupling components make sure that they do not<br />
compromise the stability of the unit.<br />
The quality and characteristics of the base on which your high-quality <strong>Hi</strong>-<strong>Fi</strong><br />
equipment stands define the limits of sound quality which can be achieved. The<br />
base surface should be as heavy, rigid, hard and level as possible.<br />
The receiver should be set up in a dry, well-ventilated site, out of direct sunlight<br />
and away from radiators.<br />
The unit must not be located close to heat-producing objects or devices, or<br />
anything which is heat-sensitive or highly inflammable.<br />
When installing the unit on a shelf or in a cupboard it is essential to provide an<br />
adequate flow of cooling air, to ensure that the heat produced by the unit is<br />
dissipated effectively. Any heat build-up will shorten the life of the unit and could<br />
be a source of danger. Be sure to leave at least 10 cm free space above the unit<br />
for ventilation. If the system components are to be stacked then the amplifier must<br />
be the top unit. Do not place any object on the top cover.<br />
Mains and loudspeaker cables, and also remote control leads must be kept as<br />
far away as possible from signal leads and antenna cables. Never run them<br />
over or under the unit.<br />
A complete connection diagram is shown in 'Appendix A'.<br />
���� Notes on connections:<br />
• Be sure to push all plugs firmly into their sockets. Loose connections can<br />
cause hum and other unwanted noises.<br />
• When you connect the input sockets of the amplifier to the output sockets on<br />
the source devices always connect like to like, i. e. 'R' to 'R' and 'L' to 'L'. If you<br />
fail to heed this then the stereo channels will be reversed.<br />
• To achieve maximum possible interference rejection the mains plug should<br />
be connected to the mains socket in such a way that phase is connected to<br />
the mains socket contact marked with a dot (�). The phase of the mains<br />
socket can be determined using a special meter. If you are not sure about<br />
this, please ask your specialist dealer.<br />
We recommend the use of the � 'POWER LINE' ready-to-use mains lead in<br />
conjunction with the 'POWER BAR' mains distribution panel, which is fitted with a<br />
phase indicator as standard.<br />
When you have completed the wiring of the system please set the volume<br />
control to a very low level before switching the system on.<br />
The screen on the <strong>MP</strong> <strong>1260</strong> Rs should now light up, and the unit should<br />
respond to the controls.<br />
If you encounter problems when setting up and using the amplifier for the first<br />
time please remember that the cause is often simple, and equally simple to<br />
eliminate. Please refer to the section of these instructions entitled 'Trouble<br />
shooting'.
Loudspeaker and signal<br />
cables<br />
Mains cables and mains<br />
filters<br />
Changing the batteries:<br />
Care of the unit:<br />
Loudspeaker cables and signal cables (inter-connects) have a significant<br />
influence on the overall reproduction quality of your sound system, and their<br />
importance should not be under-estimated. For this reason � recommends<br />
the use of high-quality cables and connectors.<br />
Our accessory range includes a series of excellent cables and connectors<br />
whose properties are carefully matched to our speakers and electronic units,<br />
and which harmonise outstandingly well with them.<br />
For difficult and cramped situations the � range also includes special-length<br />
cables and special-purpose connectors (e. g. right-angled versions) which can<br />
be used to solve almost any problem concerning connections and system<br />
location.<br />
The mains power supply provides the energy which your sound system<br />
equipment needs, but it also tends to carry interference from remote devices<br />
such as radio and computer systems.<br />
Our accessory range includes the specially shielded 'POWER FOUR' mains<br />
cable, ready-to-use 'POWER LINE' mains cable with integrated shell-type<br />
filters and the 'POWER BAR' mains filter distribution board which prevent<br />
electro-magnetic interference from entering your <strong>Hi</strong>-<strong>Fi</strong> system. The<br />
reproduction quality of our systems can often be further improved by using<br />
these items.<br />
If you have any questions regarding cabling please refer to your specialist �<br />
dealer who will gladly give you comprehensive expert advice without obligation.<br />
We would also be happy to send you our comprehensive information pack on this<br />
subject.<br />
To open the battery compartment disconnect the latch by pressing in, then lift<br />
the cover out. Remove the old cells and fit two new dry cells of the LR 03<br />
(MICRO) type in the battery compartment, taking care to fit them with correct<br />
polarity. Please remember that all the cells must be replaced at the same<br />
time.<br />
���� Disposing of exhausted batteries:<br />
Exhausted batteries must never be thrown into the household waste! They<br />
should be returned to the battery vendor (specialist dealer) or your local toxic<br />
waste collection point, so that they can be recycled or disposed in a proper<br />
way. Most local authorities provide collection centres for such waste, and some<br />
provide pick-up vehicles for old batteries.<br />
Always disconnect the unit from the mains supply before cleaning it.<br />
The surfaces of the case should be wiped clean with a soft, dry cloth only.<br />
Never use solvent-based or abrasive cleaners!<br />
Before switching the unit on again, check that there are no short-circuits at the<br />
connections, and that all cables are plugged in correctly.<br />
23
24<br />
Safety notes<br />
All the components in this device fulfil the currently valid German and European<br />
safety norms and standards.<br />
We ensure that our products are of consistently high quality, and meet all<br />
specifications, by checking all materials rigorously for quality, using meticulous<br />
production methods and subjecting each unit to a fully automatic computercontrolled<br />
final inspection.<br />
For your own safety please consider it essential to read these operating<br />
instructions right through, and observe in particular the notes regarding setting<br />
up, operation and safety.<br />
Installation Das Gerät ist so aufzustellen, dass eine Berührung sämtlicher Geräteanschlüsse<br />
(insbesondere durch Kinder) ausgeschlossen ist. Die <strong>Hi</strong>nweise und<br />
Angaben im Kapitel 'Aufstellung und Verkabelung' sind unbedingt zu<br />
beachten.<br />
Power supply The power supply required for this unit is printed on the mains supply socket.<br />
The unit must never be connected to a power supply which does not meet<br />
these specifications. If the unit is not to be used for a long period disconnect it<br />
from the mains supply at the wall socket.<br />
Mains leads / Mains plug Mains leads must be deployed in such a way that there is no danger of damage<br />
to them (e. g. through persons treading on them or from furniture). Take<br />
particular care with plugs, distribution panels and connections at the device.<br />
Unplugging the mains plug will disconnect the device from the mains for service<br />
and repair. Please make sure that the mains plug is easily accessible.<br />
Enclosure openings Liquid or particles must never be allowed to get inside the unit through the<br />
ventilation slots. Mains voltage is present inside the unit, and any electric shock<br />
could cause serious injury or death. Never exert undue force on mains<br />
connectors.<br />
Supervision of device<br />
operation<br />
Protect the unit from drips and splashes of water; never place flower vases or<br />
fluid containers on the unit.<br />
Like any other electrical appliance this device should never be used without<br />
proper supervision. Take care to keep the unit out of the reach of small<br />
children.<br />
Service, Damage The case should only be opened by a qualified specialist technician. Repairs<br />
and fuse replacements should be entrusted to an authorised � specialist<br />
workshop. With the exception of the connections and measures described in<br />
these instructions, no work of any kind may be carried out on the device by<br />
unqualified persons.<br />
If the unit is damaged, or if you suspect that it is not functioning correctly,<br />
immediately disconnect the mains plug at the wall socket, and ask an<br />
authorised � specialist workshop to check it.<br />
Over voltage The unit may be damaged by excess voltage in the power supply, the mains<br />
circuit or in aerial systems, as may occur during thunderstorms (lightning<br />
strikes) or due to static discharges.<br />
Special power supply units and excess voltage protectors such as the �<br />
'Power Bar' mains distribution panel offer some degree of protection from<br />
damage to equipment due to the hazards described above.<br />
However, if you require absolute security from damage due to excess voltage,<br />
the only solution is to disconnect the unit from the mains power supply and any<br />
aerial systems.<br />
To avoid the risk of damage by overvoltages we recommend to disconnect all<br />
cables from this device and your <strong>Hi</strong><strong>Fi</strong> system during thunderstorms.<br />
All mains power supply and aerial systems to which the unit is connected must<br />
meet all applicable safety regulations and must be installed by an approved<br />
electrical installer.<br />
���� Many insurance companies offer lightning damage insurance for electrical<br />
equipment as part of their household insurance service.
Approved usage<br />
Approval and conformity<br />
with EC directives<br />
Disposing of this<br />
product<br />
FCC Information to the<br />
user<br />
�<br />
This device is designed exclusively for reproducing sound and/or pictures in the<br />
domestic environment. It is to be used in a dry indoor room which meets all the<br />
recommendations stated in these instructions.<br />
Where the equipment is to be used for other purposes, especially in the<br />
medical field or any field in which safety is an issue, it is essential to establish<br />
the unit’s suitability for this purpose with the manufacturer, and to obtain prior<br />
written approval for this usage.<br />
� equipment which includes a radio or television receiving section must be<br />
operated within the stipulations laid down by the Post Office and the<br />
Telecommunications authorities in the country in which it is used.<br />
This unit may only be used to receive or reproduce those transmissions which are<br />
intended for public reception. The reception or reproduction of other<br />
transmissions (e. g. police radio or mobile radio broadcasts) is prohibited.<br />
In its original condition the unit meets all currently valid European regulations. It<br />
is approved for use as stipulated within the EC.<br />
By attaching the CE symbol to the unit � declares its conformity with the EC<br />
directives 89/336/EEC, amended by 91/263/EEC, amended by 93/68/EEC, and<br />
also 73/23/EEC, amended by 93/68/EEC and the national laws based on those<br />
directives.<br />
The original, unaltered factory serial number must be present on the outside of<br />
the unit and must be clearly legible! The serial number is a constituent part of<br />
our conformity declaration and therefore of the approval for operation of the<br />
device.<br />
The serial numbers on the unit and in the original � documentation supplied<br />
with it (in particular the inspection and guarantee certificates), must not be<br />
removed or modified, and must correspond.<br />
Infringing any of these conditions invalidates � conformity and approval, and<br />
the unit may not be operated within the EC. Improper use of the equipment<br />
makes the user liable to penalty under current EC and national laws.<br />
Any modifications or repairs to the unit, or any other intervention by a workshop<br />
or other third party not authorised by �, invalidates the approval and<br />
operational permit for the equipment.<br />
Only genuine � accessories may be connected to the unit, or such auxiliary<br />
devices which are themselves approved and fulfil all currently valid legal<br />
requirements.<br />
When used in conjunction with auxiliary devices or as part of a system this unit<br />
may only be used for the purposes stated in the section 'Approved usage'.<br />
The only permissible method of disposing of this product is to take it to your<br />
local collection centre for electrical waste.<br />
(for use in the United States of America only)<br />
Class B digital device – instructions:<br />
Note: This equipment has been tested and found to comply with the limits for a<br />
Class B digital device, pursuant to Part 15 of the FCC Rules. These limits are<br />
designed to provide reasonable protection against harmful interference in a<br />
residential installation. This equipment generates, uses and can radiate radio<br />
frequency energy and, if not installed and used in accordance with the<br />
instructions, may cause harmful interference to radio communications.<br />
However, there is no guarantee that interference will not occur in a particular<br />
installation. If this equipment does cause harmful interference to radio or<br />
television reception, which can be determined by turning the equipment off and<br />
on, the user is encouraged to try to correct the interference by one or more of<br />
the following measures:<br />
- Reorient or relocate the receiving antenna.<br />
- Increase the separation between the equipment and receiver.<br />
- Connect the equipment into an outlet on a circuit different form that to which<br />
the receiver is connected.<br />
- Consult the dealer or an experienced radio/TV technician for help.<br />
25
Network Configuration<br />
General Information The <strong>MP</strong> <strong>1260</strong> R can be operated in wired LAN networks (Ethernet LAN or<br />
Powerline LAN) or in wireless networks (WLAN).<br />
Compatible hardware<br />
and UPnP servers<br />
Network Configuration<br />
Menu<br />
26<br />
If you wish to use your <strong>MP</strong> <strong>1260</strong> R in your home network, you must first enter<br />
the necessary network settings on the <strong>MP</strong> <strong>1260</strong> R. This includes entering the<br />
network parameters such as the IP address etc. both for wired and wireless<br />
operation. If you wish to use a wireless connection, a number of additional<br />
settings for the WLAN network also have to be entered.<br />
Please refer to the Chapter 'Glossary / Additional Information' and 'Network<br />
Terms' for additional explanations of terminology relating to network technology.<br />
���� In the following sections we assume that a working home network (cable<br />
network of WLAN network) with router and (DSL) Internet access is present.<br />
If you are unclear about some aspect of installing, setting up and configuring<br />
your network, please address your queries to your network administrator or a<br />
network specialist.<br />
���� <strong>Hi</strong>gh-resolution audio files via network<br />
The <strong>MP</strong> <strong>1260</strong> R can also play back high-resolution 96 kHz / 24-bit audio formats<br />
in the FLAC 96/24 and WAV formats. A WLAN connection is not generally<br />
sufficient to handle the large quantities of data. If you wish to play back highresolution<br />
audio files via a network connection, please use a cable network<br />
exclusively.<br />
The marketplace offers a vast number of routers, NAS devices and USB hard<br />
discs made by a very wide range of manufacturers. � equipment is generally<br />
compatible with other makes of machine which bear the UPnP label. A list of<br />
devices which � has checked for compatibility can be found on the Internet<br />
at: http://www.taelektroakustik.de/hardware/comp_lan_hw.pdf.<br />
All network settings are entered in the Network Configuration menu. This menu<br />
will vary slightly in appearance depending on the type of your network, i.e.<br />
whether you have a wired (LAN) or wireless (WLAN) network.<br />
If the <strong>MP</strong> <strong>1260</strong> R detects a LAN connection to a network when you switch it on,<br />
the machine will assume that this is to be used, and displays the network<br />
configuration menu for LAN networks.<br />
If no LAN network is connected, the <strong>MP</strong> <strong>1260</strong> R activates its WLAN module and<br />
displays the WLAN configuration menu when you call up the configuration<br />
menu. The menu for a WLAN network includes a number of additional menu<br />
points. The following sections explain how to use the menu, and the meaning of<br />
the individual menu points.
Opening the Network<br />
Configuration Menu<br />
Operating the Menu,<br />
Changing and Storing<br />
IP Addresses<br />
<strong>Fi</strong>rst select the <strong>MP</strong> <strong>1260</strong> R’s Streaming Client function by pressing the ����<br />
button on the front panel.<br />
Open the configuration menu with a long press on the ���� button on the<br />
front panel. You should now see the configuration menu on the front panel<br />
screen.<br />
Use the ���� / ���� buttons in the menu to select the network parameter to<br />
be changed, and activate the entry with the ���� button.<br />
You can now change the setting using the following buttons, depending on the<br />
type of setting:<br />
���� / ���� button for simple selection (ON / OFF)<br />
Numeric buttons ���� to ���� for entering IP addresses<br />
(remote control only)<br />
Alpha-numeric input for entering text<br />
(remote control only)<br />
When the setting process is complete, or when you have entered the complete<br />
address, press the ���� button to confirm your action.<br />
Alpha-numeric entry (remote control only)<br />
At certain points, e.g. for entering server names or passwords, it is necessary to<br />
input series of characters (strings). At such points you can enter letters, numbers<br />
and special characters by repeatedly pressing the numeric buttons on the<br />
remote control handset, as when writing SMS news. The assignment of letters to<br />
the buttons is printed below the buttons. Special characters can be accessed<br />
using the ���� and ���� buttons:<br />
���� + - * / ^ = { } ( ) < ><br />
���� . , ? ! : ; \ " ' _ $ % & # ~<br />
Use the blue ���� button for toggling between numbers, capitals and lowercase<br />
letters. The bottom line of the screen shows which input mode is currently<br />
selected.<br />
���� At certain points (e.g. DNS server name) it is possible to enter both an alphanumeric<br />
string and an IP address. At these points an IP address should be<br />
entered like a string (with separating dots as special characters). In this case an<br />
automatic check for valid address ranges (0 … 255) is not carried out.<br />
Closing the Menu Once you have correctly set all the parameters, select the menu point 'Save',<br />
then press the ���� button. This action causes the <strong>MP</strong> <strong>1260</strong> R to accept the<br />
settings, and the machine restarts with the new network settings. After the<br />
restart you should see the available network media sources (Internet radio,<br />
UPnP-AV server, etc.) displayed in the main menu.<br />
Interrupting the Menu<br />
without Storing the<br />
Settings<br />
At any time you can leave the network configuration menu without making any<br />
changes to the network settings: this is done by pressing the ���� button,<br />
which takes you to the menu point 'Exit'. Pressing the ���� button at this<br />
juncture interrupts and closes the menu.<br />
27
The Configuration for a Wired Ethernet LAN or Power-Line LAN connection<br />
Setting the Parameters<br />
for a Wired Network<br />
Menu Point Description<br />
MAC<br />
28<br />
• Connect the <strong>MP</strong> <strong>1260</strong> R to an operational network or Power-Line modem<br />
using the LAN socket on the back panel.<br />
• Switch the <strong>MP</strong> <strong>1260</strong> R on, and select the Streaming Client function by<br />
pressing the ���� button on the front panel.<br />
• Call up the Configuration menu as described above. You should now see the<br />
menu reproduced below, displaying the network parameters. In the title line<br />
the message 'LAN' should appear, indicating that the machine is connected to<br />
a wired LAN. If you see 'WLAN' at this point instead, please check your<br />
network connection, and ensure that the network is switched on and<br />
operational.<br />
• You can now select the individual menu points and adjust them to match your<br />
network conditions. The illustration below shows the possible button inputs<br />
after each menu point.<br />
Possible entries<br />
���� / ����: Switching ON / OFF<br />
(0...9): Numeric input, separating dots are automatically generated;<br />
input limited to valid addresses<br />
(0...9, A...Z): Alpha-numeric input and special characters.<br />
IP - separating dots must be entered as special characters.<br />
���� The parameters illustrated above are only typical values.<br />
Addresses and settings may require different values for your network.<br />
The MAC address is a hardware address which uniquely identifies your<br />
machine. The address displayed is determined by the manufacturer, and cannot<br />
be altered.<br />
DHCP ON<br />
If your network includes a DHCP server, please select the ON setting at this<br />
point. In this mode an IP address is automatically assigned to the <strong>MP</strong> <strong>1260</strong> R by<br />
the router. The screen shows only the MAC address and the message DHCP<br />
state ON. In this case the address input fields shown in the illustration do not<br />
appear in the menu.<br />
OFF<br />
If your network does not include a DHCP server, please select the OFF setting.<br />
In this mode you must configure the following network settings manually. Please<br />
ask your network administrator for the addresses to be entered for your network.<br />
Device IP IP address of the <strong>MP</strong> <strong>1260</strong> R<br />
IP mask Network mask<br />
Gateway IP address of the router<br />
DNS 1 Name / IP of the name server (optional)<br />
DNS 2 Alternative name server (optional)<br />
Proxy ON if a proxy server is present, otherwise OFF<br />
Proxy IP Address of the proxy server<br />
Proxy port Port number of the proxy server<br />
Save Stores the network parameters, and restarts the <strong>MP</strong> <strong>1260</strong> R with the new<br />
settings.<br />
Exit Closes the menu: data already entered is discarded.
The Configuration for a WLAN connection<br />
Setting the Parameters<br />
for a Radio Network<br />
Searching for and<br />
Selecting the Network<br />
Entering the Password (for<br />
encoded networks)<br />
Storing Network Settings<br />
and Restarting<br />
• Connect the WLAN aerial (supplied) to the <strong>MP</strong> <strong>1260</strong> R’s WLAN aerial socket,<br />
and ensure that no cable is attached to the <strong>MP</strong> <strong>1260</strong> R’s LAN socket.<br />
• Switch the <strong>MP</strong> <strong>1260</strong> R on, and select the Streaming Client function by<br />
pressing the ���� button on the front panel.<br />
• Now call up the Configuration menu as described above: with a long press on<br />
the ���� button on the front panel. You should now see the menu<br />
reproduced below, dis-playing the network parameters.<br />
<strong>Fi</strong>rst select the menu point 'WLAN configuration', and activate it by pressing<br />
the ���� button.<br />
A menu appears showing these points:<br />
• Rescan - initiates new search for accessible radio networks<br />
• Set manually - adding a WLAN manually<br />
After a brief delay the networks present in the vicinity are listed on the screen.<br />
You can use the 'Rescan' function to start a new search for networks present in<br />
the vicinity.<br />
Please select one of the networks located, and activate it by pressing the<br />
���� button.<br />
If your network is encoded, the window illustrated above now appears. Please<br />
enter the network password and confirm the entry by pressing ����. Now<br />
select the point 'Save' and confirm with ����.<br />
Please enter the settings for the remaining network parameters as described<br />
earlier in the section entitled 'Setting the Parameters for a Wired Network'.<br />
<strong>Fi</strong>nally select the menu point 'Save', and press the ���� button; this action<br />
accepts the settings, and restarts the <strong>MP</strong> <strong>1260</strong> R with the new settings.<br />
29
Special case:<br />
Manual Network Entry<br />
30<br />
The <strong>MP</strong> <strong>1260</strong> R automatically searches for accessible radio networks, and lists<br />
them when you call up the menu point 'WLAN Configuration'. However, the<br />
<strong>MP</strong> <strong>1260</strong> R can only locate networks which broadcast their SSID network identity.<br />
For security reasons many radio networks do not transmit the SSID (if you are not<br />
sure about this, ask your network administrator). In such cases the network<br />
cannot be found and displayed automatically, i.e. it must be set up manually. This<br />
is the purpose of the menu point 'Set Manually'. If you select this menu point, you<br />
will see the input window reproduced below; you can enter the parameters for<br />
your network at this point.<br />
After successfully entering all the data, please select the point 'Save', and confirm<br />
by pressing the ���� button. Your <strong>MP</strong> <strong>1260</strong> R now accepts the data you have<br />
entered relating to the WLAN network, and moves on to the subordinate menu in<br />
which you can set the remaining network parameters, as described earlier in the<br />
section entitled 'Setting the Parameters for a Wired Network'.<br />
You can now leave the Configuration menu by selecting the menu point 'Save'.
The vTuner Premium Service<br />
The list of radio stations displayed by your <strong>MP</strong> <strong>1260</strong> R is prepared by an<br />
Internet Service Provider, and transferred to your machine by data transfer.<br />
You can expand and edit the 'Favourite Groups' and 'Added Stations' list to suit<br />
your preferences via the Internet portal of your service provider, using the main<br />
menu point 'Internet Radio'. This is the procedure:<br />
Open your Internet browser and call up the following web address:<br />
http://ta.vtuner.com<br />
The first time you register you should enter the MAC address of your<br />
<strong>MP</strong> <strong>1260</strong> R; the MAC address provides unique identification of your machine.<br />
The MAC address can be found in the Configuration menu (hold the ����<br />
button on the front panel pressed in), and consists of six pairs of characters,<br />
e.g.: 00:0e:9b:cc:a4:35. You do not need to enter the separating colons when<br />
you enter this data. MAC addresses are in hexadecimal format, i.e. the address<br />
consists only of the letters a to f, and the numbers 0 to 9.<br />
Confirm your entry.<br />
You must register with vTuner in order to be able to use the service; you can<br />
register via your e-Mail address and a password. Please follow the instructions<br />
stated by the service provider.<br />
Now you can select radio stations from the comprehensive inventory provided<br />
by vTuner, and store them in lists. The lists are transferred to your <strong>MP</strong> <strong>1260</strong> R<br />
automatically via your Internet connection. Shortly after you have edited lists on<br />
the vTuner page, or stored new stations, you will find that they are available on<br />
your <strong>MP</strong> <strong>1260</strong> R.<br />
���� Notes regarding Internet Radio:<br />
• Not all stations are always accessible<br />
- Not all stations transmit 24 hours<br />
- Stations are no longer accessible<br />
- Capacity exhausted<br />
• Transmission breaks off<br />
- (Internet) network problems<br />
- Server capacity exhausted<br />
31
Setting up new Internet<br />
Radio Stations<br />
32<br />
On the vTuner Internet site you can also set up new stations which are not (yet)<br />
included in the Select lists. This is accomplished by registering with vTuner and<br />
logging on. Click on the point 'My Added Stations'. An input mask appears in<br />
which you can enter the data for your station. After a brief period you will be<br />
able to access the newly set-up station via the menu system of your<br />
<strong>MP</strong> <strong>1260</strong> R. You will find the station under Internet Radio / Added Stations.<br />
<strong>Fi</strong>nding a Station URL ���� You require the URL (Internet address) of any radio station you wish to set up<br />
on the vTuner service. You will generally find the URL on the station’s website.<br />
Another method of finding the URL is to search for it using an Internet<br />
searching service such as Shoutcast (www.shoutcast.com). Once you have<br />
found your station, click on the 'Tune In' switch: this will normally open your<br />
media player, and the station should play. In most cases you can set Media<br />
Player to display the 'Streaming Properties'. For example, using the popular<br />
Winamp Player, simply right-click on the entry for the currently playing station<br />
in the player’s Playlist window. A menu now opens, and clicking on the point<br />
‘View <strong>Fi</strong>le Info’ opens an information box which displays the streaming<br />
properties including the URL.
Assigning a Device Address<br />
If the <strong>MP</strong> <strong>1260</strong> R shall be operated in a � system with R LINK or RC control,<br />
it is necessary to assign a device address in the System Configuration menu to<br />
the <strong>MP</strong> <strong>1260</strong> R.<br />
Assigning a device address • Open the menu by a brief press on the ����-button on the front panel.<br />
• With the ���� / ���� buttons select the menu item Device Address<br />
• To change the address first activate this menu item by pressing the<br />
����-button, then select the address with � / �-buttons.<br />
You have the choice of the following device addresses:<br />
� CD � Tuner � Tape1 � Tape2 � TV � Aux1 � Aux2<br />
� Aux3 � DVD � STB � VCR � AuxAV1� AuxAV2� DBR<br />
Please select that device address which corresponds to the amplifier input<br />
the <strong>MP</strong> <strong>1260</strong> R is connected to. In most cases the AUX1 address will be the<br />
best choice for the <strong>MP</strong> <strong>1260</strong> R<br />
• After selecting the desired address, please press the ����-button again to<br />
store your selection.<br />
• To leave the menu, please press the ���� button.<br />
���� You can leave the menu any time without changing the address assignment by<br />
pressing the ����-button.<br />
33
34<br />
Trouble shooting<br />
Many problems have a simple cause and a correspondingly simple solution. The following section describes a few<br />
difficulties you may encounter, and the measures you need to take to cure them. If you find it impossible to solve a<br />
problem with the help of these notes please disconnect the unit from the mains and ask your authorised � specialist<br />
dealer for advice.<br />
Machine does not switch<br />
on (On LED does not light<br />
up).<br />
Machine responds correctly<br />
to manual operation of the<br />
buttons, but can not be<br />
controlled by IR remote<br />
control.<br />
<strong>MP</strong> <strong>1260</strong> R does not switch<br />
on when the source button<br />
of the remote control is<br />
pressed.<br />
Cause 1:<br />
Mains lead not plugged in correctly.<br />
Remedy:<br />
Check connection, push connector in firmly.<br />
Cause 2:<br />
Mains fuse burned out.<br />
Remedy:<br />
Have the mains fuse replaced by an authorised specialist workshop. The rating<br />
of the replacement fuse must agree with the specification printed on the unit.<br />
Cause 1:<br />
Incorrectly inserted batteries or flat batteries in the remote control handset.<br />
Remedy:<br />
Re-install batteries correctly or fit new ones.<br />
Cause 2:<br />
No direct line-of-sight contact between remote control handset and receiver.<br />
Remedy:<br />
Make sure that the remote control transmitter has direct line-of-sight contact<br />
with the receiver - note that glass doors can interrupt the connection.<br />
Maximum range between transmitter and receiver: approx. 8 metres.<br />
Be sure to position the receiver where it is not subjected to direct sunlight or<br />
very bright artificial light. Fluorescent tubes and energy-saving lamps are<br />
powerful sources of interference.<br />
Cause 3:<br />
The <strong>MP</strong> <strong>1260</strong> R's R LINK socket is not connected to the amplifier's R LINK<br />
socket.<br />
Remedy:<br />
Check that the units are connected correctly. Push all plugs in firmly.<br />
Cause 1: (R LINK System)<br />
R LINK cable not connected.<br />
Remedy:<br />
Make all connections according to the wiring diagram: <strong>MP</strong> <strong>1260</strong> R in a �<br />
system with R LINK control (appendix A).<br />
Cause 2: (RC System)<br />
RC cable not connected.<br />
Remedy:<br />
Make all connections according to the wiring diagram: <strong>MP</strong> <strong>1260</strong> R in a �<br />
system with RC control (appendix A).<br />
Cause 3: (R LINK or RC System)<br />
Device address not assigned correctly.<br />
Remedy:<br />
Assign the device address to the <strong>MP</strong> <strong>1260</strong> R that corresponds to the amplifier<br />
input the <strong>MP</strong> <strong>1260</strong> R is connected to.<br />
(see chapter 'Assigning a Device Address').
Streaming Client<br />
The streaming client can<br />
not connect to a network.<br />
On the display the indication<br />
'SCL Connecting...' is<br />
Cause 1 (cable LAN):<br />
Network cable not properly connected<br />
Remedy:<br />
Connect network cable, check connection to router<br />
displayed. Cause 2 (wireless LAN):<br />
WLAN antenna not connected or placed in a location with bad reception quality<br />
The message<br />
'Track not found'<br />
is displayd<br />
The message<br />
'Format Error'<br />
is displayed<br />
The message<br />
'network problems –<br />
restarting'<br />
is displayed<br />
Remedy:<br />
Connect WLAN antenna properly and find a location with good reception<br />
quality.<br />
Set the transmission power output of your WLAN router to maximum.<br />
Try to establish a network connection first in a location close to the WLAN<br />
router. If this succeeded try to connect to WLAN from a more remote location.<br />
Experiment with antenna position and try to find a location with better reception<br />
quality.<br />
Cause 3 (wireless LAN):<br />
WLAN reception qualiy bad ( low field strength). Possibly too much attenuated<br />
by walls/ceilings on the transmission path.<br />
Remedy:<br />
Optimize location of receiver and transmitter antennas.<br />
Alternative:<br />
If transmission problems persist a so called ‚Power Line‘ network might be<br />
good alternative to establish a good and stable network connection.<br />
The best, safest and most secure network however will always be a cable LAN<br />
network.<br />
Cause 4:<br />
Netzwork parameters not properly configured.<br />
Remedy:<br />
Configure the network parameters correctly (see chapter 'Network<br />
configuration').<br />
Cause 5 (operation without network connection):<br />
For proper operation the <strong>MP</strong> <strong>1260</strong> R needs at least one properly connected<br />
network device. This can be a LAN or WLAN network or a USB storage device.<br />
Remedy:<br />
If the <strong>MP</strong> <strong>1260</strong> R shall be operated without network (LAN / WLAN) please<br />
connect at least a USB stick.<br />
Cause:<br />
The music file on the storage device or on the music server was deleted or the<br />
internet radio station is not available at the moment.<br />
Remedy:<br />
Choose an other music title or radio station. If the station or title is not available<br />
any more it should be deleted from the Favourites List (if stored there).<br />
Cause:<br />
The title is stored / the radio station is transmitting in a format that can not be<br />
decoded by the <strong>MP</strong> <strong>1260</strong> R.<br />
Remedy:<br />
Choose an other title or station.<br />
Cause:<br />
Network problems in your home network or on the internet occurred; the<br />
connection was interrupted.<br />
Remedy:<br />
When encountering a network problem or interruption the <strong>MP</strong> <strong>1260</strong> R will restart<br />
the network communication. After re-start please choose a music title or<br />
internet radio station and start playback.<br />
35
Transmission interruptions<br />
occur when listening to<br />
internet radio stations.<br />
Some internet radio stations<br />
can not be received<br />
Bad sound quality bei<br />
certain internet radio<br />
stations<br />
USB Storage device is not<br />
recognised<br />
Problems occur with highresolution<br />
audio formats<br />
(HD audio) (FLAC and WAV<br />
96/24).<br />
36<br />
Cause 1:<br />
The capacity of the internet radio station‘s server is at it‘s limit.<br />
Remedy:<br />
Choose a different station.<br />
Cause 2:<br />
Network problems occurred.<br />
Remedy:<br />
Check your netwerk (see above).<br />
Cause:<br />
The internet radio station has been switched off, it transmits only at certain<br />
hours of the day or it has changed ist internet address.<br />
Remedy:<br />
Try to get information from the website of the station regarding transmission<br />
hours ans internet address (URL).<br />
Try to establish a connection to the station at a later time.<br />
Cause:<br />
The station transmits with a low audio bandwidth (low bitrate).<br />
Remedy:<br />
Use stations transmitting at least at 128 kBit/s. This is the lowes recommended<br />
bitrate for adequate sound quality. For good sound quality we recommend high<br />
bitrates like 320 kBit/s<br />
Cause 1:<br />
The storage device (especially USB hard discs without separate power supply)<br />
draws more electrical current from the USB interface than is permitted by the<br />
USB standard.<br />
Remedy:<br />
Only use USB storage devices that conform to the USB standard or use<br />
storage devices with own power supplies.<br />
Cause 2:<br />
The storage device is not formatted with an appropriate file system.<br />
Remedy:<br />
The <strong>MP</strong> <strong>1260</strong> R accepts storage devices with FAT16 or FAT32 file systems.<br />
Note:<br />
For big music archives we recommend to use a NAS (network attached<br />
storage) device with a UPnP-AV server to which the <strong>MP</strong> <strong>1260</strong> R will connect via<br />
your home network.<br />
Cause:<br />
The <strong>MP</strong> <strong>1260</strong> R is receiving audio data via a WLAN connection. WLAN connections<br />
do not provide reliable quality, and in most cases are not adequate for<br />
HD audio.<br />
Remedy:<br />
If you want to play back HD audio formats via a network connection, please use<br />
a LAN cable network.
Tuner<br />
Whistling or whispering<br />
noises from the speakers.<br />
The RDS station name does<br />
not appear in the display.<br />
The unit can be operated<br />
normally, but very few<br />
stations or none at all can<br />
be picked up.<br />
iPod<br />
Cause:<br />
The antenna lead is routed too close to a mains, remote control or audio signal<br />
cable.<br />
Remedy:<br />
Move the leads so that they are spaced well apart. Use the domestic (loft or<br />
outside) antenna or a cable connection.<br />
Cause 1:<br />
The station is not broadcasting RDS information.<br />
Cause 2:<br />
Reception is poor, interference is severe, or the field strength (signal strength)<br />
is low.<br />
Remedy:<br />
Select only those stations which can be received with a strong signal: hiss-free<br />
and without interference.<br />
Cause:<br />
The antenna system or antenna cable is faulty.<br />
Remedy:<br />
Check the antenna lead for good contact at the antenna socket (at the wall)<br />
and in the back of the tuner. As a test, try using the system with a trailing<br />
antenna. If you can now receive stations reasonably well, we recommend that<br />
you call out an expert antenna technician to check your antenna system.<br />
The iPod is not recharged. Cause:<br />
An iPod connected to the USB socket is only charged if the <strong>MP</strong> <strong>1260</strong> R is<br />
switched on, and if the iPod is selected as listening source.<br />
Remedy:<br />
To recharge the iPod, please switch the <strong>MP</strong> <strong>1260</strong> R on and select the iPod as<br />
listening source.<br />
37
Digital filters<br />
Glossary / Supplementary Information<br />
Digital audio signals are stored with a certain sampling rate of for example<br />
44.1 kHz - i. e. for each second of music 44.100 sampled values are available<br />
for each channel. In the <strong>MP</strong> <strong>1260</strong> R the digital audio signals are converted<br />
(upsampled) to a much higher sample rate (352,8 or 384 kHz) before they are<br />
converted to analog signals by the D/A converter. This process delivers a very<br />
much better, more finely graduated signal to the converter, which can then be<br />
converted with correspondingly higher precision.<br />
For the upsampling of the digital audio signals four different algorithms are<br />
implemented in the <strong>MP</strong> <strong>1260</strong> R. You can choose between these algorithms during<br />
music playback.<br />
The different algorithms are described in more detail below.<br />
<strong>Fi</strong>lter 1 (Standard FIR filter)<br />
The long FIR filter is the standard oversampling process in digital technology,<br />
offering extremely linear frequency response, very high damping, linear phase<br />
characteristics and constant group delays. The disadvantage is the pre- and<br />
post-echoes which are added to the signal. These „time domain errors“ tend to<br />
affect the music signal’s dynamics, precision and naturalness, and reduce<br />
spatial orientation.<br />
Frequency response and transient characteristics of the long FIR filter<br />
<strong>Fi</strong>lter 2 (Impulse optimised filter)<br />
By shortening the filter length (lower number of filtercoefficients) the time<br />
domain errors are reduced resulting in a better impuls response (less filter<br />
‚ringing‘) Acoustically such a shorter filter will have a slightly less accurate<br />
frequency response but higher dynamics and better imaging.<br />
Frequency response and transient characteristics of the short FIR filter<br />
<strong>Fi</strong>lter 3 (Bezier interpolator plus IIR filter)<br />
In this process an ideal Bezier interpolator is combined with what is known as<br />
an IIR filter. This eliminates the problematic pre-echo of the FIR method. This<br />
process produces highly „analogue“ system characteristics, with a sound<br />
quality and measured performance similar to those of good analogue disc<br />
players.<br />
Frequency response and transient characteristics of the Bezier interpolator plus<br />
IIR filter<br />
39
R LINK<br />
40<br />
<strong>Fi</strong>lter 4 (pure Bezier interpolator)<br />
This process delivers a perfect reconstruction of the original music signal. It<br />
exhibits no pre- or post-echoes of any kind, and does not add coloration or<br />
timing errors to the original signal. In sonic terms this method offers an<br />
impressive blend of naturalness, good dynamics and accuracy.<br />
Frequency response and transient characteristics of the Bezier interpolator<br />
Control interface for remote control of � systems. The <strong>MP</strong> <strong>1260</strong> R receives<br />
the infra-red remote control signals and passes then on to the power amplifier<br />
and to the source devices.<br />
Standby The <strong>MP</strong> <strong>1260</strong> R can be switched on from the Standby state from the remote<br />
control handset.
General information<br />
NETWORK TERMINOLOGY<br />
The Switch ensures that the individual components within a network are<br />
connected correctly. This is only possible if it can identify each device within the<br />
network unambiguously; this is the reason why every component is assigned a<br />
form of “house number” (IP address). The IP address consists of four number<br />
blocks each containing three digits separated by dots (e.g. 192.168.1.1).<br />
Each of the individual number blocks may contain values between 1 and 254<br />
(the values 0 and 255 are reserved for certain special functions, and should<br />
therefore not be used). However, if the network is to operate reliably, the<br />
network owner should only select addresses designed for home network use -<br />
i.e.: the first two number blocks should always be 192.168.xxx.xxx; the third<br />
block can be selected without restriction within the above limits (but should be<br />
the same for all devices on the network), and the fourth block must distinguish<br />
each device uniquely (e.g.: <strong>MP</strong> <strong>1260</strong> R 192.168.001.001, NAS:<br />
192.186.001.002, PC: 192.168.001.003, ...).<br />
If this local network is to include Internet music sources (Internet radio) as well<br />
as physical devices, then the � <strong>MP</strong> <strong>1260</strong> R must have access to the<br />
Internet. This facility is provided by a device such as a router with connection to<br />
the DSL network. This router is also a constituent part of the network, and is<br />
assigned its own IP address. The � <strong>MP</strong> <strong>1260</strong> R must also be informed of the<br />
address of the router (Gateway) to enable it to gain access to the outside world.<br />
���� Please ensure that the first three blocks of the Device IP, Gateway IP and DNS<br />
1 share the same address space (e.g. 192.168.0.xxx). The fourth block assigns<br />
a unique address (house number) to the components in the local network. This<br />
number must not be present more than once in the local network.<br />
The Device IP mask should always be assigned the address 255.255.255.0.<br />
DNS The Domain Name System (DNS) is one of the most important services on the<br />
Internet. Its primary task is to convert “Internet addresses”, such as<br />
www.taelektroakustik.de, into the associated IP address. In most home<br />
networks the router carries out the DNS function.<br />
If you decide to configure your network manually (without DHCP), then simply<br />
enter the address of your router as the DNS address when configuring the<br />
network.<br />
Ethernet-LAN Wired network. Interference-free network technology, with the drawback of<br />
having to deploy a network cable.<br />
Gateway The computer or router in your network which is responsible for managing data<br />
traffic between your home network and the outside world (i.e. the Internet).<br />
Client Network device which obtains data from the network, decodes it and converts it<br />
into, for example, analogue music signals which can then be reproduced via an<br />
amplifier and loudspeakers. Streaming Clients also contain functions for<br />
displaying media content, and for navigating on the Internet or servers.<br />
DHCP DHCP is an abbreviation of Dynamic Host Configuration Protocol. The primary<br />
purpose of DHCP is to enable Clients to obtain your network configuration<br />
automatically from a server or router.<br />
IP-Adresse Network address. Each device in the network requires an IP address at which it<br />
can be accessed, and by which it is unambiguously identifiable. No individual<br />
network address may be present more than once. This is important if you are<br />
entering network addresses manually. If the addresses in your network are<br />
assigned by DHCP, you do not need to worry about IP addresses at all, as the<br />
DHCP server manages the addresses automatically without your intervention.<br />
41
NAS<br />
(Network Attached Storage)<br />
42<br />
Network storage facility. This is generally a very large-capacity (> 200 GB)<br />
storage device to which other devices have access. If the NAS server includes<br />
a UPnP-AV server service, then the <strong>MP</strong> <strong>1260</strong> R has access to media files<br />
stored on the NAS, and can play them back.<br />
Powerline-LAN In a Power-Line LAN data is transferred via the existing mains power cabling.<br />
Devices known as “Power-Line modems” are required at the transmitting and<br />
receiving end. In most cases Power-Line offers relatively problem-free data<br />
transfer with adequate data rates for audio streaming. We recommend Power-<br />
Line modems with bit rates of 85 or 200 Mbit/s.<br />
Proxy server A Proxy or Proxy server is a computer in the network which is capable of<br />
carrying out data transfers faster and more efficiently, and can increase<br />
security through the use of access control mechanisms. Most home networks<br />
do not include a proxy server. In this case there is no need to enter a Proxy<br />
address when configuring the <strong>MP</strong> <strong>1260</strong> R network.<br />
Router Central network device which creates and manages the connections between<br />
the network devices. In most networks the router also assumes the function of<br />
Gateway to the outside world.<br />
Server Network device which provides data and services for other devices in the<br />
network. For example, a UPnP-AV server typically stores audio / video data,<br />
and makes it available to other devices (the Streaming Clients). Many<br />
UPnP-AV servers also offer functions such as cataloguing, and easy<br />
identification of media content using criteria such as artiste, album name,<br />
genre, etc.<br />
UPnP-AV Network protocol that makes media files available on the home network.<br />
On PCs and NAS storage devices a UPnP-AV server software must be<br />
installed to enable the <strong>MP</strong> <strong>1260</strong> R to access media files stored on these<br />
devices.<br />
WLAN<br />
(also W-LAN, Wireless LAN)<br />
Compatible hardware<br />
and UPnP servers<br />
Examples for UPnP-AV server software compatible with the <strong>MP</strong> <strong>1260</strong> R:<br />
Windows:<br />
• Twonky Media Server<br />
http://www.twonkyvision.de/<br />
• Windows Media Player 11<br />
http://www.microsoft.com/windows/windowsmedia/de/default.aspx<br />
Linux:<br />
• Mediatomb<br />
http://mediatomb.cc/<br />
• GmediaServer<br />
http://www.gnu.org/software/gmediaserver/<br />
Radio network. The network is connected by means of radio waves operating in<br />
the 2.4 GHz frequency band. Radio networks are easy to install as no cables<br />
have to be deployed, but they are often problematic and unreliable - especially<br />
when the transmission distances are substantial. Power-Line networks, which<br />
can also be installed without separate cabling, are a better choice in many<br />
situations. In every case the deployment of a network cable is the most reliable<br />
and problem-free technology for data transfer.<br />
The marketplace offers a vast number of routers, NAS devices and USB hard<br />
discs made by a very wide range of manufacturers. � equipment is generally<br />
compatible with other makes of machine which bear the UPnP label. A list of<br />
devices which � has checked for compatibility can be found on the Internet<br />
at: http://www.taelektroakustik.de/hardware/comp_lan_hw.pdf.
Anhang<br />
Appendix<br />
43
44<br />
Anhang / Appendix A<br />
Anschluss-Schema / Wiring diagram: <strong>MP</strong> <strong>1260</strong> R in a ���� system with R LINK control<br />
���� If the <strong>MP</strong> <strong>1260</strong> R is connected to the AUX1 input like in this example, the<br />
device address must also be set to AUX1 in the System Configuration menu.<br />
If an other input is used please select the device address corresponding to this<br />
address.<br />
* Please also refer to the notes on the following page.
Anschluss-Schema / Wiring diagram: <strong>MP</strong> <strong>1260</strong> R in a ���� system with RC control<br />
���� Attention!<br />
A properly set up home network with router must be installed and in operation<br />
to use the <strong>MP</strong> <strong>1260</strong> R.<br />
For the use of internet radio a DSL access to the internet is needed.<br />
For questions regarding setting up your network and internet connection<br />
please ask your system administrator or any network specialist.<br />
*1 Musik Server with UPnP-AV server software installed<br />
*2 Connection either via Cable-LAN oder Wireless-LAN; FLAC / WAV 96/24 via<br />
LAN only<br />
*3 Please connect the <strong>MP</strong> <strong>1260</strong> R to the analog input corresponding to the<br />
device address that you assigned in the 'System Configuration, Device<br />
Adr' dem <strong>MP</strong> <strong>1260</strong> R menu (normally AUX 1).<br />
���� If the <strong>MP</strong> <strong>1260</strong> R is connected to the AUX1 input like in this example, the<br />
device address must also be set to AUX1 in the System Configuration menu. If<br />
an other input is used please select the device address corresponding to this<br />
address.<br />
45
Anhang / Appendix B<br />
Technische Daten / Specification<br />
Audio Formate Streaming Client: <strong>MP</strong>3(cbr+vbr), WMA, AAC, FLAC, OGG-Vorbis, WAV<br />
HD Audio via LAN + USB disc: FLAC / WAV 96 kHz / 24 Bit<br />
Internet radio Data Base vTuner Internet Radio Service<br />
Unterstützte Medienserver /<br />
Supported Mediaserver:<br />
Schnittstellen / Interfaces<br />
Analogausgang<br />
Analogue output<br />
Digitalausgang /<br />
Digital output:<br />
Digitaleingang<br />
UPnP-AV 1.1 and DLNA compatible servers, Microsoft Windows Media<br />
Connect Server (WMDRM10)<br />
Ethernet 10/100, WLAN 802.11b/g, USB 2.0, iPod, 2 x SP/DIF digital input<br />
Digitalfilter / Digital filter: 8 fach Oversampling mit 56 Bit<br />
Digital-Signalprozessor<br />
2.5 Veff / 22 Ω<br />
1 x coax, IEC 60958 (SP-DIF)<br />
1 x coax. IEC 60958 (SP-DIF)<br />
1x optical IEC 60958 (SP-DIF / TOS-Link)<br />
Vier unterschiedlichen Upsampling-<br />
Algorithmen.<br />
D/A Wandler / D/A converter Doppel-Differential-Modus,<br />
zwei Sigma-Delta Konverter mit<br />
384 kHz / 32 Bit<br />
Analogfilter<br />
Analogue filter<br />
phasenlineares Besselfilter,<br />
(konstante Gruppenlaufzeit)<br />
3. Ordnung, 100 kHz Grenzfrequenz<br />
8-times oversampling by 56-bit digital<br />
signal processor with four different<br />
oversampling algorithms,<br />
Double differential mode,<br />
two Sigma-Delta converters with<br />
384 kHz / 32 Bit<br />
Phase-linear Bessel filter<br />
(constant group delay),<br />
3rd order, 100 kHz bandwidth<br />
Frequenzgang (+0, -0,2 dB)<br />
Frequency response (+0, -0,2 dB) 2 Hz .... 44 kHz<br />
Obere Grenzfrequenz abhängig von Upper limit frequency dependent<br />
der Abtastrat des Musikmaterials upon the sampling rate of the music<br />
material<br />
Klirrfaktor / Intermodulation<br />
Total harm. distortion / intermodulation < 0.001 %<br />
Geräuschspannungsabstand /<br />
Signal : noise ratio, A-weighted: 109 dB<br />
Kanaltrennung 1 kHz / 10 kHz /<br />
Channel separation 1 kHz / 10 kHz: 106 dB<br />
Netzanschluss / Mains supply: 100 - 240 V, 50 - 60 Hz, 40 W<br />
Zum Lieferumfang gehören /<br />
Standard accessories:<br />
Steuerschnittstelle /<br />
Control interface:<br />
Netzkabel, R LINK-Kabel, WLAN<br />
Antenne, Betriebsanleitung, Aufkleber<br />
zur Konvertierung einer F6<br />
Fernbedienung zur F6a, Garantieanforderungskarte<br />
RS232<br />
für Update und<br />
Steuerung (spez. Software-Version<br />
erforderlich)<br />
Mains cable, R LINK cable, WLAN<br />
Antenna, user manual, Sticker to<br />
convert a F6 remote control to model<br />
F6a<br />
RS 232<br />
for firmware update and<br />
external control (special Software<br />
version required)<br />
Technisch begründete Änderungen vorbehalten. / We reserve the right to alter specifications.<br />
47
� elektroakustik GmbH & Co. KG<br />
Herford<br />
Deutschland * Germany