Streifeneder ContexGel-Liner - R S L Steeper
Streifeneder ContexGel-Liner - R S L Steeper
Streifeneder ContexGel-Liner - R S L Steeper

You also want an ePaper? Increase the reach of your titles
YUMPU automatically turns print PDFs into web optimized ePapers that Google loves.
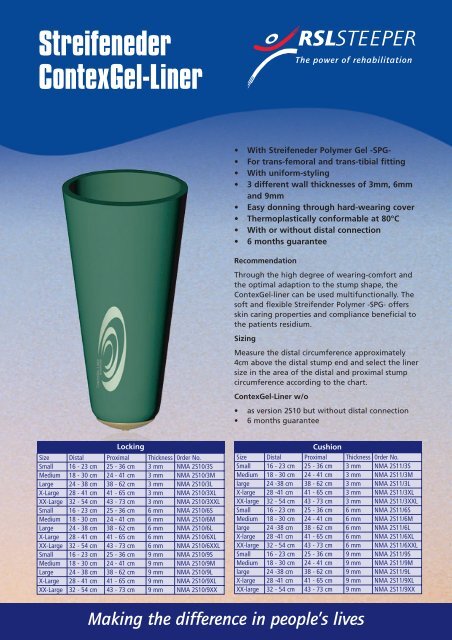
<strong>Streifeneder</strong><br />
<strong>ContexGel</strong>-<strong>Liner</strong><br />
• With <strong>Streifeneder</strong> Polymer Gel -SPG-<br />
• For trans-femoral and trans-tibial fitting<br />
• With uniform-styling<br />
• 3 different wall thicknesses of 3mm, 6mm<br />
and 9mm<br />
• Easy donning through hard-wearing cover<br />
• Thermoplastically conformable at 80°C<br />
• With or without distal connection<br />
• 6 months guarantee<br />
Recommendation<br />
Through the high degree of wearing-comfort and<br />
the optimal adaption to the stump shape, the<br />
<strong>ContexGel</strong>-liner can be used multifunctionally. The<br />
soft and flexible Streifender Polymer -SPG- offers<br />
skin caring properties and compliance beneficial to<br />
the patients residium.<br />
Sizing<br />
Measure the distal circumference approximately<br />
4cm above the distal stump end and select the liner<br />
size in the area of the distal and proximal stump<br />
circumference according to the chart.<br />
<strong>ContexGel</strong>-<strong>Liner</strong> w/o<br />
• as version 2S10 but without distal connection<br />
• 6 months guarantee<br />
Locking<br />
Size Distal Proximal Thickness 0rder No.<br />
Small 16 - 23 cm 25 - 36 cm 3 mm NMA 2S10/3S<br />
Medium 18 - 30 cm 24 - 41 cm 3 mm NMA 2S10/3M<br />
Large 24 - 38 cm 38 - 62 cm 3 mm NMA 2S10/3L<br />
X-Large 28 - 41 cm 41 - 65 cm 3 mm NMA 2S10/3XL<br />
XX-Large 32 - 54 cm 43 - 73 cm 3 mm NMA 2S10/3XXL<br />
Small 16 - 23 cm 25 - 36 cm 6 mm NMA 2S10/6S<br />
Medium 18 - 30 cm 24 - 41 cm 6 mm NMA 2S10/6M<br />
Large 24 - 38 cm 38 - 62 cm 6 mm NMA 2S10/6L<br />
X-Large 28 - 41 cm 41 - 65 cm 6 mm NMA 2S10/6XL<br />
XX-Large 32 - 54 cm 43 - 73 cm 6 mm NMA 2S10/6XXL<br />
Small 16 - 23 cm 25 - 36 cm 9 mm NMA 2S10/9S<br />
Medium 18 - 30 cm 24 - 41 cm 9 mm NMA 2S10/9M<br />
Large 24 - 38 cm 38 - 62 cm 9 mm NMA 2S10/9L<br />
X-Large 28 - 41 cm 41 - 65 cm 9 mm NMA 2S10/9XL<br />
XX-Large 32 - 54 cm 43 - 73 cm 9 mm NMA 2S10/9XX<br />
Cushion<br />
Size Distal Proximal Thickness 0rder No.<br />
Small 16 - 23 cm 25 - 36 cm 3 mm NMA 2S11/3S<br />
Medium 18 - 30 cm 24 - 41 cm 3 mm NMA 2S11/3M<br />
large 24 -38 cm 38 - 62 cm 3 mm NMA 2S11/3L<br />
X-large 28 -41 cm 41 - 65 cm 3 mm NMA 2S11/3XL<br />
XX-large 32 - 54 cm 43 - 73 cm 3 mm NMA 2S11/3XXL<br />
Small 16 - 23 cm 25 - 36 cm 6 mm NMA 2S11/6S<br />
Medium 18 - 30 cm 24 - 41 cm 6 mm NMA 2S11/6M<br />
large 24 -38 cm 38 - 62 cm 6 mm NMA 2S11/6L<br />
X-large 28 -41 cm 41 - 65 cm 6 mm NMA 2S11/6XL<br />
XX-large 32 - 54 cm 43 - 73 cm 6 mm NMA 2S11/6XXL<br />
Small 16 - 23 cm 25 - 36 cm 9 mm NMA 2S11/9S<br />
Medium 18 - 30 cm 24 - 41 cm 9 mm NMA 2S11/9M<br />
large 24 -38 cm 38 - 62 cm 9 mm NMA 2S11/9L<br />
X-large 28 -41 cm 41 - 65 cm 9 mm NMA 2S11/9XL<br />
XX-large 32 - 54 cm 43 - 73 cm 9 mm NMA 2S11/9XX<br />
Making the difference in people’s lives
<strong>Streifeneder</strong> <strong>ContexGel</strong>-<strong>Liner</strong><br />
Cast Modifications<br />
The aim of the modification is to achieve a total surface<br />
weight bearing of the residual limb for optimum<br />
performance of the <strong>ContexGel</strong>-<strong>Liner</strong>. To achieve this, the<br />
modifications involve reduction of the positive model only.<br />
Build-ups of the model are neither required nor<br />
recommended. This includes the areas which you may have<br />
typically built up in the past, such as the anterior distal tibia<br />
and the head of the fibula. Avoid any build-ups in any area.<br />
A) For CAD/CAM:<br />
Globally reduce the circumference by 13 mm or<br />
B) For a modification by hand:<br />
1) Use a round Sureform file (or equivalent), carve a small<br />
bar at the patella tendon. It should not be as large as<br />
the type used when making a PTB socket; its purpose is<br />
only to prevent the liner from gapping in that area. The<br />
maximum depth of the bar should be 1.6 cm ( 5 ⁄8").<br />
2) Start at the mid-patella tendon bar and work towards<br />
the distal end, make a mark at every 2.5 cm (1”) along<br />
the length of the model. Then start again the at the<br />
mid-patella tendon bar and move proximally, make a<br />
mark at every 2.5 cm (1”) for approximately 7.5 cm (3”).<br />
3) Use a pointed awl or similar device, pierce the mould to<br />
a depth of about 0.5 cm ( 3 ⁄16“) at each of the marks<br />
along the crest of the tibia. These penetrations will<br />
assure that the reference marks will not be lost when<br />
plaster is removed from the mould.<br />
4) Measure and record the circumference of the mould at<br />
each of the marked areas.<br />
5) Reduce each of the circumference measurements taken<br />
in step 4 by 13 mm or 1 ⁄2"<br />
For example: initial circumference = 50 cm<br />
goal circumference should be 48.7 cm<br />
6) Use a half-round Sureform file 158P2/HR, remove<br />
plaster from the cast in order to achieve the goal<br />
measurements determined in step 5. To remove the<br />
plaster symmetrically, start at the proximal edge of the<br />
cast and pull the file towards the distal end of the cast<br />
in one continuous motion. After approx. three strokes,<br />
move the file to the left or the right of the area that<br />
was just reduced, and repeat the procedure until you<br />
have worked your way all around the cast.<br />
Note: A half-round file 158P2/HR is recommended<br />
because it helps to maintain the contour of the cast. Do<br />
not simply reduce the prominent points of the cast<br />
while leaving the rest alone. On very conical, bony limbs<br />
it may be necessary to use our Draw Knife 160P10 to<br />
remove plaster around the base of the bony<br />
prominence that the half-round file will miss.<br />
7) Measure the cast again. If the goal measurements have<br />
been achieved, proceed to step 8. If the new<br />
measurements are still larger than the goal<br />
measurements, repeat steps 6 and 7 until the goal<br />
measurements have been achieved.<br />
8) Use our Sanding Net 107P31 to smooth out the file<br />
marks on the cast.<br />
Customisation of the <strong>ContexGel</strong>-<strong>Liner</strong><br />
Each size of the <strong>ContexGel</strong>-<strong>Liner</strong> is designed to fit a wide<br />
range of limb circumferences. The thermoplastic nature of<br />
the <strong>ContexGel</strong>-<strong>Liner</strong> allows it to be heated and stretched to<br />
fit the larger limbs in each size category. This process is<br />
called customisation, and should be performed whenever<br />
the amputee finds the liner to be uncomfortably tight or<br />
difficult to wear. Follow either of the two methods listed<br />
below.<br />
Method 1<br />
1) Apply a stockinette or other protective barrier to a<br />
clean, dry positive model that is similar in size and<br />
shape to the amputee's residual limb and is longer<br />
than the usable length of the <strong>ContexGel</strong>-<strong>Liner</strong>.<br />
2) Roll the <strong>ContexGel</strong>-<strong>Liner</strong> onto the model.<br />
3) Leave the liner on the model for at least one hour. The<br />
longer the liner is left on the positive model, the more<br />
the liner will take the shape of the model.<br />
4) Remove the liner from the model.<br />
Method 2<br />
1) Apply a stockinette or other protective barrier to a<br />
clean, dry positive model that is similar in size and<br />
shape to the amputee's residual limb and is longer<br />
than the usable length of the <strong>ContexGel</strong>-<strong>Liner</strong>. The<br />
positive model can be pre-heated at 65°C (150°F) for<br />
ten minutes if desired.<br />
2) Roll the <strong>ContexGel</strong>-<strong>Liner</strong> onto the model.<br />
3) Place the positive model, with the liner on it, into a<br />
pre-heated oven set at 65°C (150°F) .<br />
Note: Please do not place the <strong>ContexGel</strong>-<strong>Liner</strong> into the<br />
oven unless it is on a positive model and avoid every<br />
contact of the <strong>ContexGel</strong>-<strong>Liner</strong> with the heating<br />
element or the sides of the oven, or the liner will be<br />
damaged and will not be covered under warranty.<br />
4) Heat the liner in the oven for two to five minutes. If<br />
the customisation is not sufficient after this time, you<br />
may increase the amount of time in the oven by 2 1 ⁄2<br />
minute increments, but do not exceed 15 minutes<br />
total time in the oven.<br />
5) Remove the positive model with the <strong>ContexGel</strong>-<strong>Liner</strong><br />
from the oven. Allow the <strong>ContexGel</strong>-<strong>Liner</strong> to cool<br />
approx. ten minutes before removing it from the<br />
model.<br />
RSLSTEEPER<br />
Products Division<br />
Unit 7 • Hunslet Trading Estate<br />
Severn Road, Leeds LS10 1BL<br />
Tel. +44 (0)113 207 0449<br />
Fax. +44 (0)113 207 0438<br />
Email. assist@rslsteeper.com<br />
Web. www.rslsteeper.com