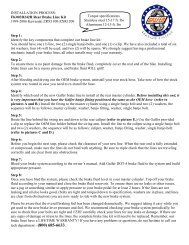
INSTALLATION PROCESS; FK002D673GP (GP Kit ... - Galfer Brakes
INSTALLATION PROCESS; FK002D673GP (GP Kit ... - Galfer Brakes
INSTALLATION PROCESS; FK002D673GP (GP Kit ... - Galfer Brakes

Create successful ePaper yourself
Turn your PDF publications into a flip-book with our unique Google optimized e-Paper software.
<strong>INSTALLATION</strong> <strong>PROCESS</strong>;<br />
<strong>FK002D673<strong>GP</strong></strong> (<strong>GP</strong> <strong>Kit</strong>)<br />
[2008 Ducati 848]<br />
RACE USE ONLY!<br />
Torque specifications<br />
Stainless steel 17-20 ft. lbs<br />
Aluminum 12-15 ft. lbs<br />
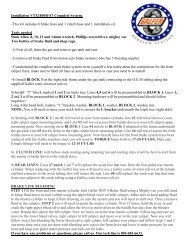
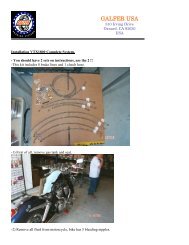
Step 1:<br />
Identify the key components that complete our <strong>GP</strong> kit:<br />
You should have 3-line (front kit), 3 SINGLE banjo bolt and 1 C-CLIP. There are also a total of 8<br />
washers. 6 will be used, and 2 are spares. We strongly suggest having a professional mechanic install<br />
these brake lines, all other installations VOID warranty. Inspect your brake system after every race.<br />
Step 2:<br />
Cover the complete front end of the bike so that if any brake fluid does spill the paint will not be<br />
damaged, brake fluid will spill, there is no question!!<br />
Step 3:<br />
Remove the stock brake lines be careful not to spill brake fluid on any of the plastics<br />
Step 4:<br />
Install the GALFER <strong>GP</strong> 3-Line starting with the master cylinder line (top line). Torque level is 12 to 15<br />
ft pounds. (See picture A2)<br />
Step 5:<br />
Install the C-CLIP provided to the lower triple tee top line needs to be held by c-clip [see picture<br />
A4&A5]. Lower lines will travel in front of the forks to the calipers; two single banjo bolt (see picture<br />
A1) are included for master cylinder to each caliper. The positioning sequence on the master cylinder is<br />
as follows:<br />
Master cylinder, washer, forty-degree banjo (Top line), and washer. Single banjo bolt torque level is 12-<br />
15 FT Pounds. (See picture A2 for positioning)<br />
Make sure that the [CALIPER fittings] on each caliper are positioned [positioning] (see picture A6-<br />
A7). Thread banjo bolt into the caliper, and torque bolt to 12 to 15 Ft pounds.<br />
Before you proceed to the next step, please check for clearance of the lines. Compress the front end to<br />
make sure that the lines are not binding with anything. When the front end is fully extended or fully<br />
compressed, double check that the lines are traveling correctly and are clear of any obstructions.<br />
Once the lines have been checked for clearance. Proceed to step #6<br />
Step 6:<br />
Bleed brake system according to owner’s manual, and build appropriate pressure. Finishing with<br />
GALFER DOT 4-brake fluid is recommended.<br />
Step 7:<br />
Once the bleeding has been done, please check brake fluid level on master cylinder.<br />
Close brake fluid reservoir, and zip tie the brake lever to the throttle for at least 2 hours to ensure no<br />
leaks or other possible issues. If the lines are not leaking and all looks OK, you may now ride with the<br />
new system. Make sure that the rider is aware that the overall feel has dramatically changed. We suggest<br />
taking it easy to get used to the new brake lever feel and pressure.<br />
We also always suggest checking the brake system after every race or in the event of a crash. Brake lines<br />
must be checked very carefully! If there are any signs of damage or stress to the lines, the complete<br />
brake system must be replaced. If you have any problems please call us at 800-685-6633.
Pictures:<br />
(A1) (HARDWARE)<br />
(A2) (MASTER CYLINDER)<br />
(A3) OVER ALL VIEW<br />
(A4) (TRIPLE TEE C-CLIP)<br />
A6 (RIGHT CALIPER) (A7) (LEFT CALIPER) (A5) (FRONT VIEW)<br />
(800) 685-6633<br />
310 Irving Drive<br />
Oxnard, California 93030