Installation VTX1800R-F3 Complete System. -This kit ... - Galfer Brakes
Installation VTX1800R-F3 Complete System. -This kit ... - Galfer Brakes
Installation VTX1800R-F3 Complete System. -This kit ... - Galfer Brakes

Create successful ePaper yourself
Turn your PDF publications into a flip-book with our unique Google optimized e-Paper software.
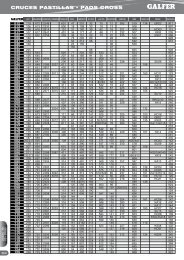
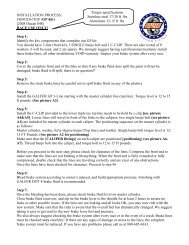
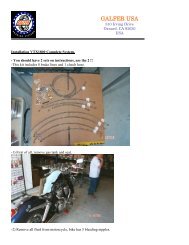
<strong>Installation</strong> <strong>VTX1800R</strong>-<strong>F3</strong> <strong>Complete</strong> <strong>System</strong>.-<strong>This</strong> <strong>kit</strong> includes 8 brake lines and 1 clutch hose and 1 installation cd.Tools needed5mm Allen, 8, 10, 12 and 14mm wrench, Phillips screwdriver, mighty vacTwo bottles of brake fluid and shop rags.-1) First of all, drain the gas and remove gas tank and seat.-2) remove all brake fluid from motorcycle brake systems, bike has 5 bleeding nipples.-3) understand the complete stock brake system write yourself a few notes about the connections for the frontcaliper lines, make sure to label all lines as you remove them in case you need to re-install.-4) Install BLOCK 3 on the right side frame under the gas tank connecting to the O.E.M tubing using thesupplied <strong>Galfer</strong> conic inversor (olive).5) Install ‘’T’’ block marked 1 and 2 on triple tree. Lines 4,5 and 6 will be preassembled to BLOCK 1. Lines 1,2 and 3 will be preassembled to BLOCK 2 Mounting hardware will be preassembled and should followsequence :Long Allen head bolt, washer, “L” bracket, washer, BLOCK 1, washer, BLOCK 2, washer, nut.NOTE: You will need to reuse your stock bolt to mount the L bracket underneath the triple tree (right side)6) Starting with BLOCK 2 Line #1 will travel to your front master cylinder, line #2 will travel down to yourright caliper upper mounting point, and Line #3 will travel across front fender down to your left caliper uppermounting point. Now moving on to BLOCK 1 Line #4 travels to BLOCK 3 mounted to the frame underneaththe gas tank Line #5 travels down to the right caliper lower mounting point, Line #6 will travel across the frontfender down to your left caliper lower mounting point. Now that all lines for the front brake system have beenreplaced with the <strong>Galfer</strong> stainless steel you will need to TORQUE banjo bolts to 17-20 FT-LBS. Male andFemale fittings will need to be torque to 12-15 FT-LBS8) CLUTCH LINE: will follow stock routing using retaining ties and routing clips it will be best to start fromthe master cylinder down to the clutch slave.9) REAR LINES: Lines #7 and 8. Line 7 will replace the stock line that runs from the foot pedal rear mastercylinder. When replacing with the <strong>Galfer</strong> line you will need to use a <strong>Galfer</strong> conic inversor (olive) at the femaleend that connects to the stock tubing, this will insure the seal. Line #8 will replace the stock rear line that runsfrom rear caliper to the stock tubing using a <strong>Galfer</strong> conic inversor (olive)BRAKE LINE BLEEDINGSTEP 1 Fill the front and rear master cylinder with <strong>Galfer</strong> DOT 4 Brake fluid using a Mighty vac you will needto bring fluid down to each caliper using the upper bleed valve on both calipers. Make sure to keep adding fluidto the master cylinder to keep it from drawing air into the system and you will need to start over. Once you havefluid in the calipers. STEP 2 you will need to pump the master cylinder 10 to 15 times, hold the lever in andcrack the right upper bleed valve and allow the lever to travel down to the handle bar and close the bleedervalve. Repeat this step to the left caliper. Now we move on to the rear master cylinder. Following step one wemove to the lower bleed valves, right caliper to left caliper, and move over to the rear caliper. Now you willfollow step 2 but bleeding the lower bleed valve right caliper, left caliper, rear caliper and follow steps 1 and 2one more time once you are done with bleeding now zip tie the front lever and leave it under pressure for onehour and keep rear pedal under pressure and look out for leaks.If you have any problems or questions, please call us. Our tech line is 800-685-6633.
LINE:1 MASTER CYLINDER BLOCKS 1 AND 2BLOCK 3LINE: 2 AND 5 RIGHT CALIPERLINES: 3 AND 6 LEFT CALIPERCLUTCH MASTER CYLINDERCLUTCH SALVE
REAR FOOT PEDAL LINE:7LINE:7 FEMALE TO OEM TUBINGLINE: 8 REAR CALIPERLINE: 8 FEMALE END TO OEM TUBING