BibleWorks Workshop - Luther Seminary
BibleWorks Workshop - Luther Seminary
BibleWorks Workshop - Luther Seminary

Create successful ePaper yourself
Turn your PDF publications into a flip-book with our unique Google optimized e-Paper software.
1<br />
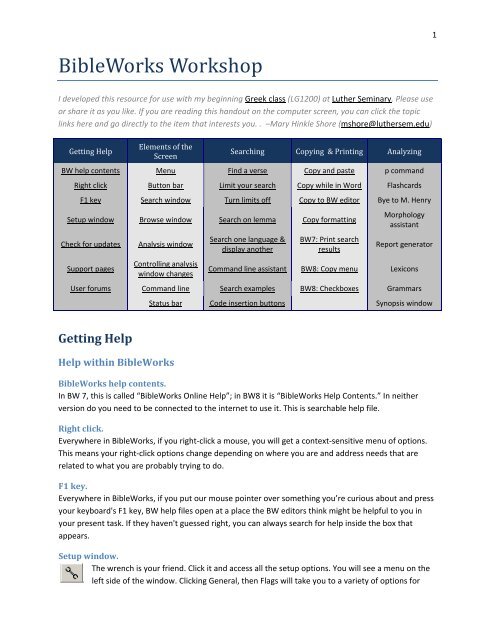
<strong>BibleWorks</strong> <strong>Workshop</strong><br />
I developed this resource for use with my beginning Greek class (LG1200) at <strong>Luther</strong> <strong>Seminary</strong>. Please use<br />
or share it as you like. If you are reading this handout on the computer screen, you can click the topic<br />
links here and go directly to the item that interests you. . –Mary Hinkle Shore (mshore@luthersem.edu)<br />
Getting Help<br />
Elements of the<br />
Screen<br />
Searching Copying & Printing Analyzing<br />
BW help contents Menu Find a verse Copy and paste p command<br />
Right click Button bar Limit your search Copy while in Word Flashcards<br />
F1 key Search window Turn limits off Copy to BW editor Bye to M. Henry<br />
Setup window Browse window Search on lemma Copy formatting<br />
Check for updates<br />
Support pages<br />
Analysis window<br />
Controlling analysis<br />
window changes<br />
Search one language &<br />
display another<br />
BW7: Print search<br />
results<br />
Morphology<br />
assistant<br />
Report generator<br />
Command line assistant BW8: Copy menu Lexicons<br />
User forums Command line Search examples BW8: Checkboxes Grammars<br />
Status bar Code insertion buttons Synopsis window<br />
Getting Help<br />
Help within <strong>BibleWorks</strong><br />
<strong>BibleWorks</strong> help contents.<br />
In BW 7, this is called “<strong>BibleWorks</strong> Online Help”; in BW8 it is “<strong>BibleWorks</strong> Help Contents.” In neither<br />
version do you need to be connected to the internet to use it. This is searchable help file.<br />
Right click.<br />
Everywhere in <strong>BibleWorks</strong>, if you right‐click a mouse, you will get a context‐sensitive menu of options.<br />
This means your right‐click options change depending on where you are and address needs that are<br />
related to what you are probably trying to do.<br />
F1 key.<br />
Everywhere in <strong>BibleWorks</strong>, if you put our mouse pointer over something you’re curious about and press<br />
your keyboard's F1 key, BW help files open at a place the BW editors think might be helpful to you in<br />
your present task. If they haven't guessed right, you can always search for help inside the box that<br />
appears.<br />
Setup window.<br />
The wrench is your friend. Click it and access all the setup options. You will see a menu on the<br />
left side of the window. Clicking General, then Flags will take you to a variety of options for
customizing <strong>BibleWorks</strong>. Other left hand menu items will change display versions, copy formatting, etc.<br />
Check for updates.<br />
Automatic checking for updates is your link to patches for the software and new free databases. BW will<br />
give you information on each update and not install anything until you give permission. Set automatic<br />
checking in the setup window. Click the wrench button, then choose Flags from the left hand side of the<br />
window, then click the plus sign beside Internet Updater Options (at the bottom of the main window),<br />
and check the box Automatically Check for Updates.<br />
Help from the <strong>BibleWorks</strong> Site<br />
Support pages.<br />
There are several helpful links on this page, http://www.bibleworks.com/. Look at the navigation across<br />
the top of the page. The Support links on the <strong>BibleWorks</strong> site take you to FAQ pages and other helps.<br />
User forums.<br />
The Forums link takes you to interactive bulletin boards you can read and write to. If you have a<br />
question about how to do something, and the Help material inside <strong>BibleWorks</strong> is not answering it,<br />
search in the user forums. Odds are good you'll find an answer just by searching past conversations. If<br />
that doesn't turn up what you want, you can post a question in the forum. BW enthusiasts hang out<br />
here and love to help others.<br />
2<br />
Elements of the Screen<br />
Menu.<br />
At the top of the screen. The menu covers most of what you can do in <strong>BibleWorks</strong>, though sometimes<br />
things are “buried” there.<br />
Button bar.<br />
<strong>BibleWorks</strong> comes with several buttons displayed and some not showing. To add or subtract<br />
your button bar, click on the button shown here.<br />
Search window.<br />
This is the window pane on the far left. When you search for words, phrases, etc., your results appear in<br />
this window.<br />
Browse window.<br />
In the center of the screen, this window contains the whole Bible when it is in browse mode, so clicking<br />
and dragging the scroll bar on the right is not advisable. Arrows at the top of the scroll bar move you one<br />
verse at a time through the text.<br />
Click the browse window options button to set up which versions to display and how to order<br />
them.
3<br />
Click the footprints button to toggle between browse mode and seeing a verse or group of<br />
verses in several different versions at once.<br />
Analysis window.<br />
Here are tabs upon tabs for different views. Access various resources within <strong>BibleWorks</strong> as they relate to<br />
the specific passage you are reading. The editor and notes tabs are also here.<br />
Controlling analysis window changes.<br />
To stop the resources or analysis windows from skipping to new information every time you<br />
mouse over a new word, hold down the Shift key. To change the setting for good, right‐click<br />
inside the resources window and choose “update only when shift key depressed.” If you choose<br />
this option, you will need to hold down the Shift key to change the information rather than to<br />
hold the window’s content.<br />
Command line.<br />
Use this line to request Bible passages, word searches, and other things from <strong>BibleWorks</strong>.<br />
Status bar.<br />
This is at the bottom of the <strong>BibleWorks</strong> page. The grey words are actually links to dialog boxes for<br />
changing the configuration of BW. Double click words in the status bar to set search limits, toggle the<br />
Browse and Analysis windows on and off, etc.<br />
Searching<br />
Find a verse.<br />
Type the verse or verse range you want in the <strong>BibleWorks</strong> Command Line. You may use either the threebutton,<br />
then choosing Book<br />
letter book abbreviations from BW, or other standard ways of abbreviating books. (You can set<br />
additional abbreviations for BW to recognize by clicking on the wrench<br />
Names from the left hand menu and following the instructions there.)<br />
Examples<br />
Joh1:1 or John 1:1 moves the browse window to the first chapter and verse of the gospel of<br />
John.<br />
John 1:1‐5 loads the first five verses of John’s gospel into the browse window.<br />
Limit a search.<br />
Double‐click the word "Limits" at the bottom of the BW page to open the Options dialog in the Search<br />
Limits window. You may limit a search in three ways:<br />
Limit a search to particular book(s).<br />
You can limit a search to a particular book or books of the Bible by choosing the book(s). You<br />
may want to clear all checkmarks before you click on the book(s) you want.
Limit a search using BW predefined search ranges.<br />
Several custom search ranges are built into BW. You can search just the gospels (which, oddly, in<br />
the BW predefined ranges also includes Acts), or just the Pentateuch, etc. Click one of these and<br />
then click OK.<br />
Limit a search to your own custom search range.<br />
Building and searching your own custom search range is a two‐step process.<br />
1. Add a New Predefined Range. Fill in the information you want here. Give your range a<br />
name; choose a version to search (I think this choice is overridden by the version chosen<br />
in the main search window), and define your range. It can be anything from a verse to<br />
the whole Bible. Click Save.<br />
2. Choose your new range in the list of Predefined Ranges, and click OK.<br />
Turn limits off.<br />
Double‐click Limits in the status bar and choose the radio button at the top of the window labeled, Do<br />
not apply any limits to this search.<br />
Search on lemma in Greek or Hebrew.<br />
Mouse over any Greek or Hebrew word in the Browse Window (center pane), right click, and you will<br />
have the option to Search on Lemma. If you choose this option, BW will perform a search for the<br />
dictionary form of the word you are hovering over. This means you will get all the forms of that word,<br />
not just the word with one particular spelling.<br />
Search Greek or Hebrew & display English.<br />
The way to switch search results to a different version is different in BW7 and BW8.<br />
<strong>BibleWorks</strong> 7: Reading Greek or Hebrew search results in English<br />
When you search on a Greek or Hebrew word, results of your search appear in the Search<br />
Window in Greek or Hebrew. If you would prefer to read your results in English, just type an<br />
English version three‐letter identifier in the Command Line (that is, type NRS for example) and<br />
click Enter (Return) on your keyboard. The results of your search stay the same, but the verses<br />
are now displayed in the version you just requested.<br />
<strong>BibleWorks</strong> 8: Reading Greek or Hebrew search results in English<br />
Getting from a Greek or Hebrew search to an English results list is a two‐step process in BW8.<br />
1. In <strong>BibleWorks</strong> 8, typing a new version code in the Command Line and you have changed<br />
your search version, but not your display version. The search version is now shown in<br />
beside the display version just below the Command Line like this: NRS/BNT, and the<br />
results are still in Greek.<br />
2. To see Greek or Hebrew search results in English, click the arrow beside BNT (it doesn’t<br />
work just to hover over the arrow) and choose Synchronize Results List. The results of<br />
your search stay the same, but the verses are now displayed in the search version you<br />
chose.<br />
4
Command line assistant.<br />
If you want help setting up searches, the Command Line Assistant might be what you’re<br />
looking for. Click the Button Bar setup button (see Button Bar setup above). In the dialog there,<br />
find the Command Line Assistant button, and add it to your button bar. Clicking on it will bring<br />
up a help window for building searches.<br />
Search Examples<br />
These tables are part of the Bibleworks help file. You can see search examples in <strong>BibleWorks</strong> 8 by<br />
clicking on the down arrow next to the little Tools drop down menu under the Command Line.<br />
English searches.<br />
5
6<br />
Greek searches.<br />
Code insertion buttons.<br />
<strong>BibleWorks</strong> performs searches at many different levels of complexity. All of these searches are built with<br />
keystrokes that look like computer code. Instead of memorizing all these keystrokes, I display code<br />
insertion buttons. Inside the Command Line, right click. Choose Code Insertion Buttons from the menu.<br />
A row of buttons appears under the Command Line. As you hover the mouse over each one, you see a<br />
tip for what the kind of search each one will facilitate.<br />
Copying & Printing<br />
Copy and paste.<br />
You can highlight, copy (ctrl + c) and paste (ctrl + v) text from the Browse Window (center window) to a<br />
Word document. This is a quick way to get a block of BW text into a Word document.<br />
Copying directly into Microsoft Word.<br />
When you have both <strong>BibleWorks</strong> and Word open, you can get paste from <strong>BibleWorks</strong> without leaving<br />
Word. Use keyboard shortcut ctrl + shift + B. A popup window will appear ready to copy the current<br />
search version into you document. Position your cursor in Word where you want the verse(s). Type a<br />
verse or verse range into the popup window, click Copy, and your selection will appear.<br />
Copying directly into the BW editor or notes area.<br />
<strong>BibleWorks</strong> has its own word processor. In the Analysis window you will see a tab for editor and/or<br />
notes (BW7 and BW8 are slightly different visually here). To copy a text into the editor or notes area,<br />
highlight the text, hold down the left mouse button and drag the text into the editor or notes area. This
7<br />
may be helpful if you want to write notes or prepare a paper while continuing to work with other tools<br />
in BW.<br />
Copy format options.<br />
BW7 has a Copy Center item in the Tools menu. Open Tools/Copy Center. BW8 gives access to these<br />
options and others from the Copy menu just under the Command Line.<br />
Interleave<br />
When you are copying a range of verses, such as a pericope, you can choose the versions you<br />
want to copy, then click Format Options. All sorts of options open up to you. Interleave Versions<br />
creates a line‐by‐line interlinear text of the versions chosen.<br />
Colors<br />
You have to choose "colors" if you want highlighting or font coloring to travel from BW to Word.<br />
<strong>BibleWorks</strong> 7: Print verses from search results.<br />
To print verses (and not just a list of citations) from the Verse List Window, choose Copy Center from the<br />
Tools menu. Choose Text of Verses in Verse List. Type in the versions you want to copy. If you want the<br />
word you searched to be highlighted in your Word document, click on Format Options in the Copy<br />
Center dialog; then, inside Format Options, in the Include area, choose Colors. Copy results to a Word<br />
document. From there, you can save, move, or print your results.<br />
<strong>BibleWorks</strong> 8: Help with copying.<br />
Everything you need is in the Copy drop‐down menu under the Command line. Choose<br />
material to copy, then a destination for it. To change the look of what you get, choose<br />
Configure Copy Favorites for a task.<br />
<strong>BibleWorks</strong> 8: Those checkboxes in the search results area.<br />
BW 8 allows you to refine your results before copying or printing them. Right‐click in the search results<br />
and choose Checkbox options from the context menu.<br />
Analyzing<br />
p (for parallel) command.<br />
In the command line, type p nrs bnt niv, press return, and up pops a new window with the NRSV,<br />
<strong>BibleWorks</strong> NT (NA27), and NIV in parallel windows. You can line up as many versions as you like this<br />
way. You cannot print from this window since it is functionally the whole Bible in as many versions as<br />
you have lined up.<br />
Vocabulary flashcard module.<br />
You can set the flashcard module to quiz you on words in a certain pericope, or on words that occur<br />
more than 50 times in the NT, and so on. The module includes a pronunciation file for each word. To<br />
explore it:
8<br />
BW7<br />
Click on Tools in the menu at the top of the BW window, then Vocabulary Flashcard Module.<br />
BW8<br />
Click on Tools in the menu at the top of the BW window, then Language Tools, then Vocabulary<br />
Flashcard Module.<br />
The module comes with a few different databases.<br />
• Choose File/Open… from the menu of the flashcard module to explore your options for groups<br />
or words to study.<br />
• Choose Tools/Filter… from the menu of the flashcard module to bring up a window where you<br />
can choose to limit the words you study by (a) chapter of a grammar textbook, (b) frequency in<br />
the Bible, or (c) appearance in a particular portion of Scripture.<br />
Turning off Matthew Henry<br />
You will so get busted if you attempt to use Matthew Henry as a source for a seminary paper. To make<br />
the Matthew Henry commentary disappear, take these steps:<br />
BW7<br />
In the Analysis window pane, choose the Resource Summary Window, then choose Resource<br />
Summary tab, then References tab, then remove the checkmark from Matthew Henry<br />
Commentary.<br />
BW8<br />
In the Analysis window pane, choose References, then remove the checkmark from Matthew<br />
Henry Commentary.<br />
Morphology assistant.<br />
This tool allows you to search a particular pericope, book, or the whole Bible for all occurrences of a<br />
particular part of speech. It is helpful when you are learning a language and want to identify all<br />
indicative verbs, for instance, or identify all uses of the genitive in a text.<br />
Click the Button Bar Setup button. (Selecting the button is the only way I can figure out to<br />
access this tool.)<br />
Choose Morphology Assistant from the available buttons. It looks like the Greek letter alpha.<br />
Click Add. Click Close. The Morphology Assistant button is now on the far right of your top<br />
button bar. You may have to click on the far right side of the button bar to see it.<br />
Before opening the Morphology Assistant, first limit your search to the excerpt of the Bible you want to<br />
search. (See Limit a search to your own custom range, above.) When you have set the limits you want,<br />
open the Morphology Assistant. From the Version drop‐down box, choose the morphologically tagged<br />
Bible version you want to search. Identify what you want to search for. Click Lookup. You have just<br />
executed a search. Your results will appear in the Search window pane in the main BW window.
9<br />
Report generator.<br />
From the Tools menu, choose Report Generator (BW7) or Importing/Exporting Information, then Report<br />
Generator (BW8). Choose the range of verses you want a report on. Choose what kind of information<br />
you want included. For instance, you could include the lexicon entries (either a minimal entry, like that<br />
in the UBS lexicon, or a substantial entry like that from Thayer) for every word in your range of verses.<br />
You can include morphological information. The final report will have (a) the text in all the versions you<br />
chose, (b) each word in the text parsed, if you chose morphological information to be included, and (c)<br />
lexical and other information you checked. After you make your choices, and click Build Report, a new<br />
window appears. You can manipulate text in this window, save it, print it, etc.<br />
Word analysis tab (BW7) or Analysis tab (BW8)<br />
The far right pane of BW is the place to access secondary sources on the Biblical text. If the Analysis tab<br />
is on top, you can see lexical information for any Greek or Hebrew word you mouse over in the Browse<br />
window. The Word Analysis tab will display the translation notes of any English translation. The NET<br />
Bible, with its 60,000 translator notes, is particularly helpful for figuring out curious translation issues.<br />
To stop information in this window from changing when you mouse over a new word, hold down the<br />
Shift key. (See Controlling Analysis Window Changes above.)<br />
Metzger, Textual Commentary on the New Testament, 4 th rev. ed.<br />
This resource comes bundled in <strong>BibleWorks</strong> 7 and is an add‐in to purchase with <strong>BibleWorks</strong> 8 (go figure).<br />
Find Metzger by clicking on Text Criticism from the Resources menu.<br />
Lexicons<br />
BDAG and HALOT are Greek and Hebrew lexicons available for purchase either separately or together.<br />
These are the best resources of their kind, but also pricey. In the Resources menu, you will find the other<br />
lexicons already bundled in <strong>BibleWorks</strong> in the Resources menu. As you start typing in the box at the top<br />
of the lexicon window, the word list at the left changes to help you find the word you are looking for.<br />
• You can also access lexicon for any word by right‐clicking in the browse window and choosing,<br />
“Look up lemma in lexicon browser.”<br />
• To choose the lexicon that appears in the Resources (or Analysis) window, right‐click in that<br />
window and choose “default analysis Greek (or Hebrew) lexicon.”<br />
Grammars<br />
<strong>BibleWorks</strong> 8 now comes with Wallace, Greek Grammar Beyond the Basics: Exegetical Syntax of the New<br />
Testament. The table of contents in this and all the others grammars is hot‐linked. You can click on the<br />
word, “adjective,” and go directly to the discussion of adjectives. When you get to the discussion you<br />
want to read, all the examples are hot‐linked back to the Bible. Find the Grammars in the Resources<br />
menu.<br />
Synopsis window<br />
From the tools menu, choose Synopsis Window (BW7), or Tools, then Viewing the Text, then Synopsis<br />
Window (BW8). A new window with each gospel parallel in a separate pane.
• To change what version is displayed, choose Edit from the File menu, typing over "NAS" with<br />
another version, choosing Save from the File menu, then closing the window and re‐opening it.<br />
In this new window, click the File menu, then Open. You'll see various options for comparing texts. Two<br />
particularly helpful options are here:<br />
Aland (greek)<br />
This opens the gospels parallels in Greek.<br />
otnt<br />
This opens two panes: on one side is a New Testament text. On the other is an Old Testament text that<br />
the editors think you will benefit from reading alongside the NT text.<br />
• To see the Greek New Testament and the Septuagint side by side, choose File, then Edit in the<br />
synopsis window. From there, add BGT as one of your display texts. (BGT is the combined LXX<br />
and Greek NT). Close the window. When you reopen the otnt file, choose BGT from the Display<br />
menu. You’ll see Greek OT and NT texts side by side.<br />
10