Setting Up the NDX800 and the DJ|iO with Traktor LE - Numark
Setting Up the NDX800 and the DJ|iO with Traktor LE - Numark
Setting Up the NDX800 and the DJ|iO with Traktor LE - Numark

Create successful ePaper yourself
Turn your PDF publications into a flip-book with our unique Google optimized e-Paper software.
<strong>Setting</strong> <strong>Up</strong> <strong>the</strong> <strong>NDX800</strong> Controller <strong>the</strong> <strong>DJ|iO</strong> <strong>with</strong> <strong>Traktor</strong> <strong>LE</strong><br />
This guide will walks through setting up one or two <strong>Numark</strong> <strong>NDX800</strong> Controllers <strong>and</strong> a <strong>DJ|iO</strong> USB<br />
audio interface <strong>with</strong> <strong>Traktor</strong> <strong>LE</strong>.<br />
Contents<br />
Install <strong>the</strong> Latest Software <strong>and</strong> <strong>DJ|iO</strong> Drivers ......................................................................... 1<br />
<strong>NDX800</strong> <strong>and</strong> <strong>DJ|iO</strong> Hardware Setup ...................................................................................... 2<br />
<strong>Traktor</strong> <strong>LE</strong> Setup Wizard......................................................................................................... 2<br />
<strong>Traktor</strong> <strong>LE</strong> Audio Setup........................................................................................................... 4<br />
<strong>Traktor</strong> <strong>LE</strong> Controller Manager Setup..................................................................................... 5<br />
Install <strong>the</strong> Latest Software <strong>and</strong> <strong>DJ|iO</strong> Drivers<br />
Note: The <strong>NDX800</strong> Controller is a class-compliant USB MIDI device. No extra drivers are<br />
needed for your Mac or PC to recognize it.<br />
1. Before you begin, make sure you have <strong>the</strong> latest available <strong>DJ|iO</strong> drivers for your system<br />
installed on your computer. Visit www.numark.com/djio.<br />
2. Next, make sure you have <strong>the</strong> latest version of <strong>Traktor</strong> <strong>LE</strong> installed.<br />
If you do not have <strong>Traktor</strong> <strong>LE</strong> installed, download it here: www.numark.com/traktorle<br />
You’ll need <strong>the</strong> authorization code supplied <strong>with</strong> your product to register <strong>the</strong> software.<br />
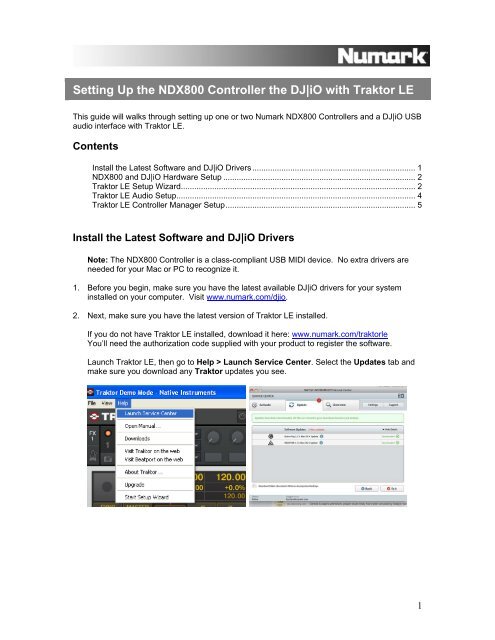
Launch <strong>Traktor</strong> <strong>LE</strong>, <strong>the</strong>n go to Help > Launch Service Center. Select <strong>the</strong> <strong>Up</strong>dates tab <strong>and</strong><br />
make sure you download any <strong>Traktor</strong> updates you see.<br />
1
<strong>NDX800</strong> <strong>and</strong> <strong>DJ|iO</strong> Hardware Setup<br />
3. Connect <strong>the</strong> <strong>NDX800</strong> Controller(s) <strong>and</strong> <strong>DJ|iO</strong> to USB Ports on your computer. Power on <strong>the</strong><br />
<strong>NDX800</strong> Controller(s).<br />
4. On <strong>the</strong> <strong>NDX800</strong> hardware itself:<br />
• Set both <strong>the</strong> left <strong>and</strong> right decks (if you’re using two units) to USB-MIDI source mode.<br />
1. Press SOURCE.<br />
2. Rotate <strong>the</strong> PARAMATER knob until <strong>the</strong> screen reads USB-MIDI.<br />
3. Press <strong>the</strong> PARAMATER knob (like a button) to confirm your selection.<br />
5. On <strong>the</strong> <strong>DJ|iO</strong> hardware:<br />
• Connect OUPUT 1 on <strong>the</strong> <strong>DJ|iO</strong> to INPUT 1 on your DJ Mixer (making sure it’s a line<br />
input).<br />
• Connect OUPUT 2 on <strong>the</strong> <strong>DJ|iO</strong> to INPUT 2 on your DJ Mixer (making sure it’s a line<br />
input).<br />
• Connect your headphones to <strong>the</strong> HEADPHONE OUTPUT on your DJ Mixer (not to <strong>the</strong><br />
<strong>DJ|iO</strong>).<br />
• Operate, mix, <strong>and</strong> Cue your DJ mixer <strong>the</strong> same as if you had two regular CD players<br />
connected.<br />
<strong>Traktor</strong> <strong>LE</strong> Setup Wizard<br />
6. Close, <strong>and</strong> <strong>the</strong>n Re-launch <strong>Traktor</strong> <strong>LE</strong>.<br />
7. Next, in <strong>Traktor</strong> <strong>LE</strong>, go to Help > Start Setup Wizard. In <strong>the</strong> window that opens, you will see<br />
setup <strong>and</strong> device drop down menus.<br />
2
8. In <strong>the</strong> window that opens, next to Are you using a USB/FireWire controller? select Yes,<br />
Then click Next.<br />
9. On <strong>the</strong> next page, set manufacturer to <strong>Numark</strong>.<br />
If you’re using two <strong>NDX800</strong> Controllers, set model to <strong>NDX800</strong> <strong>LE</strong> Dual Deck.<br />
If you’re using a single <strong>NDX800</strong>, set model to <strong>NDX800</strong> <strong>LE</strong> Single Deck.<br />
Click Next.<br />
10. On <strong>the</strong> next page, next to Are you using a NI audio interface? select No. Click Next. The<br />
next page that is displayed will review <strong>the</strong> settings you have chosen. Click Finish.<br />
3
<strong>Traktor</strong> <strong>LE</strong> Audio Setup<br />
11. Next, to go into <strong>the</strong> Preferences menu in <strong>Traktor</strong> <strong>LE</strong> to configure <strong>the</strong> MIDI/Audio settings.<br />
• On Windows, go to File > Preferences.<br />
• On Macintosh, go to <strong>Traktor</strong> > Preferences.<br />
12. Click on Audio Setup.<br />
• Make sure that <strong>Numark</strong> USB Audio Device is selected.<br />
13. To set up your audio input <strong>and</strong> output configuration click on Output Routing on <strong>the</strong> left-h<strong>and</strong><br />
side of <strong>the</strong> preferences window.<br />
• Under Mixing Mode, choose External.<br />
• Under Output Channel A, choose Out 1, <strong>and</strong> Out 2.<br />
• Under Output Channel B, choose Out 3, <strong>and</strong> Out 4.<br />
4
<strong>Traktor</strong> <strong>LE</strong> Controller Manager Setup<br />
14. Click on Controller Manager on <strong>the</strong> left-h<strong>and</strong> side of <strong>the</strong> preferences window.<br />
15. Setup your first <strong>NDX800</strong> to control Deck A in <strong>Traktor</strong> <strong>LE</strong>:<br />
1. Next to Device, select <strong>NDX800</strong> DeckA Controls.<br />
2. Under In-Port, select USB Audio Device.<br />
3. Under Out-Port, select USB Audio Device.<br />
4. If you’re using a single <strong>NDX800</strong>, Next to Device Target, select Focus.<br />
• The <strong>NDX800</strong> will control whichever deck is focused, or selected on <strong>the</strong> screen in<br />
<strong>Traktor</strong> <strong>LE</strong>.<br />
• To change which deck is focused, or selected, you can ei<strong>the</strong>r click <strong>the</strong> RECALL<br />
button in <strong>the</strong> upper-right corner of <strong>the</strong> <strong>NDX800</strong> hardware, or you can click click A or<br />
B on <strong>the</strong> screen in Tracktor <strong>LE</strong><br />
If you’re using two <strong>NDX800</strong> units, Next to Device Target, select Deck A.<br />
16. If you’re using two controllers, setup your second <strong>NDX800</strong> to control Deck B in <strong>Traktor</strong> <strong>LE</strong>:<br />
1. Next to Device, select <strong>NDX800</strong> DeckB Controls.<br />
2. Under In-Port, select USB Audio Device.<br />
3. Under Out-Port, select USB Audio Device (2).<br />
4. Next to Device Target, select Deck B (2).<br />
17. Click Close.<br />
You should be set up <strong>and</strong> ready to go.<br />
5