
Create successful ePaper yourself
Turn your PDF publications into a flip-book with our unique Google optimized e-Paper software.
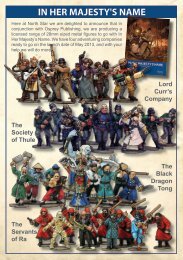
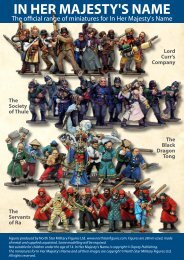
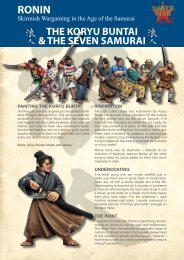
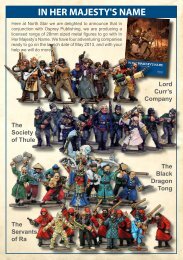
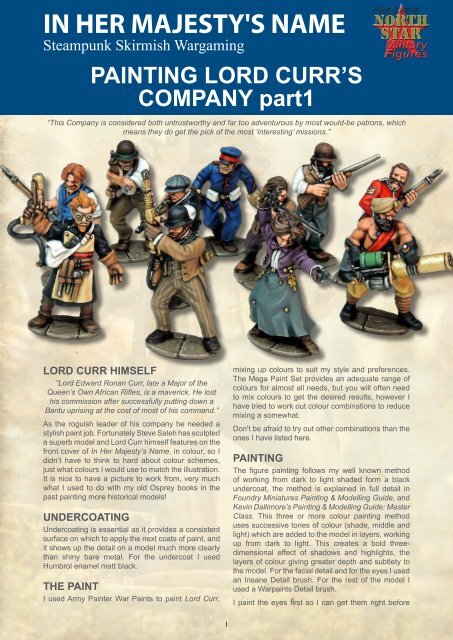
IN HER MAJESTY'S NAME<br />
Steampunk Skirmish Wargaming<br />
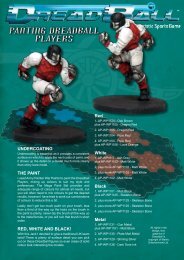
PAINTING <strong>LORD</strong> <strong>CURR</strong>’S<br />
COMPANY part1<br />
“This Company is considered both untrustworthy and far too adventurous by most would-be patrons, which<br />
means they do get the pick of the most ‘interesting’ missions.”<br />
<strong>LORD</strong> <strong>CURR</strong> HIMSELF<br />
“Lord Edward Ronan Curr, late a Major of the<br />
Queen’s Own African Rifles, is a maverick. He lost<br />
his commission after successfully putting down a<br />
Bantu uprising at the cost of most of his command.”<br />
As the roguish leader of his company he needed a<br />
stylish paint job. Fortunately Steve Saleh has sculpted<br />
a superb model and Lord Curr himself features on the<br />
front cover of In Her Majesty’s Name, in colour, so I<br />
didn’t have to think to hard about colour schemes,<br />
just what colours I would use to match the illustration.<br />
It is nice to have a picture to work from, very much<br />
what I used to do with my old Osprey books in the<br />
past painting more historical models!<br />
UNDERCOATING<br />
Undercoating is essential as it provides a consistent<br />
surface on which to apply the next coats of paint, and<br />
it shows up the detail on a model much more clearly<br />
than shiny bare metal. For the undercoat I used<br />
Humbrol enamel matt black.<br />
THE PAINT<br />
I used Army Painter War Paints to paint Lord Curr,<br />
mixing up colours to suit my style and preferences.<br />
The Mega Paint Set provides an adequate range of<br />
colours for almost all needs, but you will often need<br />
to mix colours to get the desired results, however I<br />
have tried to work out colour combinations to reduce<br />
mixing a somewhat.<br />
Don't be afraid to try out other combinations than the<br />
ones I have listed here.<br />
PAINTING<br />
The figure painting follows my well known method<br />
of working from dark to light shaded form a black<br />
undercoat, the method is explained in full detail in<br />
Foundry Miniatures Painting & Modelling Guide, and<br />
Kevin Dallimore’s Painting & Modelling Guide: Master<br />
Class. This three or more colour painting method<br />
uses successive tones of colour (shade, middle and<br />
light) which are added to the model in layers, working<br />
up from dark to light. This creates a bold threedimensional<br />
effect of shadows and highlights, the<br />
layers of colour giving greater depth and subtlety to<br />
the model. For the facial detail and for the eyes I used<br />
an Insane Detail brush. For the rest of the model I<br />
used a Warpaints Detail brush.<br />
I paint the eyes first so I can get them right before<br />
1
doing the rest of the model, as if the eyes are not<br />
good it will spoil the rest of the paint job! Then I paint<br />
the flesh, and then the rest of the model.<br />
FLESH 1<br />
Lastly don’t get too much paint on your brush, less<br />
than a third of the way up the hairs on the brush in<br />
the paint is plenty, never dip the brush all the way up<br />
to the metal ferrule, or you will ruin that brush in short<br />
order.<br />
FLESH 2<br />
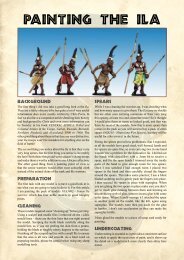
<strong>LORD</strong> <strong>CURR</strong><br />
EYES & FLESH<br />
While the model is very nicely the done, the positioning<br />
of his Arc Rifle makes painting the facial detail a might<br />
tricky, as you never get a full straight-on front view. So<br />
you have to work around it, but all the detail is there,<br />
just slightly harder to access. I very much treated his<br />
face as two halves. Even if you don’t get both halves<br />
to quite match it doesn’t matter as you can’t see both<br />
sides together. Also Lord Curr is wearing gloves so<br />
no flesh hands to paint.<br />
EYES<br />
1. His whites are AP-WP1102 - Matt White<br />
(no prizes)<br />
2. The irises are AP-WP1116 - Deep Blue<br />
FLESH<br />
1. AP-WP1122 - Fur Brown<br />
2. AP-WP1127 - Tanned Flesh<br />
3. AP-WP1126 - Barbarian Flesh<br />
4. AP-WP1126 - Barbarian Flesh<br />
plus AP-WP1102 - Matt White<br />
5. Plus more AP-WP1102 - Matt White<br />
FLESH 3<br />
FLESH 5<br />
FLESH 4<br />
EYES<br />
WHITE<br />
2
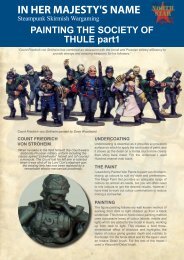
WHITE<br />
The next step was the<br />
white, very much just<br />
collar and cuffs. I did<br />
these first as they are<br />
very small areas and<br />
would be more difficult<br />
to do at the end.<br />
Painting them in first<br />
allows you to correct<br />
any mistakes by painting over the slips with black AP-<br />
WP1101 - Matt Black. And then you can paint up to<br />
the white with the larger area colours.<br />
WHITE<br />
3. AP-WP1102 - Matt White + AP-WP1117 -<br />
Ash Grey<br />
4. + more AP-WP1102 - Matt White<br />
5. + more AP-WP1102 - Matt White<br />
6. pure AP-WP1102 - Matt White<br />
HAIR & BEARD<br />
Nice and defined, so no<br />
trouble here. I left a lot<br />
of the shade showing as<br />
I wanted his beard to be<br />
nice and dark.<br />
HAIR & BEARD<br />
1. AP-WP1124 - Oak Brown<br />
2. AP-WP1124 - Oak Brown + AP-WP1106 -<br />
Lava Orange & AP-WP1121 - Desert Yellow<br />
3. + AP-WP1125 - Skeleton Bone<br />
4. + more AP-WP1125 - Skeleton Bone<br />
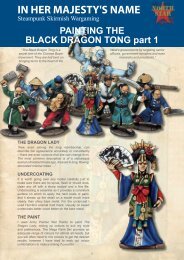
MOST OF THE REST<br />
CRAVAT<br />
As with the face his cravat is a little hard to reach,<br />
tucked away behind that very large gun!<br />
1. AP-WP1112 - Angel Green<br />
2. AP-WP1112 - Angel Green + AP-WP1109 -<br />
Goblin Green<br />
3. + more AP-WP1109 - Goblin Green<br />
4. pure AP-WP1109 - Goblin Green<br />
2. + AP-WP1124 - Oak Brown<br />
3. + more AP-WP1124 - Oak Brown<br />
4. and finally pure AP-WP1124 - Oak Brown<br />
TROUSERS & WAISTCOAT<br />
Not so straightforward. In the illustration Curr’s<br />
trousers and waistcoat are definitely striped, tastefully<br />
in dark brown over light brown. Stripes like these are<br />
never easy, the best way is to paint the trousers in<br />
the solid under-colour shading up from dark to light<br />
as normal, then paint in the stripes, starting in the<br />
most visible places and working around the leg to the<br />
inside leg. Don’t worry if they don’t quite work all the<br />
way around as again, like the face, you can’t see all<br />
around the leg all at once. In this case the stripes are<br />
done in the shade colour of the trousers. Try to paint<br />
a stripe all in one brush stroke, in a confident single<br />
brush stroke, if you need to break do it at a change of<br />
direction or fold or crease. I corrected any mistakes<br />
(and there were a few) in my stripes with the highlight<br />
colour of the trousers.<br />
1. AP-WP1101 - Matt Black mixed with AP-<br />
WP1120 - Monster Brown (which was also<br />
the stripe colour, so save some!)<br />
2. pure AP-WP1120 - Monster Brown<br />
3. AP-WP1120 - Monster Brown + AP-WP1102<br />
- Matt White<br />
4. then + more AP-WP1102 - Matt White<br />
JACKET<br />
More brown, but a different brown. His long tailcoat<br />
has smooth areas, paint them without folds or extra<br />
creases to give a nice smart well kept look.<br />
1. AP-WP1101 - Matt Black mixed with AP-<br />
WP1123 - Leather Brown<br />
MOST OF THE REST<br />
SHOES<br />
Very straightforward, I wanted shoes nice and dark<br />
like the illustration.<br />
1. AP-WP1101 - Matt Black mixed with AP-<br />
WP1124 - Oak Brown<br />
3
MOST OF THE REST<br />
THE REST<br />
2. pure AP-WP1123 - Leather Brown<br />
3. AP-WP1123 - Leather Brown + AP-WP1125<br />
- Skeleton Bone<br />
4. + more AP-WP1125 - Skeleton Bone<br />
GLOVES<br />
And still more brown! The gloves are very fine soft<br />
leather; so fine you could even paint them in flesh<br />
colours if you would rather.<br />
1. AP-WP1124 - Oak Brown<br />
2. + AP-WP1125 - Skeleton Bone<br />
3. + more AP-WP1125 - Skeleton Bone<br />
4. and lastly more AP-WP1125 - Skeleton<br />
Bone<br />
THE BLACK BOWLER HAT, RIFLE<br />
PIPE WORK & STRAP<br />
Make sure all the black areas are really black,<br />
sometimes the black undercoat I use has not given<br />
quite a dense enough coat, or there are some misses,<br />
so I recoat them in pure AP-WP1101 - Matt Black,<br />
before commencing the shading/highlighting.<br />
1. AP-WP1101 - Matt Black mixed with AP-<br />
WP1125 - Skeleton Bone<br />
2. + AP-WP1125 - Skeleton Bone<br />
3. + more AP-WP1125 - Skeleton Bone<br />
4. and lastly more AP-WP1125 - Skeleton<br />
Bone<br />
THE REST<br />
THE ELECTRIC ARC RIFLE<br />
The Arc Rifle is really not too dissimilar to painting<br />
and normal rifle, it has a lock, stock and a (very long)<br />
barrel, even if they are not quite conventional, it also<br />
has an electric arc generator carried on a strap.<br />
Stock<br />
Here I have painted on a wood grain effect on the<br />
stock.<br />
1. AP-WP1124 - Oak Brown mixed with AP-<br />
WP1122 - Fur Brown<br />
2. + AP-WP1121 - Desert Yellow<br />
3. + more AP-WP1121 - Desert Yellow<br />
4. an lastly + AP-WP1102 - Matt White<br />
THE REST<br />
4
The Metalwork<br />
There is a lot of metal on the Arc Rifle, and lots of<br />
nice detail bits to paint. The dials of the arc generator<br />
are a bit fiddly but do repay careful painting.<br />
Steel<br />
1. AP-WP1131 - Gun Metal plus AP-WP1101 -<br />
Matt Black<br />
2. AP-WP1130 - Plate Mail Metal<br />
3. AP-WP1129 - Shining Silver<br />
4. AP-WP1136 - Dark Tone Ink<br />
Brass<br />
1. AP-WP1133 - Weapon Bronze<br />
2. Foundry PP036C – Shiny<br />
3. Foundry PP044C - Burning Gold<br />
THE BASE<br />
For these models I decided to do a very minimal<br />
base. For several reasons, firstly the models are not<br />
really intended to play with so don’t need to be very<br />
stable on the tabletop, also choosing one particular<br />
style of base might not be suitable for all the different<br />
environments I wanted to take pictures of them in, and<br />
I wanted to have a go at a fake stone paving trompe<br />
l’oeil effect. The key to the trompe l’oeil effect is to<br />
decide where the light is coming from and highlight<br />
accordingly. The final highlight goes on just the very<br />
edge of the fake stones on the paving.<br />
<strong>LORD</strong> <strong>CURR</strong> FINISHED<br />
VARNISH<br />
Make sure all the paint on the model is thoroughly dry<br />
before commencing varnishing.<br />
THE BASE<br />
5
Gloss<br />
The models were then given a coat of Humbrol<br />
polyurethane gloss varnish and set aside for 24 hours<br />
to dry completely. Be careful not to let the varnish<br />
pool, especially under the horse and on the feet. You<br />
don’t need a very thick coat of varnish.<br />
Matt<br />
Then they were given two coats of Anti-Shine Matt<br />
Varnish. Be even more careful when painting on the<br />
matt varnish. When applying the matt, brush it out<br />
well from any nooks and crannies where it is likely to<br />
collect and pool.<br />
A BIGGER BASE<br />
I would recommend a bigger base if you are going to<br />
game with your models. The small bases are perfect<br />
for photography, but your models will readily fall over<br />
if you jog the table or are less than very careful how<br />
you place them.<br />
<strong>LORD</strong> <strong>CURR</strong> FINISHED<br />
Try something like this, using a 25mm circular plastic<br />
base from Renedra. Use superglue to stick the<br />
models in place, blowing over them to prevent the<br />
glue whitening off on the model. Then infill around the<br />
model base with household filler, then glue on some<br />
sharp sand with PVA glue.<br />
When the sand was dried hard paint the whole base<br />
with.<br />
1. AP-WP1123 - Leather Brown.<br />
2. Then dry-brush on AP-WP1121 - Desert<br />
Yellow quite heavily.<br />
3. Then dry-brush on a layer of AP-WP1125 -<br />
Skeleton Bone.<br />
4. And finally a light dry-brush of AP-WP1102 -<br />
Matt White.<br />
Then add some flora. Some tufts of The Army Painter<br />
- Battlefields AP-BF4127 - Swamp Tuft, or AP-<br />
BF4131 - Winter Tufts.<br />
6
Below. Lord Edward Ronan Curr, strikes a dramatic pose.<br />
7