PAINTING THE ILA.pdf
PAINTING THE ILA.pdf
PAINTING THE ILA.pdf

You also want an ePaper? Increase the reach of your titles
YUMPU automatically turns print PDFs into web optimized ePapers that Google loves.
<strong>PAINTING</strong> <strong>THE</strong> <strong>ILA</strong><br />
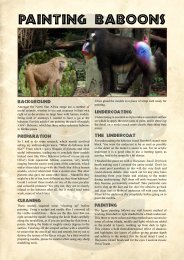
BACKGROUND<br />
The first thing I did was take a good long look at the Ila.<br />
They are a fairly obscure tribe but quite a lot of very useful<br />
information does exist, mostly written by Chris Peers. In<br />
fact we also have a companion article detailing their history<br />
and background by Chris and even more information can<br />
be foundry in his book CENTRAL AFRICA, Tribal and<br />
Colonial Armies in the Congo, Gabon, Rwanda, Burundi,<br />
Northern Rhodesia and Nyasaland, 1800 to 1900. The<br />
other good thing about them is that they are very distinctive;<br />
your Ila troops won’t be mistaken for anything else on the<br />
field of battle!<br />
The second thing you notice about the Ila is that they carry<br />
very long spears, but the first thing you notice is inevitably<br />
the hair! Both these things add up to unique looking troops<br />
and make them a worthy addition to any African collection.<br />
The other good thing from a painting point of view is<br />
that the senior warriors would often wear colourful cloth<br />
instead of the animal skins of the rank and file warriors.<br />
PREPARATION<br />
The first task with any model is to have a good look at it,<br />
see what you are going to have to do to it. For this article<br />
I am painting the pack of models NSA3002 - Senior Ila<br />
warrior, which has four noble models in good haughty<br />
poses.<br />
Cleaning<br />
These models required some “cleaning up” before painting.<br />
Using a scalpel and needle files I removed all the visible<br />
mould lines – these are the thin lines that run right around<br />
the model. Scraping the knife blade carefully along the<br />
mould line, as if you are peeling the skin from a potato,<br />
holding the blade at roughly ninety degrees to the surface.<br />
Finishing off the scraped surface with a small file to ensure<br />
that the area is all nice and smooth. As a final word on<br />
preparing models, please be careful when using any sharp<br />
modelling tools.<br />
Spears<br />
While I was cleaning the warriors up, I was deciding what<br />
and how many spears to give them. The Ila carry no shields<br />
but are often seen carrying numerous of their very long<br />
thin spears, at least two and sometime more! So it thought<br />
I would give them as many as looked good, and that was<br />
three for most of the models. Now that is more spears than<br />
comes in the pack so you will need to buy a pack of extra<br />
spears (NSS101 - 50mm long Wire Spears), but they will be<br />
useful for other project in the future.<br />
Fitting the spears proved less problematic that I expected,<br />
as all the models have good sized, well formed, hands and<br />
the spears are quite fine, so even carrying two in one hand<br />
wouldn’t be a problem for the diminutive Ila. I drilled out<br />
the hands with closed fists with a .5mm bit to receive a<br />
spear, and for the open hands I trimmed away the inside<br />
palm of the hand to give enough room for two spears.<br />
Once I was satisfied I had enough room I placed two<br />
spears in the hand and then carefully closed the fingers<br />
around the spears. This takes some practice; I use a blunt<br />
bladed sculpting tool to gently push the fingers into place.<br />
I then secured the spears in place with superglue. When<br />
you are gluing the two spears in place make sure you don’t<br />
get to much glue running between them and forming an<br />
unconvincing web of glue, remove excess glue with some<br />
toilet tissue. Where I could manage it I attached the spear<br />
to another point on the model, like the kilt, again using<br />
superglue. The models were then put aside for the glue<br />
to harden; I don’t use accelerators as they can make the<br />
superglue brittle.<br />
I then glued the models to a piece of scrap card ready for<br />
painting.<br />
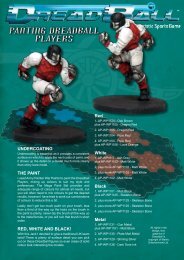
UNDERCOATING<br />
Undercoating is essential as it provides a consistent surface<br />
on which to apply the next coats of paint, and it shows up<br />
the detail on a model much more clearly than shiny bare<br />
metal.<br />
1
The Undercoat<br />
For undercoating the Ila I used Humbrol enamel matt<br />
black. You want the undercoat to be as matt as possible<br />
so the detail on the model is easier to see. For an acrylic<br />
undercoat it is a good idea to use a matting agent, as<br />
acrylics tend to be naturally a bit shinier.<br />
I brushed the paint on with a Warpaints Small Drybrush<br />
brush making sure I covered the entire model. Don’t let<br />
the paint pool anywhere as this will dry very thick and<br />
could obscure details. Also watch out for any stray hairs<br />
detaching from your brush and sticking to the model<br />
during undercoating. Pull them off with tweezers before<br />
they become permanently attached! Take particular care<br />
not to clog up the face and similar fine detail areas and I<br />
also made sure the undercoat didn’t form a web of paint<br />
between the spears, don’t be afraid to go back and clear<br />
runs or blobs of undercoat off with your brush. I then let<br />
the undercoat dry completely before going on to paint the<br />
models.<br />
<strong>PAINTING</strong><br />
The figure painting follows my well known method of<br />
working from dark to light shaded form a black undercoat,<br />
the method is explained in full detail in Foundry Miniatures<br />
Painting & Modelling Guide, and Kevin Dallimore’s<br />
Painting & Modelling Guide: Master Class. This three<br />
or more colour painting method uses successive tones of<br />
colour (shade, middle and light) which are added to the<br />
model in layers, working up from dark to light. This creates<br />
a bold three-dimensional effect of shadows and highlights,<br />
the layers of colour giving greater depth and subtlety to the<br />
model. It may seem counterintuitive if you haven’t painted<br />
this way before, but bear with me.<br />
<strong>THE</strong> PAINT<br />
I used Army Painter paints to paint the Ila, from the<br />
Warpaints Mega Paint Set, mixing up colours to suit my<br />
style and preferences. The Mega Paint Set provides and<br />
adequate range of colours for almost all needs, but you<br />
will often need to mix colours to get the desired results,<br />
however I have tried to work our combinations of colours<br />
to reduce this a bit.<br />
Below. Onulla<br />
cortin henisl<br />
dolesenisit accum<br />
vel do esequismod<br />
The amount of paint you squeeze out to use is harder to<br />
judge, I usually mix up more than I need, which better than<br />
not having enough, I’m afraid I have grown a bit lazy with<br />
using pre-mixed paint systems.<br />
Lastly don’t get too much paint on your brush, less than<br />
a third of the way up the hairs on the brush in the paint<br />
is plenty, never dip the brush all the way up to the metal<br />
ferrule, or you will ruin that brush in short order.<br />
<strong>THE</strong> EYES<br />
These models have well defined eyes a swell as great faces<br />
and so are ideal if you fancy having a go at eyes. I paint the<br />
eyes first so I can get them right before doing the rest of the<br />
model, as if the eyes are not good it will spoil the rest of<br />
the paint job! If you are not confident about painting eyes<br />
leave them unpainted, it will look fine.<br />
The whites of the eyes are in Matt White, no prizes, I<br />
painted the in with a Warpaints Insane Detail brush.<br />
Follow the detail on the model, and don’t worry if you<br />
don’t get it quite right because you can always neaten up<br />
the white with some Matt Black. Then I painted in the iris,<br />
just a dot using the same brush, with Oak Brown. Make<br />
sure the position of the iris match, as you can see I have<br />
one warrior looking to the side and the rest looking straight<br />
ahead, but above all, try not to make them crossed eyed!<br />
Below. Lenis eros adignis etumsan heniamet,<br />
consequisl utpat.<br />
2
<strong>THE</strong> FLESH<br />
Main Colour<br />
Next to highlight the flesh I used Oak Brown as it comes<br />
with a tiny bit acrylic thinner and water added, it is quite<br />
thick, so you will need to thin it before you use it to allow<br />
it to flow freely from your brush. Again paint the face first,<br />
then the hands and feet, then the rest. All the time try to<br />
leave a little of the shade colour showing in the folds and<br />
creases. The nose for example is really just a stripe with<br />
two dots either side at the bottom. Also try to define the<br />
main muscle groups, chest, biceps, and areas like shoulder<br />
blades and collarbone. With so much flesh on show it<br />
is worth doing a little more work to really bring out the<br />
excellent physique of the models. Again I used the Detail<br />
brush, but the Insane Detail brush would be fine too.<br />
Above. Onulla cortin henisl dolesenisit accum vel do<br />
esequismod endreet lorem quat in ut laorper si.<br />
Shade<br />
The most important part of the warriors, so no pressure<br />
then! Getting a good colour black African flesh is a bit<br />
tricky, but Oak Brown looked promising so I gave it a go.<br />
As I work from the dark shade up, I needed a shade version<br />
of Oak Brown to start with; I mixed this up from Oak<br />
Brown and a little Matt Black. Before painting I thinned<br />
the paint slightly with an acrylic thinner, with also help to<br />
release any trapped air bubbles in the paint. I painted this<br />
all over the flesh areas, taking extra care around the eyes,<br />
and leaving a tiny bit of black showing between the fingers<br />
and toes and between lips, I always do all the hard bits first<br />
then fill in the rest . I applied this with a Warpaints Detail<br />
brush.<br />
Above & below.<br />
Onulla cortin henisl<br />
dolesenisit accum vel<br />
do esequismod endreet<br />
lorem quat in ut laorper<br />
Above. Onulla<br />
cortin henisl<br />
dolesenisit accum<br />
vel do esequismod<br />
endreet lorem<br />
quat in ut laorper<br />
si.<br />
3
Highlights<br />
Then the highlights, however, you could leave the flesh<br />
without doing any more work, and that would look fine,<br />
but with darker flesh it is nice to make it really zing, so I<br />
like to do a couple of highlights on the basic colour. All<br />
applied using the Detail brush.<br />
The colour for the first highlight is a mix of Oak Brown<br />
and Tanned Flesh, which gives a nice warm lighter brown.<br />
This goes over the first two coats forming a highlight,<br />
paying particular attention to the nose and to delineate<br />
the fingers, knuckles and toes. Leave some of the first two<br />
coats showing around the edges and in the musculature.<br />
As you can see the facial detail is clearly delineated by<br />
this highlight.<br />
Again the next stages are optional. For this final extra<br />
highlight I mixed in more Tanned Flesh to the highlight<br />
mix and applied it to just the very highest points like the<br />
nose, knuckles, cheekbones, chest and so forth. And the<br />
final touch was painting the lip in with a mix of the final<br />
highlight colour with a touch of Pure Red, on the bottom<br />
lip only.<br />
Below. Lenis eros adignis etumsan heniamet,<br />
consequisl utpat. Osto corero del iustrud mod et verit<br />
Above & below. Onulla cortin<br />
henisl dolesenisit accum vel<br />
do esequismod endreet lorem<br />
quat in ut laorper si.<br />
4
<strong>THE</strong> WHITE BITS<br />
On the Ila, these consist of; the head cloth, the<br />
shell ornament, known as an impande, worn on the front<br />
of the head and on the chest and war-paint.<br />
More shade<br />
Once you have done the shade you can paint on the<br />
highlights. The second colour for the white is a mix of the<br />
shade with more Matt White added in. then painted on over<br />
the shade, leaving some of it showing, in a similar way to<br />
the flesh colours.<br />
White<br />
The last highlight with white is err… Matt White, but<br />
mixed with some an acrylic thinner and a tiny amount of<br />
water to get the paint to flow easily. Flow of the paint is<br />
the key with pure white; it is a matter of practice, as with<br />
all painting.<br />
War-Paint Designs<br />
The pattern for the war-paint, I must admit, I copied and<br />
embellished from the painted models that already appear on<br />
the North Star site, and following Chris Peer’s description,<br />
“Warriors painted their faces and bodies white for war,<br />
often in varied patterns of lines and dots”. But you could<br />
do anything along those lines or none.<br />
Above & below. Onulla cortin henisl dolesenisit accum<br />
vel do esequismod endreet lorem quat in ut laorper si.<br />
Shade<br />
Using only three shades for this colour I started with a<br />
mix of Matt White and Ash Grey as the shade colour for<br />
the white. Applied with the Insane Detail brush as the<br />
white areas are quite small, and the war paint is a freehand<br />
pattern which requires a steady hand. Getting this first coat<br />
of shade really is the key, if you can get this layer neat and<br />
tidy, the subsequent layers will be a breeze, and actually<br />
become enjoyable!<br />
Above & below. Onulla cortin<br />
henisl dolesenisit accum vel<br />
do esequismod endreet lorem<br />
quat in ut laorper si.<br />
5
LEA<strong>THE</strong>RWORK<br />
Not a huge amount, mostly the hair bands and necklaces,<br />
and one of the warrior’s kilts. For this I used a mix<br />
of Leather Brown and Matt Black for the shade coat,<br />
followed by Leather Brown, the a mix of Leather Brown<br />
and Monster Brown for the first highlight and then adding<br />
a drop of Skeleton Bone for a final highlight.<br />
KILTS<br />
The kilts for the senior warriors also give plenty of scope<br />
for entertainment, Chris says “… hide loincloths and cloth<br />
blankets were coming into widespread use by the late 19th<br />
century. Chiefs would substitute lion or leopard skins for<br />
the normal brown cow hide.” Again taking inspiration<br />
from those already painted on the North Star site I did two<br />
in plain tan or brown cow hide (one I did when I was doing<br />
the other leatherwork), and two in patterned coloured<br />
cloth. I got further ideas for patterns from an old book on<br />
African designs and went with what looked right! I claim<br />
no historical accuracy here.<br />
The kilts are so nicely sculpted, flowing around the body<br />
and hanging convincingly, with natural folds and gathers<br />
they were a real joy to paint, no trouble deciding where to<br />
paint the highlights on these, follow the sculpting!<br />
The Green and Yellow Kilt<br />
I wanted a turquoise kilt with yellow patterns, it turned our<br />
more green that I meant but it still works ok I think and<br />
looks suitably African. The main kilt colour is a mix of<br />
Wolf Grey and Angel Green for the shade coat, then more<br />
Wolf Grey added for the main colour (as in said before<br />
follow the sculpted lines of the kilt and you won’t go far<br />
wrong!) and then a little Matt White added to that mix for<br />
the highlight, however before this highlight I painted on<br />
the decoration.<br />
Above & below.<br />
Onulla cortin<br />
henisl dolesenisit<br />
accum vel do<br />
esequismod<br />
endreet lorem<br />
quat in ut laorper<br />
si.<br />
First I painted the double line border, then the swirly pattern<br />
down the front of the kilt. The decoration was started in<br />
Desert Yellow as the shade colour. I blocked out the whole<br />
design, and then neatened it up with the Angel Green and<br />
Wolf Grey mix, which I had saved for this very purpose.<br />
The Desert Yellow gives a good base for the next shade<br />
which was a mix of Desert Yellow and Daemonic Yellow,<br />
and then pure Daemonic Yellow. Daemonic Yellow is not<br />
the strongest colour and needs the support of a good strong<br />
under colour like Desert Yellow. Lastly I added some Matt<br />
White to the Daemonic Yellow for a final highlight.<br />
Right. Onulla<br />
cortin henisl<br />
dolesenisit accum<br />
vel do esequismod<br />
endreet lorem<br />
quat in ut laorper<br />
si. Tum vel<br />
eugiatum acilit,<br />
velit<br />
Above. Onulla<br />
cortin henisl<br />
dolesenisit<br />
accum vel do<br />
esequismod<br />
endreet lorem<br />
quat in ut<br />
laorper si.<br />
6
The Red and Green Kilt<br />
The colours for this kilt started with a mix of Oak Brown<br />
and the lovely Dragon Red, followed by that mix with<br />
more Dragon Red in it, then pure Dragon Red (with the<br />
addition of some acrylic thinners) and a final highlight of<br />
Dragon Red mixed with a bit of Daemonic Yellow.<br />
The stripes are in Angel Green, followed by Angel Green<br />
mixed with Army Green and a final highlight of Angel<br />
Green mixed with Army Green with a tiny bit of Daemonic<br />
Yellow added.<br />
There is no magic to the stripes, and even pressure on<br />
the Insane Detail brush, and try to do the first coat of the<br />
stripes in one fluid motion, again you can always neaten<br />
them up.<br />
The Other Brown Kilt<br />
Very straightforward this one; shade layer, Oak Brown<br />
mixed with Desert Yellow, adding more Desert Yellow for<br />
the next coat, then pure Desert Yellow and a final highlight<br />
of Desert Yellow mixed with a drop of Matt White.<br />
<strong>THE</strong> REST OF<br />
<strong>THE</strong> MODEL<br />
FEA<strong>THE</strong>RS<br />
I wanted the feathers to be quite vibrant as Chris states “the<br />
long grey plumes of the crane were popular for decoration…<br />
blue jay feathers were the sign of a particularly brave<br />
man, while one who had killed an enemy warrior or a lion<br />
or leopard was entitled to wear the metallic green, blue<br />
or yellow tail feathers of the touraco.” (The turacos are<br />
brightly coloured birds, usually blue, green or purple.)<br />
Green<br />
feather<br />
Angel Green, then<br />
Greenskin, then<br />
Greenskin mixed<br />
with Daemonic<br />
Yellow, and<br />
then Greenskin<br />
mixed with more<br />
Daemonic Yellow.<br />
Above & below. Onulla cortin henisl dolesenisit accum<br />
vel do esequismod endreet lorem quat in ut laorper si.<br />
Grey<br />
feather<br />
Uniform Grey,<br />
then Uniform Grey<br />
mixed with Matt<br />
White, and then<br />
Uniform Grey<br />
mixed with more<br />
Matt White.<br />
Blue<br />
feather<br />
Crystal Blue, then<br />
Crystal Blue mixed<br />
with Matt White,<br />
and then Crystal<br />
Blue mixed with<br />
more Matt White.<br />
Yellow<br />
feather<br />
Desert Yellow, then<br />
Daemonic Yellow,<br />
then Daemonic<br />
Yellow mixed Matt<br />
White.<br />
7
Above. Onulla cortin henisl dolesenisit accum vel do esequismod endreet lorem quat in ut laorper si. Tum vel<br />
eugiatum acilit, velit<br />
BANGLES<br />
“…ivory or copper bangles could be worn around the<br />
wrists and ankles”<br />
SPEARS<br />
“They produced a variety of spear types, designed for<br />
different tasks in hunting and warfare.”<br />
Ivory Bangles<br />
Desert Yellow, then Desert Yellow mixed with Skeleton<br />
Bone, and then pure Skeleton Bone and final highlight of<br />
Skeleton Bone mixed with Matt White.<br />
Metal Bangles<br />
Weapon Bronze, then Greedy Gold, then Greedy Gold<br />
mixed with Shining Silver and a final very tiny highlight<br />
of pure Shining Silver. And then I gave them a wash with<br />
Strong Tone Ink.<br />
Iron tip<br />
Gun Metal, then Plate Mail Metal, and then Shining Silver<br />
lastly a wash with Strong Tone Ink.<br />
Shaft<br />
Oak Brown mixed with Leather Brown, and then Monster<br />
Brown mixed with Skeleton Bone, then Matt White added<br />
to that, and then a final highlight with more Matt White<br />
added to the mix.<br />
8
HAIR<br />
“The most distinctive feature of Ila warriors was the<br />
extraordinary hair cone or “isusu”…”<br />
Matt Black mixed with a small amount of Uniform Grey,<br />
and then Matt Black mixed with more Uniform Grey, and<br />
lastly Matt Black mixed with even more Uniform Grey.<br />
The black feather was also painted in this colour<br />
combination.<br />
VARNISH<br />
Make sure all the paint on the model is thoroughly dry<br />
before commencing varnishing.<br />
Below. Lenis eros adignis etumsan heniamet,<br />
consequisl utpat. Osto corero del iustrud mod et verit<br />
Gloss<br />
The models were then given a coat of Humbrol polyurethane<br />
gloss varnish and set aside for 24 hours to dry completely.<br />
Be careful not to let the varnish pool, especially under the<br />
kilts and between the spears. You don’t need a very thick<br />
coat of varnish.<br />
Matt<br />
Then they were given two coats of Anti-Shine Matt Varnish.<br />
Be even more careful when painting on the matt varnish.<br />
When applying the matt, brush it out well from any nooks<br />
and crannies where it is likely to collect and pool.<br />
BASING<br />
Now normally I would base up the models to finish them<br />
off, but firstly I have gone on long enough and more<br />
importantly that is going to be another article later!<br />
9