
You also want an ePaper? Increase the reach of your titles
YUMPU automatically turns print PDFs into web optimized ePapers that Google loves.
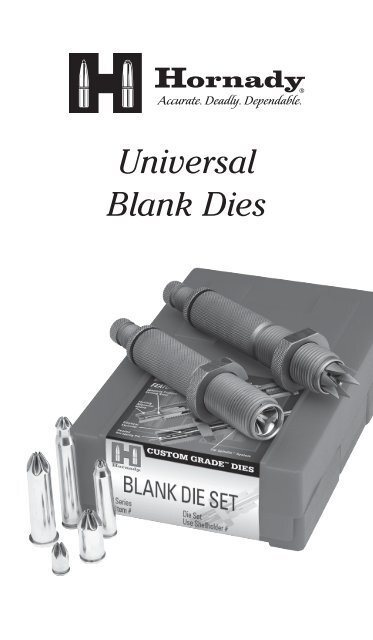
<strong>Universal</strong><br />
<strong>Blank</strong> <strong>Dies</strong>
Instructions<br />
These dies are designed to allow shooters<br />
the opportunity to manufacture/load blank<br />
rounds for use in activities centered around<br />
this type of sport; i.e. Cowboy Action<br />
Shooting, Honor Guard, Reenactments, dog<br />
training, etc.<br />
See drawing on opposite side for reference.<br />
1. Start with approximately 2" of the<br />
adjusting screw showing above the<br />
adjusting screw lock ring of the Crimp<br />
Start Die.<br />
2. Place cartridge case into shell holder<br />
and run the ram to the top of the stroke<br />
of the press.<br />
3. With the ram at the top of the stroke,<br />
thread the Crimp Start Die into the<br />
press until one of the following<br />
happens:<br />
A. The Crimp Start Die makes contact<br />
with the cartridge case (some rifle<br />
cases).
B. The Crimp Start Die contacts the<br />
shell holder, in which case, un-thread<br />
die one-half to one full turn (most<br />
pistol cases).<br />
4. At this point, the crimp die lock ring<br />
can be threaded against the press and<br />
locked.<br />
5. If the crimp start sleeve has not<br />
made contact with the cartridge case<br />
(instance 3B), thread the adjusting<br />
screw into the die until contact is made.<br />
6. Obtain a “star shaped” crimp by<br />
lowering the ram of the press and<br />
threading the adjusting screw into<br />
the die. Raise the ram to the top of the<br />
stroke again. Continue this step until<br />
the serrations in the cartridge case<br />
come nearly to a point or the mouth of<br />
the cartridge case is closed.<br />
The Crimp Start Die is now set. In<br />
some instances, the crimp start die will<br />
sufficiently close the cartridge case to<br />
form the blank round and no finish crimp<br />
will be necessary.
7. If a finish crimp is necessary to close<br />
the case mouth, remove Crimp Start Die<br />
from the press continue with step 8.<br />
8. Repeat steps 1-6 using the crimped<br />
cartridge case with the Finish Crimp<br />
Die until cartridge case mouth is closed<br />
enough for the desired blank round.<br />
Please Note: Adjustments can be made<br />
to the amount of crimp start and finish to<br />
obtain the ideal round. For example, if too<br />
much of either start or finish crimp force is<br />
applied to the cartridge case, it may bulge<br />
and not chamber properly.
CRIMP START DIE<br />
CRIMP FINISH DIE<br />
2"<br />
ADJUSTING<br />
SCREW<br />
ADJUSTING<br />
SCREW LOCK<br />
RING<br />
SURE LOCK<br />
LOCK RING<br />
CRIMP<br />
START SEEVE<br />
CRIMP FINISH SEEVE
P.O. Box 1848 • Grand Island, NE 68802-1848<br />
(308) 382-1390 • www.hornady.com