IL-60 ENG - Mica Elektro OY Ltd
IL-60 ENG - Mica Elektro OY Ltd
IL-60 ENG - Mica Elektro OY Ltd

Create successful ePaper yourself
Turn your PDF publications into a flip-book with our unique Google optimized e-Paper software.
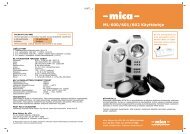
USING LAMP<br />
Electronics controlled by the push switch are used to turn the lamp on, to switch the illumination<br />
capacity between half and maximum power and to turn the lamp off. The series of LEDs under<br />
the lamp’s handle show the battery charge (not included in models <strong>IL</strong>-<strong>60</strong>EM and <strong>IL</strong>-<strong>60</strong>NiMH EM).<br />
When only one of the LEDs is on and/or the lamp begins to flash approximately every 15 seconds,<br />
the battery is almost empty. Thus, control electronics will automatically turn off the lamp prior<br />
to deep discharge of the battery. In an emergency, the lamp can still be used for a short period<br />
of time. However, if you use the lamp at that time, its service life will be reduced. Operation time<br />
of a fully loaded battery depends on the bulb and the illumination efficiency used. Overall<br />
illumination time of the lamp will be longer if it is used for short periods of time only.<br />
TO BE TAKEN INTO ACCOUNT WHEN USING LAMP<br />
In order to guarantee as long a service life as possible, the lamp should be discharged from time<br />
to time by leaving the lamp on until it automatically shuts off. Especially the NiCd batteries should<br />
be discharged approximately once a month. Thus, a battery memory phenomenon will not occur.<br />
The phenomenon will reduce the illumination period of the lamp. The illumination period will also<br />
become shorter as the battery ages. If overall illumination period remains clearly below the values<br />
stated in the table below even when the battery has been charged full, the battery must be<br />
replaced. Please note that you may not install a NiMH battery in a NiCD lamp!<br />
CHARGING AND STORAGE<br />
Do not charge lamps equipped with a NiMH battery with any other charger than a MICA <strong>IL</strong>C<br />
charging stand. Lamps equipped with a NiCd battery may be charged in a MICA <strong>IL</strong>C or MICA<br />
<strong>IL</strong>-35 charging stand. The nameplate of your lamp shows which battery has been installed.<br />
You should store all <strong>IL</strong> lamps in their stands when they are not being used. The MICA chargers<br />
will keep the battery operational at all times.<br />
MAINTENANCE<br />
Please handle the bulb and the reflector with care, since impurities in these components will<br />
reduce the lamp’s illumination efficiency. You can clean a dirty reflector or bulb by using a<br />
piece of cloth and a suitable solvent. When disassembling your lamp, please remember to<br />
keep in mind the correct places of all conductors and correct polarity. During the warranty<br />
period, components may be replaced by an authorised MICA service agent only and you<br />
may not use any other spare parts than original MICA spare parts.<br />
Replacing bulb:<br />
In order to replace the bulb, unscrew the closing ring and remove the glass lens by touching the<br />
edges only. Cover your fingers with a clean piece of cloth when pulling the bulb from its socket<br />
and replacing it with a new one. If your lamp is equipped with a narrow reflector, press the new<br />
bulb with a shielded hand into the socket so that the point formed when pointing the beam of<br />
light on a wall, for example, is as sharp as possible.<br />
Disassembling the lamp:<br />
First remove the bulb, unscrew the two screws on the reflector and remove the reflector. Open<br />
the contacts by unscrewing the Phillips screws on the bottom of the lamp in order to remove the<br />
carriage unit from the cover. If the carriage is stuck, lightly tap the lamp against the edge of a<br />
table. Pull the carriage halfway out of the cover and disassemble the operating switch contactor<br />
(black wires). Pull the carriage completely out of the cover. Note: Do not touch the circuit board<br />
when pulling the carriage out of the cover.<br />
Battery package:<br />
Open the battery contactors (red and black wires). You can now lift the battery out of the carriage.<br />
Electronics unit:<br />
Unscrew the screws keeping the charging contacts in their place. Next, remove the back screw<br />
holding the electronics unit. You can now remove the electronics unit from the carriage.<br />
Push switch:<br />
Begin removing the switch from the outside of the cover by unscrewing the four screws holding<br />
the switch cover plate in place. Remove the cover plate and the rubber shield, and disassemble<br />
the switch from the inside of the cover. When doing this, remember to check that the rubber<br />
switch shield is intact because its condition is important to the sealing capacity of the lamp.<br />
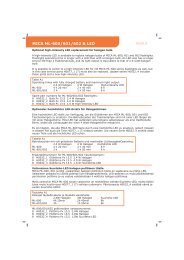
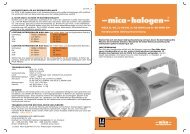
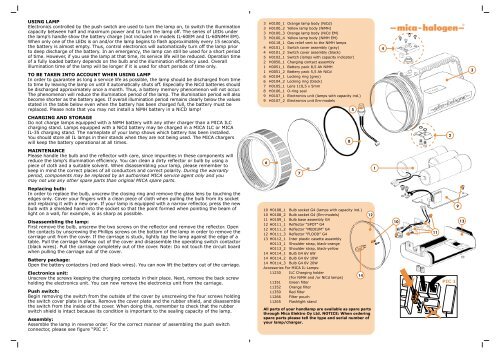
Assembly:<br />
Assemble the lamp in reverse order. For the correct manner of assembling the push switch<br />
connector, please see figure “PIC 1”.<br />
3 H0100_1 Orange lamp body (NiCd)<br />
3 H0100_2 Yellow lamp body (NiMH)<br />
3 H0100_3 Orange lamp body (NiCd EM)<br />
3 H0100_4 Yellow lamp body (NiMH EM)<br />
H0118_1 Gas relief vent to the NiMH lamps<br />
4 H0101_1 Switch cover assembly (gray)<br />
4 H0101_2 Switch cover assembly (black)<br />
5 H0102_1 Switch (lamps with capacity indicator)<br />
2 H0056_1 Charging contact assembly<br />
1 H0051_1 Battery pack 8,5 Ah NiMH<br />
1 H0051_2 Battery pack 5,5 Ah NiCd<br />
6 H0104_1 Locking ring (grey)<br />
6 H0104_2 Locking ring (black)<br />
7 H0105_1 Lens 110,5 x 5mm<br />
8 H0106_1 O-ring seal<br />
9 H0107_1 Electronics unit (lamps with capacity ind.)<br />
9 H0107_2 Electronics unit Em-models<br />
5<br />
4<br />
3<br />
8<br />
2<br />
6<br />
7<br />
1<br />
10 H0108_1 Bulb socket G4 (lamps with capacity ind.)<br />
10 H0108_2 Bulb socket G4 (Em-models)<br />
11 H0109_1 Bulb base assembly G4<br />
12 H0111_1 Reflector “SPOT” G4<br />
12 H0111_2 Reflector “MEDIUM” G4<br />
12 H0111_3 Reflector “FLOOD” G4<br />
13 H0112_1 Inter plastic casette assembly<br />
H0113_1 Shoulder strap, black-orange<br />
H0113_2 Shoulder strap, black-yellow<br />
14 H0114_1 Bulb G4 6V 6W<br />
14 H0114_2 Bulb G4 6V 10W<br />
14 H0114_3 Bulb G4 6V 20W<br />
Accessories For MICA <strong>IL</strong>-Lamps:<br />
11230 <strong>IL</strong>C Charging holder<br />
(For NiMH and /or NiCd lamps)<br />
14<br />
11351 Green filter<br />
11352 Orange filter<br />
11350 Red filter<br />
11266 Filter pouch<br />
11265 Flashlight stand<br />
All parts of your handlamp are available as spare parts<br />
through <strong>Mica</strong> <strong>Elektro</strong> Oy <strong>Ltd</strong>. NOTICE: When ordering<br />
spare parts please tell the type and serial number of<br />
your lamp/charger.<br />
12<br />
10<br />
11<br />
9<br />
13<br />
PIC 1