MTData Handbook - Premier Cabs
MTData Handbook - Premier Cabs
MTData Handbook - Premier Cabs

You also want an ePaper? Increase the reach of your titles
YUMPU automatically turns print PDFs into web optimized ePapers that Google loves.
<strong>Premier</strong> <strong>Cabs</strong><br />
<strong>MTData</strong> <strong>Handbook</strong><br />
Revision 2.0, June 2011
Table Of Contents<br />
1. Introduction .......................................................................................................................... 4<br />
2. Use of Navigation System ................................................................................................... 4<br />
3. General Operating Instructions .......................................................................................... 4<br />
3.1. Display Controls ............................................................................................................... 5<br />
3.2. Status LED ....................................................................................................................... 5<br />
3.3. Cleaning & Maintenance .................................................................................................. 5<br />
4. Screen Layout ....................................................................................................................... 6<br />
4.1. Status Line Information .................................................................................................... 6<br />
5. System Functions ................................................................................................................ 7<br />
5.1. Driver Logon .................................................................................................................... 7<br />
5.2. Driver Settings ................................................................................................................. 9<br />
5.3. Logoff ............................................................................................................................... 9<br />
5.4. Receiving Bookings ....................................................................................................... 10<br />
5.5. GPS Available and Off Duty .......................................................................................... 10<br />
5.6. Rank Plotting ................................................................................................................. 11<br />
5.7. Street Hails .................................................................................................................... 12<br />
5.8. Automatic GPS Available after Meter Off ...................................................................... 13<br />
5.9. On Hold .......................................................................................................................... 13<br />
5.10. Accepting a Booking ...................................................................................................... 14<br />
5.11. Rejecting a Booking ....................................................................................................... 14<br />
5.12. Cover ............................................................................................................................. 15<br />
5.12.1. Symbols .............................................................................................................. 16<br />
5.12.2. Cover Jobs Filter ................................................................................................. 17<br />
5.12.3. Rejected and Recalled Jobs ............................................................................... 17<br />
5.13. Area Statistics ................................................................................................................ 18<br />
5.13.1. Multiple Fleet Statistics ....................................................................................... 19<br />
5.14. Query ............................................................................................................................. 19<br />
5.15. Job Related Queries ...................................................................................................... 19<br />
5.15.1. No Jobs (M3’s) .................................................................................................... 19<br />
5.15.2. Job Recalls ......................................................................................................... 19<br />
5.16. Other Queries ................................................................................................................ 20<br />
5.17. On Query ....................................................................................................................... 20<br />
5.18. Priority after No Jobs or Cancellations .......................................................................... 21<br />
5.19. Driver Messages ............................................................................................................ 21<br />
5.20. Jobs ............................................................................................................................... 22<br />
5.21. Job Pickup ..................................................................................................................... 23<br />
5.22. Job Drop-off ................................................................................................................... 23<br />
5.23. Street Hails .................................................................................................................... 24<br />
5.24. Map Display ................................................................................................................... 24<br />
5.24.1. Vehicle Location .................................................................................................. 24<br />
5.24.2. Job Pickup .......................................................................................................... 25<br />
5.24.3. Destination Location ........................................................................................... 26<br />
5.25. Navigation ...................................................................................................................... 26<br />
5.25.1. Address Entry ..................................................................................................... 26<br />
5.26. Messages ...................................................................................................................... 28<br />
5.27. Fixed Price Jobs ............................................................................................................ 28<br />
5.28. Price Required Jobs ...................................................................................................... 29<br />
5.29. Corporate Account Jobs ................................................................................................ 30<br />
5.30. Driver Alarm ................................................................................................................... 31<br />
5.31. Advance bookings ......................................................................................................... 32<br />
5.32. Driver Destination .......................................................................................................... 35<br />
Appendix 1 – Dispatch Rules .................................................................................................... 37<br />
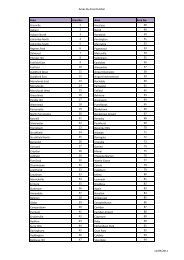
Appendix 2 – Areas and Ranks ................................................................................................. 40<br />
Table 1 – Areas in Numeric Order............................................................................................ 40<br />
© 2006 Mobile Tracking and Data Pty. Ltd. Page 2 of 50<br />
Revision 0.2, 9 November 2006
Table 2 – Areas in Alphabetical Order ..................................................................................... 43<br />
Table 3 – Ranks in Numeric Order ........................................................................................... 46<br />
Appendix 3 – M Codes and Their Meanings ............................................................................ 50<br />
<br />
Some of the features and options described in this manual may change from time-to-time as<br />
required. These changes will be posted on the driver’s section of the <strong>Premier</strong> website<br />
www.premiercabs.com.au/drivers.<br />
© 2006 Mobile Tracking and Data Pty. Ltd. Page 3 of 50<br />
Revision 0.2, 9 November 2006
1. Introduction<br />
The <strong>MTData</strong> in-vehicle computer comprises a colour touch screen with built-in microphone,<br />
wireless keypad and speaker which are all connected to the mobile dispatch controller unit. The<br />
control unit includes an internal GPS receiver and provides both private radio and NextG mobile<br />
communications back to the call centre.<br />
The touch screen is a high-temperature unit<br />
designed for in-vehicle use. It is used to display<br />
information to the driver and to select options and<br />
enter data as required.<br />
Figure 1: <strong>MTData</strong> screen and keypad.<br />
The wireless keypad is designed to allow for the<br />
easy and fast selection of options and entry of data.<br />
Any function which can be performed via the touchscreen<br />
can also be done using the keypad. The<br />
keypad includes numbered keys 0-9, *, #,<br />
▲,,▼, and OK buttons, plus six coloured option<br />
buttons. These coloured buttons are used to<br />
access the corresponding options which are<br />
displayed on the touch-screen.<br />
<br />
Each keypad is electronically matched to its Mobile Dispatch Controller (MDC) unit. It is not<br />
possible to swap keypads between vehicles without first matching the keypad with the MDC<br />
unit. This needs to be done at the base.<br />
The in-built hands-free microphone is used when you are communicating by voice with the call<br />
centre. The speaker is used to produce audible alerts when bookings are received or there is a<br />
status change which affects the vehicle/driver. It is also used when you are communicating by<br />
voice with the call centre.<br />
2. Use of Navigation System<br />
The <strong>MTData</strong> System includes the option of navigation guidance to addresses. The information<br />
provided by the navigation system should only be used as a guide to assist a driver. The<br />
navigation system may not always provide the best or most appropriate route and is no<br />
substitute for a driver’s local knowledge.<br />
3. General Operating Instructions<br />
To power on the unit, press the [OK] button on the keypad. The unit will power on and start<br />
loading its application program. This will take approximately 45 seconds and will display the<br />
driver terms and conditions screen once it is complete.<br />
The keypad is battery powered and has a range of approximately 50 metres, but will vary<br />
depending on the number of obstructions in its communications path. Its internal batteries<br />
charge when it is placed in its specially designed cradle. When the keypad’s internal batteries<br />
are running low it will generate a low battery alarm to warn the driver to return the keypad to its<br />
cradle for charging. When a key is pressed it will beep to signify the message has been<br />
received by the control unit.<br />
© 2006 Mobile Tracking and Data Pty. Ltd. Page 4 of 50<br />
Revision 0.2, 9 November 2006
3.1. Display Controls<br />
The screen includes a number of buttons which<br />
can be used to adjust the display to suit the<br />
ambient light conditions. The buttons left to right<br />
are:<br />
The [Full Brightness] control sets the display to<br />
full brightness.<br />
The [Increase Brightness] control increases the<br />
display brightness.<br />
The [Decrease Brightness] control decreases the<br />
display brightness.<br />
Figure 2: Screen controls.<br />
The [Automatic Brightness] control allows the screen to automatically adjust its brightness<br />
setting based on the ambient light conditions.<br />
The [Query PTT] button can be used as a push-to-talk (PTT) button when on the query channel.<br />
The [Power On/Off] button is used to switch the unit and screen on. It can also be used to turn<br />
the screen off – on its own. However, if the vehicle is not going to be used for a few hours it is<br />
better to depower both the screen and the mobile dispatch controller unit (MDC) to avoid<br />
flattening the vehicle’s battery. To depower the whole system, the appropriate menu option<br />
must be selected: from the Main menu select [Next] then [LogOff].<br />
3.2. Status LED<br />
When the Status LED is green it indicates the display is in auto-brightness mode. Pressing the<br />
“Automatic Brightness Control” button puts it in this mode. The screen will start up in this mode<br />
automatically.<br />
If the driver manually changes the brightness using either the “Full Brightness”, “Increase<br />
Brightness” or “Decrease Brightness” controls, then the LED will change to orange to indicate it<br />
is in manual brightness control mode.<br />
Once it is in manual mode, the “Automatic Brightness Control” button needs to be pressed to<br />
return it to auto-mode.<br />
3.3. Cleaning & Maintenance<br />
It is important to remove fuses before any electrical or panel beating work is performed on the<br />
vehicle.<br />
The touch screen surface should be kept free of dust, dirt or any other foreign material.<br />
Presence of any of these can affect the screen's optical properties, as well as possibly<br />
scratching the surface, causing permanent damage.<br />
<br />
It is very important the touch screens are NOT cleaned with chemical cleaners as these will<br />
cause permanent damage to the screens. Only special touch screen cleaning wipes should<br />
be used to clean the screens. You can buy these at most computer stores.<br />
Maintenance and servicing (including de-installation and re-installation) of the <strong>MTData</strong><br />
equipment must only be performed by authorized service agents.<br />
© 2006 Mobile Tracking and Data Pty. Ltd. Page 5 of 50<br />
Revision 0.2, 9 November 2006
4. Screen Layout<br />
The <strong>MTData</strong> screen is divided into three functional<br />
areas as shown.<br />
The option buttons are used to access system<br />
features and navigate through the various menus.<br />
The status line provides important status<br />
information to assist the driver.<br />
The display area is used to show operational<br />
information such as bookings, maps and statistics.<br />
Figure 3: Screen layout.<br />
4.1. Status Line Information<br />
The status line provides a range of information designed to assist the driver. An example status<br />
line is shown in Figure 4.<br />
Figure 4: Status line.<br />
Reading left to right; the information included in the status line is as follows:<br />
Vehicle Number:<br />
Time:<br />
Vehicle Status:<br />
Radio Signal Indicator:<br />
NextG Signal Indicator:<br />
GPS Indicator:<br />
Received Data Counter:<br />
The number or call-sign used to identify the vehicle.<br />
The current time provided by the GPS receiver.<br />
The current vehicle status (logged off, logged on, plotted, GPS,<br />
booked or picked up).<br />
The radio signal indicator will display in green (R) if radio is<br />
working, red (R) if it is not.<br />
The NextG signal indicator will display in green (S) if NextG is<br />
working, red (S) if it is not.<br />
The GPS indicator will display in green (G) if GPS is working, red<br />
(G) if it is not.<br />
The received data counter will count between 0 and 9 and will<br />
increment each time the unit receives a valid data message from<br />
the system.<br />
Transmitted Data Counter: The transmitted data counter will count between 0 and 9 and will<br />
increment each time the unit transmits a data message to the<br />
system.<br />
© 2006 Mobile Tracking and Data Pty. Ltd. Page 6 of 50<br />
Revision 0.2, 9 November 2006
Cover Jobs Indicator:<br />
Messages Indicator:<br />
The cover jobs indicator is displayed when there are cover jobs<br />
available which have not yet been displayed to the driver.<br />
The messages indicator is displayed when there are any unread<br />
messages for the driver.<br />
5. System Functions<br />
The Main Menu provides the following options:<br />
Plot: Allows the driver to access GPS Available, Off Duty and On Hold options.<br />
Cover: Displays cover work located in the vicinity of the vehicle.<br />
Stats: Displays statistical information for each zone such as the number of vehicles<br />
and jobs in each.<br />
Query: Provides access to a voice operator for assistance.<br />
Jobs: Displays details of all jobs received since logon.<br />
Next: Provides access to additional options.<br />
The Next menu provides the following options:<br />
Msgs: Displays details of all messages received since logon.<br />
Map: Provides access to mapping for vehicle and job location.<br />
Adv Book: Provides access to the advance bookings screen (this option will only be<br />
displayed if you are eligible to see advance bookings, i.e. Maxi).<br />
Tools: Provides access to driver settings, alarm test and technician functions.<br />
Log Off: Allows the driver to logoff and depower the unit at the end of their shift.<br />
Main: Returns to the Main Menu.<br />
5.1. Driver Logon<br />
To access the <strong>Premier</strong> dispatch system you must logon to the system. Before logging on,<br />
drivers must accept the company’s terms and conditions as shown below in Figure 5.<br />
A driver cannot logon without first accepting the terms and conditions.<br />
To accept the terms and conditions, press the<br />
[OK] button on the keypad or screen.<br />
To reject the terms and conditions and depower<br />
the unit, select the [Power Off] option. A driver<br />
who does not accept the terms and conditions is<br />
unable to logon to the dispatch system.<br />
Figure 5: Driver terms and conditions display.<br />
© 2006 Mobile Tracking and Data Pty. Ltd. Page 7 of 50<br />
Revision 0.2, 9 November 2006
If the terms and conditions are accepted, the unit<br />
will display the driver logon screen as shown in<br />
Figure 6. Enter your driver number using the<br />
keypad or touch screen followed by [OK]. If an<br />
error is made, use the [Clear] option to clear all<br />
entries and start again or the [* Delete] key to<br />
erase the previous entry.<br />
Once your driver number has been entered, your<br />
PIN must be entered as shown in Figure 7. Enter<br />
your PIN using the keypad or touch screen<br />
followed by [OK]. If an error is made, use the<br />
[Clear] option to clear all entries and start again or<br />
the [* Delete] key to erase the previous entry.<br />
Figure 6: Driver Logon Screen<br />
A successful logon will result in the Main Menu<br />
being displayed as shown in Figure 8.<br />
Figure 7: Driver PIN screen.<br />
A logon will be unsuccessful if an invalid driver<br />
number or PIN is entered.<br />
The Main Menu displays a range of status<br />
information for the driver as follows:<br />
Figure 8: Main Menu display.<br />
Car: Car number<br />
Plot: Whether you are plotted on a rank or not<br />
Position: Your position on the rank i.e. how many <strong>Premier</strong>/Prestige cars are in front of<br />
you<br />
Cars at Front: Not used<br />
In Front: Car numbers of the two cars plotted on the rank in front of this car<br />
Date: Current date<br />
Time: Current time<br />
Meter: Meter status (ON or OFF)<br />
Logoff in: Not used<br />
Driver Points: Not used<br />
© 2006 Mobile Tracking and Data Pty. Ltd. Page 8 of 50<br />
Revision 0.2, 9 November 2006
5.2. Driver Settings<br />
A number of Driver Settings are available which<br />
can be accessed from the Main Menu by<br />
selecting the [Next] option followed by [Tools].<br />
This will display the Tools Menu as shown in<br />
Figure 9. The Driver Settings can then be<br />
displayed by selecting the [Settings] option<br />
button. A list of available options will be<br />
displayed which can be selected and changed<br />
using the corresponding number.<br />
Press [Tools] to return to the Tools Menu or<br />
[Main] to go back to the Main Menu.<br />
Figure 9: Driver settings.<br />
Set Volume<br />
Set Text to Speech<br />
Show Points of Interest<br />
Rotate Map with Car<br />
Keyboard Layout<br />
The Set Volume control adjusts the job offer and text-to-speech<br />
audio levels. The volume of query operator audio is controlled<br />
separately and can only be accessed whilst on the voice channel.<br />
The Set Text to Speech turns this option on/off.<br />
The Show Points of Interest option allows the display of points of<br />
interest on the map to be turned on or off.<br />
The Rotate Map With Car option allows the navigation mapping<br />
display to follow the direction of the vehicle or constantly point<br />
north.<br />
The Keyboard Layout option allows either a QWERTY or ABC<br />
keyboard layout to be selected for navigation address entry.<br />
5.3. Logoff<br />
To turn the screen off at the end of your shift, you<br />
must logoff from the system. From the Main<br />
Menu select the [Next] option. If you have no<br />
incomplete bookings on board the Log Off option<br />
will be displayed. Select [Log Off] to display the<br />
Log Off screen as shown.<br />
To log off, press [OK] on the keypad or screen. If<br />
you do not wish to log off, select the [Main]<br />
option to return to the Main Menu and continue<br />
working.<br />
Figure 10: Logoff screen.<br />
A driver cannot logoff until all jobs on board have been completed.<br />
© 2006 Mobile Tracking and Data Pty. Ltd. Page 9 of 50<br />
Revision 0.2, 9 November 2006
5.4. Receiving Bookings<br />
To receive computer dispatched bookings, a<br />
vehicle must be either GPS Available or plotted on<br />
a rank. Selecting the [Plot] function from the Main<br />
Menu will display the Plot Menu.<br />
The Plot display will show your current GPS area<br />
along with the location and direction of travel of<br />
your vehicle. In this example the vehicle is located<br />
in area 1 (highlighted in purple).<br />
The keypad or touch-screen can be used to<br />
become GPS Available or to plot on a rank (if you<br />
are located at the rank). Both options are explained<br />
below.<br />
Figure 11: Plot display.<br />
5.5. GPS Available and Off Duty<br />
A driver can elect to become available for dispatched bookings. The [Available] option can be<br />
used to become GPS Available when first logging on or after rejecting or recalling a booking.<br />
If a driver is GPS Available, the option to go [Off Duty] is provided. This can be selected if a<br />
driver does not wish to receive any more bookings. Selecting to go Off Duty will zero any GPS<br />
waiting time accumulated by the driver.<br />
Figure 12: Off Duty option.<br />
© 2006 Mobile Tracking and Data Pty. Ltd. Page 10 of 50<br />
Revision 0.2, 9 November 2006
5.6. Rank Plotting<br />
You cannot forward plot onto a rank, you must be on or very near it to plot.<br />
<strong>Premier</strong> has introduced rank plotting in certain<br />
locations. A list of these is provided in Appendix<br />
2 – Areas and Ranks.<br />
It is not possible to forward plot onto a rank.<br />
You must be located on or very near the rank to<br />
plot onto it. When the Plot screen is displayed<br />
as shown in Figure 13, ranks are displayed in<br />
light blue.<br />
Because the size of ranks is typically much<br />
smaller than areas, the following method is<br />
recommended for plotting onto a rank.<br />
Figure 13: Plot display of ranks.<br />
From the Plot Menu select the [Rank] option. If<br />
the vehicle is currently located within the plot<br />
restriction of a rank, the rank will be highlighted<br />
in orange as shown in Figure 14. Selecting the<br />
rank from the touch screen is usually not<br />
practical, so it is easier to use the [Auto] option.<br />
Figure 14: Available rank display.<br />
The [Auto] option will list any ranks the<br />
vehicle is currently able to plot onto as shown<br />
in Figure 15. The rank can then be selected<br />
using the button.<br />
If no ranks are displayed using the [Auto]<br />
option, then the vehicle is not located within<br />
the plot restriction for the rank.<br />
Figure 15: Auto Plotting<br />
Use the [Refresh] option to update the Auto<br />
Plot list if the vehicle is moving.<br />
© 2006 Mobile Tracking and Data Pty. Ltd. Page 11 of 50<br />
Revision 0.2, 9 November 2006
Once successfully plotted, the display<br />
changes to show your position on the rank<br />
and the rank statistics.<br />
The rank area changes to a green colour as<br />
shown in Figure 16.<br />
Figure 16: Plot Display<br />
If a vehicle leaves a rank it will be automatically deplotted after 30 seconds.<br />
<br />
Whenever a rank plot is performed, the keypad will generate a series of beeps to indicate<br />
the current plot position. For example, if you plot in and are number 3, the keypad will<br />
generate 3 beeps.<br />
The keypad will only beep for plot position of 5 or lower, so if you are plotted number 6 or<br />
above in an area, the keypad will not beep.<br />
As you progress up the plot queue, your screen will automatically update your position<br />
without you needing to replot and the keypad will generate a series of beeps to indicate<br />
your new position.<br />
5.7. Street Hails<br />
If a driver turns the meter on for a street hail, the<br />
display changes as shown in Figure 17.<br />
Any accumulated GPS waiting time is zeroed<br />
(lost).<br />
While performing a street hail, it will not be<br />
possible to receive a booking from the dispatch<br />
system. However, you will still be able to access<br />
cover work via the cover screen.<br />
Figure 17: Street Hail Display<br />
© 2006 Mobile Tracking and Data Pty. Ltd. Page 12 of 50<br />
Revision 0.2, 9 November 2006
Selecting 1 displays the map (Figure 18)<br />
allowing you to navigate to your destination as<br />
required (see section 5.25 for details on using<br />
navigation).<br />
Figure 18: Map location<br />
5.8. Automatic GPS Available after Meter Off<br />
When a driver clears the taximeter at the end of each fare the dispatch system automatically<br />
makes you GPS Available so you can receive radio bookings.<br />
5.9. On Hold<br />
In cases where a driver wishes to take a short<br />
break (such as to fill up with gas, have lunch or<br />
during prayer time) the On Hold option can be<br />
used. The [Hold] option is available on the Plot<br />
Menu as shown in Figure 19.<br />
A driver can go On Hold for a period of 15<br />
minutes. When On Hold, a screen showing how<br />
much time remaining is displayed as shown in<br />
Figure 20. When the On Hold time expires, the<br />
driver will automatically be available for work<br />
again.<br />
When On Hold, the status line indicates On<br />
Hold, and the driver will not be able to look at<br />
statistics or jobs.<br />
Figure 19: On Hold option.<br />
Figure 20: On Hold time display.<br />
When On Hold, a driver retains their GPS waiting time, but will not accumulate any additional<br />
time.<br />
If a driver wishes to return to work before the On Hold time expires, press the [OK] button to<br />
immediately return to work. Any remaining On Hold time is lost.<br />
Once a driver has gone On Hold, they are not allowed to go On Hold again for a period of 60<br />
minutes.<br />
© 2006 Mobile Tracking and Data Pty. Ltd. Page 13 of 50<br />
Revision 0.2, 9 November 2006
5.10. Accepting a Booking<br />
When a booking is offered to a suitable vehicle<br />
the partial address details will be sent to the<br />
successful vehicle only. The computer will<br />
generate an audible alert when a booking offer<br />
is received and display the offer as shown in<br />
Figure 21.<br />
If the booking offer is not accepted by pressing<br />
[OK] on the screen or keypad (whilst in its<br />
cradle) within 15 seconds, then it will be<br />
considered to have been rejected and will be<br />
dispatched to another vehicle.<br />
Figure 21: Booking offer display.<br />
Bookings can also be accepted using the keypad when it is out of the cradle. To do so the [OK]<br />
button must be pressed within the 15 second job offer period. In this case, the booking must<br />
also be confirmed by either returning the keypad to the cradle and pressing [OK] or pressing<br />
[OK] on the screen within another 60 seconds. If this is not done, the booking will be considered<br />
to have been rejected and will be dispatched to another vehicle.<br />
Once a booking has been accepted the full details of the job will be sent through to the car as<br />
described in section 5.21.<br />
<br />
Radio Jobs Abbreviations<br />
SHP Shop WOC Waiting On Corner<br />
WOF Waiting Out Front FU W/C Fold Up Wheel Chair<br />
CNR Corner PAX Passenger<br />
5.11. Rejecting a Booking<br />
If a booking fails to be accepted within the<br />
allowable time, it will be considered to have<br />
been rejected by the driver. If you are located<br />
within a short distance of the pickup address<br />
(defined as the first GPS “ring”) rejecting a<br />
booking will result in the driver losing any<br />
accumulated GPS waiting time.<br />
In addition a 2 minute penalty applies before a<br />
driver can become available for radio work.<br />
You are provided with a warning in the job<br />
offer where a reject penalty will apply - as<br />
shown in Figure 22.<br />
Figure 22: Job Offer With Reject Penalty<br />
© 2006 Mobile Tracking and Data Pty. Ltd. Page 14 of 50<br />
Revision 0.2, 9 November 2006
The Status Line will change to indicate you<br />
are serving a penalty as shown in Figure 23.<br />
A driver must become GPS Available after a<br />
reject penalty to receive any radio jobs or be<br />
able to access the Cover screen. In Figure 24,<br />
the Status Line has changed to Logged On.<br />
Figure 23: Reject Penalty Acknowledgement<br />
Figure 24: Main Display after Reject Penalty<br />
5.12. Cover<br />
Selecting the [Cover] option from the Main<br />
Menu while plotted on a rank, available or<br />
engaged will show the Cover Jobs display. This<br />
screen will list any cover jobs located in the<br />
vicinity of your vehicle. Any available jobs will<br />
be listed based on the distance from your<br />
current location, with the closest jobs at the top<br />
of the list.<br />
Figure 25: Cover job display.<br />
Each available booking which your vehicle is<br />
suitable for will be displayed with a number. To<br />
select a booking from the list, press the button<br />
corresponding to the required booking.<br />
Booking 1 is a pickup at Peach Court in Carlingford, is on the “odd” side of the road, has a<br />
destination of Westmead, has previously been rejected (RJ) and is a time booking (clock<br />
symbol).<br />
Booking 2 is a pickup at Terminus Street in Liverpool, is on the “even” side of the road, has a<br />
destination of Campbelltown and has a capsule condition (U).<br />
Booking 3 is a pickup at Wood Street in Ashfield is on the “odd” side of the road, has a<br />
destination of City and has been recalled (RC).<br />
© 2006 Mobile Tracking and Data Pty. Ltd. Page 15 of 50<br />
Revision 0.2, 9 November 2006
In the case of Booking 3, you would only see a capsule booking if your car is listed in the system<br />
as having a capsule. Your car and driver conditions will determine which bookings you can see<br />
and those you can’t. The conditions used in the system and their codes are listed below.<br />
Code Name Code Name<br />
A Airport T Prestige<br />
D <strong>Premier</strong> Corporate 5 Five Seater<br />
Docket<br />
M M40 – govt. 6 Six Seater<br />
subsidy<br />
P Parcels 7 Seven Seater<br />
Q Quality Driver 8 Eight Seater<br />
S WAT SPV 9 Nine Seater<br />
U Capsule 10 Ten Seater<br />
W Wagon 11 Eleven Seater<br />
Y Preferred<br />
The [Refresh] button is used to update the Cover Job display. As jobs are taken by other<br />
vehicles, they will be grayed out on the Cover Job display and you will no longer be able to<br />
select them. Pressing the [Refresh] button will update the display and remove any bookings<br />
which are no longer available. This will also re-sort the jobs with the closest to your car at the<br />
top of the list.<br />
Usually a maximum of four jobs can be displayed on a single screen. If there are more jobs<br />
available than can be displayed, the [# Down] and [* Up] buttons can be used to navigate<br />
through the list of available jobs.<br />
5.12.1. Symbols<br />
Symbols used on the <strong>MTData</strong> screen are there to distinguish between jobs.<br />
<br />
<br />
<br />
<br />
<br />
<br />
“ODD” indicates a pick up on the odd side<br />
of the road;<br />
A clock means a timed booking;<br />
The red letters “RJ” show that a booking<br />
has previously been rejected;<br />
The telephone symbol with a number<br />
alongside shows that the passenger has<br />
called back and the number of times;<br />
The word “EVEN” indicates a pick up on<br />
the even side of the road;<br />
The letter “U” requires the vehicle to have a<br />
capsule for this booking.<br />
© 2006 Mobile Tracking and Data Pty. Ltd. Page 16 of 50<br />
Revision 0.2, 9 November 2006
5.12.2. Cover Jobs Filter<br />
In cases where cover jobs are being shown<br />
to engaged taxis, a Cover Jobs Filter is<br />
available which allows the driver to specify a<br />
single area they wish to only view cover jobs<br />
for. This is designed to allow drivers who are<br />
heading to a known destination area to only<br />
view jobs which may be available in this<br />
area, to simplify the selection process.<br />
When viewing the Cover screen with the<br />
meter on, the [Filter] option button will be<br />
displayed as shown in Figure 26.<br />
Figure 26: Cover job filter option.<br />
A list of areas (and ranks) is shown in Appendix 2 at the back of this handbook.<br />
Selecting the [Filter] option will display the<br />
filter area entry screen as shown in Figure<br />
27. Enter the required area number followed<br />
by [OK] to set the filter. If an error is made<br />
when entering the area number, use the<br />
[Clear] option to clear the entire entry or the<br />
[* Delete] option to remove the last entered<br />
digit.<br />
Once a cover job filter has been set, the<br />
[Reset] option can be used to clear the filter<br />
and show all available cover jobs.<br />
Figure 27: Cover job area filter entry.<br />
Figure 28 shows a filtered cover job<br />
display. The area number used to filter the<br />
cover jobs is shown on the top line, in this<br />
example Area 1.<br />
To manually clear the filter, select the<br />
[Filter] option and then [Reset].<br />
When the meter is cleared at the end of<br />
the job, the filter is automatically reset.<br />
Figure 28: Filtered cover job display.<br />
5.12.3. Rejected and Recalled Jobs<br />
Once a booking has been rejected or recalled by a driver, it will not be automatically dispatched<br />
back to the same driver during the current shift, but will be available on the Cover screen if it<br />
remains available.<br />
Cover jobs that have been previously rejected by you will be displayed as shown in Figure 25.<br />
Rejected jobs are highlighted by an RJ (job 1 in the example in Figure 25) and recalled jobs by<br />
an RC (Job 2).<br />
© 2006 Mobile Tracking and Data Pty. Ltd. Page 17 of 50<br />
Revision 0.2, 9 November 2006
5.13. Area Statistics<br />
To view statistics select the [Stats] option from<br />
the Main Menu. This will display a list of areas<br />
with the current statistics for each area as<br />
shown in Figure 29. The area in which the<br />
vehicle is currently located is highlighted in<br />
purple (area 1).<br />
The [#Down] button is displayed if there are<br />
more areas in the list to view. Use it and the<br />
[*Up] button to navigate though the list of<br />
displayed areas.<br />
The statistics shown for each area include:<br />
Figure 29: Statistics display.<br />
Plot:<br />
Vac:<br />
The number of vehicles plotted on a rank in the area.<br />
The number of GPS available vehicles (not plotted) in the area.<br />
Busy: The number of vehicles in the area not available for work (off duty, meter on,<br />
logged on).<br />
JbT:<br />
The number of jobs currently available in the area.<br />
L60: The total number of jobs dispatched in the area in the last 60 minutes.<br />
H60: The total number of street hails in the area in the last 60 minutes.<br />
Statistics for any area can be displayed using<br />
the [Area] option available from the Stats Menu.<br />
Selecting the [Area] option will display a<br />
keypad. Enter the required area number<br />
followed by [OK] using either the keypad or<br />
touch screen. If an error is made entering the<br />
area number, use the [*Delete] button to clear<br />
the last entry or the [Clear] button to clear the<br />
area number entry.<br />
If statistics for a specified area are being<br />
displayed, you can revert back to local area<br />
stats near your current location by selecting the<br />
[Area] option from the Stats Menu and then the<br />
[Car] option as shown in Figure 30.<br />
Figure 30: Statistics area number entry.<br />
© 2006 Mobile Tracking and Data Pty. Ltd. Page 18 of 50<br />
Revision 0.2, 9 November 2006
5.13.1. Multiple Fleet Statistics<br />
In cases where a vehicle is included in more<br />
than one fleet (such as a Prestige vehicle<br />
which would be in both the normal <strong>Premier</strong><br />
fleet and the Prestige fleet), separate statistics<br />
for each of the fleets are provided.<br />
The driver can select from the available fleets<br />
of statistics using the [Previous] and<br />
[Next] options as shown in Figure 31.<br />
Figure 31: Multiple fleet statistics.<br />
5.14. Query<br />
If a driver has a query regarding a booking, or any other question, they can contact the query<br />
operator using the Query function. To contact the query operator, select the Query option from<br />
the Main Menu (for general queries) or from the Job Menu (for job-related queries). This will<br />
display a list of available query reasons. Select the one which best describes the reason you<br />
need to speak with the operator.<br />
<br />
There are two query menus: one for general queries, located in the Main Menu; and one for<br />
job-related queries, located on the Job Menu.<br />
A driver is still able to receive a job offer whilst they are on the query channel.<br />
5.15. Job Related Queries<br />
With the required booking displayed, select the<br />
[Query] option. This will display the available<br />
job related queries.<br />
Select the appropriate query reason using the<br />
number on the keypad or by pressing the<br />
screen. This will send a message to the query<br />
operator and you will be automatically placed on<br />
the query channel.<br />
Once you are on the query channel, wait for the<br />
operator to call you (see Figure 34).<br />
Figure 32: Job related query.<br />
5.15.1. No Jobs (M3’s)<br />
Where possible M3’s (“no jobs”) will be processed automatically by the system. You need to be<br />
located at the pickup address for an automatic M3.<br />
An automatic M3 is not available for an account booking – you must go to query for these jobs.<br />
5.15.2. Job Recalls<br />
Where possible job recalls will be processed automatically by the system. There are certain<br />
conditions where you cannot auto recall a job, and you will be directed to the query operator.<br />
© 2006 Mobile Tracking and Data Pty. Ltd. Page 19 of 50<br />
Revision 0.2, 9 November 2006
Each driver is allowed one recall per shift before penalties apply. For recalls, a 2 minute penalty<br />
applies before a driver can become available for radio work. A driver must become GPS<br />
Available after a recall penalty to receive any radio jobs or be able to access the Cover screen.<br />
5.16. Other Queries<br />
If you have a general query (one which does not<br />
relate to a specific job), use the [Query] option<br />
available from the Main Menu. This will display<br />
a list of query reasons as shown in Figure 33.<br />
Select the appropriate query reason using the<br />
number on the keypad or by pressing the<br />
screen. This will send a message to the query<br />
operator and you will be automatically placed on<br />
the query channel.<br />
Once you are on the query channel, wait for the<br />
operator to call you (Figure 34).<br />
Figure 33: General Query<br />
The general query options are:<br />
M20: The alarm warning state – select this option if you are suspicious about<br />
passenger behavior and you believe your safety might be at risk.<br />
Please note, this does not activate your alarm.<br />
Credit Card:<br />
Account Job:<br />
This query channel allows you to gain authorization for a credit card for<br />
a fare above the normal floor limits as stated by the card provider /<br />
EFTPOS equipment you are using.<br />
To gain authorization for an account job using <strong>Premier</strong> Account<br />
Dockets or another docket where an authorization is required. Many<br />
authorizations will be provided automatically by the system at the<br />
completion of the account job – those bookings where this is not<br />
possible are authorized by using the Account Job query channel.<br />
5.17. On Query<br />
While on the query channel, the following<br />
screen will be displayed. The Query Operator<br />
will call you when it is your turn to speak.<br />
You can adjust the operator audio volume using<br />
the keypad [▲] to increase or [▼] to decrease<br />
or by touching the buttons on the screen. The<br />
current volume setting is displayed on the<br />
screen.<br />
To speak to the Query Operator you must press<br />
and hold the [OK] button on the keypad and<br />
speak towards the screen which has a handsfree<br />
microphone installed. Alternatively, you<br />
can press the Query PTT button at the bottom<br />
of the screen (not the touch screen itself – see<br />
section 3.1).<br />
Figure 34: Query channel display.<br />
© 2006 Mobile Tracking and Data Pty. Ltd. Page 20 of 50<br />
Revision 0.2, 9 November 2006
When on the query channel, the status line radio indicator will always change from R to R<br />
because whilst on the voice channel no radio data is being received. When you hang-up<br />
and return to normal operation, the indicator should return to R to indicate radio data is<br />
once again being received.<br />
Jobs or messages can be accessed whilst on query using the [Jobs] or [Msgs] options.<br />
When you have finished with your query, select the [HangUp] option to exit the query channel<br />
and return to data operation.<br />
In some cases when a query is requested, if the<br />
operator is busy with other drivers, you may see<br />
the message as shown in Figure 35. This<br />
means your query is in a queue waiting for the<br />
Operator to process.<br />
Once the Operator is available, you will<br />
automatically be put onto the query channel.<br />
The Operator will then call your vehicle number<br />
when ready to speak to you.<br />
Figure 35: Waiting For Operator display.<br />
5.18. Priority after No Jobs or Cancellations<br />
If a driver accepts a booking which is cancelled by the customer, they will be cleared from the<br />
job, and will be automatically made GPS available with 60 minutes of GPS waiting time.<br />
5.19. Driver Messages<br />
On the Query Menu, the option for a driver to select and send a message back to the Supervisor<br />
is available with the [Send Msg] option. This is designed to allow drivers to pass on common<br />
messages back to the Supervisor without the need to go to the voice channel.<br />
Selecting the [Send Msg] option will display a list of available message types as shown in<br />
Figure 36. In this example there is one type of message, those relating to Fares. Message<br />
types are identified with the symbol. Selecting one of these items will display a list of<br />
available messages. Messages are identified with the symbol. If a message type is selected,<br />
the [Up] option can be used to return to the message type list.<br />
© 2006 Mobile Tracking and Data Pty. Ltd. Page 21 of 50<br />
Revision 0.2, 9 November 2006
Figure 36: Driver message types.<br />
Figure 37: Fares messages.<br />
Select the type of message required using the<br />
corresponding numbered button, [1] for Fares.<br />
This will then display a list of available<br />
messages for the selected option.<br />
Selecting option [1] Fares displays the<br />
messages as shown in Figure 37. The<br />
[#Down] button indicates there are more<br />
message options to view. Select the required<br />
message using the corresponding number.<br />
The selected message will then be sent to the<br />
Supervisor automatically and a confirmation<br />
message displayed to the driver as shown in<br />
Figure 38.<br />
Figure 38: Message sent confirmation message.<br />
5.20. Jobs<br />
Any booking or street hail for the current shift<br />
(i.e. since the last logon) can be accessed<br />
from the Main Menu using the [Jobs] option.<br />
If a single active booking is on-board, selecting<br />
the [Jobs] option will display it. If there are no<br />
active bookings or more than one, then a list of<br />
all bookings will be displayed as shown.<br />
A booking can be displayed in full by selecting<br />
its numbered button. The buttons are colour<br />
coded to indicate the status of each booking.<br />
White indicates the booking has not yet been<br />
picked-up (or was a no job), green indicates it<br />
has been picked-up but not dropped-off and<br />
red indicates the booking has been completed.<br />
Figure 39: Jobs list display.<br />
If more than one screen of bookings are available, the [*Up] and [#Down] buttons can be used<br />
to navigate through the entire list.<br />
<br />
The Jobs information is cleared each time a driver logs off from the terminal, even if this is<br />
in the middle of a shift.<br />
© 2006 Mobile Tracking and Data Pty. Ltd. Page 22 of 50<br />
Revision 0.2, 9 November 2006
5.21. Job Pickup<br />
Once a job has been accepted, it will be<br />
displayed as shown in Figure 40. If there is<br />
more than one screen of information, use the<br />
[#Down] and [*Up] buttons to scroll through<br />
the entire job detail.<br />
<br />
Once a booking has been accepted<br />
and is being displayed, it is important<br />
to check for the button. If this is<br />
displayed, there is more information to<br />
view about the job, such as additional<br />
pickup or destination addresses or<br />
specific information to assist in<br />
completing the job.<br />
Figure 40: Accepted job.<br />
After a booking has been accepted, it must be<br />
picked-up and dropped-off. This is done using<br />
the taximeter. This sends a message to the<br />
base computer and records the pick-up time<br />
against the job for your future reference (as<br />
shown in Figure 41).<br />
The button can be used to display the<br />
location of the pickup address. Refer to<br />
section 5.24.2 for more information.<br />
In cases where the destination is shown, the<br />
numbered button corresponding to the<br />
destination address can be used to display the<br />
location of the destination address. Refer to<br />
section 5.24.3 for more information.<br />
Figure 41: Job pick-up.<br />
5.22. Job Drop-off<br />
A booking which has been picked-up must be<br />
dropped off. Clearing your meter will<br />
automatically complete a job.<br />
This will send a message to the base<br />
computer and will record the drop-off time<br />
against the job for your future reference.<br />
In cases where a destination address is not<br />
provided as part of the job, the <strong>MTData</strong> unit<br />
will automatically add the destination area of<br />
the drop-off.<br />
Figure 42: Job drop-off.<br />
© 2006 Mobile Tracking and Data Pty. Ltd. Page 23 of 50<br />
Revision 0.2, 9 November 2006
5.23. Street Hails<br />
Details of street hails are also stored by the<br />
<strong>MTData</strong> terminal in the same way as any<br />
bookings which were dispatched to the vehicle<br />
during the current shift.<br />
Figure 43 shows the Street Hail screen for<br />
pick-ups. Details of the meter on and off times,<br />
and the pick-up areas are recorded to assist<br />
the driver.<br />
Pressing 1 allows the driver to view a map of<br />
the pick-up point and your car’s current<br />
position.<br />
Figure 43: Street Hail Display – Pick-up.<br />
Figure 44 shows the display at the end of the<br />
street hail including information on the<br />
distance travelled, drop-off area and time.<br />
Figure 44: Street Hail Display – Drop-off.<br />
5.24. Map Display<br />
The map function is accessed from the Main Menu by selecting [Next] and then the [Map]<br />
option. It is used to display the vehicle’s current location and the pickup and/or destination<br />
locations for any received bookings.<br />
5.24.1. Vehicle Location<br />
The Map option provides access to the map<br />
and navigation features. Selecting the [Car]<br />
option shows the current car location as<br />
shown in Figure 45.<br />
If the speed of travel is greater than 5 km/h,<br />
then the direction of travel will be shown by an<br />
arrow. In cases where the vehicle is stationary<br />
or is travelling at less than 5 km/h, then the<br />
directional arrow will flash to show the last<br />
known direction.<br />
Figure 45: Map display.<br />
In cases where valid GPS is not currently being received, the last known position and direction<br />
will be shown and the arrow will be displayed in grey.<br />
© 2006 Mobile Tracking and Data Pty. Ltd. Page 24 of 50<br />
Revision 0.2, 9 November 2006
The maps can be displayed in a range of different scales. The [Up] button zooms out (shows a<br />
greater area on the map) and the [Down] button zooms in (shows less area).<br />
5.24.2. Job Pickup<br />
When a booking is being displayed, selecting the number corresponding to an address will<br />
display a map showing the location of the address as shown below. The [Nav Pickup] option<br />
can also be used to request navigation guidance to the booking pickup address.<br />
Figure 46: Sample booking and map display.<br />
The map will automatically zoom to show the car and location of the address as the car<br />
approaches the location.<br />
Figure 47 and Figure 48 show zoomed in map displays including land plots and street numbers.<br />
Figure 47: Map display zoomed in.<br />
Figure 48: Map display zoomed in.<br />
The scale of the map can be adjusted using the [*Up] and [#Down] options.<br />
<br />
<br />
<br />
<br />
<br />
Selecting the [Car] option centers the map display on the current location of the<br />
vehicle.<br />
Selecting the [Car + Leg] option resizes the map to show the car and current<br />
address.<br />
Selecting the [+Leg] option centers the map display on the location of the next<br />
address.<br />
Selecting the [-Leg] option centers the map display on the location of the previous<br />
address.<br />
Selecting the [Job] option takes you back to the booking information display.<br />
© 2006 Mobile Tracking and Data Pty. Ltd. Page 25 of 50<br />
Revision 0.2, 9 November 2006
5.24.3. Destination Location<br />
The destination address location can be shown in the same way as used for the pickup address.<br />
Select the number corresponding to the destination address to display the map as described for<br />
the pickup address. The same controls apply for both the pickup and destination addresses.<br />
5.25. Navigation<br />
5.25.1. Address Entry<br />
Addresses can be entered using the [Suburb] or [Street] options. Selecting [Street] from the<br />
Nav Menu displays the street entry screen. Type the street name using the on-screen keyboard.<br />
A list of streets that match the entered letters will be displayed.<br />
Figure 49: Navigation suburb entry.<br />
Figure 50: Navigation street selection list.<br />
Figure 49 shows the street display when the letters WOODV are entered. When the required<br />
street is displayed, select it from the list and make sure it is highlighted in blue as shown in<br />
Figure 50. Use the [] and [] arrows to move up and down the list.<br />
The next step is to enter the street number. Select the [Number] option to start entering the<br />
street number.<br />
A numeric keypad is displayed to allow entry<br />
of the street number. Type the required street<br />
number and when the correct address<br />
information has been entered, select the [Go]<br />
option to navigate from your current location to<br />
the entered address.<br />
If at any time an error is made it is possible to<br />
go back to either the street or suburb entry<br />
screen using the [Street] or [Suburb] option<br />
buttons.<br />
The [Clear] option button can also be used to<br />
clear any entered information and start again.<br />
Figure 51: Navigation street number entry.<br />
© 2006 Mobile Tracking and Data Pty. Ltd. Page 26 of 50<br />
Revision 0.2, 9 November 2006
When the [Number] option is selected, the<br />
driver is able to nominate a cross street<br />
instead of a street number. To enter a cross<br />
street, select the [Cross Street] option and<br />
start entering the street name using the onscreen<br />
keyboard.<br />
In this example, GU has been entered, and a<br />
list of matching streets that cross Woodville<br />
Road is displayed.<br />
When the required street is displayed, select it<br />
from the list and make sure it is highlighted in<br />
blue. Use the [] and [] arrows to move up<br />
and down the list.<br />
Figure 52: Navigation route display.<br />
The navigation system will show a map with<br />
the suggested route. Voice instructions will be<br />
received in addition to the display of arrows<br />
indicating which way to turn when required.<br />
The [*Up] and [#Down] option buttons can be<br />
used to change the scale of the map display<br />
as required.<br />
Figure 53: Navigation route display.<br />
Navigation guidance to a booking can be accessed using the Nav Menu as already discussed.<br />
When a booking has been received, navigation to the received pickup address (or destination<br />
address if available) can be requested by selecting the [Nav Pickup] option from the Job<br />
Display Menu as shown in Figure 54 or [Nav Dropoff] once the customer has been picked up.<br />
Figure 54: Navigation to pick-up address.<br />
Figure 55: Navigation to drop-off address.<br />
<br />
The navigation system should only be used as a guide. The routes provided may not<br />
always be the best possible in all circumstances. <strong>Premier</strong> <strong>Cabs</strong> accepts no responsibility or<br />
liability resulting from a driver’s decision to follow the suggested route.<br />
© 2006 Mobile Tracking and Data Pty. Ltd. Page 27 of 50<br />
Revision 0.2, 9 November 2006
5.26. Messages<br />
Messages are automatically displayed once they are received by the screen as shown. Press<br />
the [0] button to clear the message from the screen and resume operation.<br />
The call centre can also send interactive messages which prompt the driver for a response. The<br />
example shown in Figure 57 includes three possible responses. The driver selects the most<br />
appropriate response using the corresponding number.<br />
Figure 56: Received message display.<br />
Figure 57: Interactive message display.<br />
All messages received since logon are stored by the unit. To view a past message, select the<br />
[Next] option from the Main Menu and then the [Msgs] option to display a list of stored<br />
messages as shown. To display a stored message in full, select the corresponding number<br />
using the keypad or the touch-screen. If more than one screen of messages available, the [*Up]<br />
and [#Down] buttons can be used to navigate through the entire list.<br />
Figure 58: Past messages display.<br />
5.27. Fixed Price Jobs<br />
Some Corporate Account jobs are classified as Fixed Price Jobs. This means that thorough<br />
investigation has occurred to set zoned areas. These zoned areas have set prices. In the figure<br />
below we can see that all jobs in Zone 1 are worth $20 and all jobs in Zone 2 are worth $26.<br />
© 2006 Mobile Tracking and Data Pty. Ltd. Page 28 of 50<br />
Revision 0.2, 9 November 2006
There are a wide range of prices within these<br />
zones, sometimes when doing a Zone 1 job it<br />
will only be a $9.50 fare but you will still<br />
receive the $20 fixed price. This works the<br />
other way as well if the fare was $23 due to<br />
extra traffic then you will still only receive the<br />
$20 fare.<br />
Not all jobs coming from these Corporate<br />
Accounts are fixed price and many are Price<br />
Required Jobs, please see 5.28.<br />
By accepting a Fixed Price Job you are<br />
agreeing to only be paid the fixed fare<br />
allocated to that zone.<br />
Figure 59: Fixed Price Zones<br />
A Fixed Fare job can be identified by the words<br />
“Fixed Price Fare”.<br />
The fixed price will be stated in the job screen,<br />
as seen in Figure 5761.<br />
Figure 60: Fixed Price Job Screen<br />
5.28. Price Required Jobs<br />
Some bookings will require a price to be provided by the driver at the end of the fare. These are<br />
typically <strong>Premier</strong> account. These bookings will be identified with the ! Price Required on Job<br />
text at the top of the job information display as shown in Figure 61.<br />
At the completion of the fare (i.e. when the taximeter is cleared) the fare entry screen will be<br />
displayed as shown in Figure 62. The driver is required to enter the total fare amount followed<br />
by [OK].<br />
Figure 61: Price required job display.<br />
Figure 62: Fare entry screen.<br />
© 2006 Mobile Tracking and Data Pty. Ltd. Page 29 of 50<br />
Revision 0.2, 9 November 2006
If the total fare was $14.50, the driver would<br />
enter 1450 followed by [OK]. If the fare was<br />
$20.00, the amount 2000 followed by [OK]<br />
would be entered. In this example a fare of<br />
$9.50 has been entered.<br />
A summary screen as shown in Figure 63 will<br />
then be displayed which details the previously<br />
entered pricing information. The fare details<br />
can be changed if required by selecting the<br />
corresponding number [1] and re-entering the<br />
fare amount.<br />
Figure 63: Price summary screen.<br />
Once the correct pricing information has been<br />
entered, the [Finalise] option must be<br />
selected to send the pricing information to the<br />
dispatch system. After this has been<br />
completed, the driver can then become<br />
available for their next job.<br />
Any completed pricing information is stored<br />
along with the job and can be retrieved if<br />
required by displaying the job and selecting<br />
the Pricing Details item, which in this<br />
example would be accessed using the [3]<br />
button.<br />
Figure 64: Job display with pricing details.<br />
5.29. Corporate Account Jobs<br />
Corporate Account jobs are work that is<br />
specifically from <strong>Premier</strong>’s high volume<br />
corporate users. This work is to be submitted<br />
on purple dockets (Figure 67).<br />
<strong>Premier</strong>’s Corporate work is only sent out to<br />
drivers who are recognised as Quality. This<br />
means if a driver behaves badly or incorrectly<br />
they can be taken off Corporate Account work.<br />
Corporate Account jobs require an<br />
authorization number to be recorded on a<br />
purple docket. Without this, you will not get<br />
paid for the job.<br />
Figure 65: Authorization Number<br />
The system will provide you with an authorization number if an acceptable fare has been entered<br />
as shown in Figure 65. Note this is called an Order # in <strong>MTData</strong>.<br />
You should record this Order # on the docket in the relevant area. For <strong>Premier</strong> Account Dockets,<br />
the Order # should be recorded in the field marked Authorization No as shown in Figure 66<br />
below. You can optionally record the authorization number on the docket stub for your own<br />
records – as shown below.<br />
© 2006 Mobile Tracking and Data Pty. Ltd. Page 30 of 50<br />
Revision 0.2, 9 November 2006
5.30. Driver Alarm<br />
Figure 66: Sample <strong>Premier</strong> Docket with Authorization Number Recorded<br />
A driver alarm switch<br />
is provided which can be used in cases where the driver is threatened with<br />
physical violence or is in immediate danger. It is important to press and hold the button for at<br />
least 5 seconds to activate an alarm.<br />
When your alarm has been activated, a “!” is displayed after<br />
the car number as shown in<br />
Figure 67. This is the only indication in the<br />
vehicle that the driverr alarm has been activated. The<br />
equipment will appear to continue to operate normally.<br />
By pressing your alarm, the query operator back at base is immediately alerted to your alarm<br />
and now has the ability to listen to what<br />
is happening in your<br />
vehicle. The location of your<br />
vehicle is also provided so help can be sent if required.<br />
Once the alarm is activated, it is importantt to try and describe what is happening in your taxi so<br />
the operator can assess the situation and provide the police<br />
with as much information as<br />
possible.<br />
Say things like:<br />
Figure 67: Driver alarm indicator.<br />
“Don’t shoot me with that gun” or<br />
“Don’t stab me with that knife I have<br />
three children” or<br />
“Don’t hurt me, I don’t want to fight you”<br />
Always obey the instructions given by the attacker – your personal safety is<br />
the only thing that is<br />
important.<br />
Once an alarm has been activated, it can only be cleared by the query operator.<br />
© 2006 Mobile Tracking and Data Pty. Ltd.<br />
Revision 0.2,<br />
9 November 2006<br />
Page 31 of 50
If you accidently set off the alarm you should:<br />
<br />
<br />
<br />
Pull over to the side of the road<br />
Check the screen is displaying the “Exclamation Mark”<br />
Say out loud that “I’m OK” and say your “authority number”. Repeat this several times.<br />
The <strong>Premier</strong> base supervisor will listen carefully and then reset your alarm.<br />
You may also need to return to the Granville base to have your camera reset – you must not<br />
continue to work if the camera indicates it is locked – the red and green lights will flash on the<br />
hand control and you must return to the base immediately where this can be reset at any time,<br />
day or night.<br />
Remember – stay safe – and if you are attacked or under threat use the alarm procedures. Make<br />
sure you keep your driver handbook with you at all times for every shift and re-read the alarm<br />
section from time-to-time to make sure you are aware. Finally, always:<br />
<br />
<br />
test your camera at the start of each shift;<br />
locate the alarm switch – the taxi you’re about to drive may be different.<br />
5.31. Advance bookings<br />
A driver’s ability to access advance bookings is determined by the conditions attached to his<br />
logon number. Only Maxi and Peninsula drivers are able to view advance bookings by selecting<br />
[Next] from the Main Menu and then [Adv Book] as shown in Figure 68 and Figure 69. The<br />
advance booking screen can be viewed as long as a driver is logged onto the system (i.e. they<br />
do not have to be available for work or plotted).<br />
Figure 68: Driver Main Menu Display.<br />
Figure 69: Driver Next Menu Display.<br />
This will display the advance bookings screen as shown in Figure 70.<br />
If the driver is able to access the Cover Jobs display, then the Advance Bookings and Cover<br />
Jobs displays will provide toggle buttons [] to allow the driver to easily and quickly switch<br />
between the two screens as shown in Figure 70 and Figure 71.<br />
© 2006 Mobile Tracking and Data Pty. Ltd. Page 32 of 50<br />
Revision 0.2, 9 November 2006
Figure 70: Advance Booking Display - Cover Toggle<br />
Button.<br />
Figure 71: Cover Display - Advance Booking Toggle<br />
Button<br />
If there are new advance bookings available to be viewed by the driver, the status line will show<br />
the icon as shown in Figure 72. Once the driver has viewed these jobs, the icon will no<br />
longer be displayed and will only be redisplayed when there are new advance bookings<br />
available to be viewed.<br />
The format of the advance bookings list<br />
display can include a number of fields such<br />
as:<br />
(1). Pickup suburb<br />
(2). Conditions e.g. U for capsules etc.<br />
(3). Destination suburb<br />
(4). Job fleet name<br />
Figure 73 shows an example Advance<br />
Booking list with all available fields displayed.<br />
Figure 72: Advance Booking Indicator.<br />
Figure 73: Advance Booking Display Options.<br />
When viewing the list of current advance bookings, new bookings will be added to the end of the<br />
list as they become available. The [Refresh] option will re-sort the list in date/time order. If<br />
there is more than one page of available advance bookings, the [*Up] and [#Down] options can<br />
be used to navigate through the list.<br />
To request an advance booking, select the<br />
number corresponding to the required booking<br />
from the displayed list of available bookings.<br />
As bookings are taken by other drivers, they<br />
will be grayed out and cannot be requested by<br />
other drivers. The [Refresh] option can be<br />
used to update the list of bookings.<br />
When an advance booking has been<br />
successfully requested by a driver, a message<br />
with the partial booking details will be sent as<br />
shown in Figure 74.<br />
© 2006 Mobile Tracking and Data Pty. Ltd. Page 33 of 50<br />
Revision 0.2, 9 November 2006
Figure 74: Advance Booking Details Message.<br />
To prevent drivers from taking several<br />
advance bookings all due to be picked up on<br />
or about the same time, a minimum time<br />
between bookings of 60 minutes has been<br />
established.<br />
If a driver requests a booking which has a<br />
pickup within 60 minutes of one of their other<br />
advance bookings, a message as shown in<br />
Figure 75 will be displayed.<br />
Figure 75: Advance Booking Time Restriction.<br />
Once an advance booking has been successfully requested, it is “reserved” for that driver.<br />
However, you are required to reconfirm your ability to do the job a short time prior to the actual<br />
pickup time, as shown in Figure 76. This time is typically 30 minutes prior to the booking but may<br />
be a few minutes longer, depending on the pickup area, to allow for traffic in built-up areas.<br />
When a driver logs on to the system, they can be provided a summary of upcoming “assigned”<br />
bookings as shown in Figure 77. These will include advance bookings requested by the driver<br />
(identified by an [A]). These jobs will be sorted in date/time order.<br />
Figure 76: Advance Booking – Reconfirmation<br />
Figure 77: Driver Assigned Booking Summary.<br />
To check the advance bookings at any other time<br />
during the shift, the driver can check the advance<br />
booking messages received at the start of the<br />
shift.<br />
To do this select [Next] from the Main Menu and<br />
choose [Msgs]. Then select the message folder<br />
relating to Assigned Bookings – in the example in<br />
Figure 78 you would select 1.<br />
Figure 78: Messages Screen.<br />
The message listing of Assigned and Advance bookings can then be reviewed by selecting the<br />
Assigned Booking Summary in Figure 79.<br />
© 2006 Mobile Tracking and Data Pty. Ltd. Page 34 of 50<br />
Revision 0.2, 9 November 2006
If a future advance booking is subsequently cancelled by the customer, the driver will be advised<br />
with a message as shown in Figure 80.<br />
Figure 79: Reviewing Advance bookings Message.<br />
Figure 80: Advance Booking Cancellation Message.<br />
5.32. Driver Destination<br />
The Driver Destination feature allows a driver to<br />
nominate a restricted region in which they wish to<br />
work. This feature is intended to assist a driver at<br />
changeover/school run times and should be used<br />
only when necessary as it will limit the number of<br />
jobs a driver will receive.<br />
The Driver Destination option can be accessed<br />
from the Main Menu by selecting the [Next]<br />
option followed by [Tools]. This will display the<br />
Tools Menu as shown in Figure 81. The Driver<br />
Destination can then be selected using the<br />
[Driver Dest] option button.<br />
Figure 81: Tools menu.<br />
The Driver Destination menu is shown in Figure 82. To set a Driver Destination select the [New]<br />
option. Enter the area number of their destination using the keypad as shown in Figure 83.<br />
© 2006 Mobile Tracking and Data Pty. Ltd. Page 35 of 50<br />
Revision 0.2, 9 November 2006
Figure 82: Driver destination display.<br />
Figure 83: Driver destination area entry.<br />
Once the destination area number has been<br />
specified, a region is automatically created as<br />
shown in Figure 84.<br />
The points labeled , , , and can be<br />
moved to adjust the shape of the Driver<br />
Destination. The [*Up] and [#Down] options<br />
can be used to zoom the area display out and<br />
in as required.<br />
Figure 84: Driver destination creation.<br />
In the example in Figure 85, point 4 has been<br />
selected for adjustment.<br />
Using the keypad, select a point to move using<br />
its corresponding number. The point will be<br />
highlighted in red and the permitted range of<br />
movement displayed as shown in Figure 85.<br />
The keypad arrow keys ▲,,▼, can then be<br />
used to move the selected point as required.<br />
Once the required Driver Destination has been<br />
created, use the [Set] option to send the<br />
request to the dispatch system. If the request<br />
is successful, a message as shown in Figure<br />
86 is displayed. Whenever a Driver<br />
Destination is currently set, a D is displayed on<br />
the status line to indicate this to the driver.<br />
Figure 85: Driver destination point editing.<br />
Driver<br />
Destination<br />
Indicator<br />
Figure 86: Driver destination set.<br />
© 2006 Mobile Tracking and Data Pty. Ltd. Page 36 of 50<br />
Revision 0.2, 9 November 2006
To clear or remove a set Driver Destination, use<br />
the [Clear] option available from the Destination<br />
Menu.<br />
The [Clear] option is only available if a Driver<br />
Destination is currently set.<br />
When a Driver Destination is successfully cleared<br />
a confirmation message will be displayed and the<br />
D indicator cleared from the status line.<br />
Figure 87: Driver destination clear option.<br />
Appendix 1 – Dispatch Rules<br />
This appendix covers how dispatch rules work in areas with and without ranks. By understanding<br />
how the system dispatches work you will be able to maximize your chances to receive work.<br />
GPS Dispatch<br />
The <strong>Premier</strong> dispatch system breaks the Sydney Metropolitan area down into areas. A list of<br />
these is provided in Appendix 2 – Areas and Ranks.<br />
For most areas within Sydney, <strong>Premier</strong> operates a system called GPS dispatch. This draws<br />
imaginary rings around the pickup location and looks for cars within each ring. Figure 89, below<br />
shows an example of GPS dispatch. The rings are centered on the pickup address and in this<br />
example there are two rings. The inner ring is called Ring 1, and the outer ring – Ring 2.<br />
When cars make themselves GPS Available (see section 5.5), they are telling the dispatch<br />
system they are available for radio work. The longer the car waits for a job, the more GPS time<br />
they have as shown on the status bar on their screen. In Figure 88 below, the car has 97<br />
minutes of GPS Time.<br />
Vehicle<br />
Status<br />
Figure 88: Status line.<br />
Below is an example of how the dispatch system chooses the best car for a given job.<br />
© 2006 Mobile Tracking and Data Pty. Ltd. Page 37 of 50<br />
Revision 0.2, 9 November 2006
Example 1 – GPS Dispatch<br />
A customer rings up for a taxi, in Auburn. There are three cars, Car 1, Car 2 and Car 3 all close<br />
by as shown in Figure 89– so who gets the job<br />
There are two taxis<br />
inside Ring 1:<br />
Car 1, and<br />
Car 2.<br />
A third taxi, Car 3, is also<br />
nearby but in Ring 2.<br />
Let’s assume:<br />
Car 1 has 45 minutes<br />
of GPS Time;<br />
Car 2, has 30 mins;<br />
Car 3 has 60 mins.<br />
So who gets the job<br />
Figure 89: Example 1 - GPS Dispatch.<br />
When the job is broadcast across the radio network, by the dispatch system, Car 1 is offered the<br />
job first – as it has the most GPS Time inside Ring 1.<br />
If Car 1 rejects the job, it is then offered to Car 2. It is the next car, inside ring 1.<br />
Let’s assume that Car 2 also rejects the job, the next car to be offered the job is Car 3.<br />
Even though Car 3 has more GPS waiting time than the other cars, it gets offered the job last, as<br />
it is not inside Ring 1.<br />
This tries to offer work to the best available car to ensure drivers that are close to the pickup and<br />
have been waiting the longest time will receive the job.<br />
In this example, cars 1 and 2 would both receive a reject penalty, losing all their GPS Time and<br />
receive a two minute penalty before they can become available for work. If Car 3 rejected the<br />
job, there would be no penalty, as the reject penalty only applies to cars in Ring 1.<br />
© 2006 Mobile Tracking and Data Pty. Ltd. Page 38 of 50<br />
Revision 0.2, 9 November 2006
Example 2 – Rank Preference<br />
Currently there is a rank at Auburn station, and cars plotted on the rank get priority on jobs<br />
offered in the Auburn area – Area 2 (shown in the light-red shaded area in Figure 90).<br />
Let’s assume:<br />
Car 1 has 45 mins;<br />
Car 2 has 30 mins;<br />
Car 3 has 60 mins;<br />
Car 4 is in Position 1<br />
on Auburn rank; and<br />
Car 5 is in Position 2.<br />
So who gets the job<br />
This time Car 4 wins the<br />
job as it is the first car<br />
on the rank.<br />
If this job is rejected by<br />
Car 4, then Car 5 is<br />
offered the job.<br />
If both cars on the rank<br />
reject the job it is<br />
offered to cars based<br />
on GPS rings and<br />
would work exactly as<br />
shown in Example 2.<br />
Figure 90: Example 3 - GPS Dispatch with Rank Preference.<br />
Note: if the pickup address was outside of Area 2, say at St Johns Rd, the cars on Auburn rank<br />
would not be offered the job ahead of other cars (rank preference); the system would use GPS<br />
Dispatch instead.<br />
For jobs that are located inside an area with a rank, priority is given to:<br />
1. Cars plotted on the rank – in plot position order;<br />
2. Cars inside Ring 1 with the most GPS time;<br />
3. Cars inside Ring 2 with the most GPS time.<br />
© 2006 Mobile Tracking and Data Pty. Ltd. Page 39 of 50<br />
Revision 0.2, 9 November 2006
Appendix 2 – Areas and Ranks<br />
The following information is provided:<br />
<br />
<br />
<br />
Areas listed in numerical order;<br />
Areas listed in alphabetical order;<br />
A list of ranks.<br />
Table 1 – Areas in Numeric Order<br />
Areas that contain ranks are shown in bold. The ranks themselves are shown in Table 3.<br />
Area<br />
Number<br />
Area<br />
Area<br />
Number<br />
Area<br />
1 Granville 36 Mosman<br />
2 Auburn 37 Neutral Bay<br />
3 Guildford West 38 North Sydney<br />
4 Westmead 39 Crows Nest<br />
5 Pendle Hill 40 St Leonards<br />
6 Seven Hills 41 Artarmon<br />
7 Seven Hills North 42 Lane Cove<br />
8 Blacktown South 43 Chatswood<br />
9 Marayong 44 Cammeray<br />
10 Greystanes 45 Willoughby<br />
11 Glendenning 46 Roseville - Lindfield<br />
12 Mt Druitt 47 Killara - Gordon<br />
13 St Clair 48 Pymble - St Ives<br />
14 Plumpton 49 Turramurra - Wahroonga<br />
15 Whalan 50 Hornsby - Normanhurst<br />
16 Cambridge Park 51 Berowra - Mt Colah<br />
17 Penrith 52 West Pennant Hills<br />
18 Penrith South 53 Epping<br />
19 Merrylands West 54 Hunters Hill<br />
20 Huntingwood 55 Ryde<br />
21 Cranebrook 56 Macquarie Park<br />
22 Kingswood 57 Eastwood<br />
23 Blacktown North 58 West Ryde<br />
24 Silverdale 59 Ermington<br />
25 Cobbitty 60 Rydalmere<br />
26 Camden Airport 61 Dundas<br />
27 Camden 62 Carlingford<br />
28 Narellan 63 Drummoyne<br />
29 Newport 64 Balmain<br />
30 Mona Vale 65 North Parramatta<br />
31 Collaroy 66 Llandilo<br />
32 Dee Why 67 Castlereagh<br />
33 Brookvale 68 Merrylands<br />
34 Manly 69 Guildford East<br />
35 Balgowlah 70 Appin<br />
© 2006 Mobile Tracking and Data Pty. Ltd. Page 40 of 50<br />
Revision 0.2, 9 November 2006
Area<br />
Number<br />
Area<br />
Area<br />
Number<br />
Area<br />
71 Ambarvale 106 Strathfield<br />
72 Bradbury 107 Enfield<br />
73 Campbelltown 108 Croydon<br />
74 Claymore 109 Belmore<br />
75 Raby 110 Mortdale<br />
76 Leumeah 111 Beverley Hills<br />
77 Minto 112 Revesby<br />
78 Concord 113 Hurstville<br />
79 Silverwater 114 Sutherland<br />
80 Rosehill 115 Cronulla<br />
81 Parramatta 116 Wetherill Park<br />
82 Rockdale 117 Fairfield<br />
83 Airport 118 Prairiewood<br />
84 Marrickville 119 Horsley Park<br />
85 Leichhardt 120 Greenfield Park<br />
86 Enmore 121 Cabramatta<br />
87 Pyrmont - Glebe 122 Green Valley<br />
88 Chippendale 123 Hoxton Park<br />
89 Redfern 124 Liverpool<br />
90 Surry Hills 125 Prestons<br />
91 Paddington 126 Casula<br />
92 Potts Point 127 Oran Park<br />
93 Bellevue Hill 128 Edmondson Park<br />
94 Vaucluse 129 Ingleburn<br />
95 Bondi 130 Kemps Creek<br />
96 Randwick 131 Terrey Hills<br />
97 Moore Park 132 Belrose<br />
98 Alexandria 133 Frenchs Forest<br />
99 Eastlakes 134 Windsor<br />
100 Port Botany 135 Riverstone - Schofields<br />
101 Chipping Norton 136 Quakers Hill<br />
102 Condell Park 137 Winston Hills<br />
103 Chester Hill 138 North Rocks<br />
104 Lidcombe 139 Bella Vista<br />
105 Greenacre 140 Baulkham Hills<br />
© 2006 Mobile Tracking and Data Pty. Ltd. Page 41 of 50<br />
Revision 0.2, 9 November 2006
Area<br />
Number<br />
Area<br />
Area<br />
Number<br />
Area<br />
141 Castle Hill 203 Delwood<br />
142 Glenhaven 207 Carlingford West<br />
143 Pennant Hills 208 Marsfield<br />
144 Rouse Hill - Kellyville 209 Westleigh<br />
145 Oakville - Nelson 211 Merrylands East<br />
146 Annangrove - Kenthurst 212 Epping West<br />
147 Round Cnr - Mid Dural 213 Seven Hills West<br />
148 North Richmond 214 Blacktown CBD<br />
149 Wilberforce 216 Bankstown Airport<br />
150 East Kurrajong 221 NRMA Blacktown<br />
151 Cattai - Wiseman's 223 NRMA Penrith<br />
152 Arcadia - Dural 225 AAMI Willoughby<br />
153 Brooklyn - Mooney Mooney 227 Top Ryde<br />
154 Lower Mountains 228 Macquarie Park<br />
155 Mid Mountains 229 Gladesville<br />
156 Upper Mountains 230 Five Dock<br />
157 Emu Plains 232 Chatswood West<br />
158 City South West 233 Castle Cove<br />
159 City West 234 Milsons Point<br />
160 City North West 235 Cremorne<br />
161 City South East 236 Spit Junction<br />
162 City North East<br />
163 Out of Area<br />
193 Beecroft<br />
194 Bella Vista AAMI<br />
195 Chester Hill West<br />
197 Richmond<br />
199 Auburn North<br />
200 Regents Park – Berala<br />
201 Silverwater West<br />
202 North Ryde<br />
As regular updates are made to the system, please check the driver website for the latest information,<br />
www.premiercabs.com.au/drivers<br />
© 2006 Mobile Tracking and Data Pty. Ltd. Page 42 of 50<br />
Revision 0.2, 9 November 2006
Table 2 – Areas in Alphabetical Order<br />
Areas that contain ranks are shown in bold. The ranks themselves are shown in Table 3.<br />
Area<br />
Area<br />
Number<br />
Area<br />
Area Number<br />
Airport 83 Castle Hill 141<br />
Alexandria 98 Castle Cove 233<br />
Ambarvale 71 Castlereagh 67<br />
Annangrove - Kenthurst 146 Casula 126<br />
Appin 70 Cattai - Wiseman's 151<br />
Arcadia - Dural 152 Chatswood 43<br />
Artarmon 41 Chatswood West 232<br />
Auburn 2 Chester Hill 103<br />
Auburn North 199 Chester Hill West 195<br />
Chippendale 88<br />
Balgowlah 35 Chipping Norton 101<br />
Balmain 64 City North East 162<br />
Bankstown Airport 216 City North West 160<br />
Baulkham Hills 140 City South East 161<br />
Beecroft 193 City South West 158<br />
Bella Vista 139 City West 159<br />
Bella Vista AAMI 194 Claymore 74<br />
Bellevue Hill 93 Cobbitty 25<br />
Belmore 109 Collaroy 31<br />
Belrose 132 Concord 78<br />
Berowra - Mt Colah 51 Condell Park 102<br />
Beverley Hills 111 Cranebrook 21<br />
Blacktown CBD 214 Cremorne 235<br />
Blacktown North 23 Cronulla 115<br />
Blacktown NRMA 221 Crows Nest 39<br />
Blacktown South 8 Croydon 108<br />
Bondi 95<br />
Bradbury 72 Dee Why 32<br />
Brooklyn - Mooney Mooney 153 Delwood 203<br />
Brookvale 33 Drummoyne 63<br />
Cabramatta 121<br />
Dundas 61<br />
Cambridge Park 16 East Kurrajong 150<br />
Camden 27 Eastlakes 99<br />
Camden Airport 26 Eastwood 57<br />
Cammeray 44 Edmondson Park 128<br />
Campbelltown 73 Emu Plains 157<br />
Carlingford 62 Enfield 107<br />
Carlingford West 207 Enmore 86<br />
© 2006 Mobile Tracking and Data Pty. Ltd. Page 43 of 50<br />
Revision 0.2, 9 November 2006
Area<br />
Area<br />
Number<br />
Area<br />
Area Number<br />
Epping 53 Llandilo 66<br />
Epping West 212 Lower Mountains 154<br />
Ermington 59<br />
Macquarie Park 228<br />
Fairfield 117 Macquarie Uni 56<br />
Five Dock 230 Manly 34<br />
Frenchs Forest 133 Marayong 9<br />
Marrickville 84<br />
Gladesville 229 Marsfield 208<br />
Glendenning 11 Merrylands 68<br />
Glenhaven 142 Merrylands East 211<br />
Granville 1 Merrylands West 19<br />
Green Valley 122 Mid Mountains 155<br />
Greenacre 105 Milsons Point 234<br />
Greenfield Park 120 Minto 77<br />
Greystanes 10 Mona Vale 30<br />
Guildford East 69 Moore Park 97<br />
Guildford West 3 Mortdale 110<br />
Mosman 36<br />
Hornsby - Normanhurst 50 Mt Druitt 12<br />
Horsley Park 119<br />
Hoxton Park 123 Narellan 28<br />
Hunters Hill 54 Neutral Bay 37<br />
Huntingwood 20 Newport 29<br />
Hurstville 113 North Parramatta 65<br />
North Richmond 148<br />
Ingleburn 129 North Rocks 138<br />
North Sydney 38<br />
Kemps Creek 130<br />
Killara - Gordon 47 Oakville - Nelson 145<br />
Kingswood 22 Oran Park 127<br />
Out of Area 163<br />
Lane Cove 42<br />
Leichhardt 85<br />
Leumeah 76<br />
Lidcombe 104<br />
Liverpool 124<br />
© 2006 Mobile Tracking and Data Pty. Ltd. Page 44 of 50<br />
Revision 0.2, 9 November 2006
Area<br />
Area<br />
Number<br />
Area<br />
Area<br />
Number<br />
Paddington 91 Seven Hills 6<br />
Parramatta 81 Seven Hills North 7<br />
Pendle Hill 5 Seven Hills West<br />
Pennant Hills 143 Silverdale 24<br />
Penrith 17 Silverwater 79<br />
Penrith NRMA 223 Silverwater West 201<br />
Penrith South 18 Spit Junction 236<br />
Plumpton 14 St Clair 13<br />
Port Botany 100 St Leonards 40<br />
Potts Point 92 Strathfield 106<br />
Prairiewood 118 Surry Hills 90<br />
Prestons 125 Sutherland 114<br />
Pymble - St Ives 48<br />
Pyrmont - Glebe 87 Terrey Hills 131<br />
Top Ryde 227<br />
Quakers Hill 136 Turramurra - Wahroonga 49<br />
Raby 75 Upper Mountains 156<br />
Randwick 96<br />
Redfern 89 Vaucluse 94<br />
Regents Park - Berala 200<br />
Revesby 112 Willoughby AAMI 225<br />
Richmond 197 West Pennant Hills 52<br />
Riverstone - Schofields 135 West Ryde 58<br />
Rockdale 82 Westleigh 209<br />
Rosehill 80 Westmead 4<br />
Roseville - Lindfield 46 Wetherill Park 116<br />
Round Cnr - Mid Dural 147 Whalan 15<br />
Rouse Hill - Kellyville 144 Wilberforce 149<br />
Rydalmere 60 Willoughby 45<br />
Ryde 55 Windsor 134<br />
Winston Hills 137<br />
© 2006 Mobile Tracking and Data Pty. Ltd. Page 45 of 50<br />
Revision 0.2, 9 November 2006
Table 3 – Ranks in Numeric Order<br />
Each rank has a Rank Area Number. Use this number to plot into the rank or use the Auto plot<br />
option as explained in section 5.6.<br />
Rank<br />
Area<br />
Number<br />
Rank Location Hours<br />
Area<br />
Number<br />
Served by<br />
Rank<br />
Area Name<br />
Served by Rank<br />
164 Granville Rank<br />
Russell St,<br />
Granville<br />
24 hrs, 7 days 1 Granville<br />
165 Alfred St Rank (City)<br />
Alfred St,<br />
Circular Quay<br />
166 Lime St Rank (City) Lime Street, City<br />
167 Chifley Sq Rank (City) Phillip St, City<br />
168 Park St Rank (City)<br />
169 Sussex St Rank (City)<br />
170 Homebush Rank<br />
Park St (between<br />
Pitt &<br />
Castlereagh Sts)<br />
City<br />
Sussex St<br />
(between Market<br />
& Druitt Sts -<br />
Darling Park),<br />
City<br />
Herb Elliott Av,<br />
Homebush<br />
7pm - 6am (Mon to<br />
Thu); 7pm Fri to 6am<br />
Mon<br />
7pm - 6am (Mon to<br />
Thu); 7pm Fri to 6am<br />
Mon<br />
7pm - 6am (Mon to<br />
Thu); 7pm Fri to 6am<br />
Mon<br />
7pm - 6am (Mon to<br />
Thu); 7pm Fri to 6am<br />
Mon<br />
7pm - 6am (Mon to<br />
Thu); 7pm Fri to 6am<br />
Mon<br />
160 City North West<br />
159 City West<br />
162 City North East<br />
161 City South East<br />
158 City South West<br />
24 hrs, 7 days 79 Silverwater<br />
171<br />
North Ryde Rank -<br />
Optus<br />
Lyon Park Rd,<br />
North Ryde<br />
24 hrs, 7 days 56 Macquarie Park<br />
173 Lidcombe Rank<br />
174 Auburn Rank<br />
175 AAMI - Bella Vista<br />
Railway St,<br />
Lidcombe<br />
South Pde,<br />
Auburn<br />
Lexington Dr,<br />
Bella Vista<br />
24 hrs, 7 days 104 Lidcombe<br />
24 hrs, 7 days 2 Auburn<br />
24 hrs, 7 days 139 Bella Vista<br />
176 Hornsby Rank<br />
Station St,<br />
Hornsby<br />
24 hrs, 7 days 50<br />
Hornsby -<br />
Normanhurst<br />
© 2006 Mobile Tracking and Data Pty. Ltd. Page 46 of 50<br />
Revision 0.2, 9 November 2006
Rank<br />
Area<br />
Number<br />
Rank Location Hours<br />
Area<br />
Number<br />
Served by<br />
Rank<br />
Area Name<br />
Served by Rank<br />
177 RNS Rank<br />
178 Manly Rank<br />
179 Brookvale Rank<br />
180 Dee Why Rank<br />
181 Narrabeen Rank<br />
182 Mona Vale Rank<br />
183 Frenchs Forest Rank<br />
185 Bella Vista Rank<br />
186 Epping Rank<br />
187 Eastwood Rank<br />
188 West Ryde Rank<br />
189 Ermington Rank<br />
190 Carlingford Rank<br />
191 Pennant Hills Rank<br />
Westbourne St,<br />
St Leonards<br />
Belgrave St,<br />
Manly<br />
Warringah Mall,<br />
Brookvale<br />
Howard Av, Dee<br />
Why<br />
Pittwater Rd,<br />
Narrabeen<br />
Barrenjoey Rd,<br />
Mona Vale<br />
Forest Way,<br />
Frenchs Forest<br />
Woolworths<br />
Way, Bella Vista<br />
Langston Pl,<br />
Epping (East side<br />
of station)<br />
West Pde,<br />
Eastwood (West<br />
side of station)<br />
West Pde, West<br />
Ryde (West side<br />
of station)<br />
Betty Cuthbert<br />
Ave, Ermington<br />
(shopping centre)<br />
Pennant Hills<br />
Rd, Carlingford<br />
(near Carlingford<br />
Court)<br />
Ramsay Rd,<br />
Pennant Hills<br />
(West side of<br />
station)<br />
24 hrs, 7 days 40 St Leonards<br />
24 hrs, 7 days 34 Manly<br />
24 hrs, 7 days 33 Brookvale<br />
24 hrs, 7 days 32 Dee Why<br />
24 hrs, 7 days 31 Collaroy<br />
24 hrs, 7 days 30 MonaVale<br />
24 hrs, 7 days 133 Frenchs Forest<br />
24 hrs, 7 days 139 Bella Vista<br />
24 hrs, 7 days 53 Epping<br />
24 hrs, 7 days 57 Eastwood<br />
24 hrs, 7 days 58 West Ryde<br />
24 hrs, 7 days 59 Ermington<br />
24 hrs, 7 days 62 Carlingford<br />
24 hrs, 7 days 143 Pennant Hills<br />
© 2006 Mobile Tracking and Data Pty. Ltd. Page 47 of 50<br />
Revision 0.2, 9 November 2006
Rank<br />
Area<br />
Number<br />
Rank Location Hours<br />
Area<br />
Number<br />
Served by<br />
Rank<br />
Area Name<br />
Served by Rank<br />
192 Beecroft Rank<br />
196 Chester Hill Rank<br />
198 Merrylands Rank<br />
Hannah St, Beecroft<br />
(West side of station)<br />
Chester Hill Rd,<br />
Chester Hill (South<br />
side of station)<br />
Pitt St, Merrylands<br />
(West side of station)<br />
24 hrs, 7 days 193 Beecroft<br />
24 hrs, 7 days 103 Chester Hill<br />
24 hrs, 7 days 68 Merrylands<br />
204 Delwood Rank Delwood St, Delwood 24 hrs, 7 days 203 Delwood<br />
205 Greystanes Rank<br />
210 Guilford Rank<br />
Cnr Terry & Percy<br />
Sts, Greystanes<br />
Military Rd, Guilford<br />
West<br />
24 hrs, 7 days 10 Greystanes<br />
24 hrs, 7 days 3 Guilford West<br />
215<br />
Blacktown Westpoint<br />
Rank<br />
Alpha St, Blacktown<br />
(on roof of Westpoint<br />
shopping centre)<br />
24 hrs, 7 days 8 Blacktown South<br />
217 Waterloo Rank<br />
NRMA Care & Repair<br />
Centre<br />
24 hrs, 7 days 218 Delwood<br />
222<br />
NRMA Blacktown<br />
Rank<br />
1 Butterfield St,<br />
Blacktown<br />
24 hrs, 7 days 221<br />
NRMA<br />
Blacktown<br />
224 NRMA Penrith Rank<br />
226<br />
AAMI Rank -<br />
Willoughby<br />
231 Macquarie Uni Rank<br />
237 Crows Nest Rank<br />
238 Chatswood West Rank<br />
239 Artarmon Rank<br />
240 Coxs Rd Rank<br />
59 Jack Williams Dr,<br />
Penrith<br />
120 Penshurst St,<br />
Willoughby (AAMI<br />
complex)<br />
Herring Rd,<br />
Macquarie Park<br />
(outside shopping<br />
centre)<br />
Burlington St, Crows<br />
Nest (cnr Alexander<br />
St)<br />
Victoria Ave,<br />
Chatswood (west side<br />
of station)<br />
Elizabeth St,<br />
Artarmon (northern<br />
side of station)<br />
Coxs Rd, North Ryde<br />
(off Lane Cove Rd)<br />
24 hrs, 7 days 223 NRMA Penrith<br />
24 hrs, 7 days 45<br />
AAMI<br />
Willoughby<br />
24 hrs, 7 days 56 Macquarie Uni<br />
24 hrs, 7 days 39 Crows Nest<br />
24 hrs, 7 days 232 Chatswood West<br />
24 hrs, 7 days 41 Artarmon<br />
24 hrs, 7 days 55 Ryde<br />
© 2006 Mobile Tracking and Data Pty. Ltd. Page 48 of 50<br />
Revision 0.2, 9 November 2006
Rank<br />
Area<br />
Number<br />
241 Five Dock Rank<br />
Rank Location Hours<br />
Garfield St, Five<br />
Dock (cnr of<br />
Thompson Lane)<br />
Area<br />
Number<br />
Served by<br />
Rank<br />
Area Name<br />
Served by Rank<br />
24 hrs, 7 days 230 Five Dock<br />
242 Gladesville Rank<br />
243 Top Ryde Rank<br />
244 Strathfield Rank<br />
245 Mosman Rank<br />
246 Neutral Bay Rank<br />
247 Chatswood Rank<br />
Jordon St, Gladesville<br />
(facing Western Cr)<br />
Pope Rd, Top Ryde<br />
(outside shopping<br />
centre)<br />
Albert Rd, Strathfield<br />
(south side of station)<br />
Avenue Rd, Mosman<br />
(btw Gladstone Ave &<br />
Military Rd)<br />
Rangers Rd, Neutral<br />
Bay (btw Yeo St &<br />
Military Rd)<br />
Anderson St,<br />
Chatswood (btw<br />
Victoria Ave &<br />
Endeavour St)<br />
24 hrs, 7 days 229 Gladesville<br />
24 hrs, 7 days 227 Top Ryde<br />
24 hrs, 7 days 106 Strathfield<br />
24 hrs, 7 days 36 Mosman<br />
24 hrs, 7 days 37 Neutral Bay<br />
24 hrs, 7 days 43 Chatswood<br />
© 2006 Mobile Tracking and Data Pty. Ltd. Page 49 of 50<br />
Revision 0.2, 9 November 2006
Appendix 3 – M Codes and Their Meanings<br />
Throughout <strong>MTData</strong> and <strong>Premier</strong> systems “M Codes” are used to define a particular event<br />
occurring. M Codes are used mainly in communication between the <strong>Premier</strong> Base and a vehicle.<br />
The list below shows all currently used M Codes and their meanings.<br />
M Code<br />
Meaning<br />
M1<br />
M3<br />
M4<br />
M6<br />
M7<br />
M8<br />
M9<br />
M10<br />
M11<br />
M12<br />
M13<br />
M16<br />
M19<br />
M20<br />
M21<br />
M22<br />
M23<br />
M24<br />
M25<br />
M26<br />
M27<br />
M40<br />
M50<br />
Your car is outside the premises, ring customer<br />
No job<br />
No job, service fees apply<br />
Local destination<br />
Account job<br />
Passenger contacted, do not start meter until passenger in vehicle<br />
Unacceptable passenger, i.e. intoxicated<br />
Regular client<br />
Incapacitated passenger, please assist<br />
Repeat of message<br />
Driver under attack<br />
Parcel booking<br />
Offload from another network<br />
Possible M13, used to alert query to possible threat<br />
One passenger<br />
Two passengers<br />
Three passengers<br />
Four passengers<br />
Five passengers<br />
Six passengers<br />
Requires answer to offload<br />
Subsidised fare, 50% on voucher<br />
Needs wheelchair access vehicle<br />
© 2006 Mobile Tracking and Data Pty. Ltd. Page 50 of 50<br />
Revision 0.2, 9 November 2006