
You also want an ePaper? Increase the reach of your titles
YUMPU automatically turns print PDFs into web optimized ePapers that Google loves.
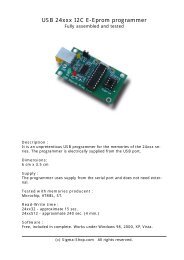
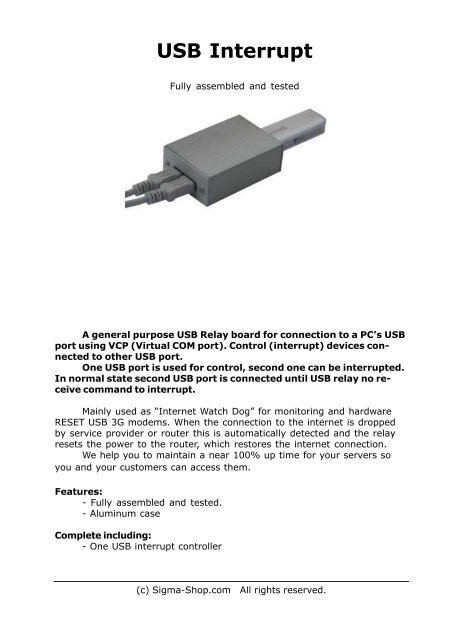
<strong>USB</strong> <strong>Interrupt</strong><br />
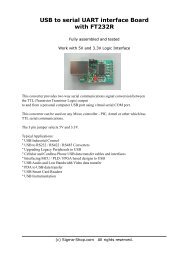
Fully assembled and tested<br />
A general purpose <strong>USB</strong> Relay board for connection to a PC’s <strong>USB</strong><br />
port using VCP (Virtual COM port). Control (interrupt) devices connected<br />
to other <strong>USB</strong> port.<br />
One <strong>USB</strong> port is used for control, second one can be interrupted.<br />
In normal state second <strong>USB</strong> port is connected until <strong>USB</strong> relay no receive<br />
command to interrupt.<br />
Mainly used as “Internet Watch Dog” for monitoring and hardware<br />
RESET <strong>USB</strong> 3G modems. When the connection to the internet is dropped<br />
by service provider or router this is automatically detected and the relay<br />
resets the power to the router, which restores the internet connection.<br />
We help you to maintain a near 100% up time for your servers so<br />
you and your customers can access them.<br />
Features:<br />
- Fully assembled and tested.<br />
- Aluminum case<br />
Complete including:<br />
- One <strong>USB</strong> interrupt controller<br />
(c) Sigma-Shop.com All rights reserved.
Dimensions:<br />
40 mm / 20 mm / 60 mm<br />
Drivers:<br />
- are available to work with the following operating systems :<br />
Windows Vista x64, Windows XP x64, Windows Server 2003 x64, Windows<br />
Vista, Windows XP, Windows Server 2003, Windows 2000, Windows ME,<br />
Windows 98, Linux, Mac OS X, Mac OS 9, Mac OS 8, Windows CE.NET (Version<br />
4.2 and greater)<br />
Communication Parameters:<br />
8 Data, 1 Stop, No Parity<br />
Baud rate : 9600<br />
Commands:<br />
OFF command: “FF 01 01” (HEX) or “255 1 1” (DEC)<br />
ON command: “FF 01 00” (HEX) or “255 1 0” (DEC)<br />
NOTE : Each command consists in 3 binary bytes (shown in hexadecimal<br />
below) without any space!<br />
(c) Sigma-Shop.com All rights reserved.
You have to download the drivers from FTDI website :<br />
http://www.ftdichip.com/Drivers/VCP.htm<br />
http://www.ftdichip.com/Drivers/CDM/CDM%202.04.06%20WHQL%20Certified.zip<br />
Unzip it to your own folder ……<br />
When you connect the <strong>USB</strong> board, the following message appears: FOUND<br />
NEW HARDWARE and drives need to be installed.<br />
When you connect the <strong>USB</strong> board to the PC the red and green LED flashes<br />
2,3 times and turn off. When the red LED and the green LED flashes means<br />
that there is a communication between the programmer and PC.<br />
1. Drivers' installation:<br />
(c) Sigma-Shop.com All rights reserved.
(c) Sigma-Shop.com All rights reserved.
After the drivers' installed, an additional COM port appears in the Device<br />
Manager of Windows- usually it is COM3:<br />
(c) Sigma-Shop.com All rights reserved.
(c) Sigma-Shop.com All rights reserved.
Testing :<br />
1. Download “<strong>USB</strong>Relay_test.exe” from :<br />
http://www.sigma-shop.com/information/<strong>USB</strong>_Relay/<strong>USB</strong>Relay_test.exe<br />
2. Connect board to <strong>USB</strong> and run software.<br />
If everything is ok this should appear :<br />
If you get this message you see the following error :<br />
that means that you do not have the latest version of Microsoft .NET Framework<br />
installed on your computer.<br />
The program has to be installed on your computer in order to use the software.<br />
You can download this from there<br />
http://www.microsoft.com/downloads/details.aspxFamilyId=333325FD-<br />
AE52-4E35-B531-508D977D32A6&displaylang=en<br />
(c) Sigma-Shop.com All rights reserved.
3. Software will detect all COM ports you have and there must be one more<br />
(Virtual COM port) :<br />
4. Choose COM port. Click on “OPEN” button and using “ON” and “OFF” buttons<br />
you can test relays.<br />
NOTE : <strong>USB</strong> one relay no support “All ON” and “All OFF” buttons<br />
(c) Sigma-Shop.com All rights reserved.
Software examples :<br />
ProfiLab EXPERT by ABACOM :<br />
You can made similar application with ProfiLab within minutes !<br />
Application :<br />
http://www.sigma-shop.com/information/<strong>USB</strong>_Relay/ABACOM_ProfiLabExpert_one_channel_relay.zip<br />
ABACOM homepage :<br />
http://www.abacom-online.de<br />
(c) Sigma-Shop.com All rights reserved.
Sample VB6 code :<br />
Private Sub cmdOff_Click()<br />
With MSComm1<br />
'make sure the serial port is open<br />
If .PortOpen = False Then .PortOpen = True<br />
'send the data<br />
.Output = Chr$(255)<br />
.Output = Chr$(1)<br />
.Output = Chr$(0)<br />
End With 'MSComm1<br />
End Sub<br />
Private Sub cmdOn_Click()<br />
With MSComm1<br />
'make sure the serial port is open<br />
If .PortOpen = False Then .PortOpen = True<br />
'send the data<br />
.Output = Chr$(255)<br />
.Output = Chr$(1)<br />
.Output = Chr$(1)<br />
End With 'MSComm1<br />
End Sub<br />
Sample C# code :<br />
private void button1_ON_Click(object sender, EventArgs e)<br />
{<br />
serialPort1.Write(new byte[] { 0xFF, 0x01, 0x01 }, 0, 3);<br />
}<br />
private void button1_OFF_Click(object sender, EventArgs e)<br />
{<br />
serialPort1.Write(new byte[] { 0xFF, 0x01, 0x00 }, 0, 3);<br />
}<br />
(c) Sigma-Shop.com All rights reserved.
Linux :<br />
Instructions to install new driver: You may require the sources matching the<br />
current kernel to be installed on your system (and built).<br />
To install the ftdi_sio driver use the following steps:<br />
1. Create a temporary folder in your linux machine.<br />
2. Extract the files from ftdi_sio.tar.gz file to your temporary folder<br />
"gunzip ftdi_sio.tar.gz"<br />
"tar -xvf ftdi_sio.tar"<br />
3. Build the driver<br />
"make"<br />
4. Plug in your ftdi device<br />
5. Check to see if default driver was loaded<br />
"lsmod" - you will see ftdi_sio if a driver is loaded<br />
6. Remove the default installed driver<br />
"rmmod ftdi_sio"<br />
7. Install the newly built driver<br />
"insmod ftdi_sio.o"<br />
NOTES:<br />
1.This driver was adapted from the 2.4.32 kernel to support both the 2232C<br />
and 232R chip<br />
2.There is no need to follow this procedure if you want 232R chip supprt. The<br />
232BM driver will be sufficient.Changes made to the driver for the 232R chip<br />
are purly cosmetic (plug/unplug will appear as a 232R chip in the kernel log).<br />
In this case the driver is correctly installed and with the bash's command :<br />
---------------------------------<br />
The old kernel's "echo" commands:<br />
echo $'\xff\x01\x01' > tty<strong>USB</strong>0<br />
the relay 1 go ON.<br />
echo $'\xff\x01\x00' > tty<strong>USB</strong>0<br />
the relay 1 go OFF.<br />
---------------------------------<br />
The new kernel's "echo" commands:<br />
echo -e '\xff\x01\x01' > /dev/tty<strong>USB</strong>0<br />
the relay 1 go ON.<br />
echo -e '\xff\x01\x00' > /dev/tty<strong>USB</strong>0<br />
the relay 1 go OFF.<br />
---------------------------------<br />
(c) Sigma-Shop.com All rights reserved.
Script code<br />
(writen by Vivek Gite from nixCraft)<br />
# ------------------------<br />
HOSTS="109.199.131.131"<br />
# no ping request<br />
COUNT=4<br />
while :<br />
do<br />
count=$(ping -c $COUNT $HOSTS | grep 'received' | awk -F',' '{ print $2 }'<br />
| awk '{ print $1 }')<br />
if [ $count -eq 0 ]; then<br />
# 100% failed<br />
stty -F /dev/tty<strong>USB</strong>0 cs8 9600 ignbrk -brkint -icrnl -imaxbel -opost -onlcr -<br />
isig -icanon -iexten -echo -echoe -echok -echoctl -echoke noflsh -ixon -<br />
crtscts<br />
echo -e "\xFF\x01\x01" > /dev/tty<strong>USB</strong>0 ; sleep 10<br />
echo -e "\xFF\x01\x00" > /dev/tty<strong>USB</strong>0 ; sleep 1<br />
fi<br />
sleep 5<br />
done<br />
# ------------------------<br />
(c) Sigma-Shop.com All rights reserved.