Canusa SuperStop - CSS - Canusa-CPS
Canusa SuperStop - CSS - Canusa-CPS
Canusa SuperStop - CSS - Canusa-CPS

Create successful ePaper yourself
Turn your PDF publications into a flip-book with our unique Google optimized e-Paper software.
ETHANOL<br />
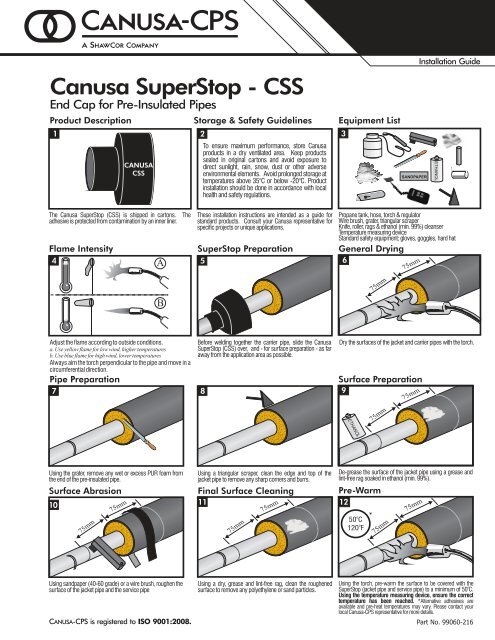
<strong>Canusa</strong> <strong>SuperStop</strong> - <strong>CSS</strong><br />
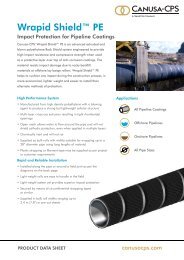
End Cap for Pre-Insulated Pipes<br />
Product Description<br />
1<br />
CANUSA<br />
<strong>CSS</strong><br />
Storage & Safety Guidelines<br />
2<br />
To ensure maximum performance, store <strong>Canusa</strong><br />
products in a dry ventilated area. Keep products<br />
sealed in original cartons and avoid exposure to<br />
direct sunlight, rain, snow, dust or other adverse<br />
environmental elements. Avoid prolonged storage at<br />
temperatures above 35°C or below -20°C. Product<br />
installation should be done in accordance with local<br />
health and safety regulations.<br />
Installation Guide<br />
Equipment List<br />
3<br />
SANDPAPER<br />
The <strong>Canusa</strong> <strong>SuperStop</strong> (<strong>CSS</strong>) is shipped in cartons. The<br />
adhesive is protected from contamination by an inner liner.<br />
These installation instructions are intended as a guide for<br />
standard products. Consult your <strong>Canusa</strong> representative for<br />
specific projects or unique applications.<br />
Flame Intensity<br />
<strong>SuperStop</strong> Preparation<br />
4 A 5<br />
Propane tank, hose, torch & regulator<br />
Wire brush, grater, triangular scraper<br />
Knife, roller, rags & ethanol (min. 99%) cleanser<br />
Temperature measuring device<br />
Standard safety equipment; gloves, goggles, hard hat<br />
General Drying<br />
6<br />
75mm<br />
B<br />
75mm<br />
Adjust the flame according to outside conditions.<br />
a. Use yellow flame for low wind, higher temperatures<br />
b. Use blue flame for high wind, lower temperatures<br />
Always aim the torch perpendicular to the pipe and move in a<br />
circumferential direction.<br />
Pipe Preparation<br />
7<br />
Before welding together the carrier pipe, slide the <strong>Canusa</strong><br />
<strong>SuperStop</strong> (<strong>CSS</strong>) over, and - for surface preparation - as far<br />
away from the application area as possible.<br />
8<br />
Dry the surfaces of the jacket and carrier pipes with the torch.<br />
Surface Preparation<br />
9<br />
75mm<br />
75mm<br />
ETHANOL<br />
Using the grater, remove any wet or excess PUR foam from<br />
the end of the pre-insulated pipe.<br />
Surface Abrasion<br />
10<br />
75mm<br />
75mm<br />
Using a triangular scraper, clean the edge and top of the<br />
jacket pipe to remove any sharp corners and burrs.<br />
Final Surface Cleaning<br />
11<br />
75mm<br />
75mm<br />
De-grease the surface of the jacket pipe using a grease and<br />
lint-free rag soaked in ethanol (min. 99%).<br />
Pre-Warm<br />
12<br />
o<br />
50 C<br />
o<br />
120 F<br />
*<br />
75mm<br />
75mm<br />
Using sandpaper (40-60 grade) or a wire brush, roughen the<br />
surface of the jacket pipe and the service pipe<br />
CANUSA-<strong>CPS</strong> is registered to ISO 9001:2008.<br />
Using a dry, grease and lint-free rag, clean the roughened<br />
surface to remove any polyethylene or sand particles.<br />
Using the torch, pre-warm the surface to be covered with the<br />
o<br />
<strong>SuperStop</strong> (jacket pipe and service pipe) to a minimum of 50 C.<br />
Using the temperature measuring device, ensure the correct<br />
temperature has been reached. *Alternative adhesives are<br />
available and pre-heat temperatures may vary. Please contact your<br />
local <strong>Canusa</strong>-<strong>CPS</strong> representative for more details.<br />
Part No. 99060-216
<strong>SuperStop</strong> Installation<br />
13 14<br />
<strong>Canusa</strong> <strong>SuperStop</strong> - <strong>CSS</strong><br />
15<br />
2<br />
1<br />
1<br />
2<br />
Remove the inner release liner from both ends of the <strong>Canusa</strong><br />
<strong>SuperStop</strong>.<br />
Using a gloved hand, push the <strong>Canusa</strong> <strong>SuperStop</strong> into the side of<br />
the pre-insulated pipe as far as possible.<br />
Using the torch and heating circumferentially, begin shrinking the larger<br />
end of the <strong>Canusa</strong> <strong>SuperStop</strong> around the jacket pipe starting from the end<br />
and working towards the middle. Use a gloved hand, press the<br />
<strong>SuperStop</strong> firmly into the wall of the pre-insulated pipe.<br />
16<br />
17<br />
Visual Inspection<br />
18<br />
1<br />
2 1<br />
Visually inspect the installed <strong>SuperStop</strong> for the following:<br />
1. <strong>SuperStop</strong> is in full contact with both pipes.<br />
2. The <strong>SuperStop</strong> is pressed in to the jacket pipe<br />
completely.<br />
3. The <strong>SuperStop</strong> has fully conformed to the profile.<br />
Shrink the <strong>SuperStop</strong> around the entire circumference of the<br />
service pipe starting from the middle and working towards the<br />
edge. Continue shrinking until the <strong>SuperStop</strong> is fully<br />
recovered.<br />
Finish the installation by heating the entire <strong>Canusa</strong> <strong>SuperStop</strong><br />
and pressing it firmly into the jacket pipe with a gloved hand.<br />
Backfilling Guidelines<br />
19<br />
After shrinking is complete, allow the <strong>Canusa</strong> <strong>SuperStop</strong> to cool to below the intended operating temperature of the pipeline before backfilling. To<br />
preventdamagetothe<strong>Canusa</strong><strong>SuperStop</strong>,useselectedbackfillmaterial(nosharpstonesorlargeparticles).<br />
www.canusacps.com<br />
Canada<br />
CANUSA-<strong>CPS</strong><br />
a division of SHAWCOR LTD.<br />
25 Bethridge Road<br />
Rexdale, Ontario<br />
M9W 1M7,<br />
Canada<br />
Tel: +1 (416) 743-7111<br />
Fax: +1 (416) 743-5927<br />
U.S.A./Latin America<br />
CANUSA-<strong>CPS</strong><br />
SHAWCOR INC.<br />
a division of<br />
2408 Timberloch Place<br />
Building C-8<br />
The Woodlands, Texas<br />
77380, U.S.A.<br />
Tel: +1 (281) 367-8866<br />
Fax: +1 (281) 367-4304<br />
Europe/Middle East<br />
CANUSA-<strong>CPS</strong><br />
a division of <strong>Canusa</strong> Systems Ltd.<br />
Unit 3, Sterling Park<br />
Gatwick Road<br />
Crawley, West Sussex<br />
England RH10 9QT<br />
Tel: +44 (1293) 541254<br />
Fax: +44 (1293) 541777<br />
Asia/Pacific<br />
CANUSA-<strong>CPS</strong><br />
a division of SHAWCOR LTD.<br />
#05-31, Blk 52, Frontier<br />
Ubi Avenue 3<br />
Singapore<br />
408867<br />
Tel: +65-6749-8918<br />
Fax: +65-6749-8919<br />
<strong>Canusa</strong> warrants that the product conforms to its chemical and physical description and is appropriate for the use stated on the installation guide when used in compliance with <strong>Canusa</strong>’s written instructions.<br />
Since many installation factors are beyond our control, the user shall determine the suitability of the products for the intended use and assume all risks and liabilities in connection therewith. <strong>Canusa</strong>’s liability is<br />
stated in the standard terms and conditions of sale. <strong>Canusa</strong> makes no other warranty either expressed or implied. All information contained in this installation guide is to be used as a guide and is subject to change<br />
without notice. This installation guide supersedes all previous installation guides on this product. E&OE<br />
Printed on recycled paper. Recyclable. IG-<strong>CSS</strong>-rev016