You also want an ePaper? Increase the reach of your titles
YUMPU automatically turns print PDFs into web optimized ePapers that Google loves.
<strong>Slip</strong><br />
<strong>Casting</strong><br />
Lecture #10
Plaster<br />
• Earliest use of plaster<br />
– Impressions dating back 9000 years<br />
from Anatolia and Syria<br />
• 1545 is the first historical record of<br />
plaster use in ceramics<br />
– (Piccolopasso’s “Three books of the<br />
Potter’s Art”)<br />
– Before this date we have many examples<br />
of clay molds but not plaster molds<br />
• If plaster was used, it was too soft to survive
From Gypsum to Plaster<br />
• Gypsum mineral consists of hydrated calcium sulphate crystals<br />
• Gypsum is mined form the earth in rock form<br />
• It is calcined at about100-120°C and goes through the following<br />
reaction…<br />
Gypsum<br />
→<br />
Plaster<br />
CaSO 4 ·2H 2 O → CaSO 4 ·0.5H 2 O + 1.5H 2 O (released as steam)<br />
• During the calcination process, water is driven off<br />
• After calcining, the material is ground into powder and bagged
Alpha vs. Beta Plasters<br />
• Beta plaster:<br />
calcined under<br />
atmospheric<br />
pressures<br />
• <strong>Casting</strong> Plaster (AKA Moulding<br />
Plaster)<br />
• #1 <strong>Casting</strong> Plaster<br />
• Dental Plasters<br />
• Industrial Gauging Plaster<br />
• Industrial Plaster<br />
• Metal <strong>Casting</strong> Plaster<br />
• Moulding Plaster<br />
• Potter Plaster Regular<br />
• No #1 Pottery Plaster<br />
• Puritan Pottery Plaster<br />
• Alpha plaster:<br />
calcined under<br />
elevated pressures<br />
• Cerami Cal<br />
• Dura Cal<br />
• Fast Cast<br />
• Garden Cast<br />
• Hydro Cal<br />
• Hydro Stone<br />
• Tuf Cal<br />
• Tuf Stone<br />
• Ultra Cal
I.e. #1 Pottery Plaster<br />
I.e. Hydro Cal<br />
lbs. of water for<br />
100 lbs. of<br />
plaster<br />
Beta Plaster<br />
Alpha Plaster<br />
65-160 22-45<br />
Hardness Soft Hard<br />
Strength Weak Strong<br />
Porosity High Low<br />
Intended use<br />
<strong>Casting</strong>/Press<br />
Molding<br />
Ram<br />
Pressing/Model<br />
Making
The Role of Water<br />
• Calcination of gypsum makes plaster hygroscopic<br />
(“thirsty” for water)<br />
• When we add water to plaster, we are restoring the<br />
water that was driven off during calcination<br />
– Plaster converts back to Gypsum<br />
• Because of plaster’s affinity for water it has a shelf<br />
life<br />
– Recommended shelf life: 4-6 months<br />
– Shorter shelf life under damp conditions
Crystallization<br />
• During hydration Gypsum crystals grow, creating<br />
a strong interwoven structure<br />
– It is important to not over-mix the plaster as it starts<br />
to set, as doing so will destroy the integrity of the<br />
structure<br />
• I.e. pour the plaster before it starts to set<br />
• Always use clean buckets when mixing new<br />
plaster<br />
– Old plaster acts as a seed for crystallization of new<br />
plaster<br />
– This will create uneven setting of plaster in the new<br />
batch
SEMs of Gypsum crystal
Factors affecting the setting of<br />
plaster<br />
• Water temperature<br />
– Plaster sets quicker in warm water than in cold<br />
• Mixing time<br />
– Long mixing time speeds up the set<br />
• Amount of water<br />
– The more water used, the more porous and weaker<br />
the mold will be<br />
• The amount of water, known as the Use Consistency<br />
Ratio, varies greatly depending on the type of plaster<br />
being used
Ideal mixing condition<br />
• By the end of the first minute<br />
– All plaster is sifted into water<br />
• By the end of the second minute<br />
– Plaster is fully soaked in water undisturbed<br />
• By the end of the third minute<br />
– Plaster is mixed<br />
• By the end of the fourth minute<br />
– Plaster is poured<br />
• Beyond the fourth minute mark, the plaster<br />
starts setting
Plaster Calculator<br />
• Courtesy of www.claystore.alfred.edu
Why <strong>Slip</strong> Cast<br />
• High detailed duplicates<br />
• Allows us to experiment with recipes that<br />
lack plasticity<br />
– I.e. bone china, talc or spodumene bodies etc…<br />
• Can create very consistent results<br />
– Equal density during forming
Equal density during forming<br />
• In slip casting,<br />
particles align<br />
perpendicular to<br />
the mold’s faces<br />
– As water is<br />
sucked into the<br />
faces of the mold,<br />
clay particles are<br />
forced against the<br />
mold’s walls and<br />
align accordingly<br />
• Very low density<br />
gradients =<br />
consistent results
The Ideal <strong>Casting</strong> <strong>Slip</strong><br />
• Does not settle<br />
– Extremely important!<br />
– If you use a slip that has settled<br />
without remixing it, you are not<br />
using the entire recipe in your<br />
casts<br />
• Gels enough to add strength to<br />
the cast, but not so much that it<br />
coagulates inside the mold<br />
– Drains well from the mold<br />
<strong>Clay</strong><br />
Non clay<br />
Over time, heavier<br />
materials settle to<br />
the bottom of the<br />
container. This is<br />
not good for slip<br />
casting!
<strong>Casting</strong> bodies<br />
• Require minimal plasticity compared to throwing<br />
bodies<br />
– Generally require some ball clay to improve dry strength<br />
for handling and for trimming<br />
• Also improve thixotropy (gelling) - But must not be overdone!<br />
– 50% clay or even less can be used<br />
• Remainder made up of non-plastics/silica/ and fluxes<br />
• Non-plastic recipes are more fragile in the green<br />
stage than plastic recipes<br />
– May have problems releasing from the mold (some ball<br />
clay in a recipe can help release due to higher shrinkage)
<strong>Casting</strong> body considerations<br />
• Avoid large non-plastics (grog/sand) which tend to settle<br />
quickly<br />
– A non-uniform body will result (grogs on bottom/clays on top)<br />
• <strong>Casting</strong> rate is influenced by water passages<br />
– Some large particle kaolins are specifically graded for casting<br />
(I.e. Velvacast)<br />
• Relatively large size allows water to migrate to mold surface during<br />
drying<br />
• Excessive ball clay will slow down casting rate<br />
• <strong>Clay</strong>s with high iron or alkali can be more difficult to<br />
deflocculate<br />
– Also, adding Red Iron Oxide to a body can cause casting to<br />
stick to the mold; select clays that naturally contain iron instead<br />
– Use Darvan 811 for iron-bearing clays
<strong>Clay</strong>s for casting<br />
• We are trying to help water escape to the walls of the<br />
mold<br />
• Coarse clays (kaolins)<br />
– Open up passages for water / speed up casting rates<br />
– Generally decrease strength<br />
• Fine clays (I.e. ball clays)<br />
– Tend to slow down casting rates as they clog the passages<br />
which water needs to escape<br />
– Increase gelling<br />
– Increase strength<br />
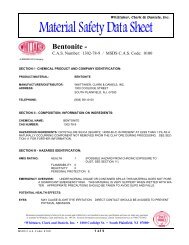
• Bentonite or Veegum should be avoided
Non-plastics for casting<br />
• While clay will remain suspended for long<br />
periods of time, non-plastics won’t<br />
• Grogs/sand will tend to settle quickly<br />
– This is why recipes generally lack them<br />
• Flux considerations<br />
– Similar to throwing/sculpture bodies
Reeves<br />
34% F-4<br />
40% Grolleg<br />
26% Flint<br />
40% clay<br />
(coarse clay)<br />
Wally’s Wonderslip<br />
26% Custer<br />
1% Whiting<br />
21% Goldart<br />
12% EPK<br />
10% Tenn. #10<br />
30% Flint<br />
43% clay<br />
(finer clays)<br />
• Quicker casting Vs. • More plastic
<strong>Casting</strong> body examples<br />
Reeves Porcelain Cone 7-10<br />
Grolleg 40<br />
Kona F-4 34<br />
Flint 26<br />
Water<br />
Darvan #7<br />
<strong>Clay</strong> 40%<br />
SSA 5.65<br />
35%<br />
0.35%<br />
Spleth Porcelain Cone 8-10<br />
Grolleg<br />
30<br />
Velvacast<br />
12<br />
Ball <strong>Clay</strong><br />
8<br />
Custer 18<br />
Flint<br />
20<br />
Pyrax<br />
12<br />
Water<br />
Darvan #7<br />
<strong>Clay</strong> 50%<br />
SSA 8.09<br />
40%<br />
0.35%<br />
• Translucent but<br />
slumps<br />
• Adopted from a<br />
throwing body<br />
– Similar to classic<br />
porcelain (50/30/20)<br />
• Stands up better<br />
during firing<br />
• Less flux<br />
• Higher clay content<br />
(especially ball clay)<br />
• Easier to<br />
release/handle
• Traditional casting bodies have low surface<br />
areas, allowing them to cast quickly<br />
• <strong>Casting</strong> bodies with finer material will be<br />
more plastic after casting but will also cast<br />
more slowly<br />
• Converting sculpture/throwing bodies into<br />
casting slips<br />
– You may want to reduce plastic materials<br />
– Consider reducing/eliminating grog
Obstacles to casting<br />
• <strong>Clay</strong> in its natural state is flocculated<br />
– Strong attraction between clay particles<br />
– This strong attraction is counter-productive to<br />
making a fluid slip<br />
• <strong>Clay</strong> is also naturally thixotropic<br />
– Gels when not agitated<br />
– Too much thixotropy makes it difficult to drain<br />
slip from the mold
Thixotropy<br />
•Video 1 - Gelled<br />
•Video 2 - Non Gelled<br />
• Note the gelled<br />
areas around the<br />
sides of the<br />
container<br />
– These areas<br />
aren’t circulating<br />
because the clay<br />
is thixotropic (a<br />
deflocculated<br />
clay doesn’t do<br />
this)
Deflocculation<br />
• Deflocculation destroy thixotropy and flocculation<br />
• Deflocculants are better known as “Dispersants”<br />
because they disperses clay flocks<br />
• The dispersant has an overall charge (either + or -)<br />
• Dispersants completely coat clay particles<br />
– <strong>Clay</strong> particles act as if they were all of the same charge;<br />
clay particles no longer attract<br />
• This repulsion results in low viscosity as clay<br />
particles repel each other<br />
– <strong>Slip</strong> drips off your hand for a long time
- - - -<br />
- -- - - - - - --<br />
- - - -<br />
- -- - - - - - --<br />
Flocculated<br />
Dispersed<br />
• Dispersed clay packs more densely than non<br />
dispersed clay<br />
– <strong>Clay</strong>s take up less space because they are more ordered<br />
Less void space/higher density<br />
• A.K.A. Higher Solids Loading
Dispersed vs. Flocculated systems<br />
Property Flocculated Dispersed<br />
Viscosity High Low<br />
Solids loading possible Low High<br />
Suspension element Particle floccs Individual particles<br />
Particle structure 3-dimensional network Independent particles<br />
Packing behavior Low density High density<br />
Compressibility Compressible Incompressible
So we add dispersants because…<br />
• Flocculated clay - 60% water to make the slip fluid<br />
• Dispersed clay - 40% water to make the slip fluid<br />
– Flocculated clay takes longer to cast/the mold gets<br />
saturated more quickly (less casts per day)<br />
– And even with a lot of water, the slip gels prematurely<br />
(due to flocculation)<br />
• Difficult/impossible to drain from the mold<br />
• Dispersants also help make our casts more dense<br />
– Higher green strength
Dispersants<br />
• Old School<br />
– Sodium silicate and Soda Ash (Sodium Carbonate)<br />
• Soda ash tends to be thixotropic, changes over time, and<br />
has a short range for over and under deflocculation; also<br />
readily dissolves plaster<br />
• Sodium silicate is more forgiving than Soda ash (still tends<br />
towards thixotropic slips)<br />
• Both are usually used together to minimize their<br />
shortcomings<br />
– Many older recipes call for these two materials
Pretend this<br />
is clay<br />
Polymer<br />
(Darvan)<br />
• New School<br />
– (Sodium based) Polyacrylic acids<br />
– Negatively charged polymer chains<br />
• A polymer is a very long molecule<br />
– Designed to attach/wrap around each individual clay<br />
particle
Darvan<br />
• Benefits over conventional soda ash/sodium silicate<br />
• Longer casting range, denser castings, more stable over<br />
time, increased mold life<br />
• Darvan 811 (short chain polymer)<br />
(Sodium Sodium polyacrylate)<br />
– More concentrated part-for-part than Darvan 7 (43% vs.<br />
25%); Ideal for red clays, but can also be used in white<br />
bodies too<br />
• Darvan 7 (long chain polymer)<br />
(Sodium polymethacrylate)<br />
– If the recipe doesn't specify, I use Darvan 7 (its more<br />
universal)
Darvan affects viscosity of clay<br />
Note that viscosity<br />
increases when too much<br />
dispersant is added
Dispersant test<br />
• Weigh out dry materials for the batch in 10 separate<br />
containers (200 g minimum for each)<br />
– Dry mix<br />
• Prepare 10 containers<br />
– 75 grams of water in each (37.5%)<br />
– Add Darvan in 2 drop increments (use a pipette for this)<br />
– Mix water and Darvan well (use small Jiffy mixer, not handheld<br />
blender)<br />
• Sift dry material into water and Darvan<br />
– Mix well using the mini-jiffy mixer<br />
• Add progressively more Darvan until the most fluid<br />
point is reached
Sequence for testing a casting slip<br />
2 4 6 8 10 12 14 16 18 20<br />
Add 20<br />
drops<br />
2 4 6 8 10 12 14 16 18 20<br />
22<br />
4 6 8 10 12 14 16 18 20 22
• Keep adding Darvan to the initial samples until<br />
you don’t notice the samples getting any thinner<br />
• Add Darvan to enough samples so that the point<br />
where the samples reach a minimum viscosity<br />
happens in the middle of the set<br />
Fluid<br />
Minimum<br />
Viscosity<br />
Same apparent viscosity as #22<br />
14 16 18 20 22 24 26 28 30 32
Thick<br />
Viscosity<br />
Danger of settling<br />
Thin<br />
18 22<br />
Drops of Darvan<br />
Fluid<br />
Choose<br />
this point<br />
Minimum<br />
viscosity<br />
Very fluid<br />
14 16 18 20 22 24 26 28 30 32<br />
Gelling<br />
Settling
Testing for Gelling<br />
• Mix all points with an electric mixer<br />
to destroy any previous gelling<br />
• Let samples sit for X amount of time<br />
– X could be 10 minutes, 30 minutes or 2<br />
hours, depending on how long you<br />
expect to be casting for<br />
• Tilt each container at a 45º angle<br />
– For the points that gel, the slip will<br />
cling to itself and won’t move as a<br />
liquid<br />
– This gelling effect is the result of<br />
thixotropy; it should diminish as you<br />
increase your Darvan<br />
Fully gelled<br />
Somewhat gelled<br />
Not gelled
Gelling effects (increasing Darvan from left to right)…
Testing for Settling<br />
• After testing for gelling, swish the container back and<br />
forth a few times; then again, tilt it at a 45º angle<br />
– Wait a few seconds for the slip to sheet off the bottom<br />
– Scrape the bottom of the container with something<br />
preferably non-porous (i.e. a plastic utensil works well)<br />
– This will give you a visual cue as to whether settling has<br />
occurred
Won’t settle<br />
Settling effects…<br />
Probably won’t settle<br />
May start to settle
If settling occurs…<br />
• If settling has occurred, it is the non-plastic part of<br />
the recipe (i.e. flint/feldspar/filler)<br />
– This will occur as we get closer and closer to the<br />
minimum viscosity<br />
• If all points settle<br />
– Try starting with less water next time<br />
– Encourage thixotropy by using finer clay materials (i.e.<br />
add more ball clays)
Before finishing your tests…<br />
• You need to figure out what the weight of 1<br />
drop of Darvan is…<br />
– Weigh 50 drops of Darvan, then divide by 50<br />
i.e. 50 drops weigh 2.63 grams<br />
So 1 drop = 0.0526 grams<br />
• If my chosen point used 30 drops, for 200g<br />
of clay, then…<br />
– 30*0.0526=1.578g for 200g of clay<br />
– Or 0.789g for 100g of clay which is 0.789%
Keeping notes…<br />
Viscosity Test (200 gram samples)<br />
0 drops (no Darvan) –Thick Paste<br />
2 drops (0.0526%) -Paste<br />
4 drops (0.1053%) -Paste<br />
6 drops (0.1579%) -Paste<br />
8 drops (0.2106%) -Paste<br />
10 drops (0.2632%) -A little wetter but still paste<br />
12 drops (0.3158%) -Noticeably wetter but still not fluid<br />
14 drops (0.3685%) -Same<br />
16 drops (0.4211%) –Fluid when mixing/almost pourable<br />
18 drops (0.4738%) –Much more fluid when not mixing/thick syrup<br />
20 drops (0.5264%) -Same<br />
22 drops (0.5790%) –Bubbles rise on their own when not agitated<br />
24 drops (0.6317%) -Same<br />
26 drops (0.6843%) –Consistency of thick cream<br />
28 drops (0.7370%) -Same<br />
30 drops (0.7896%) -Same<br />
32 drops (0.8422%) –Very little resistance to stirring<br />
34 drops (0.8949%) –No noticeable change<br />
36 drops (0.9475%) - No noticeable change<br />
38 drops (1.0002%) - No noticeable change<br />
Conclusion<br />
Gelling Test After 45 Minutes<br />
18 drops (0.4738%) –Gels heavily<br />
20 drops (0.5264%) -Same<br />
22 drops (0.5790%) –Gels but starts to move<br />
when container is tilted<br />
24 drops (0.6317%) –Same<br />
26 drops (0.6843%) –Same<br />
28 drops (0.7370%) – Very little gelling<br />
30 drops (0.7896%) - Same<br />
32 drops (0.8422%) – No gelling<br />
34 drops (0.8949%) – No gelling<br />
36 drops (0.9475 %) - No gelling<br />
38 drops (1.0002%) - No gelling<br />
Settling Test After 1 Hour<br />
18 drops (0.4738%) –No settling but coagulates at the bottom<br />
20 drops (0.5264%) -Same<br />
22 drops (0.5790%) –No settling/Starts to sheet nicely<br />
24 drops (0.6317%) –No settling<br />
26 drops (0.6843%) –No settling<br />
28 drops (0.7370%) - No settling<br />
30 drops (0.7896%) - No settling<br />
32 drops (0.8422%) – No settling<br />
34 drops (0.8949%) – No settling<br />
36 drops (0.9475 %) - No settling<br />
38 drops (1.0002%) - No settling<br />
Use 32 drops (.8422% Darvan) because this point seems to be the most liquid, and it<br />
doesn’t gel right away.
Fine tuning the slip<br />
• Once you’ve figured your Darvan additions,<br />
its time to fine tune<br />
1 st - Test specific gravity<br />
– Do this test after the slip has been thoroughly<br />
mixed<br />
2 nd - Test viscosity<br />
– Do this 12-24 hours after mixing
Specific Gravity<br />
• This measures the amount of solids in a<br />
given volume of slip (i.e. the slip’s density)<br />
• <strong>Slip</strong> will always weigh more than a<br />
comparable volume of pure water<br />
1cc of water = 1g<br />
1cc of slip = more than 1g<br />
• If the slip is not dense enough (i.e. if it has<br />
too much water), the casts it produces will be<br />
weak
Specific Gravity<br />
• Measure the specific gravity of the slip<br />
– i.e. 100cc of water = 100g<br />
– I.e. 100cc of slip = 187.5g<br />
• Specific gravity = <strong>Slip</strong> weight/water weight<br />
• Most casting slips fall between 1.7 and 1.8<br />
(1.75-1.78 is ideal)<br />
If your slip weighs more… add water to decrease<br />
the weight<br />
If your slip weighs less… add dry materials to<br />
increase the weight<br />
A bottle that<br />
measures<br />
exactly<br />
100cc
Viscosity<br />
• This measures the viscosity<br />
of the slip<br />
• Pour a known volume of<br />
slip (usually 500cc)<br />
through a ¼” hole<br />
– Record the amount of time it<br />
takes to drain<br />
• Should take about 100 –<br />
130 seconds to drain<br />
– If too long, add dispersant<br />
– If too short, remove<br />
dispersant<br />
Corporate<br />
DIY
Specific gravity<br />
bottle<br />
Viscometer<br />
Hydrometer<br />
For measuring<br />
density<br />
For measuring<br />
flow<br />
Not good for slip<br />
Good for thinner<br />
materials like glazes
Calculating dispersant<br />
level…<br />
• The amount of dispersant needed to<br />
disperse a body depends on the surface<br />
area of the clay body (we are really<br />
only interested in clays)<br />
– We are looking to fully coat each<br />
individual clay particle without adding<br />
excess dispersant<br />
• A spreadsheet has been written that<br />
adds up the total surface area within a<br />
body<br />
• Based on a known amount of darvan<br />
needed to coat a given surface area (<br />
.1 mg/m 2 ), it then calculates how much<br />
Darvan we need for our particular<br />
body…<br />
m 2 /g Material<br />
21.99 Tile Kaolin #6<br />
27.09 EPK<br />
12 Grolleg<br />
36.41 Helmar<br />
9.97 Kaopaque<br />
11.4 Velvacast<br />
15.6 Peerless<br />
21.2 SSP<br />
21.28 Tenn #10<br />
22.5 XX Sagger<br />
27.51 OM #4<br />
24.32 C&C<br />
1.1 G-200<br />
1.14 NC-4<br />
1.39 Kona F-4<br />
1.76 Custer<br />
4.65 Cornwall Stone<br />
1.1 A400 Neph Sy<br />
1.44 Flint<br />
2.62 Pyrax<br />
31.7 Bentonite<br />
98.66 VeeGum/Macaloid
Dispersant Calculator for Batches<br />
• Courtesy of www.claystore.alfred.edu
• In general, more plastic bodies have a<br />
higher surface area, and therefore require<br />
more dispersant…<br />
A Traditional Porcelain<br />
55 Grolleg<br />
25 Custer<br />
20 Flint<br />
#570 Stoneware<br />
19.13 EPK<br />
28.55 Goldart<br />
28.55 Hawthron 35<br />
14.27 OM-4<br />
9.5 Custer<br />
7.33 m 2 /g 21.8<br />
.2923% Darvan .8643%<br />
More surface<br />
More dispersant<br />
required
Is the dispersant calculator perfect<br />
• NO!<br />
• You still need to do a 10-point test to fine<br />
tune viscosity<br />
• Some clays (i.e. Hawthorn Bond) bring in<br />
salts which counteract dispersion<br />
– This calculator doesn’t account for these cases<br />
– The calculator was developed for white ware<br />
bodies (i.e. Porcelains); as we stray further<br />
away from these, its predictions are less and<br />
less reliable<br />
• It is great for predicting future tests with<br />
what you’ve already tested
Stick up slip<br />
• Start with a casting slip with minimal water<br />
• Add a saturated solution of salt one drop at a time<br />
– Never add dry salt!<br />
• Effects of salt will occur much more rapidly than<br />
effects of dispersant (one drop at a time means…<br />
one drop at a time!)<br />
• Resulting slip can be tailored for viscosity<br />
– Gelling behavior can be controlled (salt brings<br />
thixotropy back to the slip)<br />
• Salt also creates a flocculated system which is<br />
more compressible than a dispersed slip<br />
– Relatively plastic compared to dispersed clay<br />
– Can absorb the stress of compression better (i.e.<br />
attaching pieces together)
• Adding salts reflocculates<br />
a<br />
dispersed slip<br />
• Increases<br />
viscosity<br />
• Use Epsom Salts<br />
(Magnesium<br />
Sulphate) or<br />
Calcium Sulphate<br />
• Not used in slip<br />
casting<br />
Apparent Viscosity (1.0 s -1 , Pa.s)<br />
V<br />
i<br />
s<br />
c<br />
o<br />
s<br />
i<br />
t<br />
y<br />
10 2<br />
10 1<br />
10 0<br />
10 -1<br />
10 -2<br />
Adding salt…<br />
10 -2 10 -1 10 0 10 1 10 2 10 3<br />
Divalent Cation Concentration (mM)<br />
Salt
Salt for suspension<br />
• Salt also helps control settling in slips and<br />
glazes<br />
• When the slip/glaze remains undisturbed it<br />
gels because of the salt<br />
– The gelled structure freezes non-plastics (i.e.<br />
flint, feldspar, colorants etc. can’t settle)<br />
– Salt will only affect the clay portion of a glaze<br />
• <strong>Clay</strong>s with high surface areas respond better<br />
• Will not work if glaze contains no clay
<strong>Slip</strong> poured over a tile…<br />
• Without<br />
Epsom<br />
salt<br />
• With<br />
Epsom<br />
salt
Procedure for mixing a casting slip<br />
• Weigh water into a bucket<br />
• Add dispersant; mix well<br />
• Add a small amount of the recipe’s clay + all<br />
non plastics (I.e. flint and Feldspar)<br />
– This allows all non plastics to be coated with clay<br />
in a very thin system (very efficient mixing)<br />
• Add remaining clay (the mixture will thicken<br />
up to its final viscosity<br />
• Mix thoroughly
Solid <strong>Casting</strong> Super-Flat slabs
• <strong>Slip</strong> gels too<br />
early<br />
– Seals off fresh<br />
supply of slip<br />
– De-lamination<br />
void spaces can<br />
occur
• Solid <strong>Casting</strong> on<br />
a vibration box<br />
• Vibration<br />
disrupts gelling,<br />
which allows<br />
slip to feed into<br />
the mold for the<br />
duration of the<br />
cast (1 ½ hours)
• Non-Vibrated<br />
• Vibrated
• Fired slab is as flat as the board it’s dried on (and<br />
the shelf it is fired on)<br />
• Fired dimensions: 22 x 15 x 3/8”<br />
References
My references…<br />
Any questions
References<br />
Cushing’s Handbook<br />
by Val Cushing<br />
Third Edition, 1994<br />
The Potter’s Dictionary of Materials and Techniques<br />
by Frank and Janet Hamer<br />
A&C Black Publishers Ltd., London, England<br />
Third Edition, 1993<br />
<strong>Clay</strong> and Glazes for the Potter<br />
by Daniel Rhodes, revised and Expanded by Robin Hopper<br />
Krause Publications, Lola, WI<br />
Third Edition, 2000<br />
Mold Making For Ceramics<br />
by Donald E. Frith<br />
Krause Publications, Lola, WI<br />
1992
Glazing over slips<br />
• Great way to achieve bright, glossy surfaces while not<br />
worrying about colors running or bleeding into each<br />
other<br />
• Clear glazes applied over slips<br />
– Physical depth of clear glass can show off the textural qualities<br />
of the underlying slip (difficult to achieve with glaze alone)<br />
• Glaze composition influences the color of the slip<br />
– Lead glazes tend to dissolve slips, blurring edges (<strong>Slip</strong>ware)<br />
– Alkaline glazes produce brilliant results<br />
• Semi-opaque glazes over slips provide many options for<br />
rich, mottled results<br />
– Especially when glaze thickness varies<br />
– Dark oxides (iron, manganese, cobalt etc.) in the slip bleed<br />
through glaze
From<br />
Val’s book<br />
• Alkaline<br />
• Calcium<br />
• Boron<br />
• Magnesia<br />
• Zinc<br />
• Barium<br />
• Lead<br />
Chappell’s book is<br />
a great source for<br />
specific oxide<br />
amounts
Terra sigillata<br />
• C.f . Latin – “sealed earth”<br />
– 1 st century B.C. (spread by the Roman empire)<br />
• Historically used to seal a porous clay<br />
– Also used in drain tiles to make them waterproof<br />
• Usually applied to leatherhard-dry clay<br />
• A true slip – Contain just clay<br />
• Made of extremely fine particles (colloidal in size)<br />
– Will never settle or cake<br />
• Much more opaque than regular slips<br />
– Consequently requires a much thinner coating than regular<br />
slips
Terra sigillata<br />
• Dense, silky-smooth, sometimes glossy<br />
– Gloss is temperature dependent based on the clay used<br />
• Generally retained up to C. 04; some can go to C. 2<br />
• Gloss is enhanced by burnishing (re-orients clay particles<br />
parallel to the surface The jury is deciding on this one)<br />
– Burnishing tools are typically smooth (spoon, river-bed stones);<br />
cloth also works well (t-shirts, cheesecloth, dry-cleaning plastic)<br />
• Historically red clays were used but any plastic (fine) clay<br />
can be used<br />
– White sig. can be prepared from ball clays or kaolins<br />
• Basic Formula<br />
Water 70%<br />
Dry <strong>Clay</strong> 30<br />
Darvan #7 0.1-0.3%
• Ball mill ingredients<br />
and place in jar,<br />
undisturbed for three<br />
days<br />
• After three days,<br />
layers should be well<br />
defined<br />
• Top layer is siphoned<br />
off<br />
• Sig. is then carefully<br />
siphoned off (careful<br />
not to include bottom<br />
layer)<br />
Procedure for<br />
making terra<br />
sigillata
Drawbacks to terra sigillata<br />
• Glazes cannot be layered overtop of terra sigillata<br />
– Glaze tends to dissolve terra sig. layer<br />
• Terra sig. is too thin to withstand glaze fusion<br />
• A lot of clay is wasted in preparing terra sig.<br />
– 50 lbs. of ball clay yields roughly 2 gallons of sig.<br />
• This can be somewhat improved by ball milling<br />
• Preparation is somewhat tedious<br />
• Limited firing range
<strong>Slip</strong>s,<br />
engobes<br />
and slip<br />
casting<br />
Lecture #9
<strong>Slip</strong>s and engobes<br />
• Historically used in Europe to make red clays look like<br />
imported white porcelain<br />
• <strong>Slip</strong>s and engobes are used for many different reasons<br />
– Brighten overlying glazes on darker colored clays<br />
– Create a dense surface over an otherwise porous body<br />
– Allow for a vast pallet of color and texture<br />
– Cover up surface imperfections/roughness/even iron spots<br />
– Improve glaze fit without adjusting the glaze or the clay<br />
body (buffer layer)<br />
• WYSIWYG<br />
– Don’t run<br />
– Don’t pinhole (during firing)
• Traditionally<br />
– <strong>Slip</strong>s are made exclusively of clay<br />
• For wet to leatherhard application<br />
– Engobes always contain fluxes and fillers and<br />
usually contain clay<br />
• Often used for bisque-fired ware<br />
• Usually, though not exclusively, denser than slips<br />
• Today we call both categories “slips”<br />
• <strong>Slip</strong>s are distinguished by the state of the<br />
ware to which they are applied and by the<br />
extent of vitrification<br />
– I.e. Vitreous or non-vitreous slip<br />
• for wet, leatherhard, green, or bisque application
Formulating slips<br />
• A slip can be made by using the clay body itself,<br />
minus any large fillers (i.e.. No grog)<br />
• Advantage<br />
– Compositionally very similar to body<br />
• CTE is almost identical to body<br />
• Drawbacks<br />
– <strong>Slip</strong> must be applied to very wet clay to avoid cracking<br />
– <strong>Slip</strong> can’t be lighter in color than the body without<br />
radically changing the sources of clay<br />
• To improve on these limitations and to tailor the<br />
slip to our need, we often include other ingredients
• <strong>Slip</strong> ingredients usually include:<br />
– <strong>Clay</strong>s<br />
– Fluxes<br />
– Fillers<br />
• A slip may also require:<br />
– Hardeners<br />
– Opacifiers<br />
– Colorants<br />
• These additions depend on the composition of the slip
<strong>Clay</strong>s<br />
• Chosen for their relative color and shrinkage<br />
• Light colored clays are necessary for a wide pallet of<br />
colors<br />
– Especially true when developing light colors<br />
• Combinations of kaolin and ball clay are normally<br />
used to adjust shrinkage<br />
– More ball clay = more shrinkage<br />
– More kaolin = less shrinkage<br />
– Total clay is usually between 40-80%<br />
• Improve slip’s adherence to the body in dry state<br />
• Help keep slip in suspension<br />
• Improve the brushing qualities of non-plastics
Fluxes<br />
• Help fuse the slip to the body<br />
• Selection is temperature dependent and<br />
reflects what we already know for clay<br />
bodies<br />
– High temp-Feldspars/+auxiliary fluxes<br />
– Mid temp-Neph Sy/Talc/Frits<br />
– Low temp-Frits/Talc<br />
• Color response to oxides or stains will be<br />
enhanced or impeded by our choice flux<br />
– Similar to a glaze in this respect
Hi Soda<br />
3110<br />
Hi Calcium/Boron<br />
3124<br />
Hi Calcium/Boron/Alumina<br />
3195<br />
Hi Magnesium<br />
Talc
Fillers<br />
• Silica is the most commonly used<br />
– Promotes hardness (depending on the amount of vitrification)<br />
– Reduces drying shrinkage<br />
– Promotes whiteness<br />
• Pyrax can also be used (though not as white as flint)<br />
• Talc (color killer)<br />
• Wollastonite<br />
• Calcined clay<br />
• Filler content usually ranges from 15-30%
Hardeners<br />
• Used to improve hardness of slip after drying (anti<br />
smudging)<br />
– <strong>Slip</strong>s high in clay usually don’t require additional hardeners<br />
– Required in low clay-content slips (esp. when ball clay is absent)<br />
• Inorganic<br />
– Borax is soluble<br />
• Recrystallizes when it dries, forming a tough finish<br />
• Can be used up to 5% but other fluxes may need to be decreased (borax is<br />
a boron source so it acts like a flux)<br />
– Bentonite/Vee Gum<br />
• Fine size hardens upon drying (add up to 2%)<br />
• Organic<br />
– Sugar<br />
– Gums (CMC, Gum Arabic)<br />
– Spoil with time/can migrate to the top of the container
Opacifiers<br />
• Help ensure whiteness and allow for thin application<br />
without loss of opacity<br />
• <strong>Clay</strong> is opaque; recipes low in clay depend on opacifiers<br />
– Not as necessary when dark stains/oxides are used<br />
• Tin Oxide<br />
– Traditional opacifier (600+ years); gives warm whites<br />
– very expensive!<br />
• Zircopax (zirconium silicate)<br />
– Cooler whites (can be compensated with small rutile additions);<br />
more affordable than Tin<br />
• Opacifiers tint colors<br />
– Don’t use if black/dark colors are what you want<br />
– May impede development of saturated colors (I.e. yellow, red<br />
etc..)
Colorants<br />
• Can be added as either oxides/carbonates or stains<br />
• Oxides/carbonates<br />
– Cheaper than stains<br />
– Limited pallet<br />
• Developing strong colors in slips requires larger<br />
amounts of colorants than for glazes<br />
– Glass in glaze provides depth and brilliance<br />
– The drier the slip, the more difficult strong color<br />
response is (i.e. vitreous slips are better candidates for<br />
strong color than dry, non-vitreous slips)<br />
• Addition amounts<br />
– Vary with stain/oxide used; lighter colors require more<br />
• I.e. Yellows require 10-15% stain<br />
• Blues require just 3% cobalt carb. (even .25% is noticeable)
Colorants<br />
• Mottled <strong>Slip</strong>s<br />
– Additions of granulated materials (I.e. rutile, illmenite,<br />
manganese, homemade aggregates)<br />
– Oxides – More mottled<br />
– Carbonates – Less mottled/more homogenous<br />
• As in glazes, oxides present in slip will push or pull colors<br />
– Some commercial stains will not give the intended color in the<br />
presence of certain oxides, especially zinc<br />
• Mason color chart identifies these (Esp. greens, purples and pinks)<br />
• Cautionary note:<br />
– Many metal oxides are not food safe in slips (because slips lack<br />
the glassy structure found in glazes)<br />
• If its not safe in the raw state, chances are it won’t be safe in a fired slip<br />
either
<strong>Slip</strong> compositions<br />
• Note changes in flux (for temperature<br />
ranges) and clay (for application ranges)
Comparing bodies to slips<br />
V.C. HF 4 All purpose white base slip<br />
Cone 9-12<br />
Grolleg<br />
30<br />
Kaolin<br />
EPK<br />
15<br />
Kaolin<br />
XX Sagger<br />
25<br />
Ball <strong>Clay</strong><br />
Nepheline Syenite 15 Soda Spar<br />
Flint 10<br />
Wet to leather hard application<br />
V.C. Off White Throwing Porcelain<br />
Cone 9-10<br />
Tile #6<br />
30<br />
Kaolin<br />
EPK<br />
15<br />
Kaolin<br />
C&C<br />
15<br />
Ball <strong>Clay</strong><br />
Kona F-4 20 Soda spar<br />
Flint<br />
Pyrax<br />
10<br />
10<br />
Macaloid +1<br />
• More<br />
similarities<br />
than<br />
differences<br />
between the<br />
two<br />
• Could we use<br />
a slip as a<br />
clay
Wet vs. Bisque<br />
• Wet application slips<br />
– High clay = creamy quality perfect for painterly<br />
qualities<br />
– Wet clay and slip can be carved as one (sgraffito)<br />
– Ideal for slip trailing/thick, textural layering<br />
• Bisque application slips<br />
– Timing is irrelevant (ware can be slipped at leisure)<br />
– Application can be washed off and reapplied<br />
– Can be applied over glazed ware<br />
– Work undergoes distortion from drying and firing<br />
before slip is applied (great for precise work)
Bisque application slips<br />
V.C. AT 1 White Vitreous <strong>Slip</strong><br />
Cone 6-10<br />
Velvacast<br />
Calcined Kaolin<br />
XX Sagger<br />
Custer Feldspar<br />
Nepheline Syenite<br />
10<br />
10<br />
5<br />
25<br />
10<br />
Flint 30<br />
Borax 5<br />
Zircopax 5<br />
• Val’s slip uses calcined clay<br />
• Not creamy compared to<br />
wet application slips<br />
C19-1 Dense Bisque <strong>Slip</strong><br />
EPK<br />
Kaopaque<br />
Glowmax<br />
Wollastonite<br />
Frit 3124<br />
Flint 6<br />
Molochite 200 Mesh 20<br />
CMC +1<br />
Cone 04<br />
4<br />
5<br />
15<br />
9<br />
41<br />
• For thick applications<br />
– Best applied through spraying<br />
– Uses very little raw clay<br />
– Glowmax is calcined<br />
– Molochite is added as a filler
The shrinkage myth<br />
• Many bisque-application slips call for large amounts of<br />
calcined clay<br />
– Myth… During drying, raw clay shrinks / calcined clay<br />
doesn’t<br />
– Truth… Water separates particles in both cases…even if you<br />
use just calcined clay, you will get shrinkage (not as much as<br />
with raw clay, but still enough to cause problems)<br />
• Including plastic clay in the recipe increases the strength<br />
of the slip during drying and can help it overcome<br />
cracks as the slip is placed in tension during drying<br />
(calcined clay has no strength to overcome this tension)<br />
– Adding too much plastic clay, however, will ultimately<br />
increase shrinkage, tension, and cracking…A balance is<br />
needed!
Spackle<br />
• For very thick applications on bisqued ware<br />
• Inert<br />
• Lots of calcined materials<br />
– Esp. clays<br />
• Raw clay is used sparingly (10-15%) to suspend<br />
mixture<br />
• Relies heavily on a wide particle size distribution<br />
– Screened material<br />
• Empirical testing (trial and error)
• Sudden thickness change from top (thick)<br />
surface to the sides (thin) causes separation
¼” thick per<br />
firing without<br />
cracks
Multiple firings,<br />
then cut on a<br />
brick saw<br />
Sanded prior<br />
to firing
Spackle<br />
Example<br />
Cone 04<br />
Raw Claw<br />
10<br />
Calcined Kaolin 10<br />
Calcined Ball <strong>Clay</strong> 10<br />
Calcined Fireclay 5<br />
Frit 3110 25<br />
Grog (screened) 30<br />
Wollastonite<br />
10<br />
CMC +1<br />
Suspension<br />
Low Shrink<br />
Low Shrink<br />
Low Shrink<br />
No shrink<br />
No shrink<br />
• Epsom salt is added to prevent settling<br />
– Added as a saturated solution to the water before adding all<br />
other dry ingredients<br />
– Creates Thixotropy (gelling effect when left undisturbed/coarse<br />
material don’t settle);<br />
– Epsom salt can be added to any slip, provided it contains clay<br />
• Salt affects the raw clay, not the non-plastics<br />
• NOTE: Salt dissolves plaster molds over time!
Vitreous slips<br />
• Halfway between a glaze and a slip<br />
– Less clay/shrinkage than regular slip<br />
• 10-20% clay for suspension and green strength<br />
• Higher non-plastics<br />
• Higher fluxes<br />
• Can be applied to dry or bisque ware<br />
– Low clay/low shrinkage<br />
– More difficult for wet applications because of high flux/low<br />
clay/low green shrinkage<br />
• Can be used alone as a functional surface<br />
– Very vitreous / almost glaze-like<br />
• Think of these as slightly underfired opaque glazes<br />
• Can also be used under glazes to influence texture and<br />
color of glaze
Vitreous vs. Non-Vitreous<br />
V.C. 5 vitreous slip<br />
Cone 04<br />
EPK 20<br />
Frit 3110<br />
Nepheline Syenite<br />
Whiting<br />
20<br />
20<br />
5<br />
<br />
Flint 15<br />
Zinc Oxide 20 Opacity/whiteness<br />
High amount of fluxes<br />
Steve’s non-vitreous slip<br />
Cone 04<br />
EPK<br />
Om4<br />
9<br />
37 High plasticity<br />
Frit 3124<br />
Nepheline Syenite<br />
11<br />
9<br />
Lower fluxes, especially<br />
frit<br />
Talc<br />
28<br />
Flint 9<br />
Zircopax +5 Opacity/whiteness<br />
• Both are for dry<br />
to bisque<br />
application<br />
• V.C. 5 vitrifies at<br />
C. 04<br />
– Not much clay<br />
– High amount of<br />
flux<br />
• Steve’s is quite<br />
porous at C. 04<br />
– More clay and<br />
less active flux<br />
to melt it
Cracking<br />
• Does not occur randomly<br />
• Every slip has a limit as to how thick it<br />
can be applied before cracking occurs<br />
• Cracks begin where there is a sudden<br />
change in thickness<br />
• This can be used effectively to create<br />
designs<br />
– Brushstrokes are never even<br />
• Bristles create ridges and valleys (cracks start<br />
in valleys)<br />
• Direction of strokes can be used to one’s<br />
advantage<br />
– I.e. Grids vs. spirals vs. random patterns<br />
– Scribing into still wet slip will influence<br />
where cracks occur<br />
<strong>Slip</strong> surface<br />
Crack
Robert Sperry<br />
Steve Heinemann
Cracking in wet to leatherhard applications<br />
• Similar problems to glaze fit (but for entirely different<br />
reasons)<br />
• <strong>Slip</strong> shrinks too much - <strong>Slip</strong> cracks, forming little islands<br />
sometimes with curled-up edges<br />
– <strong>Slip</strong> is shrinking too much<br />
• Apply when clay is wetter OR…<br />
• Remove some bentonite or substitute ball clay with kaolin<br />
• <strong>Slip</strong> doesn’t shrink enough - <strong>Slip</strong> releases in large sheets<br />
from body<br />
– <strong>Slip</strong> is not shrinking enough<br />
• Apply when clay is drier OR…<br />
• Add finer clays
Solutions to cracking in drying<br />
stage<br />
• Cracking can be minimized by changing<br />
how the slip is applied<br />
– Dipping vs. pouring vs. brushing vs. sponging<br />
vs. spraying<br />
• High water content can lead to cracks<br />
– More water = more shrinkage<br />
• Deflocculating the slip reduces water, and<br />
by extension, shrinkage<br />
– Adding salt can help control viscosity of<br />
deflocculated slip (I.e. Stick-up slip)
Crow’s Foot cracking
Cracking due to trapped air<br />
• <strong>Slip</strong>s that are thick can trap air during mixing<br />
• Air bubbles don’t allow slip to shrink (tension is<br />
formed)<br />
– Bubbles become nuclei for crow’s foot cracking<br />
– Three cracks propagate from a point<br />
• Sometimes the offending bubble is seen at the surface,<br />
sometimes it is below the surface<br />
• Solution… remove bubbles<br />
– Tapping the container<br />
• Bubbles will rise and pop<br />
– Tilt and Rotate the container to expose bubbles<br />
• Bubbles at the surface will stretch and pop<br />
– Increase water content<br />
• Bubbles will rise and pop
Cracking after firing<br />
• <strong>Slip</strong> goes into kiln defect free but comes out<br />
cracked (very annoying)<br />
• Can be due to minute drying cracks (invisible to the<br />
eye); you have exceeded the maximum thickness<br />
for your slip<br />
– Cracks open up during firing<br />
– Common in high zinc slips (zinc shrinks!)<br />
– Solution - Apply a thinner and more even coat of slip<br />
• Can be due to large difference in firing shrinkage<br />
between body and slip<br />
• Solution - Compare fired shrinkage of body with that of slip<br />
(shrink-test bars for both)<br />
– If slip shrinks too much - decrease flux<br />
– If slip doesn’t shrink enough - increase flux
Cracking after firing<br />
• Can also be due to a mismatch in CTE between<br />
body and slip<br />
• Sharp transitions and corners are usually the<br />
first place this happens (the first place to look)<br />
• Usually a case of shivering, where the crack<br />
runs through the body and separates the slip<br />
from the surface<br />
• Remedied by increasing the slip’s CTE
Shivering slip
Measuring<br />
slip<br />
thickness<br />
• Easy to do<br />
and more<br />
reliable<br />
than<br />
measuring<br />
water<br />
content
Using a pin<br />
tool as a<br />
thickness<br />
gauge<br />
Tape<br />
• Useful for slips<br />
and glazes applied<br />
on dry or bisque<br />
ware<br />
• Stab the slip/glaze<br />
before it hardens<br />
• Tape serves as a<br />
visual reference