Musashi 5 Matrix Board Instructions - Tadao Technologies
Musashi 5 Matrix Board Instructions - Tadao Technologies
Musashi 5 Matrix Board Instructions - Tadao Technologies

Create successful ePaper yourself
Turn your PDF publications into a flip-book with our unique Google optimized e-Paper software.
Pulling and releasing the trigger quickly will toggle between the different<br />
programming modes:<br />
Green<br />
Debounce<br />
Purple<br />
Dwell<br />
Yellow<br />
Loader delay<br />
Blue<br />
AMB (anti-mechanical bounce)<br />
Red<br />
ABS dwell<br />
White<br />
Fire mode<br />
Teal<br />
Fire mode max rate of fire<br />
Flickering Green Eye mode<br />
Flickering Purple CPF (cycle percentage filter)<br />
Flickering Yellow Ramp start<br />
When the LED is lit for the desired setting, press and hold the trigger until the<br />
LED goes out. When you release the trigger, the LED will blink to show the<br />
current setting. For example, if the current setting for debounce is 5, the LED will<br />
blink green 5 times. Once the LED stops blinking, you have 2 seconds to begin<br />
entering the new setting.<br />
To enter the new setting, pull the trigger the desired number of times. For example,<br />
to set the debounce to 2, you must pull the trigger 2 times. Every time you pull the<br />
trigger the LED will light. After all settings have been changed, turn the marker<br />
off, using the power button.<br />
Programming Example<br />
If you wanted to set the dwell to 12:<br />
1. Make sure the marker is powered off.<br />
2. Make sure the tournament lock is disabled.<br />
3. Pull and hold the trigger, then push the power button.<br />
4. The programming LED shows a rainbow sequence then stops on solid<br />
green. This is the debounce mode.<br />
5. Quickly pull and release the trigger 1 time to switch to the dwell mode.<br />
The LED will show purple.<br />
6. Pull and HOLD the trigger until the LED turns off.<br />
7. Release the trigger. The LED will blink out the current setting.<br />
8. When the LED stops blinking, enter the new setting by pulling the<br />
trigger 12 times.<br />
9. Wait until the LED turns back on, indicating programming has<br />
completed.<br />
10. Turn the marker off using the power button.<br />
Program Reset<br />
To reset all settings to factory defaults hold down the lock button for 10 seconds<br />
while in programming mode. The LED will rapidly cycle through every setting<br />
color to indicate that the process has completed.<br />
Settings<br />
Debounce – The <strong>Musashi</strong> software features a hybrid debounce scheme that uses<br />
microcontroller cycles to debounce the pull of the trigger and ½ ms time<br />
increments to debounce the release. This results in a very effective debounce<br />
algorithm that does not hinder the user at any setting. At low debounce settings,<br />
however, it may cause the marker to read switch bounce as additional pulls, falsely<br />
generating shots or near full-automatic fire. The setting ranges from 1 to 50 and is<br />
defaulted at 10.<br />
Dwell – Also known as “front pulse,” this is the amount of time the solenoid is<br />
energized each time the marker is fired. The default is 14 ms. The range is 5 to 30<br />
ms. Too low of a dwell may lead to inconsistency or drop off. Too high of a dwell<br />
can cause bad air efficiency.<br />
Loader Delay – Adds a slight delay after the eye has seen a ball and the bolt is<br />
cycled, causing the gun to fire. If not using force fed loaders, it may be necessary<br />
to increase this setting to prevent chopping. A setting of 1 means no loader delay,<br />
which is the fastest. The default is 2 and may be set from 1 to 50.<br />
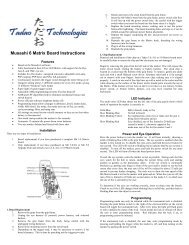
AMB – Allows the user to adjust the anti-mechanical bounce feature. Mechanical<br />
bounce occurs with the <strong>Matrix</strong> due to the kick generated during each shot and can<br />
cause the marker to “run away,” firing even after the trigger has been released.<br />
AMB helps stop markers from going full-auto when the trigger is pulled very<br />
slowly. The default is 2 and may be set from 1 to 5 (1 being off). AMB is only<br />
used in fire modes 1 and 2 (semi-automatic unlimited and capped).<br />
Fire Mode – Included are five different fire modes (default is 1):<br />
1. Semi-automatic, unlimited rate of fire<br />
2. Semi-automatic, adjustable rate of fire<br />
3. PSP ramping, adjustable rate of fire<br />
4. PSP burst, adjustable rate of fire<br />
5. NXL full-automatic, adjustable rate of fire<br />
Setting 1 is normal semi-automatic with an unlimited rate of fire while the eyes are<br />
enabled. When the eyes are turned off, the max rate of fire is set to 20 balls per<br />
second.<br />
Setting 2 is semi-automatic with a capped rate of fire. It limits the maximum balls<br />
per second that can be fired. The cap is set by the Max ROF setting.<br />
Setting 3 is the first PSP fire mode that works as follows:<br />
• The first 3 shots of a string are semi-automatic.<br />
• After the 4 th shot the marker will add shots as long as the user fires<br />
faster than the ramp start setting. For example, if the ramp start setting<br />
is 5, the user must pull 5 times per second or faster for the software to<br />
add additional shots.<br />
• If the trigger is released, the marker will stop firing immediately.<br />
• If the trigger is not pulled again within 1 second of release, the 3-shot<br />
semi-automatic count starts over.<br />
Setting 4 is the second PSP fire mode that works as follows:<br />
• The first 3 shots of a string are semi-automatic.<br />
• After the 4 th shot the marker will fire 2 or more shots per pull as long as<br />
the user continually pulls and releases the trigger.<br />
• If the trigger is released, the marker will stop firing immediately.<br />
• If the trigger is not pulled again within 1 second of release, the 3-shot<br />
semi-automatic count starts over.<br />
In normal operation, continually pulling the trigger faster than 5 to 6 pulls per<br />
second will effectively give the user full-automatic at the max rate of fire. If the<br />
user stops shooting then resumes within 1 second, the marker will return to the<br />
max rate of fire. If the user stops shooting for more than 1 second, the next 3 shots<br />
will be semi-automatic. On the 4 th shot it will resume a faster fire rate.<br />
PSP ramping and PSP burst differ in that PSP ramping requires the user to<br />
maintain the ramp start rate of fire for software assistance, whereas the PSP burst<br />
mode will fire at least 2 shots per pull, regardless of rate of fire. Some players<br />
prefer multiple shots every time they pull the trigger after the initial 3 semiautomatic<br />
shots, while others like to shoot 1 ball at a time until they achieve a<br />
certain rate of fire.<br />
Setting 5 is the NXL full-automatic fire mode. It functions similarly to the PSP<br />
fire modes except, after the 3 rd semi-automatic shot, the user may pull and hold the<br />
trigger for the marker to fire in full-automatic.<br />
Fire Mode Max ROF – The maximum rate of fire setting only applies to the 2 nd ,<br />
3 rd , 4 th , and 5 th fire modes. The max rate of fire is adjustable from 14 to 20 balls per<br />
second in ¼ balls per second increments. It also has an unlimited setting. The<br />
default is 4, which is roughly 14.75 balls per second. Oscillator inconsistencies<br />
from chip to chip make it impossible to time perfectly, so the only true way to<br />
check rate of fire is to use a Pact Timer or ballistic chronograph. The red radar<br />
chronographs commonly found at fields are NOT reliable.<br />
Setting BPS Setting BPS Setting BPS<br />
1 14.0 9 16.0 17 18.0<br />
2 14.25 10 16.25 18 18.25<br />
3 14.5 11 16.5 19 18.5<br />
4 14.75 12 16.75 20 18.75<br />
5 15.0 13 17.0 21 19.0<br />
6 15.25 14 17.25 22 19.25<br />
7 15.5 15 17.5 23 19.5<br />
8 15.75 16 17.75 24 19.75<br />
25 20.0<br />
26 Unlimited<br />
w/eyes on<br />
ABS Dwell – Amount of dwell time added for an ABS shot. The range is from 1 to<br />
15 additional milliseconds of dwell. The default is 5. Setting this to 1 turns ABS<br />
off. For a more detailed explanation of ABS see the “Additional Features” section.