Tengu Software and Yakuza Board - Tadao Technologies
Tengu Software and Yakuza Board - Tadao Technologies
Tengu Software and Yakuza Board - Tadao Technologies
- No tags were found...

You also want an ePaper? Increase the reach of your titles
YUMPU automatically turns print PDFs into web optimized ePapers that Google loves.
Table of ContentsWarranty .......................................................................................................................................................3Things That Void Your Warranty...................................................................................................................3About This Manual:.......................................................................................................................................4General Feature Overview:...........................................................................................................................5Recommendations ....................................................................................................................................6Settings..................................................................................................................................................6<strong>Yakuza</strong> Series Design & Development ..........................................................................................................7Why OLED?................................................................................................................................................7<strong>Board</strong> Installation......................................................................................................................................8Care <strong>and</strong> cleaning......................................................................................................................................8Batteries....................................................................................................................................................8Trigger adjustment <strong>and</strong> switch life ...........................................................................................................9<strong>Yakuza</strong> Series USB <strong>Board</strong> Operation ............................................................................................................9Settings....................................................................................................................................................11<strong>Tengu</strong> USB Interface: ..................................................................................................................................14Additional Information............................................................................................................................15Versions :.............................................................................................................................................15Power on/off:......................................................................................................................................15<strong>Tengu</strong> Requirements:..............................................................................................................................15Using the <strong>Tengu</strong> Interface.......................................................................................................................16Updating Your <strong>Board</strong>'s Firmware........................................................................................................16Using The Boot Screen Editor .............................................................................................................17Additional Information........................................................................................................................22End User License Agreement (EULA) ......................................................................................................22Disclaimer................................................................................................................................................22FAQ..............................................................................................................................................................23
Warranty<strong>Tadao</strong> <strong>Technologies</strong> provides a limited lifetime warranty against manufacturing defects to the originalowner.• <strong>Tadao</strong> <strong>Technologies</strong> LLC warrants to the original purchaser that this product is free from defectsin material <strong>and</strong> workmanship during normal use <strong>and</strong> service. Warranty service extends only tothe original purchaser who must provide valid proof of MAP purchase from an authorized <strong>Tadao</strong>dealer.• This warranty applies only to original factory components, <strong>and</strong> any modification to or tamperingwith original factory components by anyone other than <strong>Tadao</strong> <strong>Technologies</strong> LLC will void thiswarranty. This warranty does not cover defects or malfunctions which <strong>Tadao</strong> <strong>Technologies</strong> LLCdetermines were caused by water, paint, fire, physical damage, improper installation, customermisuse, modification, or abnormal wear <strong>and</strong> tear to parts. At its discretion <strong>Tadao</strong> will repair orreplace the product within a reasonable period of time. Discontinued products are subject towarranty repairs only.• The customer assumes all risk for the use of this product <strong>and</strong> is solely responsible fordetermining its suitability for use by any individual or installation in any specific marker. Underno circumstances shall <strong>Tadao</strong> <strong>Technologies</strong> LLC be held liable for damages resulting from the useor misuse of this product.• Further warranty information is available at www.tadaotechnologies.com.Things That Void Your Warranty• Dremels making contact with parts of your marker.• Uploading your own code into the <strong>Yakuza</strong> USB. (The exception is the first person to get Doomrunning on the <strong>Yakuza</strong>)• Exposure to excessive moisture or liquids• Physical damage or modification of the board
About This Manual:This Manual is divided into three sections –General Information, <strong>Yakuza</strong> board specific information, <strong>and</strong><strong>Tengu</strong> specific information. The <strong>Yakuza</strong> USB <strong>Board</strong> enables you to adjust settings the old fashioned way– using the trigger <strong>and</strong> power switch. We know a lot of folks are excited about the USB programmingcapabilities but there is always the chance that you want to put on some retro Velcro sneakers <strong>and</strong> do itold school. Well – that <strong>and</strong> if you decide to adjust something at the field <strong>and</strong> don’t have a laptop withyou these instructions will show you what you need to do.The last section brings on the new hot sauce known as <strong>Tengu</strong>. Bottom line you can load <strong>Tengu</strong> on yourcomputer, plug in a USB cable to your board <strong>and</strong> by hitting a couple dropdown menus change everysetting, upload preconfigured custom settings, or even change the boot screen!As with every Mangled Manual we try to put in the notes or details that people are asking about on themessage boards. If it is in the stickies it is probably in here.
General Feature Overview:• Includes super thin Stinger grip panels with a window for the OLED display• Licensed 4C TM technology enables automatic detection <strong>and</strong> use of 4 Eye boards to dynamicallymaximize rate of fire <strong>and</strong> reduce chops• <strong>Yakuza</strong> Series OLED graphical display system which shows eye status, battery life, current firemode, max rate of fire, game timer, <strong>and</strong> menu system• Microchip PIC18F2550 microcontroller runs at up to 48 Mhz <strong>and</strong> provides Full Speed USB 2.0(12Mbit/s)• <strong>Tengu</strong> USB interface for Windows XP <strong>and</strong> Vista provides free firmware updates, custom bootscreens, settings adjustments, <strong>and</strong> more• Zero power drain while turned off (less than 0.0001 mA)• Industry first anti‐breech bounce software reduces chopping when a loader is running out ofpaintballs• RF socket <strong>and</strong> wiring harness included to support Magna, Pulse, <strong>and</strong> other RF transmitters• Multiple modes of fire ensure compliance with all major tournament series: unlimited semiautomatic,adjustable semi‐automatic, PSP ramping, PSP 3 round burst, NXL full‐automatic,Millennium ramping, custom ramping, auto‐response, 3 round burst, <strong>and</strong> full‐automatic• <strong>Tadao</strong> trigger logic asynchronously monitors the trigger switch, using an interrupt based scan atup to 12 million times per second for the quickest response time <strong>and</strong> fastest semi‐automatic• <strong>Tadao</strong> dynamic eye logic watches for the bolt to return every shot, cycling the marker as fast aspossible• Rate of fire adjustable from 5 to 30 bps in 0.1 bps increments, plus unlimited rate of fire• Extremely easy to use OLED graphical <strong>and</strong> text based menu system for changing settings• All settings are stored in non‐volatile memory so they are not lost when the battery isdisconnected• Spring battery contacts so there’s no wiring harnesses to break or wear out• Five custom user profiles allow you to save settings for specific tournament series orperformance tuning• Additional features include adjustable debounce, anti‐mechanical bounce, cycle percentagefilter, anti‐bolt stick, ball in place delay, bolt delay, eye modes, ramp start, ramp percentage,breakout modes, game timer, auto power down timer, shot counter, screen brightness, <strong>and</strong>more• High quality Omron 80 gram trigger microswitch
RecommendationsSettingsThe <strong>Yakuza</strong> series ship with default settings which are tuned for a wide range of trigger adjustments <strong>and</strong>general usage. Obviously certain tournament series allow alternate fire modes with specificcharacteristics. The following is a list of settings which will give you a baseline. Ultimately, every markeris unique, <strong>and</strong> may require different settings for optimal performance.Semionly tournaments: Use the default settings, possibly only changing debounce, AMB, <strong>and</strong> CPF tosuit your personal trigger adjustments.PSP: Use the PSP ramping or PSP burst fire modes, with maximum rate of fire set to the required cap forthe league (for 2009 this should be either 10 or 12 bps, depending on your division). Make suredebounce is near default values. The PSP/Millennium semi shots setting should be at 3, <strong>and</strong> thePSP/Millennium reset time should be 1000ms or less.Millennium: For 2008 the Millennium series modified their rules slightly. It should be a 12 bps cap witha 6 pulls per second activation, <strong>and</strong> requires the 1‐2‐3 semi‐auto shots like PSP mode before rampingcan begin, meaning the PSP/Millennium semi shots setting should be at 3. The PSP/Millennium resettime is not specified in the Millennium rules, but it is recommended that you keep this below 1000 ms.Many European tournaments besides the Millennium series utilize semi‐automatic, but capped at 15bps. Select the capped semi‐automatic fire mode for these events.
<strong>Yakuza</strong> Series Design & DevelopmentOn the software level, running an LCD or OLED display is relatively easy, assuming you don't have tofire a paintball gun. This represents a significant challenge.So on top of making everything fit in the marker, we also have to display information on the screen thatis intuitive, legible, <strong>and</strong> updates correctly as a player uses the board. It's one thing to turn an LED on oroff with a single instruction that executes in 0.00000025 seconds. Displaying two full lines of text acrossa 96x16 pixel display can take over 10 milliseconds, which is 1/100th of a second. Anyone who playspaintball knows that this kind of delay can cause a trigger pull to be missed, as the most commondefault debounce on any board is typically 10 milliseconds.Despite the cool visuals <strong>and</strong> extremely easy‐to‐use interface, the <strong>Yakuza</strong> software doesn't give upeven one processor cycle to make it look pretty. It never sacrifices firing performance for visuals. Whenyou need to fire that string of paint at 12.0 bps on the break of the PSP finals, any inconsistency thatoccurs will not be caused by the <strong>Yakuza</strong> software.<strong>Yakuza</strong> uses all new hardware, too. The USB <strong>Yakuza</strong> board is a step forward in technology, not just theaddition of a USB socket. PIC18 USB series microcontrollers, Texas Instruments voltage regulators <strong>and</strong>boosters, Panasonic capacitors, International Rectifier MOSFETs, <strong>and</strong> Omron microswitches addrobustness <strong>and</strong> reliability to the circuit board, <strong>and</strong> reduce the fragility of the electronics powering yourfavorite paintball marker.Features include a fine rate of fire adjustment, allowing you to tune your maximum rate of fire in 0.1 bpsincrements. Want your gun to shoot 11.9 bps? No problem. Another feature of the software is theanti‐breech bounce code, which dynamically adjusts the cyclic rate when a loader starts to run low onpaint. This helps prevent chops when a fast loader actually throws a paintball down into the breech <strong>and</strong>it bounces up, since there are no paintballs stacked above it. As many users have requested, there isalso a ramping percentage setting, adjustable from 10% to 500%, so you can tune any of the ramp basedfire modes. Lastly, there are 5 setting profiles, which allow you to save your favorite settings <strong>and</strong> loadthem later with just a few button presses, making it infinitely easier to switch between tournamentmarker rules.Altogether, <strong>Yakuza</strong> gives you the fastest, easiest‐to‐use, <strong>and</strong> most reliable circuit board available.Why OLED?When compared to an LCD, OLED screens have several advantages, including better durability, lowerpower consumption, <strong>and</strong> higher contrast, especially in sunlight.Unlike an LCD, each pixel of an OLED is a light emitting diode, <strong>and</strong> therefore emits its own light. Thismakes the power consumption directly proportional to how many pixels are lit. With an LCD none ofthe pixels light up on their own, so a backlight must be used, which drastically increases powerconsumption by lighting up the entire display instead of only the pixels that are active. Paintball
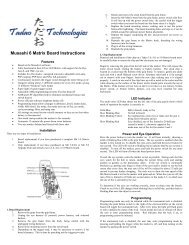
markers that use LCDs were (<strong>and</strong> still are) very difficult to read when viewed in the sun, <strong>and</strong> impossibleto read at night without a backlight.<strong>Board</strong> Installation1. Remove the currently installed grips to expose the circuitboard.2. Disconnect the wiring harness from the circuit board bygripping the plug itself – Pulling the wires may yank themout of the plug – something that generally makes themarker inoperative <strong>and</strong> will delay you getting to fire up the<strong>Yakuza</strong>. Take a look at the plug <strong>and</strong> you will see the holesare off center.3. Remove the screws <strong>and</strong> lift the circuit board out of theframe. If you use a spring to return the trigger, make sure to keep track of it <strong>and</strong> the returnspring bracket.4. Place the <strong>Yakuza</strong> USB board into the grip frame <strong>and</strong> adjust the wiring if necessary to get theboard into the frame.5. Partially tighten the circuit board retention screws <strong>and</strong>connect a battery to the board. The positive terminal istowards the front of the frame, as shown by the + <strong>and</strong> –marks on the surface of the board.6. Do a test fit to make sure the display shows properly in thegrip frame window.7. Plug the wires in making sure that the off center holes fromstep #2 match the off center wires in the circuit board.8. Install grip panels with the included screws. Using longerscrews may damage internal components of the gun <strong>and</strong> will definitely void the warranty.Care <strong>and</strong> cleaningYour <strong>Yakuza</strong> series board includes a conformal coating to help protect against damage caused bymoisture from things such as broken paint or rain. Under normal conditions, the board should continueto operate fine with small amounts of moisture present. However, paint is slightly corrosive <strong>and</strong> c<strong>and</strong>estroy the conformal coating over time. In the event that you get broken paint or water on theelectronics, unplug the battery, <strong>and</strong> then use rubbing alcohol <strong>and</strong> a blast of compressed air to clean theboard off. The compressed air will ensure that everything is cleaned out from beneath the components<strong>and</strong> connectors.Batteries<strong>Tadao</strong> <strong>Technologies</strong> recommends the use of quality alkaline batteries such as those made by Duracell<strong>and</strong> Energizer. Photo lithium 9 volt batteries are also adequate. Batteries labeled as “heavy duty” or“super heavy duty” are not true alkaline, <strong>and</strong> will cause inconsistent operation, or may not properly
power the electronics. Rechargeable batteries are also not recommended because they typically do notprovide enough current.Trigger adjustment <strong>and</strong> switch lifeThe trigger switch used on the <strong>Yakuza</strong> series boards is a high quality tactile lever switch made by Omron.It has a life expectancy of several million actuations. The life of a trigger switch on a paintball markercan be substantially shortened by using too short of a trigger pull. It is imperative that there is at least atiny amount of travel before <strong>and</strong> after the actuation point. It is also extremely important that some kindof trigger return force is used, such as a spring or magnet. Excessive bounce may occur if a spring ormagnet is not used, or the actuation point is too close to the beginning or end of the trigger pull.<strong>Yakuza</strong> Series USB <strong>Board</strong> OperationTurn on the board by pushing the power switch. The OLED display will show the boot screen, followedby the main screen with the current fire mode, rate of fire, battery, <strong>and</strong> eye status visible.Turn off the board by pressing <strong>and</strong> holding the power switch for at least 1 second. The OLED display willturn off to indicate the board has shut down.The eye system is toggled on <strong>and</strong> off by quickly pressing <strong>and</strong> releasing the power switch. The OLEDdisplay will reflect the eye status.The use of the 4C eye system allows for much faster rates of fire because it can anticipate the nextpaintball being loaded into the breech <strong>and</strong> start the firing cycle early, which negates the delay timefound in the pneumatics of the paintball marker. The <strong>Yakuza</strong> software was written specifically to takeadvantage of this arrangement, <strong>and</strong> automatically uses the top eye set when the loader is feeding fastenough. It can also determine when the top eye set is blocked by paint or debris, <strong>and</strong> will default tousing only the bottom eye until the top is clear again. Once the top eye is clear, it will resume use ofboth eye sets.If used, the eye system cycles the marker as fast as possible. During each shot the eyes watch for thebolt to return, ending the current firing cycle <strong>and</strong> starting another as quickly as the pneumatics allow. Ifthe eye system is continually blocked (e.g. putting your finger in front of the eyes) <strong>and</strong> is unable to seethe bolt return after every shot, the max rate of fire will be reduced to about 12 balls per second toprevent further chopping, <strong>and</strong> the OLED display will display an eye malfunction. Firing the marker withpaint <strong>and</strong> air will utilize the eye system correctly, maximizing the rate of fire.The programming menu system is activated by holding down the trigger while pressing the powerswitch. The OLED display will show “Menu system initiated….” Further details regarding the menusystem can be found below.If selected in the menu system, the game timer will replace the current rate of fire indicator on the OLEDdisplay. The game timer will start after the first trigger pull.
OLED DIAGRAMSThe OLED display built into the <strong>Yakuza</strong> series board shows the user a multitude of information via text<strong>and</strong> icons. The software is written with performance in mind, <strong>and</strong> will not update the screen until theuser stops shooting for just a fraction of a second. This ensures that the screen does not interfere withthe timings of the marker.The battery indicator shows battery life by displaying a bar within the icon. The longer the bar, thehigher the battery level. A low battery is reached at approximately 7.5 volts, but if quality alkalinebatteries are used, the remaining power should be adequate for at least one more case of paint.The eye indicator is displayed as a circular icon with a number beside it. The number represents thecurrent number of eyes in use, <strong>and</strong> will display 4 if using the 4C eye system, 2 if using the stock eyes,<strong>and</strong> nothing when the eyes are off. If the top eye set becomes dirty or inoperable while using the 4Ceye system, it will also display 2 <strong>and</strong> switch to using just the bottom set.If any eyes are off or malfunctioning it will be shown in the circular indicator. If using 4 eyes, the top halfof the circle will be blocked when the top set of eyes are blocked, <strong>and</strong> the bottom half of the circle whenthe bottom eyes are blocked. If the eye system is off, the indicator displays “off.” If the eye system hasa malfunction from not seeing the bolt return, it will show an X.2 or 4 eyes, empty breech: 2 or 4 eyes, blocked breech: 4 eyes, top eye blocked:4 eyes, bottom eye blocked: Bolt not seen returning: Eyes off:MENU SYSTEMThe <strong>Yakuza</strong> menu system allows the user to quickly <strong>and</strong> easily change a multitude of settings. The textbased menu is much faster <strong>and</strong> easier to underst<strong>and</strong> than LED based programming modes.To boot into the menu system the user must hold down the trigger while pressing the power switch toturn the board on. After the menu boot message, the displayed setting will be the last one that wasmodified. If this is the first time the board has been booted into the menu system, it will show the firemode.Scrolling through the settings is done by pulling <strong>and</strong> releasing the trigger. The menu will wrap around tothe beginning when the last setting is reached. You can scroll backwards through the settings by holdingdown the trigger, then pressing the power switch. Once the first setting is reached it will wrap aroundto the last setting.To change a setting the user must quickly press <strong>and</strong> release the power switch. The OLED screen willreflect this by displaying “set” in front of the current value. The setting can be modified at this point bypulling <strong>and</strong> releasing the trigger, which will advance the current value. Once you reach its maximum or
last value, it will loop back to the lowest value. You can also decrement the value by holding down thetrigger <strong>and</strong> pressing the power switch repeatedly. After the desired value is displayed, you can save thesetting by pressing the power switch. The “set” designation next to the value will disappear.Example of changing the maximum rate of fire from 12 to 20:1. Boot into programming mode by holding the trigger while pressing the power switch.2. The first setting is fire mode. Pull the trigger one time to advance to max rate of fire.3. Press <strong>and</strong> release the power button quickly. The “set” designation will display next to thecurrent value.4. Pull <strong>and</strong> release the trigger 8 times to increment the value from 12 to 20.5. Press <strong>and</strong> release the power button quickly. The OLED screen will remove the “set” designationfrom view <strong>and</strong> save the setting.6. Cycle through additional settings using the trigger, or exit programming mode by holding thepower switch for 1 second, until the OLED screen turns off.Tournament lock: The tournament lock prevents access to the menu system while enabled. It can betoggled on <strong>and</strong> off while the board is powered up in the main firing mode (not the menu system) byholding the lock switch on the surface of the board for 2 seconds. The OLED screen will display thestatus as it changes.SettingsFire mode (default semiautomatic unlimited)1. Semi‐automatic unlimited2. Semi‐automatic adjustable3. PSP ramping – 123 shots semi, on 4 th shot ramps at 5 pulls per second, resets after 1 second4. PSP burst – 123 shots semi, on 4 th shot fires 3‐round burst, resets after 1 second5. NXL full‐automatic – 123 shots semi, on 4 th shot fires full‐automatic, resets after 1 second6. Millennium ramping – 123 shots semi, on 4 th shot ramps at 6 pulls per second, ignores rampstart setting if less than 6 pulls per second7. Custom ramping – user adjustable ramping, select custom ramp start <strong>and</strong> ramp percentage8. Auto response – fires on each pull <strong>and</strong> release9. Burst – 3‐round burst10. Full‐automatic – 1 shot semi, on 2 nd shot fires full‐automatic, resets after 1 secondMaximum rate of fire (default 12 bps, range 530 <strong>and</strong> infinity):The semi‐automatic unlimited fire mode ignores this value, making it easy to switch back <strong>and</strong> forthbetween semi‐automatic <strong>and</strong> PSP gun rules without modifying more than one setting. Adjustable from5 to 30, with an unlimited option designated by the infinity symbol.Fine rate of fire timing (default 0.0, range 0.0 to 0.9 additional bps):Fine adjustment of the max rate of fire in 0.1 bps increments, from 0.0 to 0.9 additional bps.
Game timer (default off, range 160 minutes):Enables <strong>and</strong> sets the game timer, which replaces the rate of fire indicator on the OLED display whenturned on. The game timer is adjustable from 1 to 60 minutes.Debounce (default 5 ms, range 0.525.0 ms):The amount of time the trigger must be released for the microcontroller to allow the next trigger pull.Asynchronous interrupt based scan up to 12 million times per second that is run independently fromcode execution. Higher values reduce bounce.Antimechanical bounce (default 1, range 14):Helps eliminate mechanical bounce which can cause a loosely held paintball marker to go full‐auto.Cycle percentage filter (default 2, range 110):Secondary debounce filter which adjusts how far through the firing cycle that additional buffered shotsare allowed. A setting of 1 turns this filter off, while settings 2 through 10 set the percentage of thecycle that must pass before shots may be buffered. Higher settings will reduce bounce.Dwell (default 6 ms, range 0.525.0 ms):The amount of time the solenoid is energized during each firing cycle. Lower is less consistent, higher isless efficient.Antibolt stick (default off, range 110 ms):Bolt stick can occur when the o‐rings in the bolt settle or stick, causing the next shot to have lowervelocity. If the marker is left sitting for more than 20 seconds, ABS adds extra dwell to ensure the nextshot has proper velocity. The default is off.BIP delay (default 1, range 110 ms):A slight delay that allows each paintball to settle in the breech before firing.Bolt delay (default 14, range 115 ms):A delay that gives the bolt enough time to block the eyes on the forward stroke. Too low will causeblank or skipped shots. Too high can slow the marker down.Eye mode (default forced):1. Forced with force shot – marker only fires when a paintball is present, unless a force shot isinitiated by holding down the trigger for ½ second.2. Delayed – the eyes will watch for a paintball for up to 500 ms after each pull, then fire. This isuseful for sound activated loaders <strong>and</strong> was the stock setting on original Intimidators.Ramping start (default 6, range 414 pulls per second):How fast you pull for the ramping fire modes to start adding additional shots. Ramping modes only.Millennium mode will ignore settings below 6 pulls per second, automatically using 6 pulls per second.
Ramping percent (default 500%, range 10%500%):Adjusts how much the software helps the user. A 50% ramp will add 50% of the user’s pulling rate tothe current rate of fire. (i.e. if you pull 8 times per second, it will add an additional 50%, meaning thegun will fire 12 times per second)PSP/Millennium mode semi shots (default 3, range 15 shots):Sets the number of semi‐automatic shots before ramping begins in any of the PSP or Millennium modes.PSP/Millennium mode reset time (default 900 ms, range 5002000 ms):Adjusts the reset time for any of the PSP or Millennium fire modes for when the user stops shootingbefore it reverts back to the initial semi‐automatic shots, as selected in the previous setting.G mode or “breakout mode” (default off): <strong>Tadao</strong> <strong>Technologies</strong> LLC takes no responsibility for theuser’s choice in using breakout modes.This breakout setting provides unlimited full‐auto, which then falls back to the user selected fire mode,on the 1 st , 2 nd , or 3 rd shot after turning the board on. Breakout modes are illegal for use in alltournament series <strong>and</strong> most recreational paintball fields .Rate of fire display mode (default average):1. Maximum – displays the highest achieved rate of fire based on the shortest time between any 2shots.2. Average – displays the highest achieved average rate of fire based on 3 consecutive shots.Brightness (default 5, range 15):Allows adjustment of the OLED display brightness. Lower settings are less bright, with a setting of 1useful for night play <strong>and</strong> scenario games.Boot screen timer (default 1.5 seconds, range 0.0 to 3.0 seconds):Adjusts how long the boot screen is displayed when the board is turned on.Autooff timer (default 30 minutes, range 5 to 60 minutes, or disabled):Adjusts how long the board must sit idle before automatically powering down to conserve batteries.Shot counter:Displays the number of shots. Can be reset by pressing/releasing the power switch.Save/Load profile:Allows the user to save or load settings in 5 separate profiles. Both saving <strong>and</strong> loading profiles followthe same operation. Enter the setting by pressing the power switch, then use the trigger to scroll towhichever profile you want to save or load. Press the power switch once the desired profile is selected.The board will prompt you for confirmation of the save or load, <strong>and</strong> then proceed to complete theaction or, if aborted, return back to the main setting menu.Reset:Allows the user to perform a settings reset, which returns all settings to their default values. Savedprofiles <strong>and</strong> the boot screen image will not be reset.Version:Displays the current software version running on the <strong>Yakuza</strong> series board.
<strong>Tengu</strong> software:Introduction:The <strong>Tengu</strong> USB Interface is a PC application that allows you to interact directly with your <strong>Yakuza</strong> SeriesUSB board. It provides the capability to update the firmware, customize the boot screen graphics, <strong>and</strong>load/modify/save settings. Additional features are continually added to correspond with new releases ofboard firmware, so it is important that you download the latest version of <strong>Tengu</strong> each time you updateyour board: http://www.tadaotechnologies.com/productcart/pc/viewContent.asp?idpage=15How it Works:The new <strong>Yakuza</strong> USB boards are designed around the Microchip PIC18F2550, which is a specialmicrocontroller that has full‐speed USB 2.0 support, <strong>and</strong> can directly interface with a PC as a humaninterface device (HID). It is a true USB implementation <strong>and</strong> not just a USB‐to‐serial converter found oncompeting products. Since it is recognized as an HID, the drivers are built into Windows, which makes itvery easy to install.There are 2 sides to <strong>Tengu</strong>. One side is in the microcontroller on your <strong>Yakuza</strong> USB board <strong>and</strong> is called thebootloader. The other side is the user interface that you see when you run the <strong>Tengu</strong> application onyour computer.The bootloader is a permanent program that occupies a small portion of the memory on themicrocontroller, <strong>and</strong> is able to rewrite the code that runs your paintball marker. It communicates overthe USB bus to the <strong>Tengu</strong> interface. The <strong>Tengu</strong> interface is thus able to send updated firmware to theboard or modify the boot screen <strong>and</strong> settings.
The firmware files are encrypted using 192 bit AES, which is the current encryption st<strong>and</strong>ard for the U.S.government. The files are sent in encrypted form over the USB bus to the microcontroller, where theyare decrypted before being written to program memory. Encryption protects the intellectual property of<strong>Tadao</strong> <strong>Technologies</strong>. It also prevents abuse of the USB interface, such as players trying to write theirown cheater software.Additional InformationVersions :Due to the addition of new settings or features in either program, a specific version of <strong>Tengu</strong> must beused with each firmware release for a board. Firmware compatible with <strong>Tengu</strong> versions are listed on thewebsite: http://www.tadaotechnologies.com/productcart/pc/viewContent.asp?idpage=15Power on/off:The board must be turned off before connecting to the PC or it will not be properly recognized. Whileplugged into the USB cable, the board cannot be manually turned on. Input from the power switch willbe ignored until it is removed from the USB cable. The battery can be left plugged in while using the USBas long as the board is first turned off.If you accidentally flash the wrong firmware to your board (i.e. putting the Ego board firmware on yourUltralite board), remove the battery <strong>and</strong> flash the correct firmware.<strong>Tengu</strong> Requirements:1. Computer with a USB port <strong>and</strong> running Windows XP or Windows Vista2. 'Mini‐B' to 'A' USB cable (commonly used with digital cameras, Blackberrys, etc.)3. Windows XP users will need the Microsoft .NET Framework, available fromhttp://msdn.microsoft.com/en‐us/netframework/default.aspx. Specifically, download <strong>and</strong> install.NET Framework 3.5. Windows Vista includes the .NET Framework by default, so nothing else isneeded to utilize <strong>Tengu</strong>.NOTE: If using Windows XP, download <strong>and</strong> install the .NET Framework from Microsoft. If usingWindows Vista, you're fine!Download the latest version of the <strong>Tengu</strong> USB interface from:http://www.tadaotechnologies.com/productcart/pc/viewContent.asp?idpage=15. The executable canbe placed anywhere on your computer <strong>and</strong> does not require an installation routine. The USB drivers arebuilt into Windows.
Connecting your <strong>Yakuza</strong> Series USB <strong>Board</strong> to the computer:1. Power off the <strong>Yakuza</strong> USB board.2. Remove/disconnect the battery.3. Using the mini‐B USB cable, connect the board to the computer.4. The board will automatically be recognized as an HID USB device. Wait patiently while Windowsfinds <strong>and</strong> installs the necessary drivers.5. If necessary hum “The Girl from Ipanema” while pretending you are on an elevator.6. Windows may notify you that a reboot is required to finish installation.Using the <strong>Tengu</strong> InterfaceStart the <strong>Tengu</strong> executable. The main window is shown, displaying the About tab, firmware updatesection, <strong>and</strong> USB status message box. The tabs along the top of the window will display specificcustomization features of <strong>Tengu</strong>. The firmware update box <strong>and</strong> USB status message box are alwaysdisplayed, regardless of the selected tab.Updating Your <strong>Board</strong>'s Firmware1. Turn off your board.2. Connect the board to the PC with the mini‐B USB cable.3. The USB status message box will display that a board has been connected.4. Click the “Open File” button. An open file dialog window will appear.5. Navigate to the location of the new firmware file (.aes file extension) you want to download toyour board. Select it.6. Click the “Program” button. The update will begin, with the USB status message box showingthe various steps of the programming sequence.7. When finished you may unplug the board from the computer or use other <strong>Tengu</strong> features.
About tab, firmware update completed (USB status message box):Using The Boot Screen EditorThe boot screen editor lets you create or import a customized boot screen, which is displayed everytime you turn on your board. The boot screen editor tab displays an enlarged 96x16 pixel representationof the OLED screen. The buttons along the top allow you to:1. Save the current image displayed in <strong>Tengu</strong> to your board.2. Load the current image stored on the board to <strong>Tengu</strong>.3. Load the default kanji/<strong>Tadao</strong> image.4. Turn all pixels on.5. Turn all pixels off.6. Mirror the pixels (every pixel lit is turned off, <strong>and</strong> vice versa).7. Save the current image displayed in <strong>Tengu</strong> to a bitmap image file on your computer.8. Load an image into <strong>Tengu</strong> from a bitmap image file on your computer.File formats supported:<strong>Tengu</strong> will load any type of bitmap image that is exactly 96 pixels wide <strong>and</strong> 16 pixels in height. The OLEDscreen is monochrome, so when you design images in applications such as Photoshop, you should create1 bpp bitmaps, or only use absolute black <strong>and</strong> white. <strong>Tengu</strong> will reject bitmaps that are not 96x16 pixels.Images that contain colors other than absolute black <strong>and</strong> white may not load correctly.Do not use image editing tools to resize an image down to 96x16 pixels. You will lose image quality, <strong>and</strong>the pixel colors may change, resulting in poor translation when loaded into <strong>Tengu</strong>.
Boot screen editor tab with default boot screen loaded:Boot screen editor tab, file open dialog box:Modifying <strong>Board</strong> Settings With <strong>Tengu</strong>The settings tab lets you adjust settings on the board. The buttons along the left side allow you to:1. Select the location on the board from which to read or save settings.2. Load settings from the selected location to <strong>Tengu</strong>.3. Save the current settings displayed in <strong>Tengu</strong> to the selected location on the board.4. Load the default settings into <strong>Tengu</strong>.5. Load settings into <strong>Tengu</strong> from a file on your computer.
6. Save the current settings displayed in <strong>Tengu</strong> to a file on your computer.Note: Each version of <strong>Tengu</strong> supports specific firmware for all of the <strong>Yakuza</strong> USB boards. As newfeatures <strong>and</strong> their corresponding settings are added to the firmware, <strong>Tengu</strong> must also be updated sothat these settings can be manipulated from within its interface.Every release of <strong>Tengu</strong> is capable of updating the firmware on any of the <strong>Yakuza</strong> USB boards. However,only specific versions of <strong>Tengu</strong> will be able to correctly load, save, <strong>and</strong> modify the settings for eachrevision of firmware. The <strong>Tengu</strong> page athttp://www.tadaotechnologies.com/productcart/pc/viewContent.asp?idpage=15 contains a list ofcompatible firmware <strong>and</strong> <strong>Tengu</strong> versions. You should always update <strong>Tengu</strong> when you update your boardfirmware.Settings tab, displaying a tooltip after loading the settings from the board:
Settings tab, modifying the Solenoid Dwell setting using the drop down menu:Settings tab, save file dialog box:
The Support TabThe support tab lists the <strong>Tengu</strong> version, build date, <strong>and</strong> contact information. The End User LicensingAgreement is also displayed.Badger Badger Badger:
Additional InformationVersions – Due to the addition of new settings or features in either program, a specific version of <strong>Tengu</strong>must be used with each firmware release for a board. Firmware compatible with <strong>Tengu</strong> versions arelisted on the website.End User License Agreement (EULA)1. Under this End User License Agreement (the Agreement), <strong>Tadao</strong> <strong>Technologies</strong> (the Vendor)grants to user (the Licensee) a non‐exclusive <strong>and</strong> non‐transferable license (the License) to usethe <strong>Tengu</strong> USB interface (the <strong>Software</strong>).2. “<strong>Software</strong>” includes the executable computer programs, encrypted firmware files, <strong>and</strong> anyrelated printed, electronic, or online documentation <strong>and</strong> files.3. Title, copyright, intellectual property rights <strong>and</strong> distribution rights of the <strong>Software</strong> remainexclusively with Vendor. Intellectual property rights include the look <strong>and</strong> feel of the <strong>Software</strong>.4. This Agreement constitutes a license for use only <strong>and</strong> is not in any way a transfer of ownershiprights to the <strong>Software</strong>.5. The <strong>Software</strong> may be loaded onto as many computers as the Licensee chooses.6. The rights <strong>and</strong> obligations of this License are personal rights granted to the Licensee only. TheLicensee may not transfer or assign any of the rights or obligations granted under thisAgreement to any other person or legal entity without the express written permission ofVendor.7. The <strong>Software</strong> <strong>and</strong> related files may not be modified, reverse engineered, or decompiled in anymanner through current or future available technologies.8. Purchase <strong>and</strong>/or use of this <strong>Software</strong> constitute acceptance <strong>and</strong> compliance with these terms.DisclaimerThis software product is provided by <strong>Tadao</strong> <strong>Technologies</strong> LLC “as is.” You are solely responsible fordetermining compatibility with <strong>and</strong> protection of your equipment. <strong>Tadao</strong> <strong>Technologies</strong> LLC will not beliable for any damages incurred by using, modifying, or distributing this software product. Use of thissoftware product constitutes acceptance <strong>and</strong> compliance with these terms
FAQ1. Q: Can an existing <strong>Yakuza</strong> board be retrofitted with the USB port?A: Unfortunately no. The USB board has twice as many components, which may be hard to tellfrom the pictures – but they are there.Original <strong>Yakuza</strong> Circuit board on Left – USB Version on the right.Other differences:‐ New microcontroller which also uses a different pad layout.‐ New voltage regulator which also uses a different pad layout.‐ Smaller form‐factor capacitors <strong>and</strong> twice as many of them.‐ Smaller form‐factor resistors <strong>and</strong> twice as many of them.‐ Smaller form‐factor diodes <strong>and</strong> twice as many of them.‐ 3x as many transistors <strong>and</strong> mosfets.‐ And of course a USB mini‐B socket.2. Q: What type of cable is needed? Is one included in the box?A: The socket on the board is a st<strong>and</strong>ard mini‐B USB port. Many cameras, phones, <strong>and</strong> otherperipherals use the same cable. You may have one already so we are not including one toreduce costs passed on to the end user.3. Q: What is the direct URL to the software on the <strong>Tadao</strong> website?A: http://www.tadaotechnologies.com/productcart/pc/viewContent.asp?idpage=15 or you c<strong>and</strong>o the tinyURL of http://tinyurl.com/tadaotengu4. Q: I have a really cool image that I want to use for the boot screen – any tips on the best way todo this?A: While importing images is generally problematic SpyderOWNAGE on PBNation outlined somesteps that he found to work well with importing. They are “So far, the best method I have foundis to: take an image, change it into grayscale, adjust the brightness/contrast until you get a
decent image, manually change the greys to black or white, re‐size the image until it's almost96x16, fix any newly formed greys <strong>and</strong> then transfer it to another PSD file that is already set upfor 96x16. Adjust the image to where you want <strong>and</strong> then change the mode to BMP at 96ppi.Words (that aren't logos) <strong>and</strong> paintball guns (because of all the milling) are the hardest tocreate.”5. Q: What if I just want my own text in the boot screen?A: In Photoshop or another image program make a 96x16 pixel image with bitmap color – thisshould automatically change to 1 bit color. Use the text insert tool <strong>and</strong> experiment with fonts toget something you like. If it isn’t completely perfect – don’t worry about it. Once you save thefile as a .bmp you can import it into <strong>Tengu</strong> <strong>and</strong> change any individual pixels you want.6. Q: Where can I find some premade images to use for my boot screen?A: Several users have posts in this thread with images they created.http://www.pbnation.com/showthread.php?t=2916596&page=3