Filter Coffee Maker ICM30 - 40 - 40B - 40T - Lakeland
Filter Coffee Maker ICM30 - 40 - 40B - 40T - Lakeland
Filter Coffee Maker ICM30 - 40 - 40B - 40T - Lakeland
Create successful ePaper yourself
Turn your PDF publications into a flip-book with our unique Google optimized e-Paper software.
instructions<br />
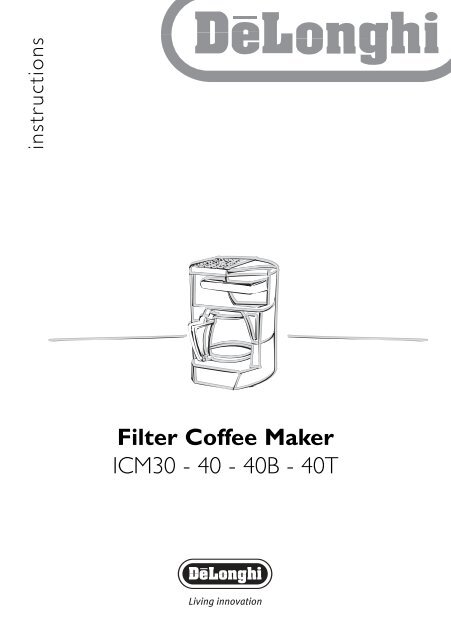
<strong>Filter</strong> <strong>Coffee</strong> <strong>Maker</strong><br />
<strong>ICM30</strong> - <strong>40</strong> - <strong>40</strong>B - <strong>40</strong>T
Glass jug<br />
(<strong>ICM30</strong> - ICM<strong>40</strong> - ICM<strong>40</strong>B only)<br />
Thermal jug<br />
(ICM<strong>40</strong>T only)<br />
Cup warmer<br />
shelf<br />
Handle<br />
ON/OFF<br />
switch<br />
<strong>Filter</strong> <strong>Coffee</strong> <strong>Maker</strong> 2<br />
Plate<br />
Measure<br />
Handle<br />
ON/AUTO/OFF<br />
button<br />
SET TIMER<br />
button<br />
Water<br />
compartment<br />
<strong>Filter</strong><br />
Holder<br />
Permanent <strong>Filter</strong> (<strong>ICM30</strong> - <strong>40</strong> - <strong>40</strong>T only)<br />
(ICM<strong>40</strong>B - Paper filter)<br />
ON/AUTO<br />
indicator light<br />
Display<br />
AROMA<br />
indicator light<br />
AROMA<br />
button<br />
SET CLOCK<br />
button
Thank you for choosing this De’Longhi coffee machine. To get<br />
the best result out of your new coffee machine please read<br />
these instructions carefully before use. This should ensure<br />
optimum results and maximum safety.<br />
Safety Warnings<br />
This appliance is designed to make coffee. Take care during use<br />
to avoid burns caused by the water or steam jets or improper<br />
use of the appliance itself.<br />
When the appliance is in use, do not touch any of the machine’s<br />
hot surfaces.<br />
After unpacking, make sure that the machine is complete and<br />
undamaged. In case of doubt, do not use the appliance and seek<br />
the advice of a qualified service professional.<br />
Packaging materials (plastic bags, foam polystyrene, etc.) should<br />
not be left within the reach of children as this could be a<br />
potential source of danger.<br />
The appliance is designed and produced for domestic use only.<br />
It is not suitable for use in:<br />
- Staff kitchens in shops offices and other workplaces,<br />
- Farm houses,<br />
- Hotels, motels or other holiday accommodation,<br />
- Guest houses.<br />
Any other use is to be considered improper and therefore<br />
dangerous.<br />
The manufacturer takes no responsibility for damage derived<br />
from improper use.<br />
Never touch the appliance with wet or damp hands.<br />
Never immerse the appliance in water.<br />
The appliance is not intended for use by persons (including<br />
children) with reduced physical, sensory or mental capabilities,<br />
or lack of experience and knowledge, unless they have been<br />
given supervision or instruction concerning use of the appliance<br />
by a person responsible for their safety. Children should be<br />
supervised to ensure that they do not play with the appliance.<br />
In the event of breakdown or malfunctioning, turn the appliance<br />
off immediately and do not touch. For repairs, please contact a<br />
Service Centre authorised by the manufacturer. See enclosed<br />
guarantee leaflet. Failure to observe the above points may<br />
affect the safe use of the appliance.<br />
The power cable must never be replaced by the user. If the<br />
power cable is damaged, it must be replaced by the<br />
manufacturer or an authorised service centre in order to<br />
eliminate all risk. See enclosed guarantee leaflet.<br />
When the appliance is not in use, turn off and disconnect the<br />
plug from the socket.<br />
3<br />
<strong>Filter</strong> <strong>Coffee</strong> <strong>Maker</strong>
Green and Yellow to Earth<br />
Blue to<br />
Neutral<br />
13 amp<br />
Fuse<br />
Brown<br />
to Live<br />
Cord Clamp<br />
As with any electrical appliance, whilst the instructions aim to<br />
cover as many eventualities as possible, caution and common<br />
sense should be applied when operating your appliance,<br />
particularly in the vicinity of young children.<br />
Materials and accessories coming into contact with food<br />
conform to EC regulation 1935/2004.<br />
Electrical connection<br />
Important - UK only<br />
· The wires in the cord are coloured as follows:<br />
Green and Yellow = Earth<br />
Blue = Neutral<br />
Brown = Live.<br />
· The appliance must be protected by a 13A approved (BS1362)<br />
fuse.<br />
· Warning: this appliance must be earthed.<br />
Note:<br />
· For non-rewireable plugs the fuse cover MUST be refitted when<br />
replacing the fuse. If the fuse cover is lost then the plug must<br />
not be used until a replacement can be obtained. The correct<br />
fuse cover is identified by colour and a replacement may be<br />
obtained from your De’Longhi Authorised Repairer. See<br />
enclosed guarantee leaflet.<br />
· If a non-rewireable plug is cut off it must be destroyed<br />
immediately. An electric shock hazard may arise if an unwanted<br />
non-rewireable plug is inadvertently inserted into a 13A socket<br />
outlet.<br />
· This appliance complies with European Economic Community<br />
Directive 89/336/EEC.<br />
Important information for correct disposal of the product in<br />
accordance with EC Directive 2002/96/EC.<br />
At the end of its working life, the product must not be disposed of as urban<br />
waste.<br />
It must be taken to a special local authority differentiated waste collection<br />
centre or to a dealer providing this service.<br />
Disposing of a household appliance separately avoids possible negative<br />
consequences for the environment and health deriving from inappropriate<br />
disposal and enables the constituent materials to be recovered to obtain<br />
significant savings in energy and resources. As a reminder of the need to<br />
dispose of household appliances separately, the product is marked with a<br />
crossed-out wheeled dustbin.<br />
<strong>Filter</strong> <strong>Coffee</strong> <strong>Maker</strong> 4
Using for the first time<br />
Before using the machine for the first time, wash all the<br />
accessories in warm soapy water and rinse. For the best tasting<br />
coffee the internal circuits must be flushed through at least twice.<br />
To do this, follow the instructions in the paragraph “How to<br />
prepare the filter coffee” without using ground coffee.<br />
Installation<br />
After removing the packaging, make sure the product is<br />
complete.<br />
If in doubt, do not use the appliance and seek the Customer<br />
Service authorised by the manufacturer. See enclosed<br />
guarantee leaflet.<br />
The packaging (plastic bags, polystyrene foam, etc.) should be<br />
kept out of reach of children as they are a safety hazard.<br />
Place the appliance on a work surface far away from water taps,<br />
basins and sources of heat.<br />
After positioning the appliance on the work top, leave a space<br />
of at least 5 cm between the surfaces of the appliance and the<br />
side and rear walls and at least 20 cm above the coffee maker.<br />
Never install the appliance in environments where the<br />
temperature may reach 0°C or lower (the appliance may be<br />
damaged if the water freezes).<br />
Make sure the mains voltage corresponds to the voltage<br />
indicated on the appliance rating plate.<br />
Connect the appliance to an efficiently earthed socket with a<br />
minimum current rating of 10A only.<br />
The manufacturer may not be considered liable for possible<br />
incidents caused by the failure to adequately earth the mains.<br />
If the power socket does not match the plug on the appliance,<br />
have the socket replaced with a suitable type by a qualified<br />
professional.<br />
Setting the clock into the mains socket<br />
Plug the appliance into the mains socket. When the coffee<br />
machine is connected to the outlet for the first time, “0:00”<br />
appears on the display. To set the time, press the SET CLOCK<br />
button and keep it pressed until the correct hour is displayed, then<br />
release the button. The time can be set at any moment.<br />
5<br />
<strong>Filter</strong> <strong>Coffee</strong> <strong>Maker</strong>
Unlock<br />
fig. 1<br />
Unlock<br />
Water level indicator<br />
fig. 2<br />
fig. 3<br />
fig. 4<br />
fig. 5<br />
How to prepare the filter coffee<br />
Open the door by pulling the handle (fig. 1) and by using the<br />
jug pour fresh water into the water compartment up to the<br />
level corresponding to the number of cups you want to make.<br />
Check the water level viewer. It is recommended to use the<br />
provided carafe as the measure, as the maximum volume of the<br />
carafe corresponds to that of the water tank (fig. 2).<br />
Place the permanent filter in the filter holder (if provided) of<br />
the paper filter in the filter holder (fig. 3).<br />
Place the ground coffee in the filter, using the measuring spoon<br />
supplied, and level evenly (fig. 4). As a general rule, use a level<br />
measuring spoon of ground coffee (around 7 grams) for each<br />
cup (for example, 8 spoons to make 8 cups). Never exceed<br />
the maximum quantity of 12 measures (models with glass<br />
jug) or 10 measures (models with thermal jug) to avoid the<br />
coffee spilling. The quantity of ground coffee used can vary<br />
according to personal taste. Use good quality medium ground<br />
coffee packaged for filter coffee makers.<br />
Close the lid and place the jug on the plate (fig. 5).<br />
Models with thermal jug: Before placing the jug on the plate,<br />
make sure the lid is closed (fig. 6).<br />
Models with electronic control panel: you can enhance the<br />
flavor of your coffee by pressing the AROMA button.<br />
This feature activates a unique brewing process, slowly releasing<br />
water into the filter basket; saturating coffee grounds a little at<br />
a time, extracting the best flavor and aroma from your coffee.<br />
To activate, press the AROMA button; the light above the<br />
button will illuminate. Press the button again to turn the<br />
selection off. It is recommended to use the AROMA function if not<br />
brewing a whole carafe of coffee.<br />
Press the ON/AUTO/OFF button (fig. 7). The red light indicates<br />
that the coffee maker is in operation and the display shows<br />
“BREW”.<br />
Models with single switch: Press the "ON/OFF" switch (fig.<br />
8). The light on the button comes on to indicate that the drip<br />
coffee maker is operating.<br />
fig. 6<br />
<strong>Filter</strong> <strong>Coffee</strong> <strong>Maker</strong> 6<br />
fig. 7<br />
AM<br />
8:00 BREW
The coffee will start to come out after a few seconds. It is<br />
completely normal for the appliance to release a little<br />
steam while the coffee is filtering.<br />
Models with glass jug: If you leave the ON/OFF button pressed<br />
after percolation has finished, the plate will keep the coffee at the<br />
ideal temperature. The unit automatically shuts off after two<br />
hours.<br />
Models with thermal jug: To pour the coffee, turn the lid to<br />
the position shown in (fig. 9). To completely remove the lid<br />
from the jug, turn it to the position shown in (fig. 10).<br />
The appliance switches automatically off after brewing cycle.<br />
Attention: Removing the jug before all the coffee is made does<br />
not interrupt production of the coffee, but merely blocks flow<br />
into the jug. If you want to pour out a little coffee<br />
immediately, you are recommended to do so as rapidly as<br />
possible in order to avoid the coffee overflowing in the filter<br />
holder.<br />
Programming the automatic start (models with electronic<br />
control panel only)<br />
Make sure that the time is set correctly.<br />
To program the time to start coffee preparation:<br />
Press the SET TIMER button and keep it pressed until you reach<br />
the desired switch-on time.<br />
Then release the SET TIMER button. The time will flash for a few<br />
seconds until set: then the display will show the current hour.<br />
Activating the timer<br />
After you have:<br />
- Set the time for switch-on as described in the previous section;<br />
- Prepare the machine for making coffee. Press the<br />
ON/AUTO/OFF button twice (fig. 11). The ON/AUTO<br />
indicator light changes to green indicating the coffee maker is<br />
in operation: the display shows AUTO.<br />
Cleaning and maintenance<br />
Before performing any cleaning or maintenance operations turn<br />
the machine off, unplug it from the power socket and allow it to<br />
cool down.<br />
1. When cleaning the coffee maker, do not use solvents or<br />
abrasive detergents. A soft, damp cloth is sufficient.<br />
2. Never immerse the coffee maker in water: it is an electrical<br />
appliance.<br />
7<br />
<strong>Filter</strong> <strong>Coffee</strong> <strong>Maker</strong><br />
fig. 8<br />
fig. 9<br />
fig. 10<br />
AM<br />
8:00 AUTO<br />
fig. 11
Descaling<br />
If the water in your local area is hard, lime scale will form over<br />
time. These deposits may affect the correct operation of the<br />
appliance.<br />
Models with electronic control panel: When the "ON/AUTO/OFF"<br />
button flashes continuously, proceed with descaling.<br />
Models with single switch: It is recommended to descale the<br />
appliance after approximately every 60 uses.<br />
The descaling process may be performed using special<br />
commercially available scale removers for filter coffee makers.<br />
Follow the instructions provided with these products.<br />
1. Dilute the descaler in the carafe, following the directions on the<br />
packaging of the descaler.<br />
2. Pour the descaling solution in the water compartment;<br />
3. Place the jug on the warming plate, do not put any ground<br />
coffee in the filter holder;<br />
4. Press the filter coffee ON/OFF switch, filter the equivalent of<br />
one cup and then switch off the appliance;<br />
5. Let the solution work for 15 minutes, then repeat steps 4 and 5.<br />
6. Switch the coffee maker back on and filter the rest of the<br />
solution;<br />
7. To rinse the machine, operate it with water and without ground<br />
coffee at least 3 times (3 complete tanks of water).<br />
You are recommended to descale the coffee machine about every<br />
60 uses.<br />
Problem Possible causes Solution<br />
The filter coffee takes a<br />
long time to filter through.<br />
The coffee has an acid<br />
flavour<br />
Problem solving<br />
The filter coffee maker<br />
needs to be descaled<br />
The coffee maker has not<br />
been rinsed sufficiently<br />
Descale as described in<br />
the paragraph<br />
"Descaling"<br />
Rinse the appliance as<br />
described in the chapter<br />
"Descaling"<br />
De’Longhi Appliance - Via L. Seitz, 47 - 31100 Treviso Italia<br />
1321047IDL/02.11


