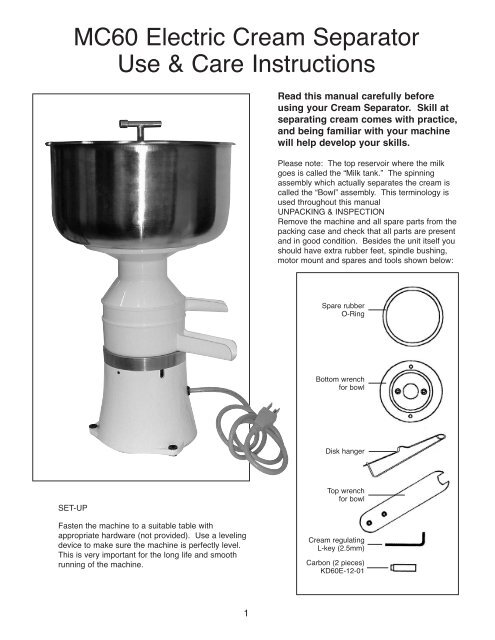
MC60 Electric Cream Separator Use & Care Instructions - Coburn
MC60 Electric Cream Separator Use & Care Instructions - Coburn
MC60 Electric Cream Separator Use & Care Instructions - Coburn

Create successful ePaper yourself
Turn your PDF publications into a flip-book with our unique Google optimized e-Paper software.
<strong>MC60</strong> <strong>Electric</strong> <strong>Cream</strong> <strong>Separator</strong><br />
<strong>Use</strong> & <strong>Care</strong> <strong>Instructions</strong><br />
Read this manual carefully before<br />
using your <strong>Cream</strong> <strong>Separator</strong>. Skill at<br />
separating cream comes with practice,<br />
and being familiar with your machine<br />
will help develop your skills.<br />
Please note: The top reservoir where the milk<br />
goes is called the “Milk tank.” The spinning<br />
assembly which actually separates the cream is<br />
called the “Bowl” assembly. This terminology is<br />
used throughout this manual<br />
UNPACKING & INSPECTION<br />
Remove the machine and all spare parts from the<br />
packing case and check that all parts are present<br />
and in good condition. Besides the unit itself you<br />
should have extra rubber feet, spindle bushing,<br />
motor mount and spares and tools shown below:<br />
Spare rubber<br />
O-Ring<br />
Bottom wrench<br />
for bowl<br />
Disk hanger<br />
SET-UP<br />
Fasten the machine to a suitable table with<br />
appropriate hardware (not provided). <strong>Use</strong> a leveling<br />
device to make sure the machine is perfectly level.<br />
This is very important for the long life and smooth<br />
running of the machine.<br />
Top wrench<br />
for bowl<br />
<strong>Cream</strong> regulating<br />
L-key (2.5mm)<br />
Carbon (2 pieces)<br />
KD60E-12-01<br />
1
TO OPEN<br />
CLEANING OF MILK CONTACT PARTS<br />
The bottom wrench should be bolted to your<br />
work table for ease of disassembly of the<br />
bowl. Dismantle as shown in Figure E and<br />
Figure F and wash all parts in soap and<br />
warm water until thoroughly clean. Rinse<br />
well and wipe dry. All the other milk<br />
contact parts shown in Figure D except the<br />
body, should be washed the same way in<br />
soap and warm water including the milk<br />
tank, float, spouts, etc. Rinse well and wipe<br />
dry. This dismantling and washing<br />
procedure must be followed before first use<br />
and after every use.<br />
ASSEMBLY<br />
Put the bowl assembly back together<br />
according to Figure F. Make sure the bowl<br />
cover pin fits into the bowl base notch.<br />
Tighten the bowl nut well. Place the milk<br />
contact parts over the spindle according to<br />
Figure D starting with the milk spout. Next<br />
place the bowl assembly making sure it<br />
seats properly on the tapered head of the<br />
spindle shaft. Put the cream spout on next.<br />
Place the float chamber, the float and the<br />
milk tank in place as shown. Make sure the<br />
milk tank is placed with the “ON” label at<br />
the front. Tighten the tank tap handle. Put<br />
the tap in “OFF” position. Your separator is<br />
now ready for use.<br />
Bottom<br />
Wrench<br />
KD60-033-02<br />
Bowl nut<br />
KD60-043-01<br />
Bowl cover<br />
KD60-041<br />
Figure E<br />
Assembly and<br />
disassembly of bowl<br />
Pin<br />
False top<br />
KD60-040-01<br />
Disks<br />
KD60-039<br />
Distributor<br />
KD60-038<br />
Top<br />
Wrench<br />
Tank tap handle<br />
KD60-049<br />
Milk tank<br />
KD60-048-01<br />
Float<br />
KD60-047<br />
Float chamber<br />
KD60-046<br />
<strong>Cream</strong> spout<br />
KD60-045<br />
Bowl assembly<br />
593-003<br />
MILK PREPARATION AND SEPARATION<br />
Milk must be strained to remove any dirt or<br />
particles. Milk must not be cold,<br />
homogenized or sour. For best results,<br />
separate milk right out of the cow. If that<br />
is not possible, rewarm the milk to<br />
approximate cow body temperature<br />
100˚F (38˚C). It is very important that the<br />
milk is warm and stays warm throughout<br />
the separating process. Pre-warm the<br />
separator as follows: Heat approximately 4<br />
quarts (3 liters) of water to 150˚F (66˚C).<br />
Pour the hot water into the tank.<br />
Rubber ring<br />
KD60-037<br />
Bowl base<br />
KD60-033-01<br />
Notch<br />
Milk spout<br />
KD60-044<br />
Main body<br />
Place containers under the spouts to catch the water. Turn the machine on and allow about 1 minute to get up to<br />
spinning speed. Open the tap so the hot water flows through the separator warming all the milk contact parts. Close the<br />
tap. Immediately pour 6 quarts (6 liters) of warm milk in the tank. Make sure you have in place adequately-sized<br />
containers to receive the cream and skimmed milk which will come out of the spouts.<br />
Turn the machine on and allow about 1-2 minutes to let the machine get up to the proper speed. Turn the tap to the<br />
“ON” position. Observe the process until all of the milk has passed out of the milk tank. Let the cream and milk drip for<br />
another moment, then remove the containers. Put another container in place to catch the rinse water then pour about 4<br />
quarts of hot tap water into the milk tank. This will rinse the last cream from the disks. When the water has run out of<br />
the milk tank, turn off the machine and allow the machine to come to a complete stop.<br />
2<br />
Figure F<br />
Bowl assembly<br />
Figure D <strong>Separator</strong> assembly
CLEANING AND STORAGE<br />
After separating your batch of milk, dismantle the spinning bowl and clean all milk contact parts<br />
thoroughly as described above. Dry thoroughly and store in a clean dry place.<br />
REGULAR MAINTENANCE<br />
Proper storage and cleaning is the only regular maintenance required. Inspect and replace any parts that<br />
become worn or damaged.<br />
TROUBLESHOOTING<br />
PROBLEM: The separator vibrates.<br />
1. Check to make sure your separator is perfectly level.<br />
2. Check to make sure the bowl is in good order, nothing is damaged or misaligned, it is assembled<br />
correctly and the nut is well attached.<br />
PROBLEM: Milk does not separate correctly.<br />
With practice, you will get the “feel” of cream separating with your particular milk and conditions. These<br />
hints will help:<br />
1. The most common cause is cold milk or a cold machine. Make sure the milk is not sour, homogenized<br />
or too cold. Follow the instructions for pre-warming the separator.<br />
2. Some breeds such as Jerseys have very high butterfat and will give very thick cream. To achieve<br />
thinner cream, some users have luck with removing one of the separating disks. This restricts the<br />
separating function very slightly and results in thinner cream.<br />
3. Make sure the cream regulating screw is not damaged or loose. The screw is found at the top of the<br />
bowl as shown below.<br />
NOTE: The cream regulating screw is adjustable but<br />
should only be used as a last resort after all other<br />
problems have been checked. The screw has been<br />
pre-set at the factory for correct functioning. If you<br />
feel the cream is still too thick or too thin, adjust the<br />
screw with the L-key as shown at right. Turn only a<br />
quarter of a turn at a time as the setting is very<br />
sensitive. Test the new setting on a batch of milk<br />
before adjusting further. Be sure you are following all<br />
instructions, inspections and cleaning as described in<br />
this manual.<br />
THINNER<br />
CREAM<br />
THICKER<br />
CREAM<br />
<strong>Cream</strong> regulating screw<br />
KD60-040-02<br />
<strong>Cream</strong> Regulating<br />
3
1 Milk tank KD60-048-01<br />
2 Tank tap handle KD60-049<br />
3 Float chamber KD60-046<br />
4 Float KD60-047<br />
5 <strong>Cream</strong> spout KD60-045<br />
6 Skimmed milk spout KD60-044<br />
7 Bowl assembly 593-003<br />
8 Main body top<br />
9 Motor KD60E-12<br />
10 Main body bottom<br />
The<br />
Company, Inc.<br />
P.O. Box 147<br />
Whitewater, Wisconsin 53190<br />
www.coburn.com<br />
4<br />
Toll-Free<br />
1-800-776-7042<br />
Phone: 262-473-2822<br />
Fax: 262-473-3522<br />
<strong>MC60</strong>-1008