LESSON 8 Page and Section Breaks, Headers, and Footers
LESSON 8 Page and Section Breaks, Headers, and Footers
LESSON 8 Page and Section Breaks, Headers, and Footers

You also want an ePaper? Increase the reach of your titles
YUMPU automatically turns print PDFs into web optimized ePapers that Google loves.
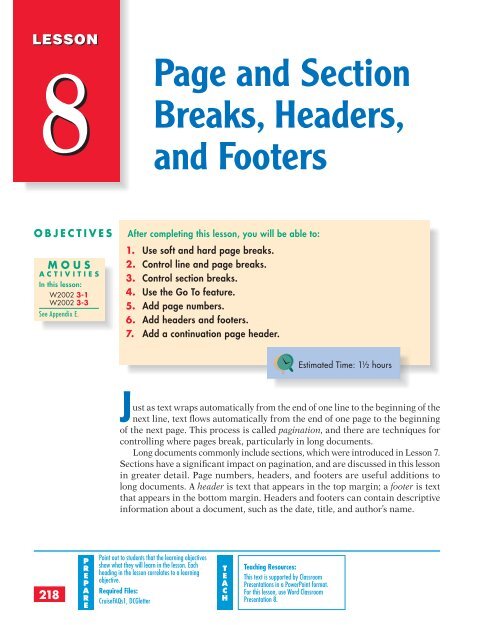
<strong>LESSON</strong><br />
8<br />
<strong>Page</strong><br />
<strong>and</strong> <strong>Section</strong><br />
<strong>Breaks</strong>, <strong>Headers</strong>,<br />
<strong>and</strong> <strong>Footers</strong><br />
OBJECTIVES<br />
MOUS<br />
ACTIVITIES<br />
In this lesson:<br />
W2002 3-1<br />
W2002 3-3<br />
See Appendix E.<br />
After completing this lesson, you will be able to:<br />
1. Use soft <strong>and</strong> hard page breaks.<br />
2. Control line <strong>and</strong> page breaks.<br />
3. Control section breaks.<br />
4. Use the Go To feature.<br />
5. Add page numbers.<br />
6. Add headers <strong>and</strong> footers.<br />
7. Add a continuation page header.<br />
Estimated Time: 1½ hours<br />
Just as text wraps automatically from the end of one line to the beginning of the<br />
next line, text flows automatically from the end of one page to the beginning<br />
of the next page. This process is called pagination, <strong>and</strong> there are techniques for<br />
controlling where pages break, particularly in long documents.<br />
Long documents commonly include sections, which were introduced in Lesson 7.<br />
<strong>Section</strong>s have a significant impact on pagination, <strong>and</strong> are discussed in this lesson<br />
in greater detail. <strong>Page</strong> numbers, headers, <strong>and</strong> footers are useful additions to<br />
long documents. A header is text that appears in the top margin; a footer is text<br />
that appears in the bottom margin. <strong>Headers</strong> <strong>and</strong> footers can contain descriptive<br />
information about a document, such as the date, title, <strong>and</strong> author’s name.<br />
218<br />
P<br />
R<br />
EP<br />
A<br />
RE<br />
Point out to students that the learning objectives<br />
show what they will learn in the lesson. Each<br />
heading in the lesson correlates to a learning<br />
objective.<br />
Required Files:<br />
CruiseFAQs1, DCGletter<br />
T<br />
EACH<br />
Teaching Resources:<br />
This text is supported by Classroom<br />
Presentations in a PowerPoint format.<br />
For this lesson, use Word Classroom<br />
Presentation 8.
Lesson 8 ■ <strong>Page</strong> <strong>and</strong> <strong>Section</strong> <strong>Breaks</strong>, <strong>Headers</strong>, <strong>and</strong> <strong>Footers</strong> WORD 219<br />
Using Soft <strong>and</strong> Hard <strong>Page</strong> <strong>Breaks</strong><br />
Objective 1<br />
1<br />
As you work on a document, Word is constantly calculating the amount of space<br />
available on the page. <strong>Page</strong> length is determined by the size of the paper <strong>and</strong> the<br />
top <strong>and</strong> bottom margins. For example, using st<strong>and</strong>ard-size paper <strong>and</strong> default<br />
margins, page length is nine inches. When a document exceeds this length, Word<br />
creates a soft page break. Word adjusts this automatic page break as you add or<br />
delete text. A soft page break appears as a horizontal dotted line on the screen in<br />
Normal view. In Print Layout view, you see the actual page break—the bottom of<br />
one page <strong>and</strong> the top of the next.<br />
W<br />
O<br />
R<br />
D<br />
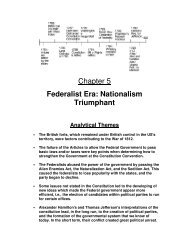
EXERCISE 8-1 Adjust a Soft <strong>Page</strong> Break Automatically<br />
FIGURE 8-1<br />
Adjusting the<br />
position of a soft<br />
page break<br />
1. Open the file CruiseFAQs1.<br />
2. Scroll to the bottom of page 1. Notice the soft page break that splits the<br />
paragraph beginning “A cruise is ideal for.”<br />
3. In the fourth line of the paragraph, position the insertion point to the left of<br />
the sentence beginning “You can also meet” <strong>and</strong> press e twice to split<br />
the paragraph. Notice the adjustment of the soft page break.<br />
b<br />
Soft page break<br />
Explain to students why learning to control<br />
1pagination is important: without any control in<br />
a long document, text will flow inappropriately from<br />
the bottom of one page to the top of another. For<br />
example, if a long document contains short chapters,<br />
each chapter might need to begin on its own page.<br />
In Word Classroom Presentation 8.<br />
b
220 WORD<br />
Unit 3 ■ <strong>Page</strong> Formatting<br />
W<br />
O<br />
R<br />
D<br />
4. Press n twice to restore the original soft page break.<br />
5. Change the document’s left <strong>and</strong> right margins to 1.25 inches. This changes<br />
the soft page breaks throughout the document.<br />
EXERCISE 8-2 Insert a Hard <strong>Page</strong> Break<br />
1<br />
When you want a page break to occur at a specific point, you can insert a hard<br />
page break. In Normal View, a hard page break appears on the screen as a dotted<br />
line with the words “<strong>Page</strong> Break.”<br />
There are two ways to insert a hard page break:<br />
● Use the keyboard shortcut Ç + e .<br />
● Choose Insert, Break from the menu.<br />
1. Working with the same paragraph, move the insertion point to the left of the<br />
italic line above the paragraph (“Is a cruise good for single people”)<br />
2. Press Ç + e . Word inserts a hard page break so the italicized paragraph<br />
<strong>and</strong> the entire paragraph that follows are not divided between two pages.<br />
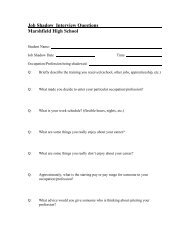
3. Switch to Print Layout view <strong>and</strong> scroll until you can see the bottom of<br />
page 1 <strong>and</strong> the top of page 2. (You might need to change the zoom setting<br />
to <strong>Page</strong> Width.)<br />
FIGURE 8-2<br />
Inserting a hard<br />
page break<br />
Hard page break<br />
b<br />
Make sure students underst<strong>and</strong> the difference<br />
In Word Classroom Presentation 8.<br />
1between a soft <strong>and</strong> a hard page break. b
Lesson 8 ■ <strong>Page</strong> <strong>and</strong> <strong>Section</strong> <strong>Breaks</strong>, <strong>Headers</strong>, <strong>and</strong> <strong>Footers</strong> WORD 221<br />
4. Scroll to the bottom of page 2. If the italic “Do I need insurance” is by<br />
itself at the bottom of the page, you’ll want to keep it with the paragraph<br />
that follows it.<br />
NOTE: Printer drivers sometimes affect pagination. Your page breaks<br />
might differ from those shown in this lesson.<br />
W<br />
O<br />
R<br />
D<br />
FIGURE 8-3<br />
Break dialog box<br />
b<br />
5. Position the insertion point before “Do” <strong>and</strong> choose Break from the Insert<br />
menu.<br />
6. In the Break dialog box, make sure <strong>Page</strong><br />
break is selected <strong>and</strong> click OK. This is<br />
another way to insert a hard page break.<br />
Notice that this dialog box is used for other<br />
types of breaks, as you’ll see later in the<br />
lesson.<br />
7. Scroll to the bottom of page 3. If the paragraph<br />
“Is there laundry service onboard” is<br />
by itself at the bottom of the page, insert a<br />
hard page break before it.<br />
EXERCISE 8-3 Delete a Hard <strong>Page</strong> Break<br />
1<br />
Objective 2<br />
You cannot delete a soft page break, but you can delete a hard page break by<br />
clicking the page break <strong>and</strong> pressing n or y .<br />
1. Move the insertion point to the page break you just inserted by positioning<br />
the I-beam over the page break <strong>and</strong> clicking.<br />
2. Press y to delete the page break.<br />
3. Scroll back to the hard page break you inserted at the bottom of page 2.<br />
Place the insertion point to the left of “Do I need insurance” <strong>and</strong> press<br />
n . The page break is deleted.<br />
Controlling Line <strong>and</strong> <strong>Page</strong> <strong>Breaks</strong><br />
2<br />
To control the way Word breaks paragraphs, choose one of four line <strong>and</strong> page<br />
break options from the Paragraph dialog box.<br />
● Widow/Orphan control<br />
A widow is the last line of a paragraph <strong>and</strong> appears by itself at the<br />
top of a page. An orphan is the first line of a paragraph <strong>and</strong> appears<br />
at the bottom of a page. By default, this option is turned on to prevent<br />
In Word Classroom Presentation 8.<br />
b 1<br />
There are several ways to delete a hard page break.<br />
Depending on the position of the insertion point, you<br />
can use the Backspace or Delete key. You might want to show<br />
students how to select the hard page break (in Normal view<br />
only) by double-clicking it or by positioning the pointer in the<br />
left margin area <strong>and</strong> clicking when the arrow points to the right.<br />
This lesson assumes that the Widow/<br />
2Orphan Control option in the Paragraph<br />
dialog box is turned on by default.
222 WORD<br />
Unit 3 ■ <strong>Page</strong> Formatting<br />
W<br />
O<br />
R<br />
D<br />
widows <strong>and</strong> orphans. Word moves an orphan forward to the next page<br />
<strong>and</strong> moves a widow back to the previous page.<br />
● Keep lines together<br />
This option keeps all lines of a paragraph together on the same page<br />
rather than splitting the paragraph between two pages.<br />
● Keep with next<br />
If two paragraphs need to appear on the same page, no matter where<br />
page breaks occur, use this option. This option is most commonly<br />
applied to titles that should not be separated from the first paragraph<br />
following the title.<br />
● <strong>Page</strong> break before<br />
Use this option to place a paragraph at the top of a new page.<br />
EXERCISE 8-4<br />
Apply Line <strong>and</strong> <strong>Page</strong> Break Options<br />
to Paragraphs<br />
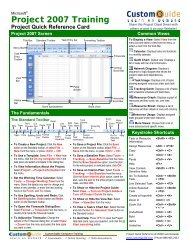
FIGURE 8-4<br />
Line <strong>and</strong> <strong>Page</strong> Break<br />
options in the<br />
Paragraph<br />
dialog box<br />
b<br />
1. At the bottom of page 2, right-click within the paragraph “Do I need insurance”<br />
to open the shortcut menu. You are going to format the paragraph so<br />
it will not be separated from the paragraph that follows it.<br />
2. Choose Paragraph from the shortcut menu to open the Paragraph dialog<br />
box <strong>and</strong> click the Line <strong>and</strong> <strong>Page</strong> <strong>Breaks</strong> tab.<br />
3. Click Keep with next to<br />
select it <strong>and</strong> then click<br />
OK. Word moves the<br />
soft page break, keeping<br />
the two paragraphs<br />
together. Notice that a<br />
small black bullet<br />
appears to the left of<br />
the italic paragraph,<br />
indicating that the<br />
paragraph is formatted<br />
with a line or page<br />
break option.<br />
NOTE: The small<br />
square bullet is a<br />
nonprinting character that<br />
appears only if the Show/<br />
Hide button is turned on.<br />
In Word Classroom Presentation 8.<br />
b
Lesson 8 ■ <strong>Page</strong> <strong>and</strong> <strong>Section</strong> <strong>Breaks</strong>, <strong>Headers</strong>, <strong>and</strong> <strong>Footers</strong> WORD 223<br />
FIGURE 8-5<br />
Applying the Keep<br />
With Next option<br />
4. Change to Normal view to see the soft page break. Display the Reveal<br />
Formatting task pane. Notice that the Keep with next option appears in the<br />
task pane as an applied paragraph format.<br />
W<br />
O<br />
R<br />
D<br />
Soft page break<br />
Small square bullet<br />
b<br />
Break<br />
formatting<br />
applied<br />
TIP: You can click the Line <strong>and</strong> <strong>Page</strong> <strong>Breaks</strong> link in the task pane to<br />
open the Paragraph dialog box, Line <strong>and</strong> <strong>Breaks</strong> tab, if you want to adjust<br />
the formatting.<br />
5. Apply the Keep with next paragraph option to the italic paragraph “Is there<br />
laundry service onboard” at the bottom of page 3.<br />
6. Locate the long paragraph at the bottom of page 4 that starts “Dining on<br />
a cruise ship.” (You might want to close the task pane to make more room<br />
for the document text.)<br />
7. Toward the end of the paragraph, split the paragraph at the sentence that<br />
starts “Most ships offer health-conscious” (insert a blank line before the new<br />
paragraph). The new paragraph is divided by a soft page break.<br />
8. With the insertion point in or at the beginning of the new paragraph, open<br />
the Paragraph dialog box (Line <strong>and</strong> <strong>Page</strong> <strong>Breaks</strong> tab), choose Keep lines<br />
together, <strong>and</strong> click OK. The soft page break moves above the paragraph to<br />
keep the lines of text together.<br />
NOTE: Keep lines together is used for lines of text within one paragraph.<br />
Keep with next requires a minimum of two paragraphs but can be applied<br />
to more than two paragraphs.<br />
In Word Classroom Presentation 8.<br />
b
224 WORD<br />
Unit 3 ■ <strong>Page</strong> Formatting<br />
W<br />
O<br />
R<br />
D<br />
FIGURE 8-6<br />
Applying the Keep<br />
Lines Together<br />
option<br />
b<br />
Soft page break<br />
Break<br />
formatting<br />
applied<br />
Objective 3<br />
9. Scroll to the italic paragraph “What are theme cruises” on page 7. Position<br />
the insertion point in this italic paragraph, which you will format so it<br />
begins at the top of the page.<br />
10. Open the Paragraph dialog box, click <strong>Page</strong> break before, <strong>and</strong> click OK. Word<br />
starts the paragraph at the top of page 8 with a soft page break before it.<br />
11. Save the document as [your initials]8-4 in a new folder for Lesson 8.<br />
TIP: Remember the various methods for moving within a long document. For<br />
example, you can drag the scroll box on the vertical scroll bar <strong>and</strong> use the<br />
scroll arrows to adjust the view. You can also use keyboard shortcuts: Ç + i or m<br />
to move up or down one paragraph, π or ∏ to move up or down one window,<br />
<strong>and</strong> Ç + h or Ç + u to move to the beginning or end of a document.<br />
Controlling <strong>Section</strong> <strong>Breaks</strong><br />
1<br />
In Word Classroom Presentation 8.<br />
b 1<br />
<strong>Section</strong> breaks separate parts of a document that have formatting different from<br />
the rest of the document. You saw in the previous lesson how formatting selected<br />
text resulted in a new section. For better control in creating sections, you can insert<br />
a section break directly into a document at a specific location using the Break<br />
dialog box. You can also choose from one of three types of section breaks:<br />
● Next page<br />
This default option starts a section on a new page.<br />
Remind students of the purpose of sections <strong>and</strong><br />
show examples of publications that use different<br />
margins on pages. Explain that sections are like<br />
documents within a document. <strong>Section</strong>s can have their<br />
own page numbering, margins, <strong>and</strong> page orientation.
Lesson 8 ■ <strong>Page</strong> <strong>and</strong> <strong>Section</strong> <strong>Breaks</strong>, <strong>Headers</strong>, <strong>and</strong> <strong>Footers</strong> WORD 225<br />
● Continuous<br />
With this type of section break, the section follows the text before it<br />
without a page break.<br />
● Even page or Odd page<br />
Use to start a section on the next even- or odd-numbered page. This<br />
feature is useful for reports in which chapters must begin on either oddnumbered<br />
or even-numbered pages.<br />
W<br />
O<br />
R<br />
D<br />
EXERCISE 8-5<br />
Insert <strong>Section</strong> <strong>Breaks</strong> Using the Break<br />
Dialog Box<br />
1<br />
1. On pages 9 <strong>and</strong> 10, select the text “What do I need to know about ship<br />
terminology” <strong>and</strong> the list below it. Move the selection to the end of the<br />
document. (Be sure to leave a blank line before the moved text.)<br />
2. With the insertion point to the left of “What do I need,” choose Break from<br />
the Insert menu.<br />
3. Under <strong>Section</strong> break types, choose Continuous <strong>and</strong> click OK. Word begins a<br />
new section on the same page, from the position of the insertion point.<br />
4. Click above <strong>and</strong> below the section mark. Notice that the section number<br />
changes on the status bar, but the page number stays the same.<br />
FIGURE 8-7<br />
Inserting a<br />
continuous<br />
section break<br />
<strong>Section</strong> break<br />
b 2<br />
<strong>Section</strong> number<br />
<strong>Page</strong> number<br />
Remind students to watch the left corner of the<br />
1status bar as they scroll through a document.<br />
The left side of the status bar displays the current page<br />
number.<br />
In Word Classroom Presentation 8.<br />
b 2<br />
Point out the page <strong>and</strong> section numbering on the<br />
status bar when students create a new section.
226 WORD<br />
Unit 3 ■ <strong>Page</strong> Formatting<br />
EXERCISE 8-6 Apply Formatting to <strong>Section</strong>s<br />
W<br />
O<br />
R<br />
D<br />
After you create a new section, you can change its formatting or specify a different<br />
type of section break. This is often useful for long documents, which might contain<br />
many sections that require different page formatting, such as different margin<br />
settings or page orientation. For example, you can change a Next page section<br />
break to a Continuous section break or you can change the page orientation of a<br />
section, without affecting the rest of the document.<br />
NOTE: The formatting you apply to the section is stored in the section<br />
break. If you delete a section break, you also delete the formatting for the text<br />
above the section break. For example, if you have a two-section document <strong>and</strong> you<br />
delete the section break at the end of section 1, the document becomes one section<br />
with the formatting of section 2.<br />
1. With the insertion point in the new section, choose <strong>Page</strong> Setup from the<br />
File menu.<br />
2. Click the Layout tab <strong>and</strong> click to open the <strong>Section</strong> start drop-down list. From<br />
this list, you can change the section break from Continuous to another type.<br />
FIGURE 8-8<br />
Using the <strong>Page</strong><br />
Setup dialog box to<br />
modify the section<br />
b<br />
3. Choose New page to start this section on a new page.<br />
In Word Classroom Presentation 8.<br />
b
Lesson 8 ■ <strong>Page</strong> <strong>and</strong> <strong>Section</strong> <strong>Breaks</strong>, <strong>Headers</strong>, <strong>and</strong> <strong>Footers</strong> WORD 227<br />
4. Click the Margins tab <strong>and</strong> change the left <strong>and</strong> right margins to 1.5 inches.<br />
Click OK. Notice that the new section now starts on a new page with a Next<br />
<strong>Page</strong> section break.<br />
5. Click within section 1 <strong>and</strong> open the <strong>Page</strong> Setup dialog box. Change the left<br />
<strong>and</strong> right margins for this section back to 1 inch. (Make sure the Apply to<br />
box says This section.) Click OK.<br />
6. View the document in Print Layout view.<br />
W<br />
O<br />
R<br />
D<br />
EXERCISE 8-7<br />
Change the Vertical Alignment of<br />
a <strong>Section</strong><br />
Another way to format a section is to specify the vertical alignment of the section<br />
on the page. For example, you can align a title page so the text is centered between<br />
the top <strong>and</strong> bottom margins. Vertical alignment is a Layout option available in<br />
the <strong>Page</strong> Setup dialog box.<br />
TABLE 8-1<br />
OPTIONS<br />
Top<br />
Center<br />
Justified<br />
Bottom<br />
1<br />
1. Click within section 2.<br />
2. Open the <strong>Page</strong> Setup dialog box <strong>and</strong> click the Layout tab.<br />
3. Open the Vertical alignment drop-down list <strong>and</strong> choose Center. Click OK.<br />
The text is centered vertically on the page.<br />
4. Switch to Print Preview. Use the Multiple <strong>Page</strong>s button to view the<br />
document two pages at a time.<br />
5. With the last page of the document in the Print Preview window, open<br />
the <strong>Page</strong> Setup dialog box. Change the vertical alignment of section 2 to<br />
Justifi ed. Click OK. Word justifies the last page of the document so the text<br />
extends from the top to the bottom margin.<br />
Vertical Alignment Options<br />
DESCRIPTION<br />
Aligns the top line of the page with the top margin (default setting).<br />
Centers the page between the top <strong>and</strong> bottom margins with equal space above<br />
<strong>and</strong> below the text.<br />
Aligns the top line of the page with the top margin <strong>and</strong> the bottom line with the<br />
bottom margin with equal spacing between the lines of text (similar in principle to<br />
the way Word justifies text between the left <strong>and</strong> right margins).<br />
Aligns the bottom line of a partial page along the bottom margin.<br />
Explain to students that centering or justifying<br />
1text on a page are the most common changes<br />
made to vertical alignment.
228 WORD<br />
Unit 3 ■ <strong>Page</strong> Formatting<br />
W<br />
O<br />
R<br />
D<br />
FIGURE 8-9<br />
Changing vertical<br />
alignment for<br />
section 2<br />
b<br />
<strong>Section</strong> 2 with<br />
justified vertical<br />
alignment<br />
6. In either Print Preview or Print Layout view, change the paragraph at the<br />
top of page 8 (“What are theme cruises”) so it does not start on a new page<br />
(clear the <strong>Page</strong> break before check box in the Paragraph dialog box).<br />
REVIEW: To edit a document in Print Preview, click the Magnifier<br />
button to switch to edit mode, position the I-beam, <strong>and</strong> use the menu to<br />
open a dialog box.<br />
1<br />
7. At the top of the document, add another line below the title. Then format the<br />
title as 14 points, centered, with 48 points of spacing before the paragraph.<br />
8. Save the document as [your initials]8-7 in your Lesson 8 folder.<br />
9. Print the document two pages per sheet.<br />
Objective 4<br />
Using the Go To Feature<br />
2<br />
The Go To feature enables you to move through a document quickly. For example,<br />
you can go to a specific section, page number, comment, or bookmark. (Comments<br />
<strong>and</strong> bookmarks are discussed later in this course.) Go To is a convenient feature<br />
for long documents—it’s faster than scrolling <strong>and</strong> it moves the insertion point to<br />
the specified location.<br />
In Word Classroom Presentation 8.<br />
b 1<br />
The Gregg Reference Manual, 9th Edition (rule<br />
1425) recommends centered <strong>and</strong> all-capital<br />
letter formatting for a report title. In this case,<br />
however, the title is uppercase <strong>and</strong> lowercase to make<br />
“FAQs” more readable.<br />
Explain to students that they should master<br />
2using the Go To comm<strong>and</strong>, because it can save<br />
time editing a long document.
Lesson 8 ■ <strong>Page</strong> <strong>and</strong> <strong>Section</strong> <strong>Breaks</strong>, <strong>Headers</strong>, <strong>and</strong> <strong>Footers</strong> WORD 229<br />
Go To is a tab in the Find <strong>and</strong> Replace dialog box. There are three ways to initiate<br />
the Go To comm<strong>and</strong>:<br />
● Choose Edit, Go To from the menu.<br />
● Press Ç + G or ∞ .<br />
● Double-click on the status bar (anywhere to the left of “REC”).<br />
W<br />
O<br />
R<br />
D<br />
EXERCISE 8-8 Go To a Specific <strong>Page</strong> or <strong>Section</strong><br />
FIGURE 8-10<br />
Using the<br />
Go To feature<br />
1. Switch to Normal view <strong>and</strong> press ∞ . Word displays the Go To tab, located<br />
in the Find <strong>and</strong> Replace dialog box.<br />
b<br />
2. Scroll through the Go to what list to review the options. Choose <strong>Section</strong><br />
from the list <strong>and</strong> click Next to move to section 2.<br />
3. Choose <strong>Page</strong> from the Go to what list <strong>and</strong> click Previous. The insertion<br />
point moves to the top of the previous page.<br />
4. Key 2 in the Enter page number text box <strong>and</strong> click Go To. The insertion<br />
point moves to the top of page 2.<br />
5. Close the dialog box.<br />
EXERCISE 8-9 Go To a Relative Destination<br />
You can use Go To to move to a location relative to the insertion point. For example,<br />
with <strong>Page</strong> selected in the Go to what list, you can enter +2 in the text box to move<br />
forward two pages from the insertion point. You can move in increments of pages,<br />
lines, sections, <strong>and</strong> so on. Another option is to move by a certain percentage within<br />
the document, such as 50%—the document’s midpoint.<br />
1. Double-click the word “<strong>Page</strong>” on the status bar to reopen the dialog box.<br />
In Word Classroom Presentation 8.<br />
b
230 WORD<br />
Unit 3 ■ <strong>Page</strong> Formatting<br />
W<br />
O<br />
R<br />
D<br />
2. Choose Line from the Go to what list <strong>and</strong> enter 1 in the text box. Click Go<br />
To. The insertion point moves to the first line in the document.<br />
3. Enter +40 in the text box <strong>and</strong> click Go To. The insertion point moves<br />
forward 40 lines from the previous location.<br />
4. Enter -40 in the text box <strong>and</strong> click Go To. The insertion point moves back<br />
to the previous location.<br />
5. Click <strong>Page</strong> in the Go to what list, enter 50% in the text box, <strong>and</strong> click Go To.<br />
The insertion point moves to the midpoint of the document.<br />
NOTE: You must select <strong>Page</strong> in the Go to what list to use a percentage.<br />
dObjective 5<br />
6. Close the dialog box.<br />
Adding <strong>Page</strong> Numbers<br />
Word automatically keeps track of page numbers—the status bar shows the current<br />
page <strong>and</strong> the total number of pages in a document. But it’s important to add printed<br />
page numbers to a multi-page document. The easiest way to add page numbers<br />
is to choose <strong>Page</strong> Numbers from the Insert menu to open the <strong>Page</strong> Numbers<br />
dialog box.<br />
EXERCISE 8-10<br />
Add <strong>Page</strong> Numbers<br />
1. In the current document ([your initials]8-7), position the insertion point at<br />
the top of the document.<br />
2. Choose <strong>Page</strong> Numbers from the Insert menu. Word displays the <strong>Page</strong><br />
Numbers dialog box. Notice that the default setting for page number placement<br />
is the bottom of the page, right-aligned. Also, by default, Word prints<br />
page numbers on the first page.<br />
FIGURE 8-11<br />
<strong>Page</strong> Numbers<br />
dialog box<br />
b<br />
Check to number<br />
page 1; clear to<br />
start numbering on<br />
page 2.<br />
Default position of<br />
page numbers<br />
dObjective 5 Assignment:<br />
Exercises 8-17 <strong>and</strong> 8-18 (Lesson Applications)<br />
can be assigned after completing Objective 5.<br />
3. Click the down arrow to open the Position drop-down list. Choose Top of<br />
page (Header). Notice the change in the Preview box.<br />
In Word Classroom Presentation 8.<br />
b
Lesson 8 ■ <strong>Page</strong> <strong>and</strong> <strong>Section</strong> <strong>Breaks</strong>, <strong>Headers</strong>, <strong>and</strong> <strong>Footers</strong> WORD 231<br />
4. Open the Alignment drop-down list <strong>and</strong> choose Center. The Preview box<br />
reflects the change.<br />
5. Click OK; then switch to Print Preview to view the page numbers.<br />
NOTE: You can see page numbers only in Print Preview, Print Layout view,<br />
or on the printed page.<br />
W<br />
O<br />
R<br />
D<br />
6. Click the View Ruler button to display the rulers. The page numbers<br />
appear within the 1-inch top margin. Specifically, page numbers are positioned<br />
0.5 inch from the top edge of the page.<br />
FIGURE 8-12<br />
Viewing page<br />
numbers in<br />
Print Preview<br />
1-inch top margin<br />
Numbers on<br />
pages 1 <strong>and</strong> 2<br />
b<br />
7. Use the Magnifier pointer for a closer view of the numbers. Scroll to see the<br />
page numbers throughout the document.<br />
EXERCISE 8-11<br />
Modify the <strong>Page</strong> Number Format<br />
In Word Classroom Presentation 8.<br />
b<br />
Not only can you change the placement of page numbers <strong>and</strong> decide if you want<br />
to number the first page, but you can also change the format of page numbers.<br />
For example, instead of using numerals such as 1, 2, <strong>and</strong> 3, you can use Roman<br />
numerals (i, ii, iii) or letters (a, b, c). You can also use different page number<br />
formats for different sections.
W<br />
O<br />
R<br />
D<br />
232 WORD<br />
FIGURE 8-13<br />
<strong>Page</strong> Number<br />
Format dialog box<br />
b<br />
Unit 3 ■ <strong>Page</strong> Formatting<br />
1. While still in Print Preview, choose <strong>Page</strong> Numbers from the Insert menu.<br />
2. Change the alignment to right. Clear the Show number on first page check<br />
box so page 1 does not display a page number.<br />
3. Click the Format button. In the <strong>Page</strong> Number Format dialog box, open the<br />
Number format drop-down list, scroll to the bottom, <strong>and</strong> choose uppercase<br />
Roman numerals (I, II, III…).<br />
4. Click OK in the <strong>Page</strong> Number Format<br />
dialog box <strong>and</strong> then click OK in the<br />
<strong>Page</strong> Numbers dialog box. The numbers<br />
are now right-aligned, starting<br />
with Roman numeral II, <strong>and</strong> page 1 is<br />
not numbered.<br />
EXERCISE 8-12<br />
Vary <strong>Page</strong> Numbers in Print Layout View<br />
1<br />
In Word Classroom Presentation 8.<br />
b 1<br />
In addition to using the <strong>Page</strong> Numbers dialog box, you can also vary page numbers<br />
in Print Layout view. For example, you can:<br />
● Apply character formatting such as bold or italic to page numbers.<br />
● Add the word “<strong>Page</strong>” before the page number.<br />
1. Display the document in Print Layout view.<br />
2. Reopen the <strong>Page</strong> Numbers dialog box <strong>and</strong> change the number format back<br />
to the 1, 2, 3 format.<br />
3. Scroll to the top of page 2. The page number appears in gray on your screen<br />
at the right margin.<br />
4. Double-click the page number. This activates the dotted header pane (the<br />
area at the top of the page that contains the page number), displays the<br />
Header <strong>and</strong> Footer toolbar, <strong>and</strong> dims the document text.<br />
NOTE: Notice that the header pane is titled “<strong>Section</strong> 1.” That’s because<br />
this is a two-section document.<br />
5. In the header pane, position the I-beam just before the number 2. If the<br />
I-beam changes to a four-headed arrow, continue to move the mouse until<br />
the I-beam is just before the number. Click to position the insertion point. A<br />
shaded frame appears around the number.<br />
Positioning the insertion point to the immediate left of a number can be<br />
difficult. The pointer alternates between an I-beam <strong>and</strong> a four-headed<br />
arrow. Stress that students should click only when they see the I-beam. The<br />
four-headed arrow is used to move an object. Additionally, remind students that<br />
a page number is a field. Fields have gray shading when clicked or selected.<br />
Students should be careful when selecting this type of text, using only the I-beam<br />
(not the four-headed arrow) to drag over the text.
Lesson 8 ■ <strong>Page</strong> <strong>and</strong> <strong>Section</strong> <strong>Breaks</strong>, <strong>Headers</strong>, <strong>and</strong> <strong>Footers</strong> WORD 233<br />
FIGURE 8-14<br />
Working with page<br />
numbers in Print<br />
Layout view<br />
W<br />
O<br />
R<br />
D<br />
Header pane<br />
Header <strong>and</strong><br />
footer toolbar<br />
Position insertion<br />
point before<br />
number<br />
b<br />
1<br />
6. Key <strong>Page</strong> <strong>and</strong> press ß once.<br />
7. Scroll to the header pane on page 3 to view the revised header text.<br />
NOTE: Changing one page number affects all page numbers.<br />
8. To apply character formatting to the page number, drag the I-beam pointer<br />
(not the four-headed arrow pointer) over the word “<strong>Page</strong>” <strong>and</strong> the number 3<br />
to select both.<br />
9. Using the Formatting toolbar, change the text to Arial italic.<br />
FIGURE 8-15<br />
Formatted page<br />
number with<br />
“<strong>Page</strong>” added<br />
b<br />
In Word Classroom Presentation 8.<br />
b 1<br />
Every time students key “<strong>Page</strong>” in a header<br />
or footer, Word displays a ScreenTip for the<br />
AutoText “<strong>Page</strong> X of Y.” Remind students of the<br />
AutoComplete feature, which suggests AutoText entries<br />
as you key. Advise students to continue the exercise; the<br />
ScreenTip disappears.
234 WORD<br />
Unit 3 ■ <strong>Page</strong> Formatting<br />
W<br />
O<br />
R<br />
D<br />
10. Click the Format <strong>Page</strong> Number button on the Header <strong>and</strong> Footer toolbar.<br />
This is another way to open the <strong>Page</strong> Number Format dialog box <strong>and</strong> change<br />
the number format.<br />
11. Close the dialog box without making changes.<br />
TIP: The page number doesn’t have to be selected in the pane before you<br />
use the Format <strong>Page</strong> Number button.<br />
12. Double-click outside the header pane to return to Print Layout view.<br />
13. Save the document as [your initials]8-12 in your Lesson 8 folder.<br />
14. Print only pages 1–2 of the document.<br />
EXERCISE 8-13<br />
Remove <strong>Page</strong> Numbers in Print<br />
Layout View<br />
dObjective 6<br />
To remove page numbers, delete the text in the header or footer area.<br />
1. On page 2 of the document, double-click the page number text to activate<br />
the header pane.<br />
2. Select the text (“<strong>Page</strong> 2”) <strong>and</strong> press y .<br />
3. Scroll to the header area of page 3. The page number is deleted on that<br />
page as well.<br />
4. Close the Header <strong>and</strong> Footer toolbar.<br />
5. Close the document without saving.<br />
Adding <strong>Headers</strong> <strong>and</strong> <strong>Footers</strong><br />
1<br />
<strong>Headers</strong> <strong>and</strong> footers are typically used in multiple-page documents to display<br />
descriptive information. In addition to page numbers, a header or footer can<br />
contain such things as:<br />
● The document name<br />
● The date <strong>and</strong>/or the time you created or revised the document<br />
● An author name<br />
● A graphic, such as a company logo<br />
● A draft or revision number<br />
This descriptive information can appear in many different combinations. For<br />
example, the second page of a business letter typically contains a header with<br />
the name of the addressee, the page number, <strong>and</strong> the date. A report can contain<br />
a footer with the report name <strong>and</strong> a header with the page number <strong>and</strong> chapter<br />
dObjective 6 Assignment:<br />
Exercises 8-19 (Lesson Applications), 8-21, <strong>and</strong> 8-23 (On<br />
Your Own) can be assigned after completing Objective 6.<br />
You might discuss header <strong>and</strong> footer type size<br />
1with students. Generally, header <strong>and</strong> footer type<br />
size should match the document’s type size <strong>and</strong> font.<br />
Word uses the default document type size (12 points)<br />
for header <strong>and</strong> footer text.
Lesson 8 ■ <strong>Page</strong> <strong>and</strong> <strong>Section</strong> <strong>Breaks</strong>, <strong>Headers</strong>, <strong>and</strong> <strong>Footers</strong> WORD 235<br />
name. A newsletter can contain a header with a title <strong>and</strong> logo on the first page <strong>and</strong><br />
a footer with the title <strong>and</strong> page number on the pages that follow.<br />
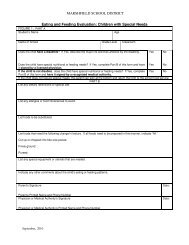
FIGURE 8-16<br />
Examples of<br />
headers <strong>and</strong> footers<br />
Ms. Joyce Brimley<br />
<strong>Page</strong> 2<br />
November 9, 2002<br />
Overseas Travel <strong>Page</strong> 7<br />
W<br />
O<br />
R<br />
D<br />
Header for letter<br />
Header <strong>and</strong> footer<br />
for report<br />
Duke City Gateway Travel<br />
EXERCISE 8-14<br />
Add a Header to a Document<br />
1. Open the file CruiseFAQs1. This is the original one-section document.<br />
2. Copy the title “Cruise Travel FAQs” (copy just the text, not the paragraph<br />
mark). You’re going to use this text to create a header.<br />
3. Choose Header <strong>and</strong> Footer from the View menu. Word switches temporarily<br />
to Print Layout view <strong>and</strong> displays the Header <strong>and</strong> Footer toolbar. The header<br />
pane is also visible.<br />
4. Click the <strong>Page</strong> Setup button on the Header <strong>and</strong> Footer toolbar. The<br />
Layout tab in the <strong>Page</strong> Setup dialog box appears.<br />
5. Check the Different first page check box <strong>and</strong> click OK. This option will allow<br />
you to create a different header <strong>and</strong> footer on page 1 than you’ll use for the<br />
rest of the document.<br />
NOTE: The Different first page option is often used when a document<br />
contains a title page <strong>and</strong> you want to create a different header/footer for<br />
the remaining pages.<br />
6. Click the Show Next button on the Header <strong>and</strong> Footer toolbar to move<br />
to the next header pane. The document contains two header panes. The first
W<br />
O<br />
R<br />
D<br />
236 WORD<br />
TABLE 8-2<br />
BUTTON<br />
1<br />
2<br />
Unit 3 ■ <strong>Page</strong> Formatting<br />
header pane is labeled First <strong>Page</strong> Header <strong>and</strong> the second header pane is<br />
labeled Header.<br />
7. Paste the Clipboard contents into the page 2 header pane. Use the Keep Text<br />
Only paste option to turn off the bold format. The text now appears on every<br />
page of the document except the first page.<br />
8. Insert a tab character before the copied text. Notice that there are two preset<br />
tab settings on the ruler: 3-inch centered <strong>and</strong> 6-inch right-aligned.<br />
9. Press t after the title text. Key <strong>Page</strong> <strong>and</strong> press ß .<br />
10. Click the Insert <strong>Page</strong> Number button on the Header <strong>and</strong> Footer toolbar.<br />
Word inserts the page number.<br />
11. Drag the 3-inch centered tab marker to 3.25 inches <strong>and</strong> drag the 6-inch<br />
right-aligned tab marker to 6.5 inches.<br />
NOTE: The preset tab settings are default settings for a document with the<br />
default 1.25-inch left <strong>and</strong> right margins. In such a document, the 3-inch tab<br />
centers text <strong>and</strong> the 6-inch tab right-aligns text. This document, however, has 1-inch left<br />
<strong>and</strong> right margins, so it’s best to adjust the tabs.<br />
12. Click the Show Previous button <strong>and</strong> notice that the first-page header<br />
pane is still blank. Click the Show Next button to return to the header<br />
you created.<br />
Buttons on the Header <strong>and</strong> Footer Toolbar<br />
PURPOSE<br />
Insert common header or footer items, such as running<br />
total page numbers (<strong>Page</strong> 1 of 10), the filename,<br />
or the author’s name.<br />
Insert <strong>Page</strong> Number<br />
Insert the page number.<br />
Insert Number of <strong>Page</strong>s<br />
Insert the total number of pages in the document.<br />
Format <strong>Page</strong> Number<br />
Open the Format <strong>Page</strong> Number dialog box.<br />
Insert Date<br />
Insert the current date.<br />
Insert Time<br />
Insert the current time.<br />
Remind students that if they key the number 2<br />
1in the header instead of using the Insert <strong>Page</strong><br />
Number button, they will produce a document with the<br />
number 2 on every page rather than the page number.<br />
You might have students experiment with the Insert<br />
2AutoText button to see exactly what is inserted into a<br />
header or footer. For example, the “-PAGE-” AutoText inserts the<br />
page number, centered, with hyphens to the left <strong>and</strong> right of the<br />
number. “Author, <strong>Page</strong> #, Date” inserts the author (the name<br />
entered on the User Information tab in the Options dialog box),<br />
followed by a centered page number <strong>and</strong> a right-aligned date.<br />
continues
Lesson 8 ■ <strong>Page</strong> <strong>and</strong> <strong>Section</strong> <strong>Breaks</strong>, <strong>Headers</strong>, <strong>and</strong> <strong>Footers</strong> WORD 237<br />
TABLE 8-2<br />
Buttons on the Header <strong>and</strong> Footer Toolbar continued<br />
BUTTON<br />
<strong>Page</strong> Setup<br />
Show/Hide Document Text<br />
PURPOSE<br />
Open the <strong>Page</strong> Setup dialog box.<br />
Display or hide the document text.<br />
W<br />
O<br />
R<br />
D<br />
Same as Previous<br />
Link or unlink the header or footer in one section to<br />
or from the header or footer in the previous section.<br />
Switch Between Header <strong>and</strong> Footer<br />
Move between the header <strong>and</strong> footer.<br />
Show Previous<br />
Show the header or footer of the previous section.<br />
Show Next<br />
Show the header or footer of the next section.<br />
1<br />
EXERCISE 8-15<br />
Add a Footer to a Document<br />
If time permits, show students how to link <strong>and</strong><br />
1unlink headers <strong>and</strong> footers.<br />
1. With the header on page 2 displayed, click the Switch Between Header <strong>and</strong><br />
Footer button to display the footer pane.<br />
2. Key your name <strong>and</strong> press t .<br />
3. With the insertion point at the center of the footer, click Insert AutoText on<br />
the Header <strong>and</strong> Footer toolbar. Notice the types of AutoText entries you can<br />
insert into a header or footer.<br />
4. Choose Created on from the AutoText list. This AutoText entry inserts a field<br />
that displays the text “Created on” plus the date <strong>and</strong> time the document was<br />
created. For example, if you created <strong>and</strong> saved the document for the first<br />
time on June 5, 2002, at 10:00 in the morning, the text “Created on 6/5/02<br />
10:00 AM” would be inserted.<br />
5. Press t , open the AutoText list again, <strong>and</strong> choose Filename. The document’s<br />
name is inserted. This footer information prints at the bottom of<br />
each page except the first. (See Figure 8-17 on the next page.)<br />
6. Adjust the tab positions by dragging the center tab marker to 3.25 inches<br />
<strong>and</strong> the right tab marker to 6.5 inches.<br />
7. Click the Show Previous button to display the first-page footer pane.<br />
8. Key Duke City Gateway Travel—Cruise Specialists in italic <strong>and</strong> centeralign<br />
the text. Leave the first-page header pane blank.
238 WORD<br />
Unit 3 ■ <strong>Page</strong> Formatting<br />
W<br />
O<br />
R<br />
D<br />
FIGURE 8-17<br />
Inserting AutoText in<br />
a footer<br />
b<br />
AutoText insertion<br />
dObjective 7<br />
TIP: If you wanted to use the same footer text in section 2 that you used<br />
in section 1, you would open the section 2 footer pane <strong>and</strong> click the Same as<br />
Previous button . This links the section 2 footer to the section 1 footer, so the same<br />
text appears in both footer panes.<br />
9. Click Close to return to the document in Normal view.<br />
10. Switch to Print Preview <strong>and</strong> view the document’s headers <strong>and</strong> footers.<br />
11. Adjust page breaks as needed (for example, if an italic question appears by<br />
itself at the bottom of a page).<br />
12. Delete the portion of the document about ship terminology (pages 8–9).<br />
Then save the document as [your initials]8-15 in your Lesson 8 folder.<br />
13. Print the document 4 pages per sheet <strong>and</strong> then close it.<br />
Creating Continuation <strong>Page</strong> <strong>Headers</strong><br />
1<br />
It’s customary to use a header on the second page of a business letter or memo. A<br />
continuation page header for a letter or memo is typically a three-line block of text<br />
that includes the addressee name, the page number, <strong>and</strong> the date.<br />
There are three rules for letters <strong>and</strong> memos with continuation page headers:<br />
● <strong>Page</strong> 1 must have a 2-inch top margin.<br />
In Word Classroom Presentation 8.<br />
b<br />
dObjective 7 Assignment:<br />
Exercises 8-20 (Lesson Applications) <strong>and</strong> 8-22 (On Your<br />
Own) can be assigned after completing Objective 7.<br />
Instructions for creating continuation headers<br />
1for memos <strong>and</strong> letters are based on The Gregg<br />
Reference Manual, which specifies a 2-inch top margin<br />
for the first page of a letter or memo, a 1-inch top<br />
margin for continuation pages, a setting of 1-inch from<br />
the edge for header text, <strong>and</strong> two blank lines between<br />
header text <strong>and</strong> continuation page text.
Lesson 8 ■ <strong>Page</strong> <strong>and</strong> <strong>Section</strong> <strong>Breaks</strong>, <strong>Headers</strong>, <strong>and</strong> <strong>Footers</strong> WORD 239<br />
EXERCISE 8-16<br />
● Continuation pages must have a 1-inch top margin.<br />
● Two blank lines must appear between the header <strong>and</strong> the continuation<br />
page text.<br />
Add a Continuation <strong>Page</strong> Header to<br />
a Letter<br />
W<br />
O<br />
R<br />
D<br />
The easiest way to create a continuation page header using the proper business<br />
format is to apply these settings to your document:<br />
● Top margin: 2 inches<br />
● Header position: 1 inch from edge of page<br />
● <strong>Page</strong> Setup Layout for <strong>Headers</strong> <strong>and</strong> <strong>Footers</strong>: Different First <strong>Page</strong><br />
● Additional spacing: Add two blank lines below the header text<br />
By default, headers <strong>and</strong> footers are positioned 0.5 inch from the top or bottom<br />
edge of the page. When you change the position of a continuation page header<br />
to 1 inch, the continuation page appears to have a 1-inch top margin, beginning<br />
with the header text. The document text begins at the page’s 2-inch margin <strong>and</strong><br />
the two additional blank lines in the continuation header ensure correct spacing<br />
between the header text <strong>and</strong> the document text.<br />
1. Open the file DCGletter.<br />
2. Add the date to the top of the letter. (Key today’s date or use the Insert,<br />
Date <strong>and</strong> Time comm<strong>and</strong>. Remember to clear the box that updates the date<br />
automatically.)<br />
3. On the fourth line below the date, add the following inside address:<br />
Ms. Lisa Knapp<br />
Napton Semiconductors<br />
400 Sara Road<br />
Rio Rancho, NM 87124<br />
4. On the second line below the address, add Dear Ms. Knapp: followed by<br />
one blank line.<br />
5. Choose <strong>Page</strong> Setup from the File menu <strong>and</strong> click the Layout tab. Check<br />
Different first page <strong>and</strong> set the Header to 1 inch from the edge.<br />
6. Click the Margins tab <strong>and</strong> set a 2-inch top margin <strong>and</strong> 1.25-inch left <strong>and</strong><br />
right margins. Click OK.<br />
7. Display the header pane. Click the Show Next button to move to the<br />
header pane on page 2.<br />
8. Create the header in Figure 8-18 (on the next page), inserting the information<br />
as shown. Press e twice after the last line.
240 WORD<br />
Unit 3 ■ <strong>Page</strong> Formatting<br />
W<br />
O<br />
R<br />
D<br />
FIGURE 8-18<br />
Ms. Lisa Knapp<br />
<strong>Page</strong> [Click<br />
[Current date]<br />
for the page number]<br />
TIP: If you use the Insert Date button on the Header <strong>and</strong> Footer toolbar,<br />
Word inserts an automatically updating date field in the format 12/25/2002<br />
instead of the format December 25, 2002 used in letters <strong>and</strong> memos.<br />
FIGURE 8-19<br />
Continuation page<br />
header for a letter<br />
Header is 1 inch<br />
from top edge of<br />
page<br />
2 blank lines<br />
b<br />
9. Close the header pane <strong>and</strong> view both pages in Print Preview.<br />
10. Add the letter closing (the letter is from Tom Carey, Senior Travel Counselor)<br />
followed by your reference initials. Check Appendix F: “St<strong>and</strong>ard Forms for<br />
Business Documents” for correct spacing.<br />
11. Save the document as [your initials]8-16 in your Lesson 8 folder.<br />
12. Print <strong>and</strong> close the document.<br />
In Word Classroom Presentation 8.<br />
b
Lesson 8 ■ <strong>Page</strong> <strong>and</strong> <strong>Section</strong> <strong>Breaks</strong>, <strong>Headers</strong>, <strong>and</strong> <strong>Footers</strong> WORD 241<br />
<strong>LESSON</strong><br />
1<br />
8 Summary<br />
➤ Pagination is the Word process of flowing text from line to line <strong>and</strong> from page<br />
to page. Word creates a soft page break at the end of each page. When you edit<br />
text, you adjust line <strong>and</strong> page breaks. You can adjust the way a page breaks by<br />
manually inserting a hard page break (Ç + e ).<br />
W<br />
O<br />
R<br />
D<br />
➤ Delete a hard page break by clicking it <strong>and</strong> pressing y or n .<br />
➤ The Paragraph dialog box contains line <strong>and</strong> page break options to control pagination.<br />
To prevent lines of a paragraph from displaying on two pages, click in the<br />
paragraph <strong>and</strong> apply the Keep lines together option. To keep two paragraphs<br />
together on the same page, click in the first paragraph <strong>and</strong> apply the Keep with<br />
next option. To insert a page break before a paragraph, click in the paragraph <strong>and</strong><br />
choose the <strong>Page</strong> break before option.<br />
➤ Use section breaks to separate parts of a document that have different formatting.<br />
Apply a Next page section break to start a section on a new page or a Continuous<br />
section break to continue the new section on the same page. Apply an Even page<br />
or Odd page section break to start a section on the next even- or odd-numbered<br />
page.<br />
➤ Change the vertical alignment of a section by clicking within the section <strong>and</strong><br />
choosing File, <strong>Page</strong> Setup. On the Layout tab, under Vertical alignment, choose an<br />
alignment (Top, Center, Justified, or Bottom).<br />
➤ Use the Go To comm<strong>and</strong> to go to a specific page or section in a document. You<br />
can also go to a relative destination, such as the midpoint of the document or<br />
the 50th line.<br />
➤ A header is text that appears in the top margin; a footer is text that appears in<br />
the bottom margin. These text areas are used for page numbers, document titles,<br />
the date, <strong>and</strong> other information.<br />
➤ Always add page numbers to long documents. You can choose the position of<br />
page numbers (examples: bottom centered, top right) <strong>and</strong> the format (examples:<br />
1, 2, 3 or A, B, C). You number the first page or begin numbering on the second<br />
page (you can also begin numbering the second page with “1” instead of “2” if<br />
appropriate).<br />
➤ Check page numbers in Print Preview or Print Layout view (they are not visible<br />
in Normal view). In Print Layout view, you can activate the header or footer pane<br />
that contains the page number by double-clicking the text <strong>and</strong> then modify the<br />
page number text (examples: make it bold or add the word “<strong>Page</strong>” before the<br />
number).<br />
Encourage students to use the Lesson Summary<br />
1to review the important concepts in the lesson.
242 WORD<br />
Unit 3 ■ <strong>Page</strong> Formatting<br />
➤ To remove page numbers, activate the header or footer pane that contains the<br />
numbering, select the text, <strong>and</strong> then delete it.<br />
W<br />
O<br />
R<br />
D<br />
➤ To add header or footer text to a document, choose View, Header <strong>and</strong> Footer. Use<br />
the Header/Footer toolbar buttons to insert the page number, date, <strong>and</strong> time or to<br />
insert AutoText for the filename, author, print date, or other information. You can<br />
switch between the header <strong>and</strong> footer pane <strong>and</strong> move to the next or previous pane.<br />
<strong>Section</strong>s can have different headers <strong>and</strong> footers.<br />
➤ A document can have a different header or footer for the first page than for the<br />
rest of the pages. Choose the Different first page option in the <strong>Page</strong> Setup dialog<br />
box (Layout tab).<br />
➤ Use the <strong>Page</strong> Setup dialog box to change the position of the header or footer text<br />
from the edge of the page. The default position is 0.5 inch.<br />
➤ Memos or letters that are two pages or longer should have a continuation page<br />
header—a three-line block containing the addressee name, page number, <strong>and</strong><br />
date. Set the header to 1 inch from the edge, add two blank lines below the header,<br />
<strong>and</strong> use a 2-inch top margin. Apply the Different first page setup option, leaving<br />
the first-page header blank.<br />
1<br />
<strong>LESSON</strong> 8<br />
Comm<strong>and</strong> Summary<br />
FEATURE BUTTON MENU KEYBOARD SPEECH<br />
Insert hard page break Insert, Break Ç + e<br />
Apply line <strong>and</strong> page<br />
break options<br />
Insert section breaks<br />
Format, Paragraph,<br />
Line <strong>and</strong> <strong>Page</strong> <strong>Breaks</strong><br />
Insert, Break<br />
Apply formatting to<br />
sections<br />
File, <strong>Page</strong> Setup<br />
Go To Edit, Go To Ç + G<br />
or ∞<br />
Add page numbers<br />
Insert, <strong>Page</strong> Numbers<br />
Add header/footer<br />
View, Header <strong>and</strong> Footer<br />
Point out that the Comm<strong>and</strong> Summary lists a<br />
1variety of ways to accomplish a specific task.<br />
Students can decide which method they prefer to use.
Lesson 8 ■ <strong>Page</strong> <strong>and</strong> <strong>Section</strong> <strong>Breaks</strong>, <strong>Headers</strong>, <strong>and</strong> <strong>Footers</strong> WORD 243<br />
e<br />
TRUE/FALSE QUESTIONS<br />
Concepts Review<br />
Each of the following statements is either true or false. Indicate your choice by<br />
circling T or F.<br />
O<br />
O<br />
O<br />
T F 1. You can delete a soft page break by pressing y .<br />
T F 2. To insert a section break, press Ç + e .<br />
T F 3. One way to insert a page break is to choose Break from the Insert<br />
menu.<br />
O<br />
T F 4. The default position for page numbers is at the bottom right of<br />
the page.<br />
O<br />
T F 5. A nonprinting character appears to the left of any paragraph to<br />
which you apply the Keep with next option.<br />
O<br />
T F 6. <strong>Section</strong> breaks appear in the Print Preview window as double<br />
dotted lines.<br />
O<br />
O<br />
T F 7. <strong>Page</strong> breaks appear in Print Layout view as single dotted lines.<br />
T F 8. You can use the Go To feature to move the insertion point from<br />
one section to another.<br />
W<br />
O<br />
R<br />
D<br />
SHORT ANSWER QUESTIONS<br />
Write the correct answer in the space provided.<br />
1. Which type of page break is automatically adjusted as you key text<br />
Soft page break<br />
2. Which type of section break does not start on a new page<br />
Continuous section break<br />
3. What is the term for the last line of a paragraph that appears alone at the<br />
top of a page<br />
Widow<br />
4. Which option would you apply to a paragraph so it is not divided by a<br />
page break<br />
Keep lines together<br />
Concepts Review:<br />
Allows students to check their underst<strong>and</strong>ing.<br />
C<br />
L<br />
O<br />
S<br />
E<br />
e<br />
Consider using the Test Bank to provide an<br />
additional review of lesson concepts. It may also<br />
be used as an assessment tool.
244 WORD<br />
Unit 3 ■ <strong>Page</strong> Formatting<br />
W<br />
O<br />
R<br />
D<br />
5. Which dialog box <strong>and</strong> tab would you display to change the vertical alignment<br />
of a section<br />
<strong>Page</strong> Setup, Layout tab<br />
6. Which type of vertical alignment spaces text so the top line aligns with the<br />
top margin <strong>and</strong> the bottom line aligns with the bottom margin<br />
Justified<br />
7. Which layout option do you use to begin a document header on the second<br />
page <strong>and</strong> leave the first-page header blank<br />
Different first page<br />
8. On the Header <strong>and</strong> Footer toolbar, what is the purpose of the button<br />
Move between the header <strong>and</strong> footer<br />
CRITICAL THINKING<br />
Answer these questions on a separate page. There are no right or wrong answers.<br />
Support your answers with examples from your own experience, if possible.<br />
1. Describe a situation where you would use a continuous section break.<br />
2. What information do you think most businesses would include in the header<br />
or footer of a business report Would this information differ from the<br />
information found in a business letter header or footer<br />
Critical Thinking Questions:<br />
Answers will vary based on students’ preferences,<br />
observations, experiences, <strong>and</strong> research.
Lesson 8 ■ <strong>Page</strong> <strong>and</strong> <strong>Section</strong> <strong>Breaks</strong>, <strong>Headers</strong>, <strong>and</strong> <strong>Footers</strong> WORD 245<br />
EXERCISE 8-17<br />
Lesson Applications<br />
Work with page breaks <strong>and</strong> add page numbers.<br />
a<br />
1. Open the file DesertSW.<br />
2. Delete the page break at the end of page 1.<br />
3. Delete the heading that followed the page break, “Desert Southwest Travel<br />
Guide.”<br />
4. Using the Format menu, display the Styles <strong>and</strong> Formatting task pane. Then<br />
apply to the following document headings the Word heading styles indicated<br />
here:<br />
“The Region” Heading 1<br />
“Climate” <strong>and</strong> “History” Heading 2<br />
“Destinations” Heading 1<br />
“Parks <strong>and</strong> Monuments” <strong>and</strong> “Cities” Heading 2<br />
“Phoenix,” “Flagstaff,” “Santa Fe,” <strong>and</strong> “Albuquerque” Heading 3<br />
“Events” <strong>and</strong> “Transportation/Accommodations” Heading 1<br />
5. Delete the blank lines before <strong>and</strong> after the styled headings.<br />
6. Insert page breaks before all four headings styled as Heading 1.<br />
W<br />
O<br />
R<br />
D<br />
TIP: Use the task pane to select all instances of the Heading 1 text, <strong>and</strong> then<br />
choose the option in the Paragraph dialog box to apply a page break before<br />
paragraphs. Include the Keep with next option.<br />
7. Format the first page as follows:<br />
● Make the first line (“Desert Southwest Travel Guide”) 20-point bold,<br />
centered, all caps, with 72 points of spacing before the paragraph.<br />
● Center the five lines of travel agency information.<br />
● Format the two paragraphs following the travel agency information as<br />
14-point justified with 1.5-line spacing. Insert an extra line before the<br />
paragraph starting “One of the most.”<br />
8. On pages 9 <strong>and</strong> 10, make the list of events fit on one page by formatting it<br />
as a bulleted list with no blank lines between events. Delete the blank line<br />
before the first event (“Various Dances”).<br />
9. Insert page numbers at the top right, without numbering the first page.<br />
10. Save the document as [your initials]8-17 in your Lesson 8 folder.<br />
11. Print the document 4 sheets per page <strong>and</strong> then close it.<br />
A<br />
SSESS<br />
Assessment Resources:<br />
• Solutions Manual<br />
• Test Bank<br />
(in Assessment Manual)<br />
• Portfolio Builder<br />
Lesson Applications:<br />
Provide independent practice for students <strong>and</strong> may be<br />
used for assessment. Objectives are indicated for each<br />
exercise.<br />
aExercise 8-17:<br />
Objectives: 1, 2, 5<br />
Required Files: DesertSW<br />
Solution Files: 8-17 in Solutions Manual <strong>and</strong> on Solutions<br />
Disk.
246 WORD<br />
Unit 3 ■ <strong>Page</strong> Formatting<br />
W<br />
O<br />
R<br />
D<br />
EXERCISE 8-18<br />
Work with page breaks <strong>and</strong> line <strong>and</strong> page break options, insert section breaks,<br />
format sections, <strong>and</strong> add page numbers.<br />
a 1<br />
FIGURE 8-20<br />
1. Open the file Mexico1. Edit the text on page 1 as shown in Figure 8-20.<br />
to the l<strong>and</strong> of tropical beauty, pristine<br />
beaches, <strong>and</strong> quaint fishing villages— 1 M<br />
The Riviera Princess leaves from Los Angeles on its way to the<br />
You’ll cruise on a<br />
elegant<br />
Mexican Riviera. It is one of the smaller cruise ships, holding<br />
just<br />
829 passengers. The staterooms, however, are among the most spacious<br />
<strong>and</strong> luxurious<br />
on any cruise ship.<br />
The ship features an extensive health <strong>and</strong> fitness center that<br />
high-tech<br />
includes state-of-the-art exercise equipment, saunas, steam rooms,<br />
<strong>and</strong> a jacuzzi. Spa services are available for massage, <strong>and</strong> there are<br />
fitness<br />
regularly scheduled aerobics classes. The ship has a practice golf<br />
batting cages<br />
courts, a jogging track<br />
tee, shuffleboard, paddle tennis, <strong>and</strong> a lovely pool.<br />
including<br />
step<br />
aerobics,<br />
kickboxing,<br />
<strong>and</strong> yoga.<br />
2<br />
aExercise 8-18:<br />
Objectives: 1–3, 5<br />
Required Files: Mexico1<br />
Solution Files: 8-18 in Solutions Manual <strong>and</strong> on Solutions<br />
Disk.<br />
2. Format the title with 72 points of spacing before the paragraph.<br />
3. Format the paragraph “Sailing dates from Los Angeles are:” so it appears on<br />
the same page as the paragraph following it (if it does not already).<br />
4. Insert a hard page break at the bold heading “Stateroom Locations <strong>and</strong><br />
Rates” to start it on a new page.<br />
5. Insert continuous section breaks before “The itinerary is as follows” on page<br />
1 <strong>and</strong> before the paragraph that begins “Examine the rates in the enclosed<br />
brochure.” (Tip: Position the insertion point to the left of the text <strong>and</strong> then<br />
insert the section break.)<br />
6. Format this new section (section 2) with 1.75-inch left <strong>and</strong> right margins.<br />
7. Delete the hard page break before the heading on page 3 <strong>and</strong> insert a Next<br />
<strong>Page</strong> section break.<br />
8. Change the vertical alignment of the new section (section 4) so it is justified<br />
between the top <strong>and</strong> bottom margins. Delete the blank paragraph mark<br />
below the heading.<br />
9. Insert page numbers at the bottom center of all pages including page 1.<br />
10. Check page numbers in Print Layout view. If the last page is not numbered<br />
“3,” double-click the page number, click the Format <strong>Page</strong> Number button<br />
on the Header <strong>and</strong> Footer toolbar, <strong>and</strong> set page numbering to start at 3.<br />
It’s sometimes difficult to number a multi-<br />
document. Students are shown how to<br />
1section<br />
make sure this document’s last section is numbered<br />
correctly. More complex page numbering <strong>and</strong> headers/<br />
footers are taught in the Expert-level text.<br />
This figure contains proofreading marks. You<br />
2might want to review Appendix D:<br />
“Proofreaders’ Marks” with students.
Lesson 8 ■ <strong>Page</strong> <strong>and</strong> <strong>Section</strong> <strong>Breaks</strong>, <strong>Headers</strong>, <strong>and</strong> <strong>Footers</strong> WORD 247<br />
EXERCISE 8-19<br />
11. View the document in Print Preview to check the pagination.<br />
12. Save the document as [your initials]8-18 in your Lesson 8 folder.<br />
13. Print <strong>and</strong> close the document.<br />
Work with page <strong>and</strong> section breaks <strong>and</strong> insert a footer.<br />
a<br />
1. Open the file WestFest1.<br />
2. Delete the page break at the end of page 1 (the title page) <strong>and</strong> insert a Next<br />
<strong>Page</strong> section break in its place.<br />
3. Format the title page attractively <strong>and</strong> center it vertically on the page.<br />
4. Make the bold headings for the four music festivals described in this document<br />
(“The Aspen Music Festival,” “The Santa Fe Chamber Music Festival,”<br />
“The Santa Fe Opera,” “The San Francisco Jazz Festival”) start on a new<br />
page, but not as new sections.<br />
5. Check the rest of the document. If a page break separates any heading from<br />
the paragraph it introduces, apply the paragraph formatting option to keep<br />
the paragraphs together.<br />
6. Create a footer that appears on all pages of the document <strong>and</strong> contains the<br />
following three elements:<br />
[Filename] Created by [your name] <strong>Page</strong> [page number]<br />
Use AutoText for the first two elements (the filename <strong>and</strong> “Created by”).<br />
Center-align the second element <strong>and</strong> right-align the last element.<br />
7. Adjust the center <strong>and</strong> right tab settings in the footer to accommodate the<br />
document’s 1-inch left <strong>and</strong> right margins. (Remember, the default tab settings<br />
are designed for a document with 1.25-inch left <strong>and</strong> right margins.)<br />
8. Format the footer text as 11 points.<br />
9. Save the document as [your initials]8-19 in your Lesson 8 folder.<br />
10. Print the document 4 pages per sheet <strong>and</strong> then close it.<br />
W<br />
O<br />
R<br />
D<br />
EXERCISE 8-20<br />
Challenge Yourself<br />
Create a continuation page header for a business letter.<br />
a g<br />
aExercise 8-19:<br />
Objectives: 1–3, 6<br />
Required Files: WestFest1<br />
Solution Files: 8-19 in Solutions Manual <strong>and</strong> on Solutions<br />
Disk.<br />
1. Open the files Robbins <strong>and</strong> Special3.<br />
2. Format Robbins as a business letter to the following address. The letter will<br />
be from Tom Carey, Senior Travel Counselor.<br />
Ms. Donna Robbins<br />
14 Big Horn Drive NE<br />
Albuquerque, NM 87122<br />
aExercise 8-20:<br />
Objectives: 6, 7<br />
Required Files: Robbins, Special3<br />
Solution Files: 8-20 in Solutions Manual <strong>and</strong> on Solutions<br />
Disk.<br />
The completed document for this exercise<br />
gmay be used in a student’s portfolio.
248 WORD<br />
Unit 3 ■ <strong>Page</strong> Formatting<br />
W<br />
O<br />
R<br />
D<br />
3. After the paragraph that begins “Choose your,” start a new paragraph by<br />
keying You might also consider one of Duke City Gateway’s specialinterest<br />
tours:<br />
4. Switch to the Special3 window. Copy paragraphs 4 through 8 (from “Our<br />
local” through “Salzburg”) <strong>and</strong> paste them below the text you just keyed in<br />
the letter document. There should be one blank line before <strong>and</strong> after the<br />
pasted text.<br />
5. Format the copied paragraphs with bullets <strong>and</strong> a 0.5-inch right indent.<br />
Leave the blank lines between the bulleted paragraphs.<br />
6. Adjust page setup options for a continuation page header. Change the left<br />
<strong>and</strong> right margins to 1.25 inches.<br />
7. Create a three-line continuation page header that prints on page 2. (Use the<br />
correct date format.)<br />
8. Check the document in Print Preview. Save the document as [your<br />
initials]8-20 in your Lesson 8 folder.<br />
9. Print the document <strong>and</strong> close both documents.<br />
On Your Own<br />
In these exercises you work on your own, as you would in a real-life work environment.<br />
Use the skills you’ve learned to accomplish the task—<strong>and</strong> be creative.<br />
EXERCISE 8-21<br />
Write a short report about your 10 favorite TV shows or movies. Include a document<br />
title. Each show or movie should be a separate paragraph with a heading.<br />
Adjust page breaks as needed to keep headings with their related paragraphs.<br />
Include page numbers <strong>and</strong> document information (author, filename, date) in a<br />
header <strong>and</strong>/or footer. Save the document as [your initials]8-21 <strong>and</strong> print it.<br />
EXERCISE 8-22<br />
Write a two-page letter (to a prospective employer, a friend, or whomever).<br />
Create your letterhead in the first-page header pane <strong>and</strong> create a continuation<br />
header in the second-page header pane. Save the document as [your<br />
initials]8-22 <strong>and</strong> print it.<br />
EXERCISE 8-23<br />
Research a topic on the Internet that interests you. Copy several paragraphs<br />
<strong>and</strong> assemble the text into a new document at least two pages long. Check<br />
pagination. Add appropriate headers <strong>and</strong> footers <strong>and</strong> include page numbering.<br />
Save the document as [your initials]8-23 <strong>and</strong> print it.<br />
On Your Own Exercises:<br />
These exercises are entirely free-form. They do not “hold<br />
the student’s h<strong>and</strong>” or provide steps. No solution files<br />
are provided. Encourage students to be creative. Some<br />
exercises might be appropriate for inclusion in students’<br />
portfolios. You might assign exercises as group projects.<br />
Exercise 8-21:<br />
Objectives: 1, 2, 5, 6<br />
Required Files: None<br />
Exercise 8-22:<br />
Objectives: 6, 7<br />
Required Files: None<br />
Exercise 8-23:<br />
Objectives: 1, 2, 5, 6<br />
Required Files: None