
You also want an ePaper? Increase the reach of your titles
YUMPU automatically turns print PDFs into web optimized ePapers that Google loves.
I. AtomixMP3 Main User Interface<br />
1. Active Waveform Display<br />
AtomixMP3 Visual Mix Display<br />
- May the rhythm be with you... -<br />
Atomix Mp3 <strong>Manual</strong><br />
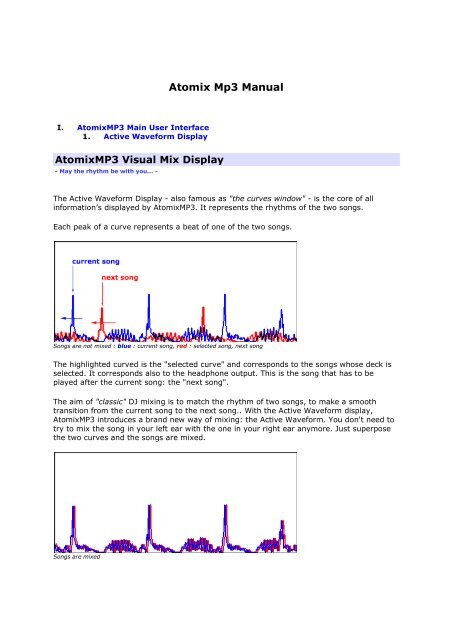
The Active Waveform Display - also famous as "the curves window" - is the core of all<br />
information’s displayed by AtomixMP3. It represents the rhythms of the two songs.<br />
Each peak of a curve represents a beat of one of the two songs.<br />
Songs are not mixed : blue : current song, red : selected song, next song<br />
The highlighted curved is the "selected curve" and corresponds to the songs whose deck is<br />
selected. It corresponds also to the headphone output. This is the song that has to be<br />
played after the current song: the "next song".<br />
The aim of "classic" <strong>DJ</strong> mixing is to match the rhythm of two songs, to make a smooth<br />
transition from the current song to the next song.. With the Active Waveform display,<br />
AtomixMP3 introduces a brand new way of mixing: the Active Waveform. You don't need to<br />
try to mix the song in your left ear with the one in your right ear anymore. Just superpose<br />
the two curves and the songs are mixed.<br />
Songs are mixed
In order to perform this "beat matching", you can use two techniques:<br />
Use the song controls to alter the selected song until it matches the current song.<br />
Use the "Magic Button" to perform all those operations in a single click.<br />
"Classic" <strong>DJ</strong> Mix technique<br />
- No Magic, only hard work -<br />
To perform the beat matching without using the Magic Button, here is the way you may<br />
want to follow:<br />
1. Change the pitch to match the two rhythms. When the distance between two consecutive<br />
peaks in the current song is equal to the distance between two consecutive peaks in the<br />
second song, the two songs have the same rhythm, the same BPM. You can also use the<br />
build-in instant BPM counter to know the exact BPM of each song and match song even<br />
more rapidly.<br />
pitch shift<br />
2. Pause and Play the selected song until its peaks match the one of the current song. Now<br />
the beats are equal: the phase of the two songs are equal. You can also drag and drop the<br />
selected curve over the current curve to perform the phase shift in a click. To be even more<br />
accurate, you can use the two shortcuts (left and right arrow) to nudge the selected curve<br />
forward (left arrow) or backward (right arrow).<br />
phase shift
3. Then, just modify the gain of the selected song to match both songs output volume. For<br />
this operation, you will need headphones, or to cross fade smoothly from the current song<br />
to the next and adjust the gain step by step.<br />
volume shift<br />
This picture is only a representation: on AtomixMP3, for maximal ease of use, the height of<br />
the curve is relative to the overall song volume and not to the other song volume, so, by<br />
changing the gain, the height of the peak will not change.<br />
Once the two songs are mixed, you can use the cross fader to make a smooth transition to<br />
the next song.<br />
To mix the two songs in one click, use the "automix now!" button to make all the process<br />
even easier.<br />
Scratch<br />
The Active Waveform Display can also be used to scratch your song like if it was a regular<br />
vinyl.<br />
In order to scratch, you need to have the scratch mode set to hold in the options.<br />
Then, just click on the Active Waveform Display and the song will stop as if you were<br />
holding the disc.<br />
Now, move your mouse to the left and to the right to move the disc.<br />
Release the mouse button to let the disc play again.<br />
Tip: You can also achieve the same effect in regular scratch mode if your song is paused.<br />
2. Song Controls<br />
AtomixMP3 Basic Song Controls<br />
- All descriptions and pictures are for desk A, and are the same for desk B -
The song controls of AtomixMP3 are the same as on a standard <strong>DJ</strong> CD Player, plus some<br />
more functionality.<br />
There are two desks, corresponding to two independent players. One on the left and one on<br />
the right. The left one is desk A and the right one is desk B.<br />
To load a song on one of the available desks, drag the song from the music browser and<br />
drop it on one of the desks.<br />
Each desk has several controls:<br />
song controls for the left desk, desk A<br />
Buttons:<br />
� Magic<br />
� Play<br />
� Pause<br />
� Stop<br />
� Cue<br />
� Loop<br />
Song position<br />
Song information window<br />
Pitch slider<br />
Gain and Equalizer<br />
AtomixMP3 Buttons controls<br />
- Magic, Play/Pause, Stop, Cue -<br />
Magic: the Magic button is the main feature of AtomixMP3: it synchronizes the<br />
two songs providing a one click beat-matching. You can check if songs are<br />
always synchronized by using the Active Waveform display. If they happen to<br />
get desynchronized, just click again on the magic button.<br />
If the song has just been loaded, is stopped or is on pause, just click on the<br />
magic button to start playing the song in the right tempo.
The Magic button performs all steps of the FAME (Fast Automated Mix Engine)<br />
algorithm :<br />
BPM Synchronization<br />
sets the BPM of the song to the BPM of the other song, changing its pitch<br />
Phase Shift<br />
shifts the song so that its next beat matches the next beat of the other<br />
song<br />
Level Adjustment<br />
sets the song gain to the same gain as the other song<br />
Every step of FAME is customizable in the options panel.<br />
Play/Pause : the two functionalities are on the same button, nevertheless, on<br />
some skins, they might be different. Press on this button to play the loaded song<br />
press it again to pause it. To play from the same point, press this button again.<br />
Stop: this button stops the song. On the first click, the song is stopped, then, three<br />
actions are available:<br />
1. If a cue point has already been set for this song, click on the stop button to set<br />
the song position to the cue point.<br />
2. Click a second time on the stop button to set the song position is brought back to<br />
its absolute start. This is the default functionality of the stop button.<br />
3. If the song has already been played, AtomixMP3 has detected the first beat of<br />
the song. Click a third time on the stop button to bring the song position to the<br />
exact location if the first beat<br />
Cue: cueing functionality. Sets a marker on the song, a cue point, so be able to get<br />
back to this point in a second. It can be :<br />
the beginning of the lyrics of the song<br />
a special break point<br />
...<br />
To return to this cue point, click on the stop button.<br />
Each time a song on switch a cue point is set is loaded to one of the desks, AtomixMP3<br />
sets the song position to the cue point.<br />
To set more than one cue point, use the corresponding shortcuts.<br />
Loop: These four buttons make the song enter a seamless loop of 1, 2, 4 or 8 beats length.<br />
The duration of the loop can be changed during the loop without breaking it by clicking on<br />
another button.
Click again on the active loop button to exit the loop and continue the song.<br />
Song information’s<br />
- Position, Extended, Condensed -<br />
Song position: the position of each player in the song is represented in a disc for a higher<br />
precision. Click at any point on the disc to start playing at this point.<br />
song position : start song position : playing song position : end of the song, stopped<br />
song information window :<br />
extended<br />
Song information window: this window on the center of each<br />
desk displays, for the song it is attached to, several useful<br />
information’s in order to perform an accurate mix. It displays :<br />
the author name<br />
the song title<br />
those information’s are retrieved from the file name, that<br />
can be of either format :<br />
� author_name-song_title.mp3<br />
� (author_name)song_title.mp3<br />
� ...<br />
Click on the information window to switch between the two<br />
available display modes :<br />
1. extended information window (default mode):<br />
Spent : time spent since the beginning of the song (in<br />
minutes : seconds . milliseconds)<br />
Left : time left to the end of the song (in minutes : seconds .<br />
milliseconds)<br />
> Cue : (from cue) time spent since the first cue point of<br />
the song<br />
> End : (to end) time left to the last beat of the song (this<br />
feature is only available once the song has been played by<br />
AtomixMP3 once)<br />
BPM : average BPM of the song, the BPM is the number of<br />
Beats Per Minute of the song (in BPM)
song information window :<br />
condensed<br />
3. Pitch<br />
Pitch control and Master tempo<br />
- -33% +33%, speed control -<br />
local : local value of the BPM (in BPM)<br />
Level : volume level of the song (in dB)<br />
Pitch: the exact value of the pitch (in %)<br />
2. condensed information window (click once on the window):<br />
Displays only the time spent and the average BPM, but<br />
with a more readable font<br />
minimum, -33% slower, slider up reset to 0% faster, slider down maximum, +33%<br />
Pitch Control: changes the speed of the song, and its BPM. Use the pitch control to mix the<br />
two songs manually. Move the slider up to make the song play slower, move it down to play<br />
the song faster.<br />
Right click anywhere on the pitch circle to move the pitch to this position, as soon as you<br />
release the mouse button, the pith returns to its former value.<br />
The default pitch range on AtomixMP3 is from -33% to +33%, it allows to:<br />
Mix two songs that a very different BPM (like hard jungle and easy listening)<br />
Mix a song with itself, by playing one song on the two desks, one with the Pitch at -<br />
33%, the other at +33% so hat one beat of the slower version happens once every<br />
two beats of the faster version of the song. This can make amazing effects.<br />
Nevertheless, if the distortion from -33% to +33% is too strong, you can set it to -8%, +8<br />
%, as on regular turntables, in the options panel.<br />
Reset button: resets the pitch to 0%. This button as two functionalities:
click once, the pitch moves slowly from its current position to 0%<br />
Click a second time, or double click on it, the pitch is instantly reset.<br />
In automix mode, the pitch is slowly reset after each mix. You can disable this option in the<br />
options panel.<br />
Time Stretch: changes the speed of the song without changing its pitch. This is the default<br />
setting of the pitch slider. If you wish to switch to the regular pitch control, you can disable<br />
the time stretch in the options panel.<br />
4. Gain and Equalizer<br />
AtomixMP3 Advanced Song Controls : Gain and Equalizer<br />
- Bass, Medium, High, Gain -<br />
Equalizers for desk A: Gain, High, Medium, Bass<br />
The advanced songs controls of AtomixMP3 are:<br />
Gain<br />
Tri-band equalizer<br />
� High<br />
� Medium<br />
� Bass<br />
Gain: main output level of the song. If the song is already normalized, and that the song<br />
level is max, increasing the gain can cause saturation. Prefer using the gain by lowering it,<br />
or to enhance parts of the song where the volume is low.<br />
The 'Magic' button also sets the gain so that the next song has the same overall output level<br />
as the playing song. You can disable this option in the options panel.<br />
Equalizers:
The tri-band equalizer allows a smooth control on the output frequencies of the song, either<br />
to correct a badly recorded song or to mix more precisely. You can "turn" one of those<br />
buttons by clicking on them and, before releasing the mouse button, drag the mouse up or<br />
down.<br />
Like the other sliders and knobs of AtomixMP3:<br />
double click on the equalizer button resets it<br />
right click on any point of the slider performs an immediate cut<br />
High: the highest frequencies of the song.<br />
Medium: the medium frequencies of the song. The vocal parts of songs often happened to<br />
be in medium frequencies, you can then use the medium equalizer slider to cut the vocals of<br />
a song.<br />
Bass: the lowest frequencies of the song, mainly the "boom-boom" giving the tempo. To do<br />
a real smooth mix, use the cross fader and the bass<br />
5. Mixer<br />
AtomixMP3 Mix Controls<br />
- The real <strong>DJ</strong> power -<br />
The Mixing controls of AtomixMP3 are, along with the equalizers, similar to regular <strong>DJ</strong><br />
mixers.<br />
The center panel of AtomixMP3 default user interface presents the main mixing controls:<br />
with them you can perform a fully automated mix, with the "automix now!" button or use<br />
advanced <strong>DJ</strong> techniques with either the cross fader or the level controls. To go even further<br />
through mixing techniques, try to use the build-in equalizers.<br />
Mixer: cross fader, level, select, automix<br />
Sliders :
� Cross fader<br />
� Level<br />
Buttons :<br />
� Select (desk A or B)<br />
� Automix now!<br />
Mixer Sliders<br />
- Cross fader, Level -<br />
cross fader positions - red : output level for desk A, blue :<br />
output level for desk B<br />
level control<br />
Cross fader: mixes the audio output<br />
between desk A and desk B.<br />
When the slider is on the left, only the left<br />
desk (A) is mixed.<br />
When the slider is on the right, only the<br />
right desk (B) is mixed.<br />
In the center (reset) both desks (A and B)<br />
are mixed at their maximal level.<br />
To change this setting, go to the options<br />
page.<br />
Like the other sliders and knobs of<br />
AtomixMP3 :<br />
double click on the slider resets the<br />
cross fader to the central position<br />
right click on any point of the slider<br />
performs an immediate cut : it sets<br />
the cross fader to this position and<br />
sets is back when you release the<br />
right mouse button<br />
Level: changes the output audio level of each song. This setting changes the<br />
cross fader effect.<br />
Use the Level slider to change your mixing techniques, perform sharp cut<br />
(using the right mouse button), and add more variety to your mixes with cross<br />
fader.<br />
Like the other sliders and knobs of AtomixMP3 :<br />
double click on the slider resets the level to the maximum position<br />
right click on any point of the slider performs an immediate cut : it sets<br />
the level to this position and sets is back when you release the right<br />
mouse button
Mixer Buttons controls<br />
- Select, Automix now! -<br />
Select : (desk A or B)<br />
sets the rhythm curve color<br />
sets the song played in the headphone<br />
Automix now! : performs all mixing operations at once, that is :<br />
beat matching<br />
cross fading<br />
reset pitch<br />
Every step of the Automix is customizable in the options panel.<br />
II. AtomixMP3 Main Window<br />
1. Music files<br />
Music Files Browser<br />
- .MP3, .WAV -<br />
This window allows you to find a song in your hard drive, by browsing your folders the<br />
"classic" way.
file browser<br />
This window is subdivided in three dynamic sub windows :<br />
on the right, the folder browser<br />
in the center, the music browser, which displays the available music files<br />
on the left, the playlist<br />
All side sub windows can be masked by clicking the unlock button and dragging the<br />
mouse outside of it.<br />
locked<br />
unlocked<br />
To show the sub window, simply put the mouse over the "playlist" or the "folders"<br />
area at each side of the main window. The sub window will close itself again when you<br />
drag the mouse outside of it, allowing you to use the maximum space to view your<br />
files. If you wish to keep it open, simply press the lock button.<br />
Folders Browser
folders browser : open<br />
closed<br />
The left part allows you to select a folder, and the right part shows the files in this<br />
folder. The file browser also includes distant files ( on your local network for instance )<br />
Favourite Folder: If all your files are in sub-folders of a main directory, you can let<br />
this main directory be the root of the folder view, the favourite folder. To set a specific<br />
folder as your favourite folder, like the "My Music" folder above, select the folder you<br />
want as your favourite folder, and click on the "set favourite button" on the top right<br />
corner of the file sub window.<br />
set favourite folder button<br />
Music Browser<br />
This window displays the available audio files contained by the folder selected in the<br />
folder browser.<br />
To load a song on one of the available desks, select the song and drag and drop it on<br />
one of the desks. You can also press the "ENTER" button.
music browser<br />
The available formats are :<br />
.wav<br />
.mp3<br />
You can edit the BPM value or insert a comment on a song by selecting a song and<br />
pressing ALT-F2 or CTRL-F2.<br />
song icons<br />
The red cross means that this song has already been played during the session. A<br />
question mark mans that this song has never been played in<br />
AtomixMP3, and therefore the BPM and volume are not known yet.<br />
2. Playlist<br />
Playlist manager<br />
III. - Mix till the end of the night -<br />
IV.<br />
V. The playlist manager is a dynamic sub window common to the file browser and the<br />
search window. It allows you both to prepare the playlist you will mix during your<br />
session. That means that you will preselect the songs you will play and their order.<br />
Moreover, AtomixMP3 can be fully automated and mix by itself your entire playlist.
playlist manager : open<br />
closed<br />
VI. Exactly the same way you can load songs from the music window, you can drag and<br />
drop files from the playlist sub window to any of the desks.<br />
locked<br />
unlocked<br />
VII. The playlist sub window can be shown by dragging the mouse to the extreme right<br />
side of AtomixMP3 main window. If you wish to keep it open, simply press the lock<br />
button. You can resize any sub window by dragging its edge.<br />
If you only wish to mix from the prepared playlist, just pull the sub window border<br />
from its open (locked) position to the extreme left edge of the screen to mask<br />
completely the music or the search window.<br />
VIII. Moreover, the playlist manager offers other powerful features :<br />
Playlist Features<br />
IX. - Automix, new only, shuffle, open, save -<br />
X.<br />
automix : off<br />
on<br />
XI. Automix Mode: toggles to the automix mode, AtomixMP3 will now mix the playlist<br />
automatically. At the end of one song, AtomixMP3 will load the next song, mix the<br />
two rhythms and cross fade to the next song, and reset its pitch to 0.<br />
XII.<br />
shuffle<br />
XIII. Shuffle: randomizes the order of the playlist.<br />
XIV.<br />
new songs only<br />
XV. New songs only: remove all previously played songs from the playlist. The songs<br />
already played during the session are marked with a red cross.
XVI.<br />
open<br />
XVII. Open: loads a playlist into AtomixMP3. This playlist can be in standard .M3U or .PLS<br />
format.<br />
XVIII.<br />
save<br />
XIX. Save: saves the playlist to standard .M3U or .PLS format.<br />
3. Search<br />
AtomixMP3 search tool<br />
- Find and manage audio files -<br />
The search tool allows you to browse your audio files in a different manner as the folder<br />
browser. You can type any keyword in the text box to retrieve the corresponding file from<br />
either one of your local drives or a previously scanned CD.<br />
Search tool<br />
Exactly the same way you can load songs from the music window, you can drag and drop<br />
files from the search tool sub window to any of the desks. You can also use the playlist sub<br />
window, located in the right side of the search window.<br />
Type in the search text box the first letters of the author name or the song name of the file<br />
you look for and AtomixMP3 will find it instantly.<br />
To use the search tool, you must already have an audio database to search in; you must<br />
have scanned your hard drive first.<br />
It can scan your local drive for audio files and manage several CDs, or removable devices.
Managing Local Drives<br />
Scan local drive<br />
Scan local drive: scans one or more of your local drives, floppy or CDs for audio files, and<br />
add them to your audio database.<br />
Search audio files on local drives<br />
Select the drive you want to scan, the files format you wish to add to your audio database<br />
(.MP3 or .WAV) and click OK to start scanning.<br />
Perform extended analysis scans each audio file rhythm structure, the same way AtomixMP3<br />
analyses a song when it is played. This process is faster than playing each of your audio<br />
files, but may require some time to proceed.<br />
Managing Removable Devices<br />
Add CD<br />
Add CD: scans your CD drive, or any removable device, for audio files and add them to<br />
your audio database. This feature keeps track of the CD even when it is removed from your<br />
CD drive and allows you to find on which CD a track was to retrieve the corresponding CD<br />
easily.
Add a CD to audio database<br />
Select the drive, choose a name for this CD and press scan to start scanning.<br />
Remove CD<br />
Remove CD: remove the content of a specific CD from your audio database.<br />
Remove a CD from audio database<br />
Select the CD you wish to remove and press delete to remove it.<br />
4. Samples<br />
Samples
The Sample window allows you to launch small audio sounds during your sessions: the<br />
samples.<br />
Sample<br />
Launch sample: Click on the sample name to launch the sample.<br />
Right click on the sample name to play the sample and stop it by releasing the right mouse<br />
button.<br />
Open<br />
Open: loads a sample into AtomixMP3. This playlist can be in standard .MP3 or .WAV<br />
format.<br />
Sample gain<br />
Gain: set the output gain of the sample.<br />
Effects<br />
5. Effects
AtomixMP3 supports effects. That means that you apply dynamic audio effects to the music<br />
played by AtomixMP3.<br />
You can download effects on the effects page of AtomixMP3 website. (Currently unavailable)<br />
The default effects are:<br />
flanger<br />
pan<br />
Flanger<br />
- Airplane tubes -<br />
launch on desk A<br />
flanger effect<br />
launch on desk B<br />
Flanging was originally achieved by mixing the outputs of two LP record turntables and<br />
changing their relative speeds by alternately touching the ``flange'' of each turntable to<br />
slow it down. This produces a sound effect resembling a jet airplane ascending and<br />
descending.<br />
The default flanger effect of AtomixMP3 changes its intensity according to the corresponding<br />
song rhythm.<br />
Then click on the A or B button to launch the flanger effect on the corresponding desk.<br />
Pan<br />
- So flute... -<br />
launch on desk A<br />
pan effect<br />
launch on desk B<br />
The pan effect output the song on the left speaker and on the right speaker alternatively,<br />
according to the corresponding song rhythm.<br />
Click on the A or B button to launch the flanger effect on the corresponding desk.<br />
Recording<br />
AtomixMP3 supports recording of your mix sessions. You can then use the output files to<br />
burn your own mixed audio CDs.
Recording Controls<br />
Start Recording Stop Recording<br />
Start Recording: starts writing the audio output to the selected file. Click a second time to<br />
abort recording.<br />
AtomixMP3 supports .WAV output format.<br />
Cut<br />
Cut: continues recording in a second file. Use this feature to burn a multi track mixed audio<br />
CD.<br />
Every written file is named as follows:<br />
1. set the file name<br />
for example my_file.wav<br />
2. start recording<br />
3. AtomixMP3 writes my_file000.wav<br />
4. click the cut button<br />
5. AtomixMP3 writes my_file001.wav<br />
6. click the cut button<br />
7. AtomixMP3 writes my_file002.wav<br />
8. And so on...<br />
Once the recording has started, you can monitor your recording, by using the recording<br />
status window, below the record button:<br />
Recording status window<br />
Recording status: displays information about the recording process:<br />
the file name, and its path<br />
the total recorded time in this file<br />
the file size (in Mo)<br />
the overall recorded time (if many recorded files in the same session)
Recording Options<br />
Recording options<br />
Auto-Start: Starts recording when the button play of any desk is pressed.<br />
Auto-Cut: Cuts the recording when the cross fader reaches the middle of its track, allowing<br />
to automate the recording of multi-track mixed audio CDs.<br />
Filename: sets the output file name.<br />
Broadcasting<br />
You can broadcast on the internet using a third-party plug-in such as shout cast<br />
(http://www.shoutcast.com/).<br />
Just change the output file name to the .dll plug-in you wish to use.<br />
III. Configuring AtomixMP3<br />
AtomixMP3 Sound Configuration<br />
- Hardware, Software settings -
The sound configuration window presents as follows:<br />
Configuration window<br />
On the right, choose the number and type of soundcard you have:<br />
One soundcard: (default setting) sets the overall output of AtomixMP3 to your<br />
default soundcard. Select on the right drop down menu among all soundcards<br />
installed on your system.<br />
3D soundcard: sets the two audio outputs of AtomixMP3 on the front and rear<br />
output lines of your 3D soundcard. Select on the right drop down menu among all<br />
soundcards installed on your system.<br />
If your system support WDM drivers, uncheck the "Software 3D" emulation box.<br />
Two soundcards: sets the two audio outputs of AtomixMP3 on each of your<br />
soundcards. Select on the right drop down menu among all soundcards installed on<br />
your system.<br />
In the center, choose the output:<br />
2. Skins<br />
Single output: (default setting) sets the overall output of AtomixMP3 one<br />
soundcard.<br />
Headphones : allows the monitoring of the selected song on headphones<br />
� With two soundcards or one 3D soundcard<br />
� With a Y-splitter and one soundcard, each mono output corresponds to the<br />
overall output and the monitoring line.<br />
External Mix table: send the left and right desk to separate outputs (via two<br />
soundcards, one 3D soundcard or a Y-splitter).<br />
AtomixMP3 Skins<br />
- Real eye candy -
AtomixMP3 supports skins. That means that you can completely change the user interface<br />
of AtomixMP3 to match your preferences.<br />
You can download skins on the skin page of AtomixMP3 website. (Currently Unavailable)<br />
Simply choose the skin you wish in the drop down menu, and click OK.<br />
Please note that AtomixMP3 may be slightly slowed down if the skin is very dense. So you<br />
may want to try several skins to fit both your current mood and your computer.<br />
If you wish to create your own skin, please visit the developer section of AtomixMP3<br />
website. (Currently Unavailable)<br />
3. Visuals<br />
AtomixMP3 Visuals<br />
- Real eye candy -<br />
AtomixMP3 supports visuals. That means that you display video animation reacting<br />
dynamically to the music played by AtomixMP3.<br />
You can download visuals on the visuals page of AtomixMP3 website. (Currently<br />
Unavailable)<br />
Simply choose the visual you wish in the drop down menu, and click OK.<br />
The pop-up visual window can be maximized to display the visual on the whole screen or on<br />
a second video display.<br />
Please note that AtomixMP3 may be slightly slowed down if the visual is very CPU<br />
demanding.<br />
If you wish to create your own visual, please visit the developer section of AtomixMP3<br />
website.<br />
4. Shortcuts<br />
AtomixMP3 Shortcuts<br />
- The guru zone -
AtomixMP3 Shortcuts are defined more a maximal ease of use in any background.<br />
Just click on the corresponding key(s) to perform the assigned action.<br />
General<br />
switch page CTRL-TAB<br />
switch page (back) CTRL-SHIFT-TAB<br />
next window TAB<br />
previous window SHIFT-TAB<br />
switch output headphone BACKSPACE<br />
close automix ALT-F4<br />
Main window<br />
load song ENTER<br />
edit bpm ALT-B<br />
edit comment ALT-C<br />
put song in playlist SHIFT-ENTER<br />
record (start, stop) R<br />
Mix Live<br />
magic play SPACE<br />
classic play ESCAPE<br />
pause P<br />
cue C<br />
stop S<br />
beat sync SPACE<br />
nudge beat CTRL-left<br />
nudge left, nudge right left, right<br />
pitch up, down +,-,CTRL-+,CTRL--,SHIFT-+,SHIFT--<br />
pitch reset *<br />
zero pitch CTRL-*<br />
cross fader PG.UP,PG.DOWN<br />
automix ALT-SPACE<br />
CTRL-PG.UP,CTRL-PG.DOWN<br />
SHIFT-PG.UP,SHIFT-PG.DOWN<br />
toggle automix CTRL-ALT-SPACE<br />
Cue Points
set (number) CTRL-(number)<br />
goto (number) ALT-(number)<br />
goto and play (number) (number)<br />
Samples<br />
play sample (number) F(number)<br />
Loops<br />
Auto-Loop on 4 beat L<br />
Auto-Loop on 8 beat CTRL+L<br />
Auto-Loop on 2 beat SHIFT+L<br />
IV. Additional Information<br />
1. Copyright<br />
AtomixMP3 Help<br />
- Second Edition -<br />
Atomix Productions<br />
http://www.virtualdj.com/contact/index.html<br />
AtomixMP3 Copyright<br />
Copyright © 1997, 1998, 1999, 2000, 2001, 2002 Atomix Productions<br />
All Rights Reserved<br />
Number IDDN.FR.001.040012.01.R.C.2000.000.31400.<br />
© Copyright Paris 1997-2002 Atomix Productions<br />
Trademarks<br />
The Logo is a registered trademark of Atomix Productions; AtomixMP3 is trademark of<br />
Atomix Productions<br />
Reproduction of this manual is not permitted without express written permission from
Atomix Productions<br />
Windows is a registered trademark of Microsoft Corporation.<br />
License and Restrictions<br />
According to the EULA (End User License Agreement) signed by every user upon installation<br />
of AtomixMP3:<br />
You may not make or distribute copies of AtomixMP3, or electronically transfer AtomixMP3<br />
from one computer to another or over a network. You may not decompile, reverse engineer,<br />
disassemble, or otherwise reduce AtomixMP3 to a human-perceivable form. You may not<br />
sell, rent, lease, transfer or sublicense AtomixMP3. You may not sell, rent, lease, transfer or<br />
sublicense hardware on which AtomixMP3 was previously installed, without the agreement<br />
of Atomix Productions. You may not modify the Software or create derivative works based<br />
upon AtomixMP3.<br />
2. Minimum Requirements<br />
Minimum Requirements<br />
In the worst configuration, you will have to set AtomixMP3 to hardware mode. Not every<br />
feature will be available, but you will be able to run AtomixMP3 with its core auto-mix and<br />
beat-matching features working.<br />
Hardware:<br />
� Pentium 400 MHz<br />
� 64 Mo RAM<br />
Sound Card:<br />
� 16 bit<br />
Graphics Card:<br />
� 800x600 16 Bit colours<br />
Software:<br />
� Windows 95,98,Me,NT4,2000,XP<br />
� DirectX 3.0<br />
Recommended Requirements<br />
This is the recommended configuration to use AtomixMP3 to its best.
Hardware:<br />
� Pentium 633 MHz<br />
� 128 Mo RAM<br />
Sound Card:<br />
� 3D PCI soundcard with WDM drivers<br />
Graphics Card:<br />
� 1024x768 32 Bit colours<br />
Software:<br />
� Windows 98,Me,XP<br />
� DirectX 8.1