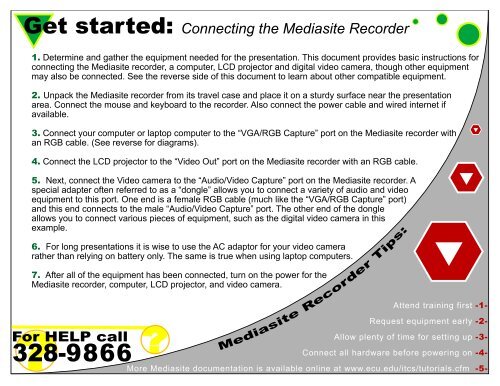
Get started: Connecting the Mediasite Recorder
Get started: Connecting the Mediasite Recorder
Get started: Connecting the Mediasite Recorder

You also want an ePaper? Increase the reach of your titles
YUMPU automatically turns print PDFs into web optimized ePapers that Google loves.
�<strong>Get</strong> <strong>started</strong>: <strong>Connecting</strong> <strong>the</strong> <strong>Mediasite</strong> <strong>Recorder</strong><br />
1. Determine and ga<strong>the</strong>r <strong>the</strong> equipment needed for <strong>the</strong> presentation. This document provides basic instructions for<br />
connecting <strong>the</strong> <strong>Mediasite</strong> recorder, a computer, LCD projector and digital video camera, though o<strong>the</strong>r equipment<br />
may also be connected. See <strong>the</strong> reverse side of this document to learn about o<strong>the</strong>r compatible equipment.<br />
2. Unpack <strong>the</strong> <strong>Mediasite</strong> recorder from its travel case and place it on a sturdy surface near <strong>the</strong> presentation<br />
area. Connect <strong>the</strong> mouse and keyboard to <strong>the</strong> recorder. Also connect <strong>the</strong> power cable and wired internet if<br />
available.<br />
3. Connect your computer or laptop computer to <strong>the</strong> “VGA/RGB Capture” port on <strong>the</strong> <strong>Mediasite</strong> recorder with<br />
an RGB cable. (See reverse for diagrams).<br />
4. Connect <strong>the</strong> LCD projector to <strong>the</strong> “Video Out” port on <strong>the</strong> <strong>Mediasite</strong> recorder with an RGB cable.<br />
5. Next, connect <strong>the</strong> Video camera to <strong>the</strong> “Audio/Video Capture” port on <strong>the</strong> <strong>Mediasite</strong> recorder. A<br />
special adapter often referred to as a “dongle” allows you to connect a variety of audio and video<br />
equipment to this port. One end is a female RGB cable (much like <strong>the</strong> “VGA/RGB Capture” port)<br />
and this end connects to <strong>the</strong> male “Audio/Video Capture” port. The o<strong>the</strong>r end of <strong>the</strong> dongle<br />
allows you to connect various pieces of equipment, such as <strong>the</strong> digital video camera in this<br />
example.<br />
6. For long presentations it is wise to use <strong>the</strong> AC adaptor for your video camera<br />
ra<strong>the</strong>r than relying on battery only. The same is true when using laptop computers.<br />
7. After all of <strong>the</strong> equipment has been connected, turn on <strong>the</strong> power for <strong>the</strong><br />
<strong>Mediasite</strong> recorder, computer, LCD projector, and video camera.<br />
For<br />
?<br />
HELP call<br />
328-9866<br />
?<br />
<strong>Mediasite</strong> <strong>Recorder</strong> Tips:<br />
�<br />
Attend training first -1-<br />
Request equipment early -2-<br />
Allow plenty of time for setting up -3-<br />
Connect all hardware before powering on -4-<br />
More <strong>Mediasite</strong> documentation is available online at www.ecu.edu/itcs/tutorials.cfm -5-<br />
�<br />
�
Sample configuration for capturing a presentation with <strong>the</strong> <strong>Mediasite</strong> <strong>Recorder</strong> www.ecu.edu/itcs<br />
Left side of system<br />
Digital Camcorder<br />
“Audio/Video Capture”<br />
�<br />
Power Outlet<br />
1 2<br />
LCD Projector<br />
“Video Out”<br />
<strong>Mediasite</strong> <strong>Recorder</strong><br />
Keyboard & Mouse for<br />
<strong>Mediasite</strong> <strong>Recorder</strong><br />
3<br />
Internet Access<br />
Laptop Computer<br />
“VGA Capture”<br />
Presenter<br />
Presentation Screen<br />
Note: Users may not likely connect <strong>the</strong> <strong>Mediasite</strong> directly to <strong>the</strong><br />
projector but instead through a wired podium using “laptop VGA in”.<br />
Right side of Right system<br />
side of system<br />
9<br />
10<br />
8 7 6 5<br />
11<br />
12<br />
Compatibility with <strong>Mediasite</strong><br />
13<br />
Audio & Video<br />
- Balanced XLR<br />
- Unbalanced RCA<br />
- 1/8” mini<br />
- DV (IEEE 1394/Firewire)<br />
- USB<br />
Images/Slides<br />
- RGB/VGA (15 pin)<br />
- Laptop<br />
- Document Camera<br />
- SMART Board<br />
- Microscope<br />
- Anything with VGA out<br />
End User Viewing<br />
- Internet Explorer<br />
- Firefox (with Active-X plugin)<br />
- Safari (Mac)<br />
- Windows Media Player 9<br />
1. DVD drive 2. Power switch 3. AC power connector 4. Primary AV 5. E<strong>the</strong>rnet/RJ45 6. six-pin Firewire port 7. Printer port 8. Video out<br />
9. Mouse port 10. Keyboard port 11. Serial port 12. USB ports 13. Secondary Audio (Line in, line out, mic) 14. Do not use 15. VGA/RGB capture<br />
14<br />
4<br />
15