
Create successful ePaper yourself
Turn your PDF publications into a flip-book with our unique Google optimized e-Paper software.
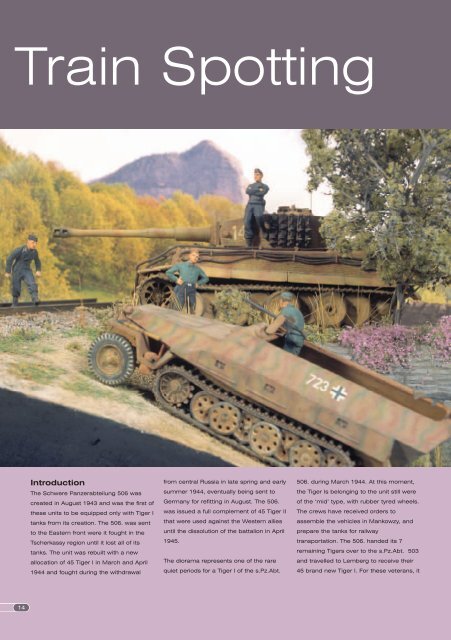
Train Spotting<br />
14<br />
Introduction<br />
The Schwere Panzerabteilung 506 was<br />
created in August 1943 and was the first of<br />
these units to be equipped only with Tiger I<br />
tanks from its creation. The 506. was sent<br />
to the Eastern front were it fought in the<br />
Tscherkassy region until it lost all of its<br />
tanks. The unit was rebuilt with a new<br />
allocation of 45 Tiger I in March and April<br />
1944 and fought during the withdrawal<br />
from central Russia in late spring and early<br />
summer 1944, eventually being sent to<br />
Germany for refitting in August. The 506.<br />
was issued a full complement of 45 Tiger II<br />
that were used against the Western allies<br />
until the dissolution of the battalion in April<br />
1945.<br />
The diorama represents one of the rare<br />
quiet periods for a Tiger I of the s.Pz.Abt.<br />
506. during March 1944. At this moment,<br />
the Tiger Is belonging to the unit still were<br />
of the ‘mid’ type, with rubber tyred wheels.<br />
The crews have received orders to<br />
assemble the vehicles in Mankowzy, and<br />
prepare the tanks for railway<br />
transportation. The 506. handed its 7<br />
remaining Tigers over to the s.Pz.Abt. 5<strong>03</strong><br />
and travelled to Lemberg to receive their<br />
45 brand new Tiger I. For these veterans, it
y Antonio Martín Tello<br />
was time to say farewell to their old Tiger<br />
that had kept them alive during the last<br />
hard winter.<br />
Building the little Tiger<br />
Like many of us, I started in <strong>AFV</strong> modelling<br />
by building and painting 1/72 kits. Soon, I<br />
moved to 1/35 because these “big” tanks<br />
were more impressive, better detailed and<br />
I thought that they allowed my modelling<br />
skills more scope to develop. Thus, I<br />
relegated the 1/72 scale and saw it as a<br />
“starting point” and the models in this<br />
scale as toy like. Recently I discovered<br />
some of the newer 1/72 kits and was<br />
astonished. All the finesse and quality of<br />
the best 1/35 kits is there, but in a tiny size<br />
and they are fun and quick to build. Out of<br />
the box they give excellent representations<br />
of the “real thing” but they also leave<br />
plenty of room for the addition of details<br />
and improvements. The limit is just set by<br />
the builder and his/her sanity. Also, for the<br />
painting aspect, all the techniques used for<br />
bigger models can be applied to these<br />
little gems.<br />
Probably, the current leader in 1/72<br />
injected plastic kits is Revell. The quality of<br />
their most recent releases is astounding<br />
and small-scale modellers await each new<br />
one with great expectation. Anyway, one<br />
has to be cautious, since among these<br />
“state of the art” kits are re-editions of<br />
older Esci or Hasegawa moulds which are<br />
not up to the same standards.<br />
The Tiger I depicted in this article<br />
(reference <strong>03</strong>516) is an example of one of<br />
these new generation Revell kits. This<br />
brand has in it’s 1/72 catalogue two Tiger I<br />
15
16<br />
kits. This one represents a mid/late vehicle while the other<br />
(ref. <strong>03</strong>508) allows you to build an “African” early Tiger I.<br />
Both kits share most of their parts, with one sprue specific<br />
for each type of tank, and their overall quality is excellent.<br />
I decided to build my model as a mid Tiger I with rubber<br />
tyred wheels. This type is provided in the box (they are<br />
common to the “African” version) along with the all steel<br />
type, but curiously enough, they are marked as “not for<br />
use” in the instruction sheet and thus no advice for their<br />
placement is given. Photographs and literature have to be<br />
checked for their correct installation, a minor task. A<br />
shortcut taken by Revell in this area is that the double<br />
wheels are represented by a single, thicker one, much in<br />
the same way as Tamiya did with its seventies 1/35 Tiger I.<br />
This apparent shortcoming is barely noticeable when all<br />
the running gear and tracks are installed.<br />
As I have already mentioned, I decided to finish my Tiger<br />
as one belonging to the s.Pz.Abt. 506. in Russia during<br />
spring 1944. The most remarkable feature of this unit’s<br />
markings at this period was the large unit symbol on the<br />
rear of the turret bin, consisting of a “W” (after its former<br />
commander, Major Willing) with the shield and the tiger.<br />
The colour of the “W” and the turret numbers denoted the<br />
company (Stabs-green, 1. Kp.- white, 2. Kp.-red and 3.<br />
Kp.-yellow). I chose this unit because the 506. crest is<br />
included on the decal sheet.The construction work<br />
progressed with no problems. There are plenty of<br />
aftermarket products available for 1/72 models including<br />
the Tiger I, but I decided to follow the “homemade way”.<br />
Photos 1 to 4<br />
First of all, the version I chose for my Tiger required a<br />
zimmerit coating. I did this by engraving with a small<br />
screwdriver the surfaces that had been previously<br />
softened with liquid cement. Two or three applications of<br />
glue were given in a relatively small area and after a few<br />
seconds, the pattern was engraved with the screwdriver. It<br />
may be necessary to check the degree of softening of the<br />
plastic and to apply more liquid cement before starting the<br />
engraving work. It probably would be advisable to practice<br />
a little bit first on non-visible surfaces, such as the interior<br />
or the underside of the hull. When the softened area is<br />
done, the process is repeated on the next area until the<br />
entire surface is completed. When the glue is completely<br />
dry and the plastic has hardened again, it may be<br />
necessary to sand the zimmerited surface in order to<br />
eliminate some hairs caused by the molten plastic.<br />
Photos 5 to 10<br />
Some other details added included new metallic towing<br />
wires, cleaning rods and their brackets, new track<br />
changing wire and its brackets, new exhaust protectors<br />
made with aluminium sheet, brackets for the missing fire<br />
extinguisher, electric wire for the headlight, periscope<br />
protectors from aluminium sheet for the driver and co-<br />
1<br />
2<br />
3<br />
4
driver hatch and turret roof, handles from<br />
wire on the commander and loader<br />
hatches and engine deck, holders for the<br />
spare tracks, brackets for the jack and<br />
details on the front mudguards and the<br />
turret bin. Just few words for two additions,<br />
the gun barrel and the engine deck grilles.<br />
The kit gun barrel looked too thick to my<br />
eye so I decided to replace it. The only<br />
material I had available at the time and<br />
was suitable was a nice pink lollipop stick. I<br />
5<br />
7<br />
9<br />
6<br />
8<br />
10<br />
had to sand this to make it thinner at the<br />
end where the muzzle brake fits. The<br />
engine deck grilles were cut from nylon<br />
mesh from a DML Panzer IV L70(A) kit and<br />
the frames made with aluminium strip.<br />
I reworked the side fenders, sanding them<br />
down until they were more of a scale<br />
thickness. Also, I cut them into sections as<br />
on the real tank. These fenders were the<br />
only parts I did not permanently glue to the<br />
model, in order to have a better access to<br />
paint and weather the upper portion of the<br />
tracks.<br />
Painting<br />
The base colour was Tamiya matt earth<br />
(XF-52). Onto this, I airbrushed Tamiya dark<br />
yellow (XF-60) but allowed the base colour<br />
to show at the edges of panels. Next coat<br />
was a mixture of dark yellow (70%) and<br />
matt yellow (XF-3) (30%), both from Tamiya,<br />
17
18<br />
11<br />
12<br />
<strong>13</strong><br />
14 15<br />
again without covering the previous colours, and finally,<br />
some details and the centre of some panels were<br />
highlighted with this mixture lightened up with Tamiya buff<br />
(XF-57). On this base, I airbrushed the brown camo colour.<br />
In order to obtain a colour that would blend better with the<br />
base, I made a mixture with Tamiya red brown (XF-64)<br />
(70%) and the mix of dark yellow and matt yellow<br />
previously mentioned (30%) (Photo 11).<br />
Photos 12 to 15<br />
At this stage I added the decals. The unit symbol at the<br />
rear of the turret bin came from the kit decal sheet.<br />
However from the wartime photographs I consulted it<br />
seemed too small, and the W is hollow, so I had to paint<br />
its interior in white, matching with the colour of the tactical<br />
numbers on the turret sides. These are spare decals<br />
which I had and were applied using Microset and Microsol<br />
to conform to the Zimmerit. I applied a couple of filters of<br />
each of the following colours, all from the Humbrol enamel<br />
range: matt pale yellow (81), cream (1<strong>03</strong>) and reddish<br />
brown (62). In all cases the paint was diluted with Humbrol<br />
thinner, which does not attack the previous acrylic paint.<br />
After this step, the model gained in chromatic variations.<br />
(slides T17-T21).<br />
Photos 16 to 17<br />
Some chipping and scratching was made with the base<br />
colour lightened with buff (Vallejo). Also, I made some<br />
"deeper" chips with a mixture of Vallejo chocolate brown<br />
872 and black , concentrating especially on the edges and<br />
areas where a more intense wearing of the paint appears.<br />
The following step was the oil washes. As can be<br />
observed in the photographs, this technique allows<br />
obtaining a degraded and faded look on the paint at the<br />
same time the model gains once more in chromatic<br />
diversity. My method of application of the oil washes will<br />
be described with some detail and the support of step-bystep<br />
photographs in the SdKfz 251 painting chapter. Also,<br />
at this moment I painted the tracks and the tyres in black.<br />
The degraded and worn out look was then accentuated by<br />
an acrylic mapping. This technique consists of the use of<br />
very diluted paint (Vallejo acrylic) to draw small spots of
irregular shape. Since the paint is so<br />
diluted, when dry, the effect is almost<br />
imperceptible, but it is there, and can be<br />
enhanced by repetition. I chose for this<br />
task brownish colours such as chocolate<br />
brown, flat earth, hull red, burnt umber,<br />
dark yellow, gold brown, medium flesh and<br />
orange brown.<br />
Now, I applied a controlled wash of very<br />
diluted matt black enamel on the nonzimmerited<br />
surfaces. I let the pigment<br />
accumulate in recesses and around the<br />
details. When dry I drybrushed with dark<br />
yellow (Humbrol enamel) very slightly some<br />
details in order to bring them out.<br />
Photo 18<br />
I painted the towing cables and tools in<br />
black, following by some light washes of<br />
16<br />
18<br />
20<br />
17<br />
19<br />
21<br />
chocolate brown, flat earth and hull red.<br />
Next, I painted the gun cleaning rods with<br />
gold brown.<br />
Photos 19 to 21<br />
So far I had worked to achieve a degraded<br />
and worn out look, but the tank was clean,<br />
so my next job would be to make it dirty. I<br />
did not want to ruin the previous work so I<br />
decided to concentrate mainly on the<br />
19
20<br />
22<br />
24<br />
23<br />
25
lower areas. I tried to replicate the effect of dried mud in<br />
the recesses of the tracks and, more sparingly, on the<br />
wheels and lower hull. To make this mud, I mixed some<br />
pastel powder until I got a colour that I think was good for<br />
this purpose. Then I added to the powder a mixture of<br />
water and white glue until I obtained a paste with the<br />
desired consistency. Then, with a small brush I applied the<br />
paste to the track recesses. With a cotton bud I removed<br />
the excess paste, mainly on the outer surface of the track<br />
links. Also, I applied some patches of the paste on the<br />
wheels and lower areas and textured them with the brush.<br />
When dry I worked all the tracks and wheels with the<br />
pastel powder in order to integrate the mud. I also used<br />
some lighter shades of pastels to get some colour<br />
variations and a dried mud look. Next, I dry brushed very<br />
slightly with black enamel on the outer side of the track<br />
links to “clean” the surface where the mud should have<br />
gone.<br />
At this stage I glued the side skirts and applied some<br />
pastels on them, as well as in the tools and towing cables.<br />
I painted the periscope glass with very dark green artist’s<br />
oil. I added the periscopes in the commander’s cupola<br />
made with plastic strips painted in dark green.<br />
The final touch was to apply graphite powder on the tools,<br />
towing cables, bow machine gun, anti aircraft MG rail and<br />
some handles to give them a more metallic look. Also, I<br />
painted directly on the track details and horns, and drive<br />
sprocket teeth with a soft lead pencil to achieve this<br />
metallic look.<br />
The SdKfz 251<br />
Hasegawa also has in their catalogue an extensive range<br />
of <strong>AFV</strong>’s in 1/72 scale. Some of them are older kits that<br />
date back to the 80’s or even the 70’s and are not at the<br />
same level of more recent releases. Nevertheless, some<br />
of their later kits are very close or at the same level as<br />
Revell’s best. Some of the finest Hasegawa kits are the<br />
three versions of the SdKfz 251 German half track.<br />
Hasegawa produces the “normal” personal carrier SdKfz<br />
251/1 (ref. 31144), the SdKfz 251/22 “PakWagen” (ref.<br />
31145), armed with a 75 mm PaK 40 gun, and the SdKfz<br />
251/9 “Stummel” (ref. 31146), armed with a short 75 mm<br />
support gun. These last two versions are in fact the same<br />
kit as the 251/1 with the addition of a new sprue<br />
containing the gun and the corresponding attachments<br />
and a new decal sheet. The version of the famous German<br />
half-track depicted in these models is the final Ausf. D,<br />
designed in order to save materials and simplify<br />
production in the second half of WWII.<br />
26<br />
27<br />
28<br />
28<br />
21
22<br />
29<br />
31<br />
33<br />
35<br />
30<br />
32<br />
34<br />
36
Photos 26 to 29<br />
The construction of the model progressed<br />
with no special difficulties. I did not want to<br />
super detail this model and only made<br />
some small improvements. Thus, in the<br />
interior I added some levers by the driver’s<br />
seat made with stretched sprue. Outside I<br />
replaced the MG shield and the rear<br />
mudguards with aluminium sheet, since<br />
these parts were too thick in the kit. The<br />
MG itself was replaced by an MG34 with<br />
armoured sleeve (used in tanks), a spare<br />
from Revell. Also, I rebuilt the tubular<br />
support for the rear MG with stretched<br />
sprue. Finally I replaced the two width<br />
indicators with stretched sprue and a drop<br />
of superglue to simulate the ball.<br />
It was necessary to paint the interior<br />
before the two main parts of the hull were<br />
glued together. The painting process here<br />
was similar to that used in the exterior and<br />
will be described later. This was also the<br />
moment to put the driver’s figure in his<br />
place. This figure came from a Preiser set,<br />
and it’s fit in the tight driving station<br />
needed some major surgery in the seat.<br />
Fortunately, this area was barely visible<br />
when the model was completed.<br />
Painting the tiny 251<br />
Photo 31<br />
The overall procedure was very similar to<br />
the one described above for the Tiger, so<br />
only the main differences will be stressed.<br />
Again, the base colour was Tamiya matt<br />
earth (XF-52) on which I airbrushed Tamiya<br />
dark yellow (XF-60) allowing the previous<br />
colour to arise on the edges and panel<br />
separations.<br />
Photos 32 to 36<br />
On this base, I airbrushed thin stripes of<br />
red brown (XF-64) as the first camouflage<br />
colour. To obtain better results I put the<br />
nozzle of the airbrush very close to the<br />
model (about 5 mm) and set my<br />
compressor to low pressure (around 0.5<br />
psi). Also, I diluted the paint more than<br />
usual with isopropyl alcohol, at about 75%<br />
(slide S8). The olive green (XF-58) colour<br />
was airbrushed next in a similar way. My<br />
first attempts were not successful as I got<br />
37<br />
39<br />
38<br />
40<br />
wide lines, “spider legs” and so on, so I<br />
had to retouch with dark yellow to finally<br />
get an acceptable result. At this stage I<br />
added the decals, the tactical numbers<br />
and German crosses are spares from<br />
Revell and the license plates are the ones<br />
provided by Hasegawa in the kit. To finish<br />
the airbrush job, I used a very dilute (95%)<br />
mixture of brown and black to outline the<br />
edges, separation lines and recesses.<br />
Photo 35<br />
Next, I applied a couple filters of cream<br />
(1<strong>03</strong>) and reddish brown (62), both<br />
Humbrol enamels.<br />
Photo 36<br />
The chipped paint effect was done next.<br />
Some chipping and scratching was made<br />
with the base colour lighten with buff<br />
(Vallejo) and with a mixture of chocolate<br />
brown 872 and black. A thin, very sharp<br />
brush has to be used and the chipping<br />
should be kept small and done moderately<br />
in sensible areas. Also, on the sides I<br />
painted some longer scratches, since<br />
these parts would be more prone to this<br />
23
24<br />
type of damage due to rubbing with<br />
branches, other vehicles or obstacles.<br />
Photos 37 to 40<br />
The following step was the oil washes . As<br />
a general rule, I deposit a small fraction of<br />
the oils (several shades of brown, ochre,<br />
green, white and blue) on a tissue paper<br />
and wait for 15-30 minutes . Some of the<br />
greasy components of the oils are<br />
absorbed by the paper-this does not affect<br />
the pigment, but improves the final<br />
appearance. I wet a zone of the model<br />
with clean Humbrol thinner and then, I<br />
apply a very small quantity of oil directly on<br />
the model, blending it quickly . I never use<br />
a general wash, but small washes of<br />
several shades in small zones. In my<br />
opinion, the trick is that the oil has to be<br />
blended with the surroundings in order to<br />
achieve subtle tonal variations in different<br />
41<br />
43<br />
45<br />
42<br />
44<br />
46<br />
parts of the same zone.<br />
Photos 41 to 42<br />
As in the Tiger, the worn out look was<br />
accentuated by an acrylic mapping (slides<br />
S19 and S20) of chocolate brown and<br />
orange brown.<br />
Photos 43 to 44<br />
It was now time to apply dirt to the model.<br />
To do that, I applied controlled washes of
very dilute buff enamel colour (Humbrol). I<br />
avoided a general wash, but tried to draw<br />
vertical lines on the sides and other vertical<br />
surfaces simulating rain streaks, and<br />
irregular shaped spots on the horizontal<br />
surfaces letting the pigment accumulate<br />
slightly where the dust would be more<br />
apparent.<br />
Photo 45<br />
To enhance the details and the volume I<br />
applied a controlled wash of very dilute<br />
matt black enamel followed (when dry) by<br />
drybrushing with dark yellow (Humbrol<br />
enamel) very lightly in the same way as for<br />
the Tiger. I painted the tools in black,<br />
followed by some light washes of<br />
chocolate brown, flat earth and hull red,<br />
and graphite powder. Next, I painted the<br />
wooden handles with gold brown.<br />
Photo 46<br />
The tyres and the tracks were painted in<br />
matt black, then I applied some washes of<br />
brown and cream enamel colours. On the<br />
tracks I drybrushed the rubber pads with<br />
matt black and finally I applied graphite<br />
powder to the metallic parts. Now, I<br />
attached the tracks to the running gear<br />
with superglue, and glued both sets of<br />
wheels and tracks to the main body. The<br />
machine guns were painted in matt black<br />
and then rubbed with graphite powder.<br />
To finish the painting process of the tiny<br />
251, some touches were given with pastel<br />
powder of several shades of earth colours,<br />
mainly in the lower areas, but very<br />
sparingly in order not to hide all the<br />
previous painting work<br />
The diorama<br />
One of the advantages of 1/72 scale is that<br />
you can build dioramas combining several<br />
vehicles and still keep the size reasonably<br />
small. In this case, my idea was to try a<br />
somewhat different composition, with<br />
several levels and elements in a relatively<br />
crowded space, which was dictated by the<br />
circular wooden base. I have always<br />
admired the dioramas built by Japanese<br />
and other Asian modellers because I think<br />
they master the art of composition and the<br />
47<br />
49<br />
48<br />
50<br />
integration of all the elements (vehicles,<br />
figures, vegetation…) in scenes that are<br />
often full of life and dynamism. Bearing this<br />
in mind, I tried to build a diorama “à la<br />
Japonais”.<br />
I wanted to put both vehicles on different<br />
levels, with the SdKfz 251 climbing uphill<br />
towards the level where the Tiger I is, and<br />
with the tall tree emphasizing the vertical<br />
perspective. Two secondary elements such<br />
as the railway and the stone wall, would<br />
create some variety.<br />
Photos 49 to 53<br />
The main body of the background was<br />
done with insulating foam, a versatile and<br />
light material that can be easily cut with a<br />
hobby knife and sanded. The basic shape<br />
was cut with the knife (Slide D1) and then<br />
a thin layer of modelling clay was used to<br />
model the ground and to create some<br />
texture. The ballast and the rail track are<br />
items from railway modelling, cheap and<br />
easily available in specialised shops.<br />
Another advantage of 1/72 is that many<br />
scenic elements conceived for train<br />
25
26<br />
51<br />
52<br />
53<br />
54 55<br />
models can be adapted to our military dioramas. A<br />
generous amount of white glue diluted with water was<br />
used to fix the small stones and the tracks. To further<br />
enhance the texture of the ground, I glued bicarbonate<br />
powder as I thought that its grain size was adequate for<br />
this scale to represent the earth and sand. Also, I glued<br />
some small stones. The stone wall is also a railwaymodelling<br />
accessory.<br />
The painting process started with a first coat of Tamiya<br />
acrylic matt earth, followed by an irregular second<br />
overspray of dark yellow and a final one with buff. Then,<br />
the ground was drybrushed with several shades of<br />
Humbrol enamel ochre and tan colours. The ballast was<br />
painted with a dilute Vallejo acrylic mix of white and black,<br />
changing the proportions and concentrating more on<br />
some areas than others to avoid monotony. The track<br />
sleepers were painted in a medium brown and washed<br />
with very dilute brown, ochre and grey enamels. The rails<br />
were painted in black and treated with red brown pastel<br />
and graphite powder. The stone wall was painted in grey<br />
and also treated with several washes.<br />
The vegetation comes from different sources-the short<br />
green grass is again from railway modelling. It was glued<br />
to the surface with matt varnish and once it dried, it was<br />
drybrushed with the same ochre colours as the ground to<br />
integrate it better and to eliminate its excessive green hue.<br />
The tall grasses are natural plants and some Woodland<br />
Scenic materials, as did the tree and the purple flower<br />
plants. I have found that Woodland Scenic has an<br />
excellent catalogue full of very useful items for 1/72<br />
diorama builders.<br />
The figures are from Preiser. This brand has a very<br />
comprehensive catalogue of figures at different scales,<br />
mostly intended for railway modelling but also some very<br />
interesting military items in 1/72, among them are two sets<br />
of German panzer crews. I can only say that the quality of<br />
these figures is outstanding, with very natural poses and<br />
finely sculpted details. They are moulded in a hard plastic<br />
and most of them are of the “multipose” type, so you can
combine arms, legs and heads. I painted<br />
the figures mostly with Vallejo acrylics,<br />
using black and German green as the main<br />
colours, and shadowing and highlighting<br />
areas following the “light from above”<br />
method mostly described by the “Spanish<br />
school” of figure painters.<br />
References<br />
- Tigers in Combat I, by Wolfgang<br />
Schneider & Jean Restayn, J. J.<br />
Fedorowicz Publishing. 1994.<br />
- Achtung Panzer No.6:<br />
PanzerKampfWagen Tiger, by M. Bitou. Dai<br />
Nippon Kaiga. 1999.<br />
- Tiger I on the Eastern Front, by Jean<br />
Restayn. Histoire & Collections. 1999.<br />
- The SdKfz 251 Half Track, by Bruce<br />
Culver. Osprey Vanguard no. 32. 1983.<br />
- SdKfz 251 in action, by Charles Kliment.<br />
Squadron Signal Publications no. 21. 1981.<br />
27


![E] Uhlenbrock Elektroni - Peskar.org](https://img.yumpu.com/3488811/1/184x260/e-uhlenbrock-elektroni-peskarorg.jpg?quality=85)