BPEL Designer Kick Start - NetBeans
BPEL Designer Kick Start - NetBeans
BPEL Designer Kick Start - NetBeans

Create successful ePaper yourself
Turn your PDF publications into a flip-book with our unique Google optimized e-Paper software.
<strong>BPEL</strong> <strong>Designer</strong> <strong>Kick</strong> <strong>Start</strong><br />
This tutorial illustrates<br />
deploying, executing and<br />
testing a synchronous <strong>BPEL</strong><br />
process using <strong>NetBeans</strong><br />
5.5 with Enterprise Pack. A<br />
synchronous <strong>BPEL</strong> process represents<br />
a simple synchronous flow: it takes an<br />
input message and sends that message<br />
back synchronously. A client starts the<br />
synchronous process by invoking a request-response<br />
operation. After invocation,<br />
the client is blocked until the process<br />
finishes and returns the result.<br />
Configuring the<br />
environment<br />
Before you can deploy<br />
your application, the Sun<br />
Java System Application<br />
Server and JBI runtime<br />
must be configured correctly<br />
and running. To configure<br />
the environment:<br />
1. Click the Runtime<br />
tab to open the Runtime window, and expand<br />
the Servers node.<br />
A 1<br />
2. If you have a default Enterprise Pack<br />
installation the Servers node already contains<br />
a Sun Java System Application Server<br />
9 node. In the Runtime window, right-click<br />
this node and choose <strong>Start</strong>. If the <strong>Start</strong> option<br />
is not available, the server is already<br />
running and you can skip the next step.<br />
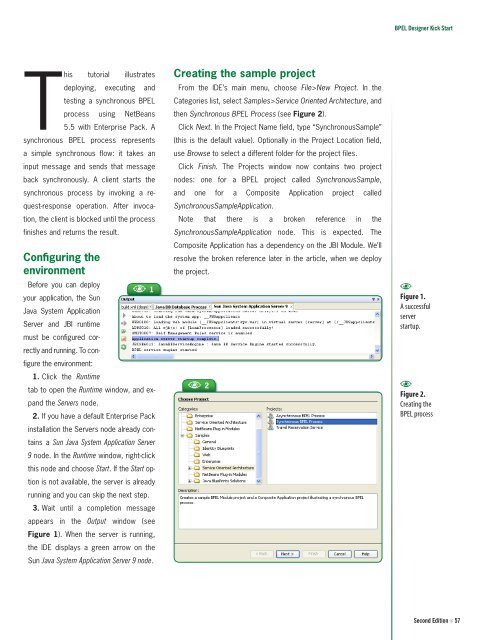
3. Wait until a completion message<br />
appears in the Output window (see<br />
Figure 1). When the server is running,<br />
the IDE displays a green arrow on the<br />
Sun Java System Application Server 9 node.<br />
Creating the sample project<br />
From the IDE’s main menu, choose File>New Project. In the<br />
Categories list, select Samples>Service Oriented Architecture, and<br />
then Synchronous <strong>BPEL</strong> Process (see Figure 2).<br />
Click Next. In the Project Name field, type “SynchronousSample”<br />
(this is the default value). Optionally in the Project Location field,<br />
use Browse to select a different folder for the project files.<br />
Click Finish. The Projects window now contains two project<br />
nodes: one for a <strong>BPEL</strong> project called SynchronousSample,<br />
and one for a Composite Application project called<br />
SynchronousSampleApplication.<br />
Note that there is a broken reference in the<br />
SynchronousSampleApplication node. This is expected. The<br />
Composite Application has a dependency on the JBI Module. We’ll<br />
resolve the broken reference later in the article, when we deploy<br />
the project.<br />
A<br />
2<br />
A<br />
Figure 1.<br />
A successful<br />
server<br />
startup.<br />
A<br />
Figure 2.<br />
Creating the<br />
<strong>BPEL</strong> process<br />
Second Edition N 57