
Create successful ePaper yourself
Turn your PDF publications into a flip-book with our unique Google optimized e-Paper software.
OWNER’S MANUAL<br />
READ THIS MANUAL BEFORE<br />
USING YOUR NEW AIRGUN
Warranty<br />
The FX <strong>Tarantula</strong> carries a One Year Warranty against<br />
faulty workmanship and defective materials. Contact the<br />
dealer from which you purchased the gun if it becomes<br />
necessary.<br />
*NOTE: Always use caution when operating this rifle.<br />
Learn and obey the laws <strong>of</strong> your city, and be responsible in<br />
your use <strong>of</strong> this weapon.<br />
WARNING!<br />
Never attempt to disassemble this rifle while it is charged.<br />
Failure to obey this instruction could result in personal<br />
injury or damage to the gun.
Specifications For Use and<br />
Maintenance <strong>of</strong> The FX <strong>Tarantula</strong><br />
The FX <strong>Tarantula</strong> is an 8-shot, pre-charged pneumatic air<br />
rifle. It is available in .177 (4.5mm) and .22 (5.5mm).<br />
SPECIAL FEATURES:<br />
1. Removable, 8-shot, automatic indexing, rotary<br />
magazine, reloadable on or <strong>of</strong>f the rifle<br />
2. Adjustable 2-stage trigger<br />
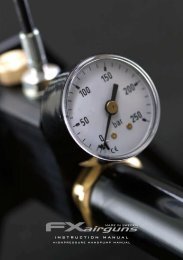
3. Pressure gauge built-in to air cylinder<br />
4. Top grade rifled barrel<br />
5. Standard quick-fill nozzle<br />
6. Checkered stock with pistol grip and rubber recoil<br />
pad. Available in synthetic or walnut.<br />
7. Standard dovetail groove for scope mounts<br />
BARREL LENGTH:<br />
OVERALL LENGTH:<br />
WEIGHT (without sight):<br />
19.7 inches<br />
43.5 inches<br />
7.1 lbs<br />
MAXIMUM CYLINDER FILL PRESSURE: 200 BAR<br />
NUMBER OF SHOTS FROM A FULL CHARGE:<br />
100@12ft/lbs in .177*<br />
40@25ft/lbs in .177*<br />
100 @12ft/lbs in .22*<br />
30 @ 30ft/lbsin .22*<br />
*Number represents count taken in a range <strong>of</strong> usable, consistent shots
General Instructions<br />
The FX <strong>Tarantula</strong> must be fitted with a scope or alternate<br />
optic sights before use. Before using your rifle, read and<br />
abide by the basic safety rules.<br />
The Basic Safety Rules:<br />
1. Treat every rifle as if it is loaded.<br />
2. Never point the rifle at anyone, or allow anyone to<br />
point a rifle at you, even if you know it is not<br />
loaded.<br />
3. Always carry the rifle so that the direction <strong>of</strong> the<br />
muzzle is under control, even if you stumble.<br />
4. Always be sure <strong>of</strong> your target and what lies behind<br />
it before firing your rifle.<br />
5. Never leave a loaded rifle unattended.<br />
6. Beware <strong>of</strong> targets that tend to cause ricochets.<br />
Operating Instructions<br />
Charging the Rifle<br />
Insert the nozzle <strong>of</strong> the fill hose into the rifle’s fill hole<br />
located in the end plug at the muzzle end <strong>of</strong> the rifle, after<br />
making sure the hole is clear <strong>of</strong> dirt. Charge the rifle to its<br />
optimal range, without exceeding 200 BAR.<br />
*Undo the bleeder valve on the hose before<br />
disconnecting the fill nozzle from the rifle.
Loading the Magazine<br />
The magazine is designed to only fit one way into the rifle.<br />
When viewed from the rearm the magazine rotates<br />
clockwise. There is a groove on the side <strong>of</strong> the rifle that<br />
allows you to view whether the next index is loaded before<br />
it rotates.<br />
To remove the magazine, open the bolt and pull the<br />
magazine axis pin open. The magazine can then be<br />
removed from barrel housing. Load pellets from the rear <strong>of</strong><br />
the magazine, pushing them through the retainer “O” ring<br />
until the skirts are flush with the bottom <strong>of</strong> the magazine<br />
face.<br />
Once reloaded, insert the magazine back into the rifle, and<br />
retain it with the magazine axis pin. If necessary, rotate the<br />
magazine counter-clockwise until its movement is halted<br />
by the spring stop.<br />
Do Not Close the Bolt Until You Are Ready to Fire the<br />
Rifle!<br />
Bolt Positions<br />
To cock the rifle, lift the bolt and pull back to the rear<br />
position. This sets the trigger. Returning the bolt to the<br />
forward position loads a pellet and makes the rifle ready to<br />
fire. The rear slot serves as a safety and dry fire position.<br />
Rifle is fully disabled with bolt up and back. To cycle the<br />
magazine, slide bolt from forward to rear position.<br />
Use Caution To Avoid Loading More Than One Pellet.
Trigger Mechanism Adjustment<br />
1 st Stage Trigger Adjustment<br />
Sear Engagement Screw (2 nd Stage<br />
Trigger Adjustment)<br />
2 nd Stage Trigger Pull Adj. Screw<br />
Trigger Blade Screw<br />
Note<br />
1. Before making any adjustments to the trigger mechanism, make sure the<br />
magazine is removed and the barrel is not loaded with a pellet.<br />
2. If the sear engagement screw is adjusted, make sure to leave enough sear<br />
engagement with the hammer to ensure safe operation <strong>of</strong> the rifle.<br />
3. Test fire the rifle before replacing a loaded magazine.<br />
Adjusting the Power<br />
To adjust the power, remove the stock and locate the air transfer<br />
port restrictor screw, located on the right-hand side <strong>of</strong> the<br />
cylinder. Turn the restrictor screw counter-clockwise to increase<br />
the velocity and clockwise to reduce the velocity. Once the<br />
adjustments are complete, blue Loctite may be applied to the air<br />
transfer port restrictor screw.
Maintenance<br />
WARNING!<br />
Never attempt to strip this rifle while it is partially or<br />
fully charged. Failure to obey this instruction can result<br />
in serious injury and/or damage.<br />
If the rifle develops a defect within the warranty period,<br />
contact the dealer from whom it was purchased. The<br />
guarantee does not cover any damage caused by tampering<br />
with the rifle.<br />
This rifle should only be disassembled by factoryauthorized<br />
repairmen, or by a competent gunsmith.<br />
Lubrication<br />
Do not apply lubrication to the air filler nozzle or the air<br />
filler hole on the rifle.<br />
Apply proper mineral based oils occasionally to the<br />
following parts:<br />
1. The trigger mechanism<br />
2. The pellet probe<br />
3. The bolt slot shroud<br />
4. The stem <strong>of</strong> the hammer assembly<br />
5. The stern <strong>of</strong> the magazine axis pin<br />
6. The magazine axis hole and the outer “O” ring<br />
Do Not Over-Lubricate the Rifle
Quick Fill Nozzle “O” Rings Replacement<br />
After a period <strong>of</strong> time, the “O” rings on the fill nozzle will<br />
need to be replaced. The need for this will become<br />
noticeable if air is heard leaking from the nozzle while<br />
charging the rifle. Always be sure to replace both “O”<br />
rings.<br />
Magazine “O” Ring Replacement<br />
After several hundred rounds are fired, it will become<br />
necessary to replace the “O” ring that retains the pellets in<br />
the magazine. The need for this will become noticeable<br />
when the rifle’s bolt becomes difficult to cycle.
This owner’s manual was<br />
provided as a service to you<br />
by:<br />
www.airguns<strong>of</strong>arizona.com<br />
airguns_az@yahoo.com<br />
Phone: (480)461-1113<br />
Fax: (480)461-3928