

B. The Virtual Radionic Instrument
B. The Virtual Radionic Instrument
B. The Virtual Radionic Instrument

Create successful ePaper yourself
Turn your PDF publications into a flip-book with our unique Google optimized e-Paper software.
<strong>The</strong><br />
<strong>Virtual</strong> <strong>Radionic</strong><br />
<strong>Instrument</strong><br />
User's Handbook<br />
Program Version 2.0<br />
Geoffrey Ardens<br />
<strong>Radionic</strong>s<br />
all rights reserved©, 2009<br />
<strong>The</strong> <strong>Virtual</strong> <strong>Radionic</strong> Handbook Page 1 / 30
Important - Please note:<br />
<strong>Radionic</strong>s is a method of sending precisely defined healing energy to people, animals<br />
or plants, no matter where they are in the world. <strong>The</strong> name reflects the view of early<br />
practitioners that they were ‘broadcasting’ healing, but we now believe that radionic<br />
treatment occurs at a level of reality (no comma) beyond 3-dimentional space where<br />
there is no distance between us. This is a challenging concept, but it is entirely<br />
compatible with modern physics and also with the ancient mystic teaching that at<br />
some level we are all one, and that at this level exchanges of healing energy can<br />
occur.<br />
<strong>Radionic</strong>s is classified as a complementary therapy, that is it should be used as a<br />
supplement to conventional medical care, not as a substitute for it. Experience<br />
indicates that radionics can help to speed recovery from illness and to maintain us in<br />
good health.<br />
<strong>The</strong> manual delivered with the <strong>Instrument</strong> describes how to use the <strong>Virtual</strong> <strong>Radionic</strong><br />
<strong>Instrument</strong>. In order to use if effectively it is essential to have received training in<br />
radionic methods first.<br />
If you are not a trained radionic practitioner you are strongly advised to take a course<br />
in radionics to understand how it works and how to work with it. You can obtain<br />
details from <strong>The</strong> <strong>Radionic</strong> Association (http://www.radionic.co.uk)<br />
All rights reserved by Geoffrey Ardens, 2009©<br />
<strong>The</strong> <strong>Virtual</strong> <strong>Radionic</strong> Handbook Page 2 / 30
Table of Contents<br />
Introduction..........................................................................................3<br />
An Attempt to Develop a <strong>Virtual</strong> <strong>Radionic</strong> <strong>Instrument</strong> ...............................4<br />
A.1. CD - Installation............................................................................8<br />
A.2. Online - Installation......................................................................8<br />
B. <strong>The</strong> <strong>Virtual</strong> <strong>Radionic</strong> <strong>Instrument</strong> - Overview...................................11<br />
C. Manual Operation of the <strong>Virtual</strong> <strong>Radionic</strong> <strong>Instrument</strong>.....................14<br />
Standard Treatment Situations............................................................14<br />
Area Treatments ...............................................................................15<br />
D. Basic programming of Broadcasts...................................................18<br />
Introduction .....................................................................................18<br />
<strong>The</strong> format ......................................................................................18<br />
How to setup an easy program............................................................19<br />
Helpful Hints:....................................................................................20<br />
E. <strong>The</strong> Potentizer.................................................................................22<br />
Broadcasting of homoeopathic like remedies..........................................22<br />
Production of homoeopathic like remedies.............................................22<br />
F. Menu-bar (File, Window, Help)........................................................23<br />
File–Menu - Storing and Loading functions............................................23<br />
Window–Menu - Storing and Loading functions......................................24<br />
Help–Menu – Helping Documents and Functions.....................................25<br />
<strong>The</strong> Autosave function – in case of system – crash.................................25<br />
H. Analysis-Mode.................................................................................26<br />
Helpful hints to the Analysis sheet........................................................27<br />
I. Support and Contact-address..........................................................29<br />
K. Appendix - How to change the appearance of the <strong>Instrument</strong>........29<br />
L. Licensing-Options............................................................................30<br />
<strong>The</strong> <strong>Virtual</strong> <strong>Radionic</strong> Handbook Page 3 / 30
Introduction<br />
An Attempt to Develop a <strong>Virtual</strong> <strong>Radionic</strong> <strong>Instrument</strong><br />
It was on Saturday evening at a Study Weekend at Sparsholt College when we first talked<br />
about a <strong>Virtual</strong> <strong>Radionic</strong> <strong>Instrument</strong>, driven by the problem of how to get a good and<br />
affordable instrument for training pupils in the School of <strong>Radionic</strong>s. <strong>The</strong> Lafferty <strong>Instrument</strong><br />
was no longer being built and the various possibilities on the market were all incredibly<br />
expensive—even in the most basic configuration. Tony showed me a Chinese-built<br />
instrument,which looks like a replica of a basic Copen instrument with 12 dials and a<br />
potentizer. I am always fond of new instruments and it looks like a nice one, however in<br />
treatment mode a bothersome ticking sound was annoying.<br />
We discussed how the Chinese, with no history or tradition in radionics, could come across to<br />
build a radionic instrument and whether the inner life of this instrument would be a copy of a<br />
Copen instrument or a mere non- sense circuit, and in the end, if any circuit would actually<br />
suffice for the efficacy of a radionic instrument.<br />
Moreover, time is moving on and the newest generation of radionic instruments are<br />
computerised systems, working more or less by themselves— pushing a knob to set the<br />
system running.<br />
This led us to the idea of whether a virtual instrument based on a Laptop or tablet computer<br />
program would be feasible as a working model for radionics. If the instrument, although made<br />
of solid plastic, metal or wood and containing an electrical circuit, is only a focus point for the<br />
practitioner, then the pattern or picture of an instrument on a screen should be effective, and<br />
the whole instrument could be simulated on a computer. After a few beers, I promised Tony to<br />
have a look into programming such an instrument and went home to think about it.<br />
Promising things is mostly the easiest part, getting it done properly a very different one. <strong>The</strong><br />
first thing I did was to brush up my programming skills which were already somewhat rusty<br />
and dipped myself into object orientated programming with Visual Basic Express—but don’t be<br />
afraid—I won’t bore you with this...<br />
What was really important for me was the question, how can a radionic instrument properly<br />
function on a computer Going back to the oldest days, the radionic work was based on<br />
electricity—with Abrams’ Oscilloclast containing arrays of resistors. Ruth Drown used radio-like<br />
circuits. It seems that she had picked the components out of the big drums in which they were<br />
sold unsorted without any conscious selection. Galen T. Hieronymus later built instruments<br />
containing capacitors which guided and transformed the so-called ‘eloptic’ energy, which he<br />
believed to be the underlying force in radionics. This was the kind of energy that he<br />
demonstrated allowed plants to become green although grown in absolute darkness.<br />
<strong>The</strong> <strong>Virtual</strong> <strong>Radionic</strong> Handbook Page 4 / 30
Little is known about the meaning of circuitry in the old instruments. Only Hieronymus gave<br />
some information about how an instrument should be built, that it would work for radionics<br />
and which are the most suitable mate-rials to be used and which ones are not. <strong>The</strong>re seem to<br />
be rules in choosing materials—substances guiding the eloptic energy included metals, light<br />
etc. while others insulated it, like Bakelite, black plastic or plastic bags.<br />
<strong>The</strong> Hieronymus idea of eloptic energy as a medium for radionic power is still alive in the US<br />
and there is a distinct differentiation between radionics and radiesthesia. In US radionics they<br />
believe much more than we do in Europe in the power of eloptic energy, sent out by the<br />
instrument itself because of its mechanical and electrical layout, rather than using their own<br />
mental power. However, also in the US, extensive use is also made of radiesthesia in analysis<br />
(they call it cold scanning).<br />
Although fascinating to look at the circuitry, this was not possible when building up a virtual<br />
instrument on a computer. So I looked at how the modern computerised systems are built to<br />
get an idea how they were realised. Although I could not afford a Copen Mars III or a Quantec<br />
instrument, because they are incredibly expensive, I got a clue about how they work.<br />
<strong>The</strong> principle philosophy behind these instruments is derived from an experiment conducted<br />
by MIT researchers. Several universities have computers with random number generators in<br />
use, which calculate every second or so a random number, let’s say between 0 and 10. <strong>The</strong><br />
mean of all numbers should be 5 with a more or less constant mean deviation according to the<br />
set-up of the individual installation. However, the mean value and the deviation is not constant<br />
but subjected to deviation and, I don’t know why, the researchers tried to find correlations<br />
between these deviations and events in the world which they felt may cause these deviations.<br />
Amazingly they found correlations between these statistical deviations and occurrences of<br />
major public inter-est or shock, like 11th September or other spectacular and disturbing<br />
catastrophes of mostly worldwide public interest.<br />
This led the instrument builders to the idea of taking a random number generator and building<br />
it into the instrument, intending to capture Variation in random numbers the intention of the<br />
practitioner (or of any ‘force’ because of emotional around) to produce a ‘yes or no’ response<br />
by a involvement of many people deviation in the random numbers produced by the generator<br />
and then process this data in the program to obtain an analysis result.<br />
Although this idea and technology is fascinating, such types of instruments would be either fit<br />
for experienced practitioners or for very inexperienced ones who are<br />
not intending to dig into classical radionics, because this computer<br />
method more or less excludes the conscious mind of the practitioner.<br />
<strong>The</strong>y seem not to be very helpful for learning basic analysis and<br />
treatment<br />
methods and understanding the principles of basic radionic work.<br />
In contrast to the USA, radionics was never forbidden to be used in<br />
humans, which was the legacy of George Delawarr and his dearly<br />
bought success in a court trial, which nearly ruined him financially.<br />
Delawarr started by copying instruments of Ruth Drown built of<br />
resistors. For him, it was not the resistance of a resistor that was the<br />
crucial point, but the division of the angles. In the beginning, therefore<br />
he used so called aerials, round shaped chrome-metal plates, which<br />
were divided by a slider. Later on, he used resistors—but only because<br />
of costs and availability reasons.<br />
<strong>The</strong> development of radionic instruments in the UK was nearly completely separated from<br />
developments in the US. While in the US Hieronymus and mostly all other researchers worked<br />
<strong>The</strong> <strong>Virtual</strong> <strong>Radionic</strong> Handbook Page 5 / 30
with eloptic energy guided in circuits, in the UK the radionic world was much more creative.<br />
Butcher came up with his instruments using light energy and Malcolm Rae developed his<br />
Magneto Optical cards which were later copied and revised in India to be called Sanjeevinis.<br />
Newer developments are holographic <strong>Instrument</strong>s, which are made f a hologram—devoid of<br />
any circuitry, either electrical or optical. In fact, in the UK there was a clear progress from<br />
circuitry to mental radionics. And the holographic instrument is surely a truly virtual<br />
instrument and truly an instrument which works exclusively by focusing and amplifying<br />
practitioners’ mind power.<br />
So back to the question how to realise a virtual instrument on a basic lap-top computer.<br />
Remembering my first contact with radionics, I looked at the outside of black boxes, the dials<br />
and plates, not knowing about what’s inside them. However, it has to be something hidden and<br />
powerful and at least something that ‘works’. In a car, there is an engine under the bonnet but<br />
s a driver you normally do not care about how it works, but you rely on it working.<br />
Sometimes I have to admit that my radionic education was similar to obtaining a driving<br />
licence—learning the rules to be obeyed in the streets of analysis and treatment, but not<br />
having to learn anything about the vehicle engine itself, except where to start and where to<br />
stop and how to choose the gear.<br />
Although it might be possible in radionics to drive without any engine inside the black box, it<br />
might be helpful to have one, at least in the beginning.<br />
I found the first hint in the book by Hieronymus. Hieronymus was the first radionic researcher<br />
who was able to obtain a patent on a radionic instrument. His analyser was tested by John W.<br />
Campbell, who did not build it from electrical circuitry but drew it on a piece of paper with<br />
India ink. <strong>The</strong> instrument worked perfectly—by only the drawn pattern, without any electrical<br />
energy.<br />
Patterns seem to be very powerful in radionics. <strong>The</strong>re are also<br />
patterns you can use or balancing and sending information. In<br />
Sanjeevini a chart is used for broadcasting the Sanjeevini remedies<br />
to the patient. <strong>The</strong> Pegotty pattern can be drawn on a piece of<br />
paper and is as powerful as the real Pegotty board itself.<br />
With this in my mind, I decided to choose a pattern for the core of<br />
a <strong>Virtual</strong> <strong>Radionic</strong> <strong>Instrument</strong>. Because the Hieronymus instruments<br />
based on two variable condensers are not very common in Europe,<br />
I chose a Delawarr instrument as the blueprint for my hart outline.<br />
I had a secret look at the wiring of the instrument and copied the<br />
circuitry into a chart which leaves the pattern for the individual<br />
potentiometers open. <strong>The</strong>se will then be later drawn into the chart<br />
by the computer according to the set rates. <strong>The</strong> chart instrument is<br />
then ready to be connected to the virtual well—also drawn on the<br />
<strong>The</strong> circuitry pattern of the <strong>Virtual</strong> <strong>Radionic</strong> <strong>Instrument</strong> screen.<br />
This works well for one well, when you can keep the pattern unchanged while broadcasting<br />
the treatment. To be able to have more than one well in parallel use I tested different patterns,<br />
which would allow the storage of the radionic information of the chart-instrument. I found<br />
spirals to be very effective, but other patterns or symbols may also be appropriate.<br />
When you have set a rate and you load the well, the instrument connects the well with the<br />
chart for about 10 seconds to store the information. <strong>The</strong>n the connection is cut by the<br />
program and the chart is reset. You can now set another rate, load a different well and so<br />
treat another patient.<br />
With this pattern as core, the black box can now again be shut by a virtual front panel<br />
<strong>The</strong> <strong>Virtual</strong> <strong>Radionic</strong> Handbook Page 6 / 30
containing knobs and other features <strong>Virtual</strong> operating panel of the <strong>Virtual</strong> <strong>Radionic</strong> <strong>Instrument</strong><br />
which make daily radionic work easy and handy.<br />
My initial thought was to place the witnesses directly on the screen, which can be done easily<br />
with laptop computers. However with desktop screens this is a bit complicated and so I added<br />
the ability to put a virtual sticker on the well, on which the name and DoB can be written.<br />
Now the fun of programming can start (after<br />
getting acquainted with the new Visual Basic<br />
programming methods) adding features like<br />
pre-set programs, programmed treatments,<br />
automatic setting of rates in the analysis<br />
process and a combination of program and<br />
analysis sheets for documentation of patient<br />
information.<br />
<strong>The</strong> <strong>Virtual</strong> <strong>Radionic</strong> <strong>Instrument</strong> is still under<br />
construction but the first working models are<br />
in the test phase. <strong>The</strong>re will be a lot more<br />
work to be done until it will work perfectly on<br />
every computer. Many thanks to all testers,<br />
who invested time and enthusiasm in improving this program to make it workable and<br />
efficient!<br />
Summary of features:<br />
- Base 10, Base 12 and Base 44 capability<br />
– 12 dials for rate making<br />
- 7 wells—to be set independently<br />
- Program mode for timed broadcasting<br />
- Colour capability<br />
- Area-treatment via scanned photos (two wells)<br />
- Analysis mode<br />
System Requirements:<br />
- Windows 2000, XP, Vista<br />
- 1·5 GHz CPU and 512 KB Ram (estimated), ca. 500 MB free disk space.<br />
- OpenOffice 3.0 or Microsoft Office<br />
<strong>The</strong> <strong>Virtual</strong> <strong>Radionic</strong> Handbook Page 7 / 30
A.1. CD - Installation<br />
On your CD, you find the following files:<br />
Start.exe, autorun.inf, index.html – starts automatically the Webbrowser, which<br />
guides you through the installation process<br />
<strong>Virtual</strong>_<strong>Radionic</strong>_<strong>Instrument</strong>.sfx.exe – For Installation of the<br />
<strong>Virtual</strong>_<strong>Radionic</strong>_<strong>Instrument</strong><br />
In 3 rd -party-programs subfolder:<br />
Foxit_PDF_Reader30_Setup.exe and AdbeRdr910_de_DE.exe – For installation of a<br />
PDF Reader you need to open the User’s Handbook<br />
OpenOffice_Setup.exe – For Installation of the OpenOffice Software Suite you to get<br />
full access to the Analysis Sheets<br />
<strong>Virtual</strong> <strong>Radionic</strong> instrument Handbook.pdf – a copy of the Handbook of the <strong>Radionic</strong><br />
<strong>Instrument</strong><br />
Installation - Routine<br />
When your system supports autorun for your CD-Drive, a web-page will be launched<br />
automatically, which guides you through the installation process. If the web-page does<br />
not start automatically, navigate to the CD-Drive in the file explorer of windows and<br />
double-click on either start.exe or index.html and the installation guide is shown.<br />
<strong>The</strong>re are some specifics for the installation under the different versions of Windows.<br />
If you meet any problems while installation, refer to the corresponding chapter below.<br />
Windows XP, Windows 7<br />
Double Click on “<strong>Virtual</strong>_<strong>Radionic</strong>_<strong>Instrument</strong>.sfx.exe”. All files will be extracted<br />
automatically. If necessary, Framework.net 3.1 will also be installed by a setup<br />
program, which starts automatically in setup process. Installation of Framework.net<br />
will take a while, therefore be patient.<br />
<strong>The</strong> <strong>Virtual</strong> <strong>Radionic</strong> <strong>Instrument</strong> will start automatically at the end of the installation.<br />
Windows Vista<br />
Double Click on “<strong>Virtual</strong>_<strong>Radionic</strong>_<strong>Instrument</strong>.sfx.exe”. All files will be extracted<br />
automatically. If Framework.net is not yet installed, the program may be halted with<br />
an error message. Please click on “ok” and the message will disappear. <strong>The</strong>n navigate<br />
in the File Explorer to C:\<strong>Virtual</strong>_<strong>Radionic</strong>_<strong>Instrument</strong>. You will find the Setup.exe<br />
program there. Make a right click on this program and click on “Run as administrator”.<br />
<strong>The</strong> setup program will continue and the <strong>Virtual</strong> <strong>Radionic</strong> <strong>Instrument</strong> will start<br />
automatically at the end of the installation<br />
<strong>The</strong> <strong>Virtual</strong> <strong>Radionic</strong> Handbook Page 8 / 30
3 rd Party Programs<br />
Please start the different installation programs and follow the installation instructions<br />
of each package. If one or more packages are already installed on your computer, you<br />
can omit the installation of this package and go on with the next one.<br />
You have access to the User’s Handbook by the menu item Help -> Manual in the<br />
<strong>Virtual</strong> <strong>Radionic</strong> <strong>Instrument</strong> program.<br />
A.2. Online - Installation<br />
Preparations and download<br />
Please, first remove older or Trial-Versions of the <strong>Virtual</strong> <strong>Radionic</strong> <strong>Instrument</strong> by<br />
clicking on<br />
START -> Control Panel -> Add/Remove Software and Uninstall ”<strong>The</strong> <strong>Virtual</strong> <strong>Radionic</strong><br />
<strong>Instrument</strong>”.<br />
If there are several entries, please remove them all.<br />
<strong>The</strong> open the File-Explorer and delete the folder C:\<strong>Virtual</strong>_<strong>Radionic</strong>_<strong>Instrument</strong><br />
completely<br />
Please download the file from<br />
http://www.alice-dsl.net/radionik/setup/<strong>Virtual</strong>_<strong>Radionic</strong>_<strong>Instrument</strong>.sfx.exe<br />
You may place the file anywhere on your computer.<br />
Installation of Framework.net<br />
Before you install the program make sure that you<br />
have Framework.net 3,5 installed on your computer.<br />
If your system does not has the proper version of<br />
Framework.net installed, the installation process is<br />
aborted and a error message is displayed.<br />
For downloading the installation packages of Framework.net, please refer to<br />
Microsoft’s homepage or to the download pages of Microsoft. You will find the newest<br />
version of Framework.net 3.5 SP1 here:<br />
http://www.microsoft.com/downloads/details.aspx<br />
displaylang=de&FamilyID=d0e5dea7-ac26-4ad7-b68c-fe5076bba986<br />
It may be necessary to install other versions of Framwork.net too e.g. Version 1.0, 2.0<br />
or 3.0 depending on the software status you have in your Windows installation.<br />
Please make sure that you have also the Windows Installer at least version 3.1<br />
installed on your system<br />
<strong>The</strong> <strong>Virtual</strong> <strong>Radionic</strong> Handbook Page 9 / 30
Program Installation – <strong>Virtual</strong> Radionik <strong>Instrument</strong><br />
Please double click on the file<br />
”<strong>Virtual</strong>_<strong>Radionic</strong>_<strong>Instrument</strong>.sfx.exe” in the File-<br />
Explorer to run the file.<br />
<strong>The</strong> file extracts all necessary files and folders<br />
automatically and starts the setup file for the<br />
Framework.net Application. Please click on the installation button to install the <strong>Virtual</strong><br />
<strong>Radionic</strong> <strong>Instrument</strong>.<br />
After the installation has finished, the<br />
<strong>Virtual</strong> <strong>Instrument</strong> starts up automatically<br />
for the first time.<br />
In future, you can start the program by<br />
clicking on<br />
Start → <strong>Virtual</strong> Radionik <strong>Instrument</strong> → <strong>The</strong> <strong>Virtual</strong> Radionik <strong>Instrument</strong><br />
Perhaps you want to create a short-cut on your Desktop for this program. For this task<br />
start a file explorer and navigate to c:\<strong>Virtual</strong>_<strong>Radionic</strong>_<strong>Instrument</strong>. Make a right click on<br />
the file “<strong>The</strong> <strong>Virtual</strong> <strong>Radionic</strong> <strong>Instrument</strong>.application” and copy the file. Close the file<br />
explorer and go back to the Desktop. Make a right click on the Desktop and chose<br />
“paste short-cut”.<br />
Further recommended Software<br />
To read this Handbook you will already have a an PDF-Reader installed. If you don't,<br />
get e.g. ADOBE PDF-Reader or Foxit-PDF-Reader or any other similar piece of<br />
Software.<br />
http://www.adobe.com/de/products/reader/<br />
http://foxit-pdf-reader.softonic.de/download<br />
To use the analysis charts you need to have OpenOffice installed. <strong>The</strong> program is<br />
freeware. You can download it from<br />
http://de.openoffice.org/downloads/quick.html<br />
Please follow the instructions of the website for installation.<br />
<strong>The</strong> <strong>Virtual</strong> <strong>Radionic</strong> Handbook Page 10 / 30
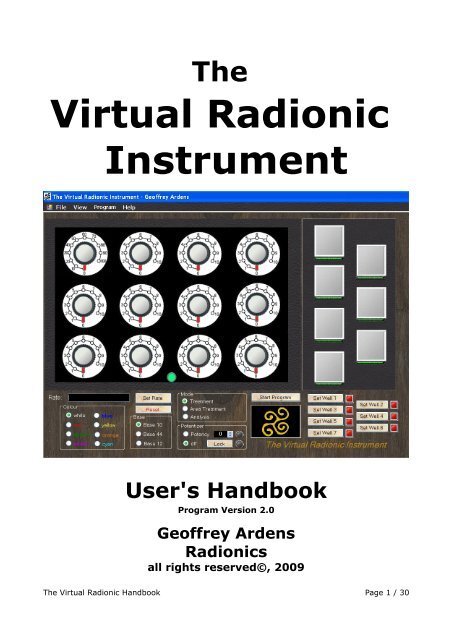
B. <strong>The</strong> <strong>Virtual</strong> <strong>Radionic</strong> <strong>Instrument</strong> - Overview<br />
Overview<br />
Loading and<br />
storing the<br />
Treatment<br />
Program<br />
Access to Manual and<br />
Analysis-Sheet<br />
Choose Mode<br />
(Treatment, Area, Analysis)<br />
Well for<br />
placing the<br />
witness on<br />
for treatment<br />
Set rate on<br />
instrument<br />
Input<br />
<strong>Radionic</strong><br />
Rates<br />
Reset<br />
Intstrument<br />
Choose<br />
Rate - Base<br />
Choose Colour<br />
for Treatment Potentizer<br />
unit<br />
Start/Stop<br />
Treatment<br />
Program<br />
Set or<br />
program<br />
a well<br />
Clear and<br />
reset a well<br />
Short overview:<br />
Menu-bar:<br />
– File: Contains topics for saving and loading the status of the instrument . <strong>The</strong>re<br />
is also a possibility to shut down and to restart the instrument.<br />
– View: For educational reasons, you can switch between front panel view and<br />
“looking inside” where the aerials are working – the heart of the instrument.<br />
However in daily working, you will not use this item.<br />
– Program: Access to programming functions of the instrument.<br />
– Help: Contains topics like a link to this manual, to a dowsing chart, the analysis<br />
sheet and the possibility to manage the programs of all wells.<br />
Input <strong>Radionic</strong> Rates: Here you can type in any Rate, you want to set on the<br />
instrument. Please remember the format of the different rate systems<br />
<strong>The</strong> <strong>Virtual</strong> <strong>Radionic</strong> Handbook Page 11 / 30
Set Rate on <strong>Instrument</strong>: Clicking on this button sets the rate on the instrument.<br />
<strong>The</strong> dials will move in the proper position and the Aerials in the<br />
background are set.<br />
Choose Rate Base: With these buttons you can choose which Rate system you want<br />
to use in setting the <strong>Instrument</strong>. According to the settings the proper<br />
dials are chosen and the aerials are working correspondingly in a 10, 12<br />
or 44 division.<br />
Choose Colour for Treatment: This setting determines whether a colour is set for<br />
the well. If no colour is chosen, black/white will be used. This setting<br />
affects the instrument on the front panel as well as on the interior plane,<br />
where the storing spirals are coloured accordingly.<br />
Reset <strong>Instrument</strong>: Erases the set rates on the Dials panel but does not affect set<br />
wells or running programs.<br />
Mode: Here you can switch between different modes of the instrument:<br />
• Treatment Mode: here you can set rates and load wells in usual treatmentsituations<br />
• Area Treatments: <strong>The</strong>re are two wells available into which you can drag and<br />
drop a picture. <strong>The</strong>se can be set like normal wells.<br />
You cannot use treatment-mode and area treatment mode at the same time, so<br />
you have to finish area treatments to switch back to treatment mode.<br />
• Analysis: With this setting you are guided through all the dowsing topics you<br />
need for filling the analysis sheet used by the <strong>Radionic</strong> Association.<br />
Potentizer Unit: <strong>The</strong> potentizer unit can be used to broadcast or produce potencies<br />
in a range of X1 to X30. Because or geometric restriction C, LM and Q<br />
potencies are not possible with this type of potentizing system.<br />
Start Stop Treatment Programs: With this button you can start preprogrammed<br />
treatments. By starting the program mode the picture underneath will<br />
change and the button will display the text “Stop program”. When you<br />
click again the program mode is halted. Set programs are not erased but<br />
will be started in time, when program mode is started again.<br />
Set a program well: Clicking on one of these buttons sets a program well for<br />
broadcasting a treatment. <strong>The</strong> well is broadcasting 5 min. in case of Base<br />
10 or Base 12 rates and 2 min. 12 sec. in case of a Base 44 rate. <strong>The</strong> well<br />
will then reset itself into a neutral state, to be ready for another<br />
broadcast.<br />
Clear a program well: This button will clear the well immediately and interrupt the<br />
broadcast of any set rate.<br />
Wells for placing the witnesses: <strong>The</strong> grey squares are representing the wells.<br />
Exactly underneath these wells the whirling spirals are working, where<br />
the radionic rate information is stored in.<br />
For broadcasting you can place a witness directly on the well or you can<br />
<strong>The</strong> <strong>Virtual</strong> <strong>Radionic</strong> Handbook Page 12 / 30
use a piece of electronic paper. When you click on the green LED bar<br />
underneath the well, a window opens and give you the possibility to type<br />
the name of your patient in. This piece of virtual paper will then be laid<br />
on the well. Another click on the LED bar underneath the well will make<br />
the piece of virtual paper disappear.<br />
<strong>The</strong> <strong>Virtual</strong> <strong>Radionic</strong> Handbook Page 13 / 30
C. Manual Operation of the <strong>Virtual</strong> <strong>Radionic</strong> <strong>Instrument</strong><br />
Standard Treatment Situations<br />
After you have analysed your patient you are dowsing for the appropriate treatments,<br />
you have to broadcast for this day or right in this moment.<br />
Independent of which method you use for finding an appropriate rate, you will result<br />
in:<br />
• a rate which has to be set (Base 10, 12 or 44)<br />
• a colour which has to be given<br />
• a patients name or witness, who shall receive the broadcast<br />
You then can proceed in the following way to set the instrument manually for<br />
immediate broadcast:<br />
a.) Placing the patients name an a virtual piece of paper on the<br />
appropriate well:<br />
• Click on the green LED-bar underneath the<br />
well you have chosen for later broadcast<br />
(see picture)<br />
• A input window comes up. Please type the<br />
patients name in and e.g. the birth dates or<br />
any other bit for identification if available<br />
• Press “ok”-button and the virtual paper is<br />
labelled with the patients name.<br />
b.) Setting the Rate:<br />
• Choose the appropriate Base for the<br />
instruments dials according to the Rate you<br />
are intending (Base 10, Base 12 or Base 44)<br />
by marking the entry in the Base section.<br />
• Click to the black “Rate”-field, so you<br />
can type the Rate in, you want to have set<br />
on the instrument. Please remember the<br />
format of the rates.<br />
(e.g. Base 10: 80.2345 – 210.32 or Base<br />
44: 23 22 01 44 23 33)<br />
• Click on “Set Rate” to set the rate you<br />
1<br />
typed in on the instrument. You will see the dials moving to their correct<br />
positions. In the Background, the Aerials will be set accordingly<br />
2 3 4<br />
<strong>The</strong> <strong>Virtual</strong> <strong>Radionic</strong> Handbook Page 14 / 30
c.) Loading the Well:<br />
• Click on “Set Well” to load the well.<br />
In this example, Well 1 is set by clicking<br />
on “Set Well 1” (upper left button).<br />
• While loading the well, the LED-bar<br />
underneath the well will change colour<br />
to blinking yellow. While blinking, the<br />
well is connected with the grid of the<br />
aerials in the background and the<br />
whirling spiral underneath the witness is<br />
loaded. This takes about 12 seconds –<br />
please wait until the well is loaded (and<br />
give some additional positive thoughts<br />
into the broadcast) before you proceed with your work.<br />
• When the well is loaded, the LED-bar will turn to a moving red dot, indicating,<br />
that the well is separated again from the aerials grid and the rate is<br />
broadcasted.<br />
• After 2 min. 12 sec. for Base 44 or 5 min. for Base 10, the well is reset<br />
automatically and the virtual paper is erased.<br />
Remark: If the dials move to slowly for you – it would be wise, to work on you<br />
patience! However, it is possible to click on “Set Rate” and immediately afterwards<br />
click on “Set Well”, although the dials are not yet in their final position. This is<br />
possible, because the aerials in the background are set immediately after the Set Rate<br />
command and therefore the broadcast information is immediately available to the<br />
whirling spiral in the background.<br />
Area Treatments<br />
This type of treatment was initially intended for treatments of larger areas, like fields,<br />
open areas or buildings. Often in this cases a name or a signifier is difficult to find, but<br />
a picture is at hand. Especially with the development of the new digital cameras, a lot<br />
of pictures are already stored on the computer and could be used for radionic work.<br />
However the example is now given with a photo of an area, feel free to take also<br />
photos of people, animals like your pets, plants or whatever you have got a picture of<br />
and want to treat it by radionics.<br />
So lets do it step by step:<br />
a.) Preparations – set area mode<br />
• Please stop the program mode if you have a<br />
program running<br />
• Please wait until the any running broadcast<br />
has stopped. Else you will interrupt these<br />
broadcasts ahead of time.<br />
• You change to the “area mode” by clicking on<br />
“Area Treatment” in the Mode Section of the<br />
instrument. <strong>The</strong> appearance of the well plate will change and you will get two<br />
large wells.<br />
<strong>The</strong> <strong>Virtual</strong> <strong>Radionic</strong> Handbook Page 15 / 30
.) Placing a photograph on the well – loading a picture file<br />
• <strong>The</strong> program will work with different file formats. Possible are *.jpg, *.bmp and<br />
*.gif files. If the program cannot handle the picture format, the well will display<br />
a small icon with a red cross. You then may have to transform the picture in an<br />
image processing software to one of the above file formats. However usually<br />
this is only rarely a problem.<br />
• To place the photo in one of the wells you can choose between two possible<br />
ways:<br />
1.) Click on the well itself. A file dialogue box will open and you choose a file<br />
from anywhere on your computer. By clicking on “open”, the file is loaded into<br />
the well and appears there.<br />
2.) Second option is to drag and drop the photo (picture-file) from your file<br />
explorer or from the desktop into the well. You might find this method more<br />
convenient especially if you have larger folders with photographs you have to<br />
search for the proper picture.<br />
• You can load a different file at any time although a well is already loaded with a<br />
file. <strong>The</strong> old file will be removed by the new file. And don't be anxious – your<br />
original file stays untouched in your file cabinet and is not deleted or changed<br />
by putting it on the well.<br />
Method 1->a:<br />
Click on well<br />
Method 1->b:<br />
look for picture<br />
Method 1->c:<br />
click on “open”<br />
Method 2:<br />
Drag and<br />
Drop<br />
the image<br />
from<br />
file explorer<br />
b.) Setting the Rate:<br />
• Setting the rate is the same procedure which you already learnt in the normal<br />
treatment situation. So this is only for repetition here.<br />
• Choose the appropriate Base for the instruments dials according to the Rate<br />
you are intending (Base 10, Base 12 or Base 44) by marking the entry in the<br />
Base section.<br />
• Click to the black “Rate”-field, so you can type the Rate in, you want to<br />
have set on the instrument. Please remember the format of the rates.<br />
(e.g. Base 10: 80.2345 – 210.32 or Base 44: 23 22 01 44 23 33)<br />
• Click on “Set Rate” to set the rate you typed in on the instrument. You will<br />
<strong>The</strong> <strong>Virtual</strong> <strong>Radionic</strong> Handbook Page 16 / 30
see the dials moving to their correct positions. In the Background, the Aerials<br />
will be set accordingly<br />
c.) Loading the well:<br />
• Click on “Set Well” to load the<br />
well. In this example, Well 2 would<br />
have to be set by clicking on “Set<br />
Well 2” (lower right button).<br />
• <strong>The</strong> well will then loaded and the<br />
instrument will behave like just<br />
described in normal treatment<br />
situation. <strong>The</strong> LED-bar will first blink<br />
yellow and then a moving red dot will<br />
show, that the well is loaded and the<br />
broadcast is working.<br />
• <strong>The</strong> treatment stops automatically<br />
after 2'12'' or 5' according to the rate<br />
you have set.<br />
d.) Back to normal treatment situation<br />
• To return to the normal treatment situation, please wait until all broadcasts<br />
have come to their end. <strong>The</strong>n click on “Treatment” in the Mode section of the<br />
instrument and you will get back the normal well plate with seven wells. You<br />
may now proceed with further treatments or restart the program mode you<br />
may have interrupted for area treatments.<br />
<strong>The</strong> <strong>Virtual</strong> <strong>Radionic</strong> Handbook Page 17 / 30
D. Basic programming of Broadcasts<br />
Introduction<br />
Imagine you have dowsed for a patient, which has to be treated for today. According<br />
to your very individual system you may start with list dowsing, questions, browsing<br />
through different rate books etc. In the end, you will come up with several treatments<br />
you have determined to be beneficial for your patient. If you have worked according<br />
the education schedule of the British <strong>Radionic</strong> Association, your treatments may look<br />
like this:<br />
27.04.08 to eliminate frustration from solar plexus chakra 43 37 35 43<br />
16 44 34 11 L4<br />
throat chakra 846582 – 846582 throat chakra<br />
L1 / 4 times<br />
to restore spinal cord grey matter 06 08 26 37 B8<br />
to give confidence into alta major chakra 37 37 44 33<br />
16 44 11 11<br />
You've got four treatments, three on Base 44 and one on Base 10. Three of them need<br />
some colour for treatment (L=violet, B=blue). <strong>The</strong> Base 10 treatment is intended to<br />
be repeated 4 times.<br />
When you have got an normal type of instrument, like a Lafferty ATP (a nice<br />
instrument, I was trained on) or similar instruments, you would set the rate, start the<br />
broadcast and wait for the time, the broadcast will need. <strong>The</strong>n you set the next rate<br />
and so on, until all rates are broadcasted. After that you make a watch list, not to<br />
forget to repeat the Base 10 rate on the next days.<br />
<strong>The</strong> <strong>Virtual</strong> <strong>Radionic</strong> <strong>Instrument</strong> will make you life easier, because you can type all<br />
treatments into a table and the instrument will broadcast them automatically for you.<br />
You only have to type the treatments in a given (but I think) not unhandy format,<br />
which can be read by the instrument. <strong>The</strong> same format of notation is also used in the<br />
Analysis and Treatment Sheet, so you can use it in combination with the program.<br />
<strong>The</strong> format<br />
O.k. - the format first:<br />
Well Name Date Base Intention Rate Intention Colour Repetitions Pause [h]<br />
You find in the above table the following columns:<br />
Well: A number from 1 – 7, which indicates on which well the broadcast will appear<br />
Name: <strong>The</strong> patients name or any other significator for the object to be treated. This<br />
identification text will be displayed on the virtual piece of paper, which is<br />
displayed with the broadcast.<br />
Date: <strong>The</strong> date you have worked out this treatments<br />
Base: Indicates the Rate Base you intend to use: 10, 12 or 44<br />
<strong>The</strong> <strong>Virtual</strong> <strong>Radionic</strong> Handbook Page 18 / 30
Intention, Rate, Intention: <strong>The</strong>se three columns reflect the notation system of the<br />
radionic shool.<br />
In case of Base 10 the notation is:<br />
| throat chakra | 846582 – 846582 | throat chakra |<br />
So, the intention is followed by the Base ten rates, followed by a second intention<br />
or doubling the first intention in case of organ/system balancing.<br />
In case of Base 44 the notation is:<br />
| to eliminate gall stones form bile duct | 13 19 08 32 - 23 24 12 36 | |<br />
In this case, the intention is followed by the both Base 44 rates and the second<br />
intention cell is left empty<br />
Colour: Here you can choose a colour for your broadcast. Possible colours are: white,<br />
red, green, violet, blue, yellow, orange and cyan.<br />
Repetitions: In this column you can type in the number of repetitions you want to<br />
perform. <strong>The</strong> broadcast is repeated for the number of times in this column<br />
Pause [h]: Here you can define, how long the instrument should wait until repeating<br />
the broadcast. <strong>The</strong> number you type in gives the number of hours, the<br />
instrument will wait. “24” does mean: again in a day (24 hours) and then every<br />
24 hours, until the number or repetitions is zero.<br />
Here is the example translated form normal notation into the notation, the instrument<br />
can easily read.<br />
27.04.08 to eliminate frustration from solar plexus chakra 43 37 35 43<br />
16 44 34 11 L4<br />
throat chakra 846582 – 846582 throat chakra<br />
L1 / 4 times<br />
to restore spinal cord grey matter 06 08 26 37 B8<br />
to give confidence into alta major chakra 37 37 44 33<br />
16 44 11 11<br />
Well Name Date Base Intention Rate Intention Colour Repetitions Pause [h]<br />
27.04.08<br />
to eliminate frustration from solar<br />
1 Our patient<br />
44 plexus chakra<br />
43 37 35 43 - 16 44 34 11 violet 1<br />
1 Our patient 27.04.08 10 throat chakra 846582 – 846582 throat chakra violet 4 24<br />
1 Our patient 27.04.08 44 to restore spinal cord grey matter 06 08 26 37 blue 1<br />
27.04.08<br />
to give confidence into alta major<br />
1 Our patient<br />
44 chakra<br />
37 37 44 33 - 16 44 11 11 1<br />
How to setup an easy program<br />
Setting up a program is a rather easy task, please follow these instructions:<br />
1.) First clear the Rate input line. If there are still any numbers in this field, click on<br />
“Reset”-button to clear these settings<br />
2.) Click on one of the “Set Well” buttons.<br />
3.) A spreadsheet window appears. <strong>The</strong> spreadsheet has 7 tabs on the bottom,<br />
which represent the seven wells. If you have clicked on “Set Well 1”, the sheet<br />
for Well 1 is displayed. You can change between the sheets by clicking on the<br />
tabs on the bottom of the table, like you are usually do it within Excel or<br />
OpenOffice Calc.<br />
<strong>The</strong> <strong>Virtual</strong> <strong>Radionic</strong> Handbook Page 19 / 30
4.) Now type your treatments into the table. Please use the above described format<br />
for doing so.<br />
You can also copy (Crtl + c) and paste (Crtl + v) your treatments into the table.<br />
5.) When you click on the “ok” button, the table is closed and the treatments are<br />
stored in the internal memory of the instrument.<br />
If you want to change or recheck the treatments you have set, or you want to<br />
have a look to see, which treatments are still in memory, you can repeat the<br />
sequence beginning with step 1). All programmed treatments are displayed on<br />
the different sheets of the table in accordance to the well they belong to.<br />
6.) To start the program mode and to start the broadcasts, click on “Start<br />
Program”. <strong>The</strong> picture underneath the button changes to a blue moving pattern<br />
and the text on the button changes to “Stop Program”.<br />
Now, the program is running and setting and broadcasting the treatments you have<br />
put into the memory of your instrument.<br />
5<br />
4<br />
Type or copy treatments in<br />
3<br />
Choose well to program<br />
1<br />
6<br />
2<br />
Helpful Hints:<br />
• If you don't type a well number in, the number of the sheet your are working in<br />
is taken for the program.<br />
• If you type a well number into the sheet which does not correspond to the<br />
sheet well number you are working on, the instrument will move this treatment<br />
to the correct sheet, when you open up the table next time.<br />
• You can edit and change the content of the program at any time. When you<br />
<strong>The</strong> <strong>Virtual</strong> <strong>Radionic</strong> Handbook Page 20 / 30
click on o.k., the old program is erased and the new one is written into the<br />
internal memory of the instrument.<br />
• You can change the next execution of a broadcast by changing the date / time<br />
in the column “Next”, which is on the very right edge of the table. You may<br />
have to scroll to this column.<br />
• <strong>The</strong> format in the analysis sheet is identical to this table, so you can copy and<br />
paste the treatments from your documentation directly into this table<br />
(I found that using the key-combinations “Crtl”+”c” and “Crtl”+”v” work best<br />
for copy and paste)<br />
<strong>The</strong> <strong>Virtual</strong> <strong>Radionic</strong> Handbook Page 21 / 30
E. <strong>The</strong> Potentizer<br />
<strong>The</strong> potentizer makes it possible to produce radionic, homoeopathic like remedies or<br />
to broadcast them like usual radionic rates.<br />
<strong>The</strong> potentizer is able to make potencies from X1 to X30 (resp. D1 to D30) which<br />
corresponds to dilutions from 1: 10 to 1:10 30 . Higher potencies are not possible due<br />
to graphical restrictions.<br />
Broadcasting of homoeopathic like remedies<br />
You can activate the potentizer by click on<br />
“potency” in the potentizer section. <strong>The</strong><br />
green light will switch on, to indicate that<br />
the potentizer is active. You can now set<br />
the potency by either clicking on the small<br />
arrows of the potency window or by simply<br />
typing a value into the potency window.<br />
Entries from 0 – 30 are accepted.<br />
You can now set a rate on the <strong>Instrument</strong>.<br />
When you load a well, the potentizer is<br />
activated and included in the devicepattern to expand the signal. After the well is<br />
loaded, the potentizer is switched of automatically. If you want to it on for more than<br />
one treatment, you can click on the “Lock” button, which keeps the potentizer in<br />
status “on”.<br />
If you want to switch of the potentizer manually, you only have to click on “off” in the<br />
potentizer section.<br />
Production of homoeopathic like remedies<br />
This is best done with a<br />
Laptop, where you can place<br />
you substrate (any neutral<br />
liquid of globuli) directly on<br />
a well on the screen, which<br />
is placed horizontally e.g. on<br />
a table. If you have a larger cup or bottle, you may use the Area Treatment Mode for<br />
this task, because the wells are expanded and of larger dimension. <strong>The</strong>n<br />
1.) switch on potentizer by clicking on “potency”<br />
2.) set intended potency e.g. 12<br />
Switch<br />
potentizer<br />
on<br />
Switch<br />
potentizer<br />
on<br />
Potency<br />
Potentizer<br />
stays on<br />
Indicates<br />
potentizer<br />
on<br />
Indicates<br />
potentizer<br />
stays on<br />
after load<br />
well<br />
3.) type in the rate and set the rate for the remedy you want to potentize and<br />
produce<br />
4.) Click on “Set Well ..” - take the well you have placed you bottle or container on<br />
and keep the bottle or container on the well until the broadcast has finished.<br />
With Base 10 rates, the remedy making need 5 min.<br />
5.) After the broadcast has finished, you can use your radionic remedy as intended.<br />
If you don't have locked the potentizer, it will be switched off automatically.<br />
<strong>The</strong> <strong>Virtual</strong> <strong>Radionic</strong> Handbook Page 22 / 30
F. Menu-bar (File, Window, Help)<br />
File–Menu - Storing and Loading functions<br />
Please keep in mind:<br />
When you close the <strong>Virtual</strong> <strong>Radionic</strong> <strong>Instrument</strong>, all set programs will be<br />
erased. By closing and restarting, the <strong>Instrument</strong> is fully reset.<br />
In File Menu, you have two storing methods available:<br />
Save Program Status – saves the instruments<br />
program situation as it is in a binary file. When<br />
you choose this item, a file dialogue box opens<br />
up and gives you the possibility to choose a<br />
location and a name for your file. To save the file<br />
press “save”.<br />
This file is not editable. <strong>The</strong> suffix of these files is *.trm.<br />
This method can best be used in cases, when you have to shut down or restart<br />
your computer while not all set broadcasts are already sent.<br />
Load Program Status – Clicking on this menu item, a file dialogue box opens<br />
up and you can choose a *.trm file you have stored in before. By clicking on<br />
“open”, the program will be load again. You can now click on “Start Program”<br />
button to restart the program mode and continue with your programmed<br />
broadcasts.<br />
Reset the <strong>Instrument</strong> - this Menu-item will close and restart the <strong>Virtual</strong><br />
<strong>Radionic</strong> <strong>Instrument</strong>. By this any programmed information in the memory of the<br />
instrument is deleted and the instrument is initialized (like switched off and<br />
switched on again).<br />
EXIT – Close down the <strong>Instrument</strong>. This Menu-item closes down the <strong>Virtual</strong><br />
<strong>Radionic</strong> <strong>Instrument</strong>. <strong>The</strong> memory of the instrument will be deleted, so any<br />
programmed broadcasts will be lost. If you want to save the information stored<br />
in the memory for later continuation of the broadcasts, please “Save Program<br />
Status” first, so you can load back the instruments memory.<br />
View–Menu - Storing and Loading functions<br />
Front-Panel – this Menu topic displays the front<br />
panel of the instrument. Because all functionalities<br />
are available here, this is the front end for your daily<br />
work with the <strong>Virtual</strong> <strong>Radionic</strong> <strong>Instrument</strong>.<br />
Interior – this Menu topic is mainly for educational<br />
reason. By clicking on this Menu topic the interior<br />
devicepattern is displayed, so you can see how the Aerials are working and the<br />
wells are set. This makes the graphical work-flow of the instrument visible.<br />
<strong>The</strong> <strong>Virtual</strong> <strong>Radionic</strong> Handbook Page 23 / 30
However there are only few possibilities to<br />
set rates and load wells, because it is not<br />
intended for your daily work with the<br />
instrument.<br />
Program–Menu - Storing and Loading<br />
functions<br />
Save Treatment File – with this option, you can save all treatments in a *.csv file,<br />
which can be edited in a program like Excel or OpenOffice Calc. All information of<br />
all wells are written in one table, in the same format you already know from the<br />
programming table mentioned before.<br />
Load Treatment File – You can locate a treatment file you have saved and/or<br />
changed in before, by using the file dialog box. When you open the file,<br />
the content of this file will be written into the internal memory of the<br />
instrument. You can then start e.g. the program mode to broadcast the<br />
radionic information automatically.<br />
Edit Treatment File – by this option a spreadsheet will be displayed, where you<br />
can edit all treatments of all wells at once. You can change them, delete or add<br />
treatments. <strong>The</strong> entry format of the table is identical to the one you have learnt<br />
in before in this manual, however, there are no tabs for the different wells, but all<br />
wells are displayed in one table. When you have finished the modifications,<br />
please click o.k. to save the changes in the memory of the <strong>Virtual</strong> <strong>Radionic</strong><br />
instrument.<br />
Manage Wells – opens up the spreadsheets, where all treatments stored in the<br />
<strong>Virtual</strong> <strong>Instrument</strong>s memory are displayed. This command is identical to clicking<br />
on “Set Well” without a rate set. (see basic programming)<br />
Help–Menu – Helping Documents and Functions<br />
Manual – opens up this Handbook (the installation of<br />
Acrobat Reader or an alternative PDF Reader may be<br />
required for this)<br />
Analysis-Sheet – opens up an OpenOffice Calc Sheet,<br />
which contains all necessary tools for an analysis<br />
according to the British <strong>Radionic</strong> Association.<br />
Dowsing-Chart – opens up a picture file of a Dowsing Chart, you can printout<br />
and use it for your analysis work. However, you also can use different other<br />
charts which you may have available and you are used to. You can find a inksaving<br />
version of the dowsing chart in the folder:<br />
C:\<strong>Virtual</strong>_<strong>Radionic</strong>_<strong>Instrument</strong>\Manuals\Dowsing_Chart_english_inksaving.pdf<br />
<strong>The</strong> <strong>Virtual</strong> <strong>Radionic</strong> Handbook Page 24 / 30
Options – opens up a new<br />
window where you can<br />
choose different languages<br />
for the <strong>Virtual</strong> <strong>Radionic</strong><br />
<strong>Instrument</strong>, complexity of<br />
view and set the Window<br />
on maximised or normal.<br />
Name and Licence-option<br />
are available here also<br />
Info... - displays a short<br />
info-test about the<br />
program<br />
<strong>The</strong> Autosave function – in case of system–crash<br />
When you start running a program, every ten minutes, the entries of the internal<br />
memory of the <strong>Instrument</strong> is saved to disk as a *.trm file.<br />
E.g you are running a bunch of broadcasts and for any reason, your system crashes<br />
(or your battery went down etc.), you can restore the situation by loading the file<br />
from the following location:<br />
C:\<strong>Virtual</strong>_<strong>Radionic</strong>_<strong>Instrument</strong>\Picture\Autosave.trm<br />
You do this by clicking on:<br />
File → Load <strong>Instrument</strong> Status<br />
navigate to the above location and open the Autosave.trm file.<br />
Your <strong>Instrument</strong>'s program is then restored again.<br />
<strong>The</strong> <strong>Virtual</strong> <strong>Instrument</strong> also saves the status of the memory automatically when you<br />
shut down the program. So in case you have done this involuntary or you have<br />
forgotten to save the existing program, you can recover it by the above<br />
mentioned routine.<br />
<strong>The</strong> <strong>Virtual</strong> <strong>Radionic</strong> Handbook Page 25 / 30
H. Analysis-Mode<br />
This modus was invented to make analysis faster and more effective. <strong>The</strong> advantages<br />
of this mode are:<br />
– all rates are set automatically<br />
– the instrument tells what do dowse for in a given sequence.<br />
– You can input your dowsing results by using “Arrow up” and “Arrow down” keys,<br />
so you don't have to put your pendulum down for this task.<br />
– You can use pictures as stimulation and to improve your dowsing results.<br />
– Normally the full analysis sheet is used for analysis. Under Help → Options you<br />
can choose the Student Analysis Sheet of the <strong>Radionic</strong> School, which is used for<br />
education until Licentiateship by checking the box.<br />
Procedure:<br />
1.) You start the analysis mode by<br />
clicking on “Analysis” in the<br />
mode section of the panel of<br />
the <strong>Virtual</strong> <strong>Radionic</strong> <strong>Instrument</strong>.<br />
<strong>The</strong> look of the front panel<br />
changes and most of the<br />
functionalities disappear, so you<br />
can focus on analysis<br />
2.) On the left hand side, you see<br />
the Base 44 rates set for<br />
analysis. <strong>The</strong> rate is also<br />
displayed in numbers in the<br />
Rate field.<br />
On the right hand side you see<br />
the question, you are asked to dowse for (in the example picture, you should<br />
dowse for Overstimulation or Understimulation of the Mental Body).<br />
3.) When you have got a result by dowsing e.g. +45, you can press the “arrow up”<br />
key on your keyboard 9 times, to reach 45 or you can type 45 into the number<br />
field. <strong>The</strong> first method has the advantage, that you can easily do this with your<br />
non-dowsing hand, while you usually have to put the pendulum down to type<br />
numbers in. However both is possible.<br />
4.) To store the number you have determined, you have to press “ENTER”<br />
5.) After you have pressed “ENTER” the next dowsing question is displayed. <strong>The</strong><br />
questions are according to the analysis routine of the British <strong>Radionic</strong><br />
Association, starting with the subtle bodies, the ethers, the chakras and the<br />
organs.<br />
In this program, the location of the root cause is not subsidised, because this is<br />
a much more tricky and intuitive work you better do offside a software.<br />
6.) If you want to recheck a result, you can navigate back and forth through the<br />
questions and dowsing results by clicking on “Back” and “Next”. But please<br />
remember, by clicking on this buttons, any change you have made is not<br />
<strong>The</strong> <strong>Virtual</strong> <strong>Radionic</strong> Handbook Page 26 / 30
stored. If you navigate to a specific question e.g. the heart chakra and you<br />
recheck it and you change the result typing a new number in, you have quit<br />
your entry with “ENTER” to store it.<br />
7.) When you have reached the last question<br />
and have entered your dowsing result, the<br />
virtual instrument opens up a Excel or<br />
OpenOffice Calc table with all your results<br />
stored therein in a row. You can now best<br />
copy the whole column and copy it into<br />
one of the free columns in the “DATA”-<br />
section of the appropriate analysis table<br />
(OpenOffice Calc-file) of the patient you<br />
have analysed.<br />
<strong>The</strong> numbers are then properly displayed<br />
in the “Analysis”-Sheet. <strong>The</strong>re are three<br />
possible rows in the “DATA”-sheet, where<br />
you can copy your results in.<br />
8.) Please choose them from left to right. For<br />
the first analysis choose column “C”, for<br />
the second column “D” and for the third<br />
column “E”. <strong>The</strong> different analysis will be<br />
displayed in different colours in the<br />
“Analysis”-sheet in the order black, red,<br />
green.<br />
9.) <strong>The</strong> <strong>Virtual</strong> <strong>Instrument</strong> does not support the<br />
search for of the worst locations or for the<br />
causes incl. the root cause. This is a skill, that<br />
is left to the radionic practitioner.<br />
Helpful hints to the Analysis sheet.<br />
• You can type or copy data into all areas that are yellow.<br />
• Blueish areas are cells which are linked to other cells. If you change or<br />
overwrite these cells with other information, the proper connections between<br />
the different cells are not any more possible. So please, leave these cells<br />
untouched.<br />
• <strong>The</strong> data which are displayed in the blueish areas of the front sheet (“Analysis”)<br />
are data from the “DATA”-sheet you have copied into the yellow columns.<br />
• <strong>The</strong> graphs are generated automatically.<br />
• <strong>The</strong> Treatments sheet has the appropriate format, that you can immediately<br />
copy and paste the treatments you have written there into the <strong>Virtual</strong> <strong>Radionic</strong><br />
<strong>Instrument</strong>.<br />
• <strong>The</strong> name in the “Treatment” sheet is automatically generated from the name<br />
and date of birth you have typed into the “Analysis” sheet. If you change the<br />
name cells in the “Treatment” sheet manually, the automatic name generation<br />
will not any more function for these cells.<br />
<strong>The</strong> <strong>Virtual</strong> <strong>Radionic</strong> Handbook Page 27 / 30
• Keep an empty Analysis-Sheet-File as an untouched copy, so you can use it as a<br />
blueprint for further patients.<br />
• You can use a separate Treatments-Sheet, to store your favourite treatments,<br />
so you can refer to this table and paste and copy appropriate treatments into<br />
your patients file or directly into the <strong>Virtual</strong> <strong>Instrument</strong>.<br />
• <strong>The</strong> pictures which are displayed while analysis are stored in<br />
“C:\<strong>Virtual</strong>_<strong>Radionic</strong>_<strong>Instrument</strong>\Analysis”. You can replace any of these<br />
pictures by a different one, you only have to save the file with the same filename<br />
and extension in this folder. If you find the pictures annoying, erase them<br />
and the <strong>Virtual</strong> <strong>Radionic</strong> <strong>Instrument</strong> will not display a picture with analysis.<br />
(but please leave the *.csv files untouched to avoid errors)<br />
<strong>The</strong> <strong>Virtual</strong> <strong>Radionic</strong> Handbook Page 28 / 30
I. Support and Contact-address<br />
For any questions and for support, please send me an Email:<br />
geoffrey.ardens@googlemail.com<br />
K. Appendix - How to change the appearance of the <strong>Instrument</strong><br />
If you want to individualize your <strong>Instrument</strong> or you don't like the traditional style of<br />
the Delawarr-<strong>Instrument</strong>s, you have the chance to do so in certain extent. Please be<br />
aware, that this will demand a little bit of computer knowledge, so don't start doing<br />
this, if you are not quite sure what you are doing!<br />
You find the key patterns in the folder:<br />
C:\<strong>Virtual</strong>_<strong>Radionic</strong>_<strong>Instrument</strong>\Picture\Skin_Default\<br />
You can exchange e.g. the background wood structure:<br />
“backwood.jpg” by a different wood structure or only by a<br />
colour of your choice. To do so, you have to pick a picturefile<br />
from somewhere e.g. the internet. Let's assume you want<br />
to replace this wood by a mahogany type of wood. Search<br />
the internet for a picture of this wood pattern.<br />
I found this one:<br />
Take the file and store it somewhere on your harddrive.<br />
Please pay attention, that the file is in *.jpg format,<br />
because the file you want to replace is a *.jpg file. Rename<br />
the file into “backwood.jpg” and copy the file into the<br />
C:\<strong>Virtual</strong>_<strong>Radionic</strong>_<strong>Instrument</strong>\Picture\Skin_Default\ folder. You will erase by this the<br />
existing file, so I recommend, to copy the whole “Skin_Default” Folder as a backup<br />
somewhere else in a safe place, so you can restore your actions afterwards.<br />
When you now start the <strong>Virtual</strong> <strong>Radionic</strong> <strong>Instrument</strong>, the mahogany background will<br />
appear.<br />
<strong>The</strong> same is possible with other parts of<br />
the instrument e.g. the grey leather, the<br />
witness-plate, the LED-bars (which are<br />
animated gifs, etc.). Please again, keep<br />
attention, that the new file is of the<br />
same type like the old one and<br />
geometry and size are kept...<br />
You see a variation on the right side,<br />
with mahogany, snake leather and and<br />
gemstones as wells.<br />
Not your taste Mine neither – I am<br />
more for the classic outline...<br />
But if you have designed something<br />
pretty, I would be happy to get a picture of your instrument.<br />
<strong>The</strong> <strong>Virtual</strong> <strong>Radionic</strong> Handbook Page 29 / 30
L. Licensing options<br />
<strong>The</strong> <strong>Virtual</strong> <strong>Radionic</strong> <strong>Instrument</strong> can be activated by different license keys. According<br />
to the license, different grades of complexity are possible to be activated. <strong>The</strong> higher<br />
complexity always includes the features of a lower complexity:<br />
Complexity 0: Manual Treatments with Base 10 Rates on 7 wells or of pictures<br />
Complexity 1: Analysis Mode and Base 44 Rates are activated<br />
Complexity 2: Program-Mode is active and Base 12 broadcasts are possible<br />
Complexity 3: Potentizer can be used<br />
Independent of any licence key, the instrument can work in complexity-mode 0 at any<br />
time. This is a free trial mode and you<br />
can use the instrument as often as you<br />
want. You will notice the writing “Limited<br />
Trial User” on the top of the windows,<br />
which will be replaced by your name<br />
when licensed.<br />
To activate the <strong>Instrument</strong>, you need to have a licence key which will correspond to<br />
your name e.g.<br />
Name:<br />
“Limited Trial User”<br />
License:<br />
“z/4I/89TfFnMg1Z//XEXxqQMyN2ZgWBhgG20SZrWQW0SS94NonPnDtkwpilYj8kh”<br />
To activate the instrument, to<br />
have to go to “Help” → “Options”<br />
in the <strong>Instrument</strong>. <strong>The</strong>re you<br />
can type your name in the first<br />
and copy the license number<br />
into the second text-box. By<br />
clicking on Store you can save<br />
the licence and the instrument<br />
is activated according to the<br />
license number.<br />
<strong>The</strong> settings are stored, so you<br />
only have to put in the licence<br />
once.<br />
Geoffrey Ardens<br />
<strong>Radionic</strong>s<br />
all rights reserved©, 2009<br />
<strong>The</strong> <strong>Virtual</strong> <strong>Radionic</strong> Handbook Page 30 / 30


