Conforms To ANSI STD Z21.58a - Smoke Hollow Smokers by ...
Conforms To ANSI STD Z21.58a - Smoke Hollow Smokers by ...
Conforms To ANSI STD Z21.58a - Smoke Hollow Smokers by ...

You also want an ePaper? Increase the reach of your titles
YUMPU automatically turns print PDFs into web optimized ePapers that Google loves.
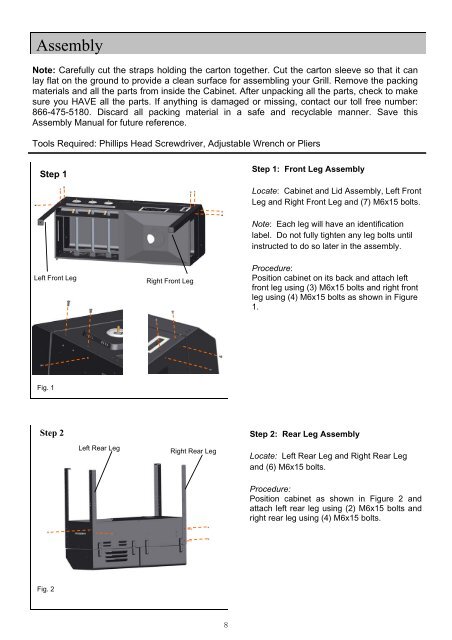
Assembly<br />
Note: Carefully cut the straps holding the carton together. Cut the carton sleeve so that it can<br />
lay flat on the ground to provide a clean surface for assembling your Grill. Remove the packing<br />
materials and all the parts from inside the Cabinet. After unpacking all the parts, check to make<br />
sure you HAVE all the parts. If anything is damaged or missing, contact our toll free number:<br />
866-475-5180. Discard all packing material in a safe and recyclable manner. Save this<br />
Assembly Manual for future reference.<br />
<strong>To</strong>ols Required: Phillips Head Screwdriver, Adjustable Wrench or Pliers<br />
Step 1<br />
Left Front Leg<br />
Fig. 1<br />
Right Front Leg<br />
8<br />
Step 1: Front Leg Assembly<br />
Locate: Cabinet and Lid Assembly, Left Front<br />
Leg and Right Front Leg and (7) M6x15 bolts.<br />
Note: Each leg will have an identification<br />
label. Do not fully tighten any leg bolts until<br />
instructed to do so later in the assembly.<br />
Procedure:<br />
Position cabinet on its back and attach left<br />
front leg using (3) M6x15 bolts and right front<br />
leg using (4) M6x15 bolts as shown in Figure<br />
1.<br />
Step 2 Step 2: Rear Leg Assembly<br />
Fig. 2<br />
Left Rear Leg<br />
Right Rear Leg<br />
Locate: Left Rear Leg and Right Rear Leg<br />
and (6) M6x15 bolts.<br />
Procedure:<br />
Position cabinet as shown in Figure 2 and<br />
attach left rear leg using (2) M6x15 bolts and<br />
right rear leg using (4) M6x15 bolts.