Blueprint for Roofing - Iko
Blueprint for Roofing - Iko
Blueprint for Roofing - Iko

Create successful ePaper yourself
Turn your PDF publications into a flip-book with our unique Google optimized e-Paper software.
Drip Edges, Eave Protection and Underlayment PART 6<br />
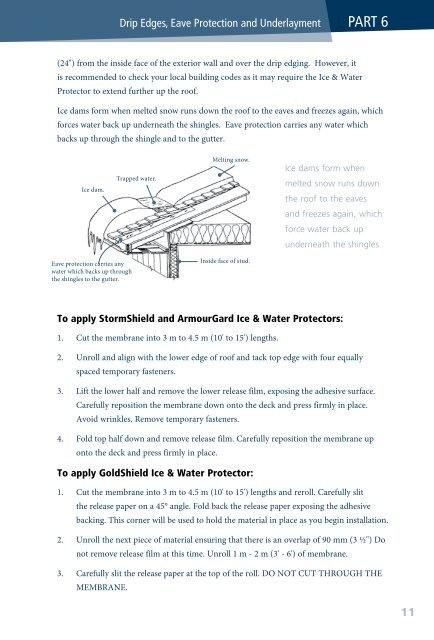
(24") from the inside face of the exterior wall and over the drip edging. However, it<br />
is recommended to check your local building codes as it may require the Ice & Water<br />
Protector to extend further up the roof.<br />
Ice dams <strong>for</strong>m when melted snow runs down the roof to the eaves and freezes again, which<br />
<strong>for</strong>ces water back up underneath the shingles. Eave protection carries any water which<br />
backs up through the shingle and to the gutter.<br />
Ice dam.<br />
Trapped water.<br />
Melting snow.<br />
Ice dams <strong>for</strong>m when<br />
melted snow runs down<br />
the roof to the eaves<br />
and freezes again, which<br />
<strong>for</strong>ce water back up<br />
underneath the shingles.<br />
Eave protection carries any<br />
water which backs up through<br />
the shingles to the gutter.<br />
Inside face of stud.<br />
To apply StormShield and ArmourGard Ice & Water Protectors:<br />
1. Cut the membrane into 3 m to 4.5 m (10' to 15') lengths.<br />
2. Unroll and align with the lower edge of roof and tack top edge with four equally<br />
spaced temporary fasteners.<br />
3. Lift the lower half and remove the lower release film, exposing the adhesive surface.<br />
Carefully reposition the membrane down onto the deck and press firmly in place.<br />
Avoid wrinkles. Remove temporary fasteners.<br />
4. Fold top half down and remove release film. Carefully reposition the membrane up<br />
onto the deck and press firmly in place.<br />
To apply GoldShield Ice & Water Protector:<br />
1. Cut the membrane into 3 m to 4.5 m (10' to 15') lengths and reroll. Carefully slit<br />
the release paper on a 45° angle. Fold back the release paper exposing the adhesive<br />
backing. This corner will be used to hold the material in place as you begin installation.<br />
2. Unroll the next piece of material ensuring that there is an overlap of 90 mm (3 ½") Do<br />
not remove release film at this time. Unroll 1 m - 2 m (3' - 6') of membrane.<br />
3. Carefully slit the release paper at the top of the roll. DO NOT CUT THROUGH THE<br />
MEMBRANE.<br />
11