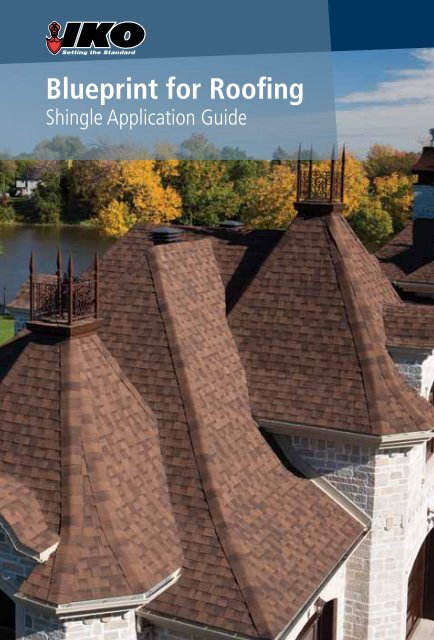
Blueprint for Roofing - Iko
Blueprint for Roofing - Iko
Blueprint for Roofing - Iko

You also want an ePaper? Increase the reach of your titles
YUMPU automatically turns print PDFs into web optimized ePapers that Google loves.
<strong>Blueprint</strong> <strong>for</strong> <strong>Roofing</strong><br />
Shingle Application Guide
TABLE OF CONTENTS<br />
Shingle Application Guide<br />
Table of Contents<br />
Introduction 4<br />
Part 1 Roof Types and Definitions 4<br />
Part 2 Measurements and Materials 5<br />
Part 3 Tool Requirements and Preparation 7<br />
Part 4 Safety 8<br />
Part 5 Deck Preparation and Roof Repair 9<br />
Part 6 Drip Edges, Eave Protection and Underlayment 10<br />
Part 7 Valley Construction 13<br />
Part 8 All Shingle Application 14<br />
A Armourshake Application 15<br />
B Crowne Slate Application 16<br />
C Cambridge/Grandeur Application 17<br />
D Royal Estate Application 18<br />
E Marathon Application 19<br />
Part 9 Re-<strong>Roofing</strong> 20<br />
Part 10 Low Slope - Roof-Fast Application 22<br />
Part 11 Ventilation 25<br />
Part 12 Flashings 27<br />
Part 13 Hips and Ridges 30<br />
Part 14 Inspection and Clean Up 32<br />
Part 15 Roof Care and Maintenance 32<br />
Part 16 Products 32<br />
Glossary 36<br />
3
INTRODUCTION<br />
Introduction<br />
You can re-roof your own home with the help of this easy-to-follow<br />
visual presentation.<br />
Using a simplified step-by-step approach, you may be able to save the cost of contract labor<br />
and still obtain professional results—along with the personal satisfaction of a job well done.<br />
Here’s what you do!<br />
• Play the program modules through completely.<br />
• Play them a second time and compare the in<strong>for</strong>mation with the installation<br />
instructions printed on the bundle wrappers and in<strong>for</strong>mation available through<br />
our website, www.iko.com.<br />
If you are a professional roofing contractor, consider joining IKO’s Shield Pro Plus<br />
Contractor Program that has been developed to help increase sales, become more profitable<br />
and expand your business opportunities; this program will help set you apart from your<br />
competitors. As a member of the elite Shield Pro Plus program, you will be given exclusive<br />
access to IKO’s Extended Iron Clad Protection, customized marketing tools to assist in<br />
promoting your business and an online tool with the ability to order warranties and access<br />
training tools from the com<strong>for</strong>t of your office. For additional in<strong>for</strong>mation or to obtain an<br />
enrollment package, please contact your local IKO sales representative.<br />
Note: All safety guidelines outlined by Government Safety and Fall<br />
Protection standards must be followed at all times.<br />
Part 1<br />
Roof Types and Definitions<br />
Most homes will have one of these roof styles:<br />
The Shed Roof<br />
The Hip Roof or Cottage<br />
Roof<br />
The Gable Roof<br />
The Gambrel Roof<br />
Every roof has similar features. For example, the ridge is at the top.<br />
The eaves are the horizontal, lower edges of a sloped roof. The hip runs from the ridge to<br />
the eaves on a Cottage Style Roof. A valley is the intersection of two sloping roof planes.<br />
4
Measurements and Materials PART 2<br />
Rake Edges<br />
Ridges<br />
Valleys & Dormers<br />
Hips<br />
Low Pitch Areas<br />
Eaves<br />
Part 2<br />
Measurements and Materials<br />
Calculations <strong>for</strong> square footage of the roofing surface can be made by<br />
simply adding up the areas of the various roof sections.<br />
The sum of the total area is then divided by the coverage of each bundle of shingles.<br />
Typically, an average 3-tab bundle covers 3 m 2 (32.3 square feet), while our architectural<br />
shingle bundles vary between 1.86 m 2 and 3.1 m 2 (20 and 33.3 square feet). It is advisable to<br />
add ten to fifteen percent to this area <strong>for</strong> material waste or loss based on your roof style.<br />
When using underlayment, the square measure of the roof may be used again to determine<br />
the number of rolls of underlayment required. We recommend our Number 15 Plain<br />
Asphalt Felt or RoofGard-SB or RoofGard-Cool Grey synthetic underlayment <strong>for</strong> this job.<br />
Drip Edging requirements are determined by measuring the lengths of the eaves and rake<br />
edges. An open metal valley flashing is recommended <strong>for</strong> the protection of valley areas.<br />
Depending on the roof design and the shingle chosen, closed cut and woven valleys may<br />
also be acceptable.<br />
A “pitch finder” tool can also be useful to measure the slope of the roof. You can<br />
determine the roof area by measuring the horizontal area of the roof or attic floor, and then<br />
multiplying by a factor which compensates <strong>for</strong> the slope of a roof.<br />
For ice dam protection along the eaves (or anywhere that is susceptible to water<br />
penetration), you’ll need IKO’s GoldShield Premium Ice & Water Protector, ArmourGard<br />
Ice & Water Protector, or StormShield Standard Ice & Water Protector. Asphalt plastic<br />
cement is used to seal at vents, stacks, or chimneys.<br />
5
PART 2<br />
Measurements and Materials<br />
IKO’s Ice & Water Protectors are modified<br />
bitumen roll roofing products with a<br />
self-adhesive backing that, once applied<br />
correctly, will provide superior protection<br />
against wind-driven rain and ice dams.<br />
Galvanized roofing nails are the best fastener to use <strong>for</strong> roofing, and they should be long<br />
enough to penetrate through the shingles and into the deck approximately 19 mm (¾")<br />
and through the deck if it is plywood or OSB. Nails no less than 6 mm (¼") longer will be<br />
required <strong>for</strong> capping the hips and ridges.<br />
IKO recommends our PRO 4 <strong>Roofing</strong> system. Shingles alone are sometimes not enough<br />
to protect your home. IKO has developed a superior multi-layered roofing system<br />
incorporating our industry-leading products. IKO’s Pro 4 <strong>Roofing</strong> System is setting the<br />
standard in protecting your home.<br />
IKO’s Shingles - Crowne Slate, Armourshake, Royal Estate, Cambridge, Grandeur and<br />
Marathon shingles are created using the industry’s most advanced technology and selected<br />
by consumers who demand the best in terms of quality, durability and value. Along with<br />
one of IKO’s quality shingles, your Pro 4 System includes these accessory products;<br />
• Eave Protection - GoldShield, ArmourGard, or StormShield Ice & Water<br />
Protectors. IKO’s Ice & Water Protectors provide a second line of defense against<br />
water penetration due to ice dams or wind-driven rain and the costly damage it<br />
can cause. This product is strongly recommended <strong>for</strong> sealing around vents, low<br />
pitch areas, ridges, hips, rake edges, chimneys, dormers, vent stacks, and skylights.<br />
• Underlayment - Asphalt Saturated Felt, RoofGard-SB or RoofGard-Cool Grey<br />
Underlayments, Use an asphalt saturated felt underlayment, or our innovative<br />
RoofGard-SB or RoofGard‐Cool Grey synthetic underlayment <strong>for</strong> total deck<br />
protection.<br />
• Roof Starters - Leading Edge Plus Starter Strips. Fast, Easy and Convenient.<br />
IKO’s Starter Strips are already cut to size saving valuable time during the<br />
installation of the first course of shingles. Compatible with all existing IKO<br />
Shingles, Leading Edge Plus includes a sealant strip at the bottom edge allowing<br />
<strong>for</strong> a tight seal.<br />
6
Tool Requirements and Preparation PART 3<br />
• Ridge Cap Shingles - Hip and Ridge, Hip & Ridge 12 Cap Shingles or Ultra HP TM<br />
High Profile Ridge Cap Shingles. Ridge cap shingles are required where roof<br />
planes meet, and provide additional protection along these high stress areas of the<br />
roof, enhancing your home’s aesthetic appeal by accentuating the roof line.<br />
Part 3<br />
Tool Requirements and Preparation<br />
Proper and safe tools are the key to any successful job.<br />
• Ladders should always be sturdy and long enough to reach the roof area at the<br />
proper angle, approximately one quarter of the vertical height out from the wall<br />
and should extend about 1 m (3') above the eaves. Make sure your ladder or<br />
scaffolding is tied off at the roof edge and all locking devices are secured.<br />
• Vertical and horizontal chalk lines are applied to ensure accurate shingle<br />
alignment over the roof surface.<br />
• The roofing knife blade is hooked <strong>for</strong> cutting and fitting asphalt shingles.<br />
• The hammer may either be a well-balanced claw hammer or a specially designed<br />
roofer’s hatchet.<br />
• You will also need a nail apron and perhaps a pair of knee pads.<br />
• A caulking gun, putty knife or pointed trowel are used <strong>for</strong> applying the asphalt<br />
plastic cement.<br />
• Tin snips will be used to cut metal flashing materials. 7
PART 4<br />
Safety<br />
• A circular saw may be required <strong>for</strong> repairing or replacing damaged decking.<br />
• A pry-bar is a handy tool <strong>for</strong> lifting hard to get at shingles and flashings.<br />
• A square-edge shovel or pitch <strong>for</strong>k is an excellent tool <strong>for</strong> removing old shingles.<br />
• Galvanized roofing nails are the best fastener to use <strong>for</strong> roofing ensuring that they<br />
are driven straight so that the nail head is flush with the shingle surface.<br />
• Protect shrubbery, air conditioners, bay windows or other protrusions from falling<br />
debris by using tarps or sheets of plywood.<br />
• And a good-sized waste receptacle should be placed conveniently below the area<br />
being worked on.<br />
Be aware of those working with and<br />
around you. Make sure that everyone<br />
knows how to properly use the tools of<br />
trade, both manual and power.<br />
Part 4<br />
Safety<br />
Proper preparation and careful attention to what you are doing are important<br />
considerations <strong>for</strong> any undertaking. Learn and adhere to Government Safety and Fall<br />
Protection standards. Certain jurisdictions may require the shingle applicator to use fall<br />
arrest safety equipment when on roofs of certain heights and slopes. IKO recommends<br />
contacting your local building or labor department <strong>for</strong> more in<strong>for</strong>mation.<br />
Inspect the job site <strong>for</strong> possible hazards such as unstable ground conditions, or overhead<br />
electrical lines. Do not attempt to work in bad weather or on wet or icy surfaces.<br />
Beware of those working around you. Make sure that everyone knows how to properly use<br />
the tools of the trade, both manual and power.<br />
Keep your safety equipment clean and in good working order. When not in use, store your<br />
equipment in a safe place.<br />
8
Deck Preparation and Roof Repair PART 5<br />
Keep your safety equipment clean and in working<br />
order. When not in use, store your equipment in a<br />
safe place. You will want to be able to tie-off on<br />
steep roofs without worrying that a frayed rope or<br />
strap will break.<br />
Make sure you have proper footwear <strong>for</strong> good traction. Rubber-soled shoes are best. And<br />
never work alone. Avoid leaning away from the ladder to work and remember to tie it off<br />
to the eaves troughing each time it is moved. Keep the work area free of debris, which is a<br />
constant tripping hazard. Consider a trained professional roofer if the roof is steep!<br />
Note: All safety guidelines outlined by Government Safety and Fall<br />
Protection standards must be followed at all times.<br />
Part 5<br />
Deck Preparation and Roof Repair<br />
If the old shingles are to be removed, it’s recommended to strip one roof plane at a time and<br />
work in these sections through all steps up to and including the roof shingles. Start on the<br />
section farthest from the disposal bin so as not to walk on newly laid shingles.<br />
The deck must be dry <strong>for</strong> the job.<br />
Be sure that all old nails are removed or hammered down flush to the deck surface. It is<br />
essential to make all necessary repairs to the existing roof deck. A warped or uneven surface<br />
is difficult to work with during the re-roofing job and creates an unprofessional looking<br />
finished project.<br />
The deck should be applied in a staggered pattern bridged across roof rafters or roof<br />
trusses. Replace rotted, damaged, or warped sheathing or delaminated plywood as it can<br />
cause shingles to distort and/or buckle. If the entire deck is to be replaced, check the<br />
building codes to determine the required thickness and type of sheathing required in your<br />
municipality. Dimensional lumber is subject to expansion and contraction caused by<br />
temperature and humidity changes.<br />
9
PART 6<br />
Drip Edges, Eave Protection and Underlayment<br />
A deck built with plywood panels<br />
generally works well with asphalt<br />
shingles.<br />
To avoid buckling shingles, you should cover a dimensional deck with an<br />
inexpensive sheathing. Our Asphalt Shingle Limited Warranty does not<br />
cover buckling.<br />
Bad decks can cause shingles to distort<br />
and/or buckle.<br />
Soil stack and vent flashings can be used again if they’re in good condition, but you should<br />
consider replacing them with new ones.<br />
Part 6<br />
Drip Edges, Eave Protection and Underlayment<br />
Metal or plastic drip edge material nailed every 300 mm (12") may be applied to protect<br />
wooden edges from damage and to facilitate water run-off into the eavestrough.<br />
Note that IKO’s Pro 4 <strong>Roofing</strong> System recommends that along with IKO’s shingles,<br />
accessory items be utilized to ensure roof per<strong>for</strong>ms to its maximum capacity. Eave<br />
protection and underlayment are recommended components to the multi-layered system.<br />
Apply IKO’s GoldShield Premium Ice & Water Protector, ArmourGard Ice & Water<br />
Protector, or StormShield Standard Ice & Water Protector as ice dam protection along<br />
the eaves. For ideal protection, Ice & Water Protector should extend up the roof, 610 mm<br />
10
Drip Edges, Eave Protection and Underlayment PART 6<br />
(24") from the inside face of the exterior wall and over the drip edging. However, it<br />
is recommended to check your local building codes as it may require the Ice & Water<br />
Protector to extend further up the roof.<br />
Ice dams <strong>for</strong>m when melted snow runs down the roof to the eaves and freezes again, which<br />
<strong>for</strong>ces water back up underneath the shingles. Eave protection carries any water which<br />
backs up through the shingle and to the gutter.<br />
Ice dam.<br />
Trapped water.<br />
Melting snow.<br />
Ice dams <strong>for</strong>m when<br />
melted snow runs down<br />
the roof to the eaves<br />
and freezes again, which<br />
<strong>for</strong>ce water back up<br />
underneath the shingles.<br />
Eave protection carries any<br />
water which backs up through<br />
the shingles to the gutter.<br />
Inside face of stud.<br />
To apply StormShield and ArmourGard Ice & Water Protectors:<br />
1. Cut the membrane into 3 m to 4.5 m (10' to 15') lengths.<br />
2. Unroll and align with the lower edge of roof and tack top edge with four equally<br />
spaced temporary fasteners.<br />
3. Lift the lower half and remove the lower release film, exposing the adhesive surface.<br />
Carefully reposition the membrane down onto the deck and press firmly in place.<br />
Avoid wrinkles. Remove temporary fasteners.<br />
4. Fold top half down and remove release film. Carefully reposition the membrane up<br />
onto the deck and press firmly in place.<br />
To apply GoldShield Ice & Water Protector:<br />
1. Cut the membrane into 3 m to 4.5 m (10' to 15') lengths and reroll. Carefully slit<br />
the release paper on a 45° angle. Fold back the release paper exposing the adhesive<br />
backing. This corner will be used to hold the material in place as you begin installation.<br />
2. Unroll the next piece of material ensuring that there is an overlap of 90 mm (3 ½") Do<br />
not remove release film at this time. Unroll 1 m - 2 m (3' - 6') of membrane.<br />
3. Carefully slit the release paper at the top of the roll. DO NOT CUT THROUGH THE<br />
MEMBRANE.<br />
11
PART 6<br />
Drip Edges, Eave Protection and Underlayment<br />
4. Peel back approximately 150 mm (6") of the release paper to expose the adhesive. Peel<br />
the release paper in the opposite direction that you are applying the membrane.<br />
5. Pull the release paper in the direction that you are applying the membrane, applying<br />
pressure to the membrane as you proceed. The membrane will adhere to the deck.<br />
6. Once you have finished laying the membrane, go back to the beginning of the roll, and<br />
pull off the release paper at that end.<br />
Next, install the underlayment, overlapping the ice and water protector by 100 mm (4").<br />
Please note that a felt or synthetic underlayment, or equivalent, is strongly recommended<br />
beneath fiberglass shingles applied to slopes below 6:12. Please refer to the IKO Asphalt<br />
Shingle Limited Warranty or the bundle wrappers <strong>for</strong> further details.<br />
Underlayment comes in rolls. It must be unrolled, cut to convenient lengths, and laid out<br />
flat until completely relaxed be<strong>for</strong>e shingles are applied over it.<br />
Water resistant underlayment felts are<br />
recommended <strong>for</strong> a sound roofing system.<br />
Use only enough nails or staples to hold each run in place, overlapping the course below<br />
by approximately 50 mm (2") (100 mm (4") <strong>for</strong> RoofGard-SB or Cool-Grey) and ends by<br />
100 mm (4"). Never use a piece less than 2 m (6') in length. Underlayment should overlap<br />
hips and ridges by 150 mm (6"), and approximately 100 mm (4") extensions should be left at<br />
the chimney and any vertical projection from the roof surface.<br />
Apply metal drip edges over the underlayment at the rake edges.<br />
For slopes between 2:12 and 4:12, that is between 50 mm (2") of rise to 300 mm (12") of run<br />
and 100 mm (4") of rise to 300 mm (12") of run, shingles may be applied. However, in order<br />
to validate the Asphalt Shingle Limited Warranty, a full layer of an Ice & Water Protector or<br />
two layers of number 15 plain felt, cemented together to 610 mm (24") beyond the interior<br />
wall line, and then nailed <strong>for</strong> the rest of the roof, must be applied to roofs of these slopes.<br />
For shingled roof slopes between 2:12 and 3:12, we offer a 12-Year Limited Warranty,<br />
regardless of the shingle applied. If this same application procedure is followed <strong>for</strong> roof<br />
slopes between 3:12 and 4:12, a full Limited Material Warranty will be offered.<br />
12<br />
Do not apply Crowne Slate on a slope 4:12 or less.
Valley Construction PART 7<br />
Please note that IKO’s Ice & Water Protectors are vapor retarders. The space under the roof<br />
deck must be properly ventilated to avoid moisture condensation.<br />
Drip edge.<br />
483 mm<br />
(19")<br />
Courses cemented<br />
to a point at least<br />
610 mm (24")<br />
beyond interior<br />
wall line.<br />
914 mm (36")<br />
483 mm (19")<br />
Wall line.<br />
483 mm (19")<br />
430 mm (17")<br />
Deck.<br />
483 mm<br />
(19")<br />
Drip edge.<br />
Starter strip.<br />
Asphalt plastic cement<br />
or lap cement.<br />
305 mm (12") end lap.<br />
First and succeeding courses<br />
are 914 mm (36") wide with<br />
483 mm (19") lap.<br />
Application of<br />
underlayment on<br />
low slopes.<br />
Part 7<br />
Valley Construction<br />
There are several different valley application methods which include<br />
closed, open and woven.<br />
For longer roof per<strong>for</strong>mance, IKO strongly recommends open metal valleys. Complete<br />
the application of underlayment and valley flashing be<strong>for</strong>e the shingles are applied. The<br />
recommended flashing material is a 28-gauge galvanized metal or an equivalent corrosion<br />
resistant, non staining material (check with local codes). Center a 914 mm (36") width<br />
strip of an ice and water protector membrane in the valley. The product is tacked in place<br />
temporarily along one edge. Carefully peel away the backing, and put it in place, smoothing<br />
out any wrinkles. Start working from the eave, allowing additional pieces to overlap by at<br />
least 150 mm (6"). Remove the temporary nails.<br />
Center a minimum 610 mm (24") wide, minimum 28 gauge pre-finished/galvanized metal<br />
valley liner in the valley, and fasten with only enough nails to hold it in place, nailing at<br />
the edges only. Overlap each metal piece by at least 150 mm (6") and use asphalt plastic<br />
cement under each section of overlap. Snap two chalk lines the full length of the valley,<br />
150 mm (6") apart at the top 75 mm (3") on each side of the valley and increasing in width<br />
3 mm (⅛") per 300 mm (12") towards the bottom to a maximum of 200 mm (8"). When the<br />
shingles are being applied, lay them over the valley flashing, trim the ends to the chalk line<br />
and nail the shingles at least 50 mm (2") back from the chalk line. Cut a 50 mm (2") triangle<br />
off the top corner to direct water into the valley and embed the valley end of each shingle<br />
into a 75 mm (3") band of asphalt plastic cement.<br />
13
PART 8<br />
All Shingle Application<br />
Valley underlayment<br />
Underlayment<br />
Chalk lines<br />
diverge 3 mm<br />
per 300 mm<br />
(⅛" par 12")<br />
Asphalt plastic cement<br />
Valley centerline<br />
Metal valley flashing<br />
300 mm (12") top lap<br />
50 mm (2") clipped<br />
off corner at 45°<br />
Open Valley Application.<br />
End shingles trimmed to chalk<br />
line and set in 75 mm (3") width<br />
of cement<br />
Part 8<br />
All Shingle Application<br />
Whether you are applying Architectural or Traditional 3-Tab Shingles, it is recommended that<br />
you read and familiarize yourself with the application instructions provided on the back of each<br />
shingle wrapper. One cannot go wrong if those instructions are adhered to during the installation<br />
of IKO shingles. Although all types, styles, and sizes have a commonality to their application, each<br />
will have an individual installation feature that you must familiarize yourself with.<br />
Remember to always drive nails straight so that nail head is flush with, but not cutting into shingle<br />
surface. Also, if nail heads are left protruding, they can tear into the shingle that is applied on top<br />
of them.<br />
Starter Strip Application:<br />
For the starter strip, we recommend using IKO’s Leading Edge Plus, a starter course that has<br />
already been cut to size. Each 1 m (39 ⅜") x 337 mm (13 ¼") IKO Leading Edge Plus strip is<br />
per<strong>for</strong>ated lengthwise <strong>for</strong> separation into two (2) shingles.<br />
Note that IKO’s Pro 4 <strong>Roofing</strong> System recommends that along with IKO’s shingles, accessory<br />
items be utilized to ensure roof per<strong>for</strong>ms to its maximum capacity. Starter strips are<br />
recommended component to the multi-layered system.<br />
Take one IKO Leading Edge Plus strip and fold flat at the per<strong>for</strong>ation to separate. Take one of the<br />
separated shingles and remove approximately 508 mm (20"). Install this shingle on the lower left<br />
corner of the roof deck, granule side up, with the factory installed sealant adjacent to the eaves.<br />
14
Armourshake Application<br />
PART 8A<br />
The shingle should overhang the rake edge and eaves by 6 mm - 10 mm (¼" – ⅜"). Fasten<br />
the shingle to the roof deck with nails located 75 mm to 100 mm (3" to 4") from the eave<br />
edge and 25 mm (1") in from each end.<br />
Take the leftover 508 mm (20") piece shingle. Rotate the piece and align it vertically up<br />
the rake edge with the factory installed sealant adjacent to the outer edge of the roof. The<br />
shingle should overhang the rake edge by 6 mm - 10 mm (¼" – ⅜"). Fasten the shingle to<br />
the roof deck with fasteners located 75 mm to 100 mm (3" to 4") from the rake edge and<br />
25 mm (1") in from each end.<br />
Repeat these steps to the right lower corner of the roof deck. Apply full-length IKO Leading<br />
Edge Plus shingles to the remaining eave edge of the roof deck. Install the shingles granule<br />
side up with the factory applied sealant adjacent to the eaves. The shingles should overhang<br />
the rake edge and eaves by 6 mm - 10 mm (¼" – ⅜"). Fasten the shingles to the roof deck<br />
with nails located 75 mm to 100 mm (3" to 4") from the eave edge, 4 nails per shingle.<br />
Make certain the first course of field shingle lies flush with the edges of the fastened IKO<br />
Leading Edge Plus. In this way, the sealant on the IKO Leading Edge Plus shingles will<br />
adhere to the first-course field shingles and help keep them from lifting in high winds.<br />
As a general rule, all shingles must be applied properly. We assume no responsibility <strong>for</strong><br />
leaks or defects resulting from poor application or failure to properly prepare the surface<br />
to be roofed over, or failure to provide proper ventilation in accordance with minimum<br />
property standards requirements. Review all applicable building codes, minimum property<br />
standards and requirements prior to applying these shingles using the application<br />
instructions found on the bundle wrapper. Please use caution when stacking bundles on<br />
sloped roofs.<br />
Part 8A<br />
Armourshake Application<br />
Armour Starter Application:<br />
After applying the Leading Edge Plus starter strip shingle, install the Armour Starter shingle<br />
starting on the lower left corner of the roof deck, granule side up. Apply full-length IKO<br />
Armour Starter shingles to the eave edge of the roof deck. Make certain the Armour Starter<br />
shingles lie flush with the edges of the fastened IKO Leading Edge Plus.<br />
Armourshake Application:<br />
First Course: Start with a full shingle. Trim the rake end of the shingle slightly so it is flush<br />
with the rake. Apply the shingle flush with starter course at rake and eaves. Use 5 nails per<br />
shingle in the nail line approximately 25 mm (1") from each end and equally spaced along<br />
the shingle’s full length. Drive nails straight so that the nail head is flush with, but not<br />
cutting into, the shingle surface.<br />
15
PART 8B<br />
Crowne Slate Application<br />
Second Course: Start with a shingle from which 143 mm (5 ⅝") has been cut at the rake<br />
end. Align the end of the shingle with the alignment notch in the top edge of the first course<br />
shingle. Continue with full shingles along the second course.<br />
Third Course: Start with a shingle from which 286 mm (11 ¼") has been cut at the rake end.<br />
Use the appropriate alignment notch in the top edge of the second course shingle. Continue<br />
with full shingles along the third course.<br />
Fourth Course: Start with a shingle from which 429 mm (16 ⅞") has been cut at the rake<br />
end. Use the appropriate alignment notch in the top edge of the third course shingle.<br />
Continue with full shingles along the fourth course.<br />
Fifth Course: Start with a shingle from which 572 mm (22 ½") has been cut at the rake end.<br />
Use the appropriate alignment notch in the top edge of the fourth course shingle. Continue<br />
with full shingles along the fifth course.<br />
Sixth Course: Start with a shingle from which 714 mm (28 ⅛") has been cut at the rake end.<br />
Use the appropriate alignment notch in the top edge of the fifth course shingle. Continue<br />
with full shingles along the sixth course.<br />
Successive Courses: Repeat this pattern: Full shingle cut flush, 143 mm (5 ⅝") removed,<br />
286 mm (11 ¼") removed, 429 mm (16 ⅞") removed, 572 mm (22 ½") removed, 714 mm<br />
(28 ⅛") removed, full shingle cut flush, 143 mm (5 ⅝") removed, 286 mm (11 ¼") removed,<br />
429 mm (16 ⅞") removed, 571 mm (22 ½") removed, 714 mm (28 ⅛") removed etc.<br />
For added wind protection, use 6 nails per shingle and seal down each shingle with (3)<br />
25 mm (1") diameter spots of asphalt plastic cement placed under each tab.<br />
Underlayment<br />
Metal<br />
Drip<br />
Edge<br />
50 mm (2")<br />
100 mm (4")<br />
ArmourShake<br />
Shingle Application.<br />
Eave protection<br />
Metal Drip Edge<br />
Part 8B<br />
Crowne Slate Application<br />
16<br />
Due to shingle design, it is recommended to begin application at the left side of the roof and<br />
work across the roof to the right. This is a fully laminated two-layer shingle. Shingles should<br />
be laid flat (not bent) prior to installation to avoid distortions and buckles.<br />
First Course: Starting from the left rake edge, trim 229 mm (9") (one full tab) from the<br />
end of the shingle so that the tab is flush with the rake edge. Apply the shingle flush with
Cambridge/Grandeur Application<br />
PART 8C<br />
starter course at left rake edge and eaves. Use 5 nails per shingle placed in the nail line<br />
approximately 25 mm (1") in from each end and equally spaced along the shingle’s full<br />
length. Drive nails straight so that the nail head is flush with, but not cutting into, shingle<br />
surface. Continue across the roof with full shingles, overlapping each shingle as you<br />
proceed.<br />
Second Course: Start with a shingle from which one and one half tabs has been cut at the<br />
rake end. Apply with lower edge of the shingle 250 mm (10") above that of the first course.<br />
There are small shingle alignment slits at the sides and in the top edge of the shingle to aid<br />
installation, but chalk lines should always be used to ensure proper offset.<br />
Third and Succeeding Courses: Start the third course with a shingle from which two full<br />
tabs have been cut off. Cut off an additional half a tab to start each succeeding course,<br />
aligning the lower edge of the shingle 250 mm (10") above that of the preceding course.<br />
At the fifth course, repeat the sequence of the first four courses. For maximum wind<br />
protection, cement shingles at the rake edges.<br />
For added wind protection, use 8 nails per shingle and seal down each shingle with (5)<br />
25 mm (1") diameter spots of asphalt plastic cement spaced as shown on the shingle bundle<br />
wrapper.<br />
Crowne Slate<br />
Shingle Application.<br />
Part 8C<br />
Cambridge/Grandeur Application<br />
Note that these brands, Cambridge and Grandeur, are the same size so<br />
we will discuss installation collectively.<br />
First Course: Start with a complete shingle applied flush with starter course at rake and<br />
eave. Use 4 nails per shingle placed in the nail line 187 mm (7 ⅜") below the top edge,<br />
approximately 25 mm (1") and 330 mm (13") in from each end. Drive nails straight so that<br />
nail head is flush with, but not cutting into shingle surface. Continue across roof with full<br />
shingles.<br />
Second, Third and Fourth Courses: Trim off 250 mm, 508 mm, and 762 mm (10", 20",<br />
and 30") respectively, from the left end of the starting shingle and apply to overhang rake<br />
edge by 6 mm to 10 mm (¼" to ⅜"). Continue each course across the roof with full shingles<br />
butting ends loosely. Align the bottom edge of the shingles with the tops of the saw teeth of<br />
the shingles in the underlying course.<br />
Fifth and Succeeding Courses: Repeat the sequence of the first four courses up the roof. For<br />
maximum wind protection, cement shingles at rake edges.<br />
17
PART 8D<br />
Royal Estate Application<br />
For added wind protection, use 6 nails per shingle and seal down each shingle with (3)<br />
25 mm (1") diameter spots of asphalt plastic cement spaced evenly along the shingle.<br />
2nd, 3rd<br />
and 4th<br />
courses<br />
100 mm<br />
(4")<br />
760 mm<br />
50 mm (2")<br />
(30")<br />
508 mm<br />
(20")<br />
Eave protection<br />
250 mm<br />
(10")<br />
Underlayment<br />
Metal drip<br />
edge<br />
Laminated Shingle<br />
Application.<br />
First course<br />
Starter strip<br />
Part 8D<br />
Royal Estate Application<br />
First Course: Start with a complete shingle applied flush with starter course at rake and<br />
eave. Use 4 nails per shingle placed in the nail line 181 mm (7 ⅛") below the top edge,<br />
approx. 25 mm and 330 mm (1" and 13") in from each end. Drive nails straight so that nail<br />
head is flush with, but not cutting into shingle surface.<br />
Second, Third And Fourth Courses: Trim off 250 mm, 508 mm, and 762 mm (10", 20",<br />
and 30") respectively, from the left end of the starting shingle and apply to overhang rake<br />
edge by 6 mm to 10 mm (¼" to ⅜"). Continue each course across the roof with full shingles<br />
butting ends loosely. Align the bottom edge of the shingles with the tops of the cutouts of<br />
the shingles in the underlying course.<br />
Fifth And Succeeding Courses: Repeat the sequence of the first four courses up the roof.<br />
For maximum wind protection, cement shingles at rake edges.<br />
For added wind protection, use 6 nails per shingle and seal down each shingle with (3)<br />
25 mm (1") diameter spots of asphalt plastic cement spaced evenly along the shingle.<br />
Underlayment<br />
100 mm (4")<br />
50 mm (2")<br />
Royal Estate<br />
4th course<br />
3rd course<br />
2nd course<br />
First course<br />
Eave protection<br />
760 mm (30")<br />
508 mm (20")<br />
250 mm (10")<br />
Starter strip<br />
Shingle<br />
Application.<br />
Metal drip<br />
edge<br />
18
Marathon Application<br />
PART 8E<br />
Part 8E<br />
Marathon Application<br />
There are several approved offset methods <strong>for</strong> applying 3-Tab shingles.<br />
Half Tab Method<br />
There is the half tab method whereby each course after the first, has an additional half of a<br />
tab removed on the rake side, until it’s time to start over with a full shingle to complete the<br />
succeeding courses. It is important to note that the proper exposure <strong>for</strong> the 3-Tab shingle<br />
starts at the top of the cut-out and works down to the most exposed edge of the shingle.<br />
Exposing more or less than what is recommended could result in wind damage or leaks<br />
that are not protected by the Limited Warranty. This method can be employed when it is<br />
necessary <strong>for</strong> the cut-outs of every other course to be aligned vertically up the roof. When<br />
nailing 3-Tab shingles, use 4 nails per shingle placed 156 mm (6 ⅛") above the butt edge,<br />
25 mm and 330 mm (1" and 13") in from each end and 13 mm (½") above each cutout.<br />
Drive nails straight so that nail head is flush with, but not cutting into shingle surface.<br />
Metal drip edge<br />
Sealing strip<br />
Start third course<br />
with full strip<br />
minus first tab<br />
Start second course with<br />
full strip minus ½ tab<br />
Wood deck<br />
Eaves flashing strip<br />
Drip edge<br />
Starter full shingle<br />
minus 100 mm (4")<br />
with tabs cut-off<br />
Start first course<br />
with full strip<br />
3-Tab Shingle<br />
Application.<br />
Random Method<br />
A superior method of applying 3-Tab shingles (instead of taking a half tab, or approximately<br />
168 mm (6 ⅝") additional off of the shingle <strong>for</strong> each succeeding course after the first), allows<br />
the installer to remove approximately 143 mm (5 ⅝") additional from each succeeding<br />
course. There<strong>for</strong>e, the third course will have 286 mm (11 ¼") removed from the rake side<br />
of the shingle, the fourth course will have 429 mm (16 ⅞") removed, the fifth course will<br />
have 572 mm (22 ½") removed, the sixth course will have 714 mm (28 ⅛") removed, and<br />
the seventh course first shingle will be reduced by 857 mm (33 ¾"). Of course all of this<br />
measuring can be done with the aid of the gauge on your roofing hatchet or power nailer<br />
fixed at the shingle exposure of 143 mm (5 ⅝").<br />
19
PART 9<br />
Re-<strong>Roofing</strong><br />
This method of application has a significant advantage over the half tab method. This<br />
method will mask any small variations in the shingle alignment that are due to variations in<br />
deck squareness, normal production or shingle application processes.<br />
Please remind yourself that under no circumstance do you want the cut-outs of the shingles<br />
to be closer than 100 mm (4") when aligned with the next course both above and below. As<br />
well, you do not want the joints of the starter strips to be any closer than 100 mm (4") to the<br />
joints or cut-outs of the shingles in the first course.<br />
The random spacing method of applying 3-Tab shingles can be achieved by removing<br />
differing amounts from the rake tab. Generally, the following principles should be followed.<br />
• The width of any tab should be no less than ¼ of the overall dimension of that tab.<br />
• The cut-outs should not be located any less than 100 mm (4") laterally from the<br />
cut-outs in both the course above and the course below.<br />
• The width of the tabs at the rake must not repeat close enough to cause the eye to<br />
be able to follow a cut-out alignment.<br />
As an example, the first course can be a full shingle tab wide. The second course can start<br />
with ½ of the rake side tab being removed. The third course can start with ¼ of the rake<br />
side tab removed. The fourth course can start with ¾ of the rake side tab removed. The fifth<br />
course can be started with another ½ tab to the rake side.<br />
For added wind protection, use 6 nails per shingle and seal down each shingle with (3)<br />
25 mm (1") diameter spots of asphalt plastic cement spaced evenly along the shingle.<br />
Part 9<br />
Re-<strong>Roofing</strong><br />
If you feel that your roof deck is in good condition and needs no repair,<br />
you can re-roof over the existing layer of shingles. For best results, we<br />
recommend a technique called “nesting”.<br />
However, it is advised that you check your local building codes to ensure re-roofing over<br />
existing shingles is allowed <strong>for</strong> your area.<br />
Nesting, which minimizes an uneven appearance that can be caused by the underlying<br />
material, may also be used when applying metric-sized shingles over an existing roof of<br />
metric shingles.<br />
20
Re-<strong>Roofing</strong> PART 9<br />
If the old shingles have only a 125 mm (5") exposure, you will require 12.5% or ⅛ more<br />
3-tabs than you would if you stripped off to the deck.<br />
Begin with a “starter” strip. Remove the tabs plus enough from the top of the starter strip so<br />
that the remaining portion is equal in width to the exposure of the old shingles.<br />
Apply the starter strip so that it is even with the existing roof at the eaves, locating the<br />
factory applied adhesive along the eaves edge.<br />
Remove 100 mm (4") from the end of the first starter strip shingle to ensure that joints<br />
between adjacent starter strip shingles will be covered when the first course is applied.<br />
For the first course, you need to trim enough material from the bottom of the shingles to<br />
allow them to fit between the bottom of the tabs of the old third course and the eave edge of<br />
the new starter strip.<br />
Start with a full length shingle. Use 4 nails per shingle placed per the respective shingle’s<br />
application instructions. In this case, <strong>for</strong> Cambridge, that would be in the nailing line. You<br />
will require slightly longer nails, in order to penetrate through the old shingles and the roof<br />
deck.<br />
For the second and all succeeding courses, offset the shingles as you would <strong>for</strong> installation<br />
on a new deck.<br />
Place the top edge of the new shingle against the bottom edge of the tabs of the old shingle<br />
in the course above.<br />
Although the exposure of the first course is reduced when using this method, this will not<br />
be noticeable when viewed from the ground.<br />
For valleys, you must first build up the exposed valley area with Roof-Fast to a level flush<br />
with the old shingles.<br />
Center a minimum 610 mm (24") wide, minimum 28 gauge pre-finished/galvanized metal<br />
valley liner in the valley, and fasten with only enough nails to hold it in place, nailing at<br />
the edges only. Overlap each metal piece by at least 150 mm (6") and use asphalt plastic<br />
cement under each section of overlap. Snap two chalk lines the full length of the valley,<br />
150 mm (6") apart at the top and increasing in width 3 mm (⅛") per 300 mm (12") towards<br />
the bottom to a maximum of 200 mm (8"). When the shingles are being applied, lay them<br />
over the valley flashing, trim the ends to the chalk line, and cut a 50 mm (2") triangle off<br />
the top corner to direct water into the valley. Embed the valley end of each shingle into a<br />
75 mm (3") band of asphalt plastic cement, and nail the shingles 50 mm (2") back from the<br />
chalk line.<br />
21
PART 10<br />
Low Slope - Roof-Fast Application<br />
Special attention is required when working with existing flashings.<br />
If the existing flashing is in good condition, continue applying the new shingles over the<br />
existing shingles. Trim the new shingles to within 6 mm (¼") of the existing step flashing.<br />
Embed the last 75 mm (3") of these shingles in asphalt plastic cement.<br />
If the flashings need to be replaced, remove the counter flashing, cut away the old shingles<br />
covering the step flashings, and remove the flashing. Build up the areas of the exposed roof<br />
deck to a level even with the old shingles be<strong>for</strong>e applying new step flashings.<br />
When applying the new shingles, each shingle course will be covered by a step flashing.<br />
Flashings need to be at least 125 mm (5") high, and 125 mm (5") wide. Each flashing should<br />
overlap the one below by at least 75 mm (3"), but not be visible below the shingle top lap.<br />
Imbed each step flashing in a 75 mm (3") wide application of asphalt plastic cement, and<br />
nail in place. The end of each shingle overlapping a step flashing is also well embedded in<br />
plastic cement. Remember to reinstall counter-flashing over the step flashings.<br />
Existing vents and flashings around soil stacks may be used again, but it’s recommended<br />
that new flashings and vents be installed. Using the hooked blade knife, cut through the old<br />
shingles around the perimeter of the flashing apron and remove them. Fill in this space with<br />
a double layer of shingles.<br />
Apply courses of new shingles up to the hole in the roof deck. Cut away the shingles to<br />
reveal the hole. Plastic cement is applied at the edges and then the vent is nailed firmly in<br />
place. Continue shingling, cutting to fit around the vent. The cut shingles should be laid in a<br />
bed of asphalt plastic cement.<br />
Pipe flashings are installed in a similar fashion and asphalt plastic cement is used to seal the<br />
pipe. Nails used to secure flashings to the roof should be used sparingly and not be driven<br />
close to the pipe.<br />
A dab of plastic cement over the exposed nails is recommended to<br />
avoid leakage.<br />
Part 10<br />
Low Slope - Roof-Fast Application<br />
Some roof areas may not be suitable <strong>for</strong> shingles especially due to low slope (less than<br />
2:12 down to 1:12). In these areas the recommended product is Roof-Fast, a self-adhered<br />
membrane (SAM) system, ideal <strong>for</strong> low-slope roofing that combines the polymer chemistry<br />
of commercial grade modified bitumen membranes with the self-adhesive characteristics of<br />
an ice and water protector and the beauty of a granule surface.<br />
22
Low Slope - Roof-Fast Application PART 10<br />
The Roof-Fast system is comprised of Roof-Fast Cap which is a fiberglass rein<strong>for</strong>ced selfadhesive<br />
cap sheet in a variety of attractive mineral surface colors, with a release film on<br />
the back side. Roof-Fast Base MA is a fiberglass rein<strong>for</strong>ced nailable base with special film<br />
surface designed <strong>for</strong> use with self-adhered cap sheet. Roof-Fast 95, a self-adhering base<br />
sheet, is an alternative base sheet that may be used as part of the system.<br />
To begin applying the Roof-Fast system using the Roof-Fast Base MA, start at the lowest<br />
edge of the roof. Prepare a starter strip by cutting the base sheet lengthwise in half and lay<br />
flat on the clean, dry deck. Leave a minimum 50 mm (2") of base sheet overhanging roof<br />
edge to cover any exposed joints in the wood facia where water could penetrate. Fasten the<br />
Roof‐Fast Base MA at 457 mm (18") on center in a row down the approximate center of the<br />
starter sheet leaving upper edge free of fasteners <strong>for</strong> later steps in installation. The preferred<br />
nail of choice <strong>for</strong> this application is a 25 mm (1") diameter steel cap nail.<br />
Lay out a full width base sheet overlapping the starter sheet by a minimum of 75 mm (3").<br />
Fasten through the overlap with 25 mm (1") disk nails 229 mm (9") on center working from<br />
the center of the sheet outwards. Ensure the sheet lays flat and wrinkle free at all times.<br />
Fasten the center of the sheet with two rows of nails 457 mm (18") apart in a staggered<br />
<strong>for</strong>mation starting from the center and working outwards.<br />
Repeat this step until the entire surface has been covered.<br />
Prior to beginning the drip edge installation, prime surface of drip edge/metal flashing with<br />
primer <strong>for</strong> self adhering membrane and allow to dry. Turn down 50 mm (2") overlap from<br />
starter strip along the drip edge area and secure with roofing nails at 229 mm (9") on center<br />
to fascia. Cut a strip of Roof-Fast Cap 300 mm (12") wide and lay across roof edge granular<br />
side down. Using the drip edge/metal flashing as a guide, score the release film the width<br />
of the drip edge with the back of a utility knife. Remove scored release film closest to roof<br />
edge and place primed drip edge/metal flashing over scored area of Roof-Fast. Fasten with<br />
roofing nails at 229 mm (9") on center staggered approximately 25 mm (1") in from inside<br />
metal edge.<br />
To complete base sheet installation, secure base sheet at remaining perimeters with 25 mm<br />
(1") steel cap nails 229 mm (9") on center.<br />
To apply the Cap Sheet, start at the lowest point of the roof and roll out full width Roof‐Fast<br />
Cap Sheet. Cut to desired length, dry fit to roof edge in final position and allow to relax.<br />
Make sure the 90 mm (3 ½") sidelap on the Roof-Fast Cap is opposite, (furthest away), from<br />
drip edge/metal flashing. Using the butterfly technique, while kneeling on the upper half of<br />
positioned cap sheet fold back ½ of the width towards you to expose release film. Remove<br />
remaining release film from 300 mm (12") inverted cap sheet strip. Remove exposed release<br />
23
PART 10<br />
Low Slope - Roof-Fast Application<br />
film from Roof-Fast cap, (½ width), and slowly “walk” cap sheet into place over base sheet.<br />
Fold down the upper unadhered cap sheet, remove release film and gently place into final<br />
position.<br />
Use a roller to ensure consistent contact of Roof-Fast Cap to the Base Sheet. In hot weather<br />
it may be best to limit the length of individual pieces of Roof-Fast to a maximum of 4 m<br />
(12') <strong>for</strong> ease of handling. Roll out second cap sheet, cut to size, dry fit into final position<br />
and allow to relax. Ensure second sheet overlaps the 90 mm (3 ½") side lap of the first sheet.<br />
Repeat the procedure <strong>for</strong> installation of first sheet remembering to remove release film<br />
covering the side lap on the first sheet. Continue up the roof repeating this procedure until<br />
all surface is covered.<br />
To apply an end lap to the Roof-Fast Cap Sheet, cut a section of cap sheet that overlaps the<br />
adhered section by 150 mm (6"). Apply a 150 mm (6") bead of mastic sealant with a trowel<br />
on the overlap section. Peel off release film and press firmly. Remove remaining release<br />
film on back of cap sheet and firmly press onto base sheet. Use a roller to ensure consistent<br />
contact of Roof-Fast Cap to the Base Sheet.<br />
The IKO End Lap is granulefree<br />
and protected with a peel<br />
off foil release strip. Some cap<br />
sheets may not have an End<br />
Lap feature; in these cases use<br />
cemented end lap procedure<br />
above.<br />
150 mm (6")<br />
Release poly - To be<br />
removed prior to<br />
seaming.<br />
Roof Slope<br />
90 mm<br />
(3 ½")<br />
Down slope roll<br />
The IKO 45° angle<br />
cut provides<br />
additional<br />
adhesion at the<br />
junction between<br />
successive sheets.<br />
This feature is<br />
on Roof‐Fast<br />
membranes only.<br />
Roof-Fast (SAM)<br />
Application Field<br />
of Roof.<br />
For the alternate base application, using the Roof-Fast 95 Base, apply a coat of self-adhering<br />
primer to the full deck and allow to dry. Cut sheet to size and using the butterfly technique,<br />
while kneeling on the upper half of positioned base cap sheet, fold back half of the width<br />
towards you, remove release film and slowly “walk” base sheet into place. Fold down the<br />
upper unadhered cap sheet, remove release film and gently place into position.<br />
As an optional application, where roof area and roof slope allow, instead of starting with<br />
a half-width of Roof-Fast Base MA, use a full-width of IKO’s GoldShield Premium Ice<br />
& Water membrane. In this installation, at eaves/rakes, the drip edge is installed over<br />
the GoldShield and below the fastened base sheet layer. The drip edge should be set in<br />
continuous bands of asphalt cement to ensure water-tightness with the membrane layers.<br />
24
Ventilation PART 11<br />
Part 11<br />
Ventilation<br />
Proper ventilation is necessary to mitigate attic heat build-up, and to avoid condensation<br />
problems that may cause dampness to rot the roof deck and distort the roofing materials.<br />
The air in your home is laden with moisture from cooking, laundry, bathing, the respiration<br />
of plants and animals and the evaporation from plumbing fixtures. Water vapor is a serious<br />
concern during the winter months when the home is generally closed up tight. At that time,<br />
the water vapor generated in the home typically migrates up into the attic since the ceiling<br />
vapor barrier is rarely 100% perfect. Without proper ventilation, this excess moisture will<br />
remain in the attic, condense, and cause damage. As warm moist air meets the colder air<br />
along the inside of the roof deck, condensation will <strong>for</strong>m. This condensation may eventually<br />
lead to rotting wood in the attic and may also drip onto the insulation and reduce its<br />
effectiveness. Ice damming occurs as the warm moist air raises the temperature of the snow<br />
on the roof and melts it. The water then runs down the roof where it re-freezes as it reaches<br />
the colder area at the eaves.<br />
Roof vents come in different<br />
shapes and sizes. Never mix<br />
different type of vents on the<br />
same roof.<br />
If your attic is under-vented, your roof rafters or trusses, roof deck and shingles are<br />
invaded by the moisture. This will reduce the life of the asphalt shingles. To minimize these<br />
problems, it is important to have proper ventilation. Remember, good venting involves<br />
both intake and exhaust. The intake must be at the eaves and the exhaust must be at or near<br />
the ridge. The venting must be balanced with approximately 50% at the intake or eaves and<br />
50% at the ridge.<br />
With proper ventilation, air will circulate freely under the roof deck and carry away water<br />
vapor be<strong>for</strong>e it can condense. One of the best methods is a combination of continuous<br />
eaves and ridge vents that together provide uni<strong>for</strong>m natural draft ventilation from the<br />
bottom to the top of the attic space. Louvre and vent openings should not be covered<br />
during the winter. Eaves or soffit vents should not be blocked by insulation.<br />
25
PART 11<br />
Ventilation<br />
There are several venting products on the market today that work well at the ridge of the<br />
roof. Ask your local distributor <strong>for</strong> more in<strong>for</strong>mation.<br />
When determining the need <strong>for</strong> additional vents, the minimum specification underlined in<br />
building codes <strong>for</strong> net free ventilation area, that is, the area permitting unrestricted airflow,<br />
of 0.1 m2 <strong>for</strong> 14 m2 (1 ft2 <strong>for</strong> 150 ft2) of attic floor space is recommended. When vents<br />
are located at eaves or soffits and near the roof’s peak or along the ridge <strong>for</strong> maximum net<br />
airflow, the net free vent area may be reduced to a minimum 0.1 m2 <strong>for</strong> 28 m2 (1 ft2 <strong>for</strong><br />
300 ft2) <strong>for</strong> a balanced system, ventilation should be equal at the undereave and at or near<br />
the ridgeline. One square foot of net free area <strong>for</strong> every one hundred and fifty square feet of<br />
insulated ceiling area is required <strong>for</strong> low sloped roofs. The net free area is usually stamped<br />
right on the vent by the manufacturer.<br />
Proper ventilation.<br />
Improper ventilation.<br />
summer<br />
winter<br />
under-eave<br />
or<br />
soffit ventilation<br />
For new roof vents, a hole should be cut the same size as the vent hole. Ideally you should<br />
center a 1 m by 1 m (3' by 3') section of one of our IKO’s Ice & Water Protectors over the<br />
new vent hole.<br />
Cut away any ice and water protector now covering up the hole. Shingle up to the bottom<br />
of the vent opening, and remove any shingle material that may be covering the hole.<br />
Apply plastic cement around the edges and nail the vent securely in place.<br />
Continue shingling, cutting to fit around the vent. Each cut shingle should be laid in a bead<br />
of cement. A dab of asphalt plastic cement over the exposed nails is recommended to avoid<br />
leakage.<br />
Several manufacturers now supply specialized ridge vents. To use these vents, install shingle<br />
courses up the roof to the ridge so that the ridge caps will cover the sealing strip on both<br />
faces of the roof at the ridge. Cut away the roof decking to reveal 25 mm (1") of space on<br />
both sides of the ridge joist. At both ends of the ridge, apply ridge cap shingles as already<br />
outlined, to cover at least 300 mm (12") of the ridge.<br />
26
Flashings PART 12<br />
For rigid ridge vents, center the ridge vent over the ridge, and overlap the installed ridge<br />
cap shingles so that the nails and sealing strip are covered. Nail to the deck using the nailing<br />
marks supplied by the vent manufacturer.<br />
For rapid ridge vents, measure length of ridge and cut fabric to size. Center vent over slot<br />
on one end with nail lines upwards and fasten with two nails. Roll out along entire ridge,<br />
pull out slack, and fasten with two nails at opposite end.<br />
Beginning from the end of the ridge opposite the direction of the prevailing winds, apply<br />
ridge cap shingles over the ridge vent, exposing each piece in the same manner as be<strong>for</strong>e.<br />
Nail the caps to the ridge vent following the nailing guide on the vent, as provided by the<br />
vent manufacturer.<br />
Part 12<br />
Flashings<br />
Roof planes that butt against vertical walls at the end of the shingle course are protected by<br />
metal step flashing at least 125 mm high and 125 mm wide (5" high and 5" wide). When<br />
applying the new shingles, each shingle course will be covered by a step flashing.<br />
There are two simple rules to follow:<br />
• Each flashing should overlap the one below by at least 75 mm (3"), but not be<br />
visible below the shingle top lap<br />
• Imbed each step flashing in a 75 mm (3") wide application of asphaltic plastic<br />
cement, and nail in place. Then the end of each shingle overlapping a step flashing<br />
must also be well embedded in plastic cement.<br />
Flashing installation.<br />
27
PART 12<br />
Flashings<br />
The metal step flashing shingles are rectangular in shape and style, approximately 250 mm<br />
(10") long and at least 50 mm (2") wider than the face of the shingle being used. For<br />
instance, when using metal flashing shingles with a typical 143 mm (5 ⅝") exposure, the size<br />
of the flashing will be 250 mm x 200 mm (10" x 8"). The 250 mm (10") length is bent in half<br />
so that 125 mm (5") will reach up the wall surface and the other 125 mm (5") will extend<br />
onto the roof deck. Note: Other step flashing sizes are also acceptable.<br />
To install the flashing shingle on the first course, place it over the end of the starter strip.<br />
Place it so the tab of the end shingle covers it completely. Secure the horizontal flange to the<br />
roof deck using two nails. Do not fasten the flashing shingle to the vertical wall. This will<br />
allow the flashing shingle to move with any expansion and contraction that may occur with<br />
the roof deck. Place the second step flashing shingle over the end shingle in the first course<br />
by positioning it 143 mm (5 ⅝") above the bottom edge of the exposed asphalt shingle.<br />
Make sure that the tab of the shingle in the second course will cover it completely. Secure<br />
the horizontal flange to the roof. The second and succeeding courses will follow with the<br />
end shingles flashed as in preceding courses.<br />
Chimney flashings are secured to the roof over top of the shingles and counter or cap<br />
flashings are secured to the chimney, providing a waterproof seal.<br />
Flashing at front and side of chimney<br />
Application of corner flashing at rear of chimney<br />
Application of flashing over cricket<br />
Application of flashing over ridge of cricket<br />
28
Flashings PART 12<br />
Application of counter flashing at side and rear of<br />
chimney<br />
Application of counter flashing<br />
For pipe flashings around soil stacks, shingle up to the bottom of the stack. Apply plastic<br />
cement around the edges, and then slide the new flashing over the soil pipe and into place.<br />
Nails used to secure flashings to the roof should be used sparingly, not be drive close to the<br />
pipe, and where recommended by the manufacturer.<br />
Continue shingling, cutting to fit around the stack. Each cut shingle should be laid in a<br />
bead of cement. A dab of plastic cement over the exposed nails is recommended to avoid<br />
leakage.<br />
Application of shingle over<br />
vent pipe.<br />
Application of flange.<br />
29
PART 13<br />
Hips and Ridges<br />
Application of shingles<br />
around flashing.<br />
Part 13<br />
Hips and Ridges<br />
Apply shingles up to a hip or ridge from both sides of the roof be<strong>for</strong>e finishing the<br />
intersection.<br />
Note that IKO’s Pro 4 <strong>Roofing</strong> System recommends that along with IKO’s shingles,<br />
accessory items be utilized to ensure roof per<strong>for</strong>ms to its maximum capacity. Hip and Ridge<br />
cap shingles are a recommended component to the multi-layered system.<br />
130 mm<br />
(5 ⅛")<br />
146 mm<br />
(5 ¾")<br />
25 mm<br />
(1")<br />
To apply the ridge shingles, bend<br />
each shingle along the centerline<br />
so that it will extend an equal<br />
distance on each side of the hip<br />
or ridge.<br />
Hip & Ridge 12 Ridge Cap Shingles are specially made ridge cap shingles that are<br />
lightweight and per<strong>for</strong>ated to give you 3 pieces, each 300 mm (12") wide. The shingles<br />
are easy to separate, even at the site of application! Hip & Ridge 12 are fiberglass asphalt<br />
shingles equipped with an SBS modified adhesive sealant <strong>for</strong> maximum wind protection.<br />
Prior to application in cold weather, storing the shingles in a heated area will allow <strong>for</strong><br />
easier bending.<br />
30
Hips and Ridges PART 13<br />
Ridge cap shingles may be applied in a traditional “single” dimensional thickness and<br />
appearance. To obtain a three-dimensional effect, (which is recommended, but not<br />
required), apply hip and ridge shingles double thickness by stacking 2 pieces on top of one<br />
another, the lower piece extending about 19 mm (¾") further than the top piece.<br />
• Separate Hip & Ridge 12 shingles into thirds, using the per<strong>for</strong>ation marks as a<br />
guide.<br />
• These shingles are designed <strong>for</strong> a 130 mm (5 ⅛") exposure. (For a neater<br />
appearance, the top of each side of each piece can be trimmed on a 25 mm (1")<br />
taper.)<br />
• Bend each piece over the hip or ridge, and nail 130 mm (5 ⅛") above the butt edge,<br />
25 mm (1") in from each edge, exposing each piece 130 mm (5 ⅛").<br />
• Apply hip pieces starting at the lower end of the hip, working up toward the ridge.<br />
On hip roofs, apply ridge pieces starting at each end, meeting in the middle. On<br />
gable roofs, apply ridge pieces starting at the end opposite to the prevailing wind<br />
direction and continue to the other end.<br />
The final shingle should be set in cement, and the exposed nail heads of the final shingle<br />
should be covered with cement.<br />
Ultra HP Hip & Ridge shingles are specially constructed ridge cap shingles designed to<br />
provide a high-quality, high-profile alternative to using cut-up shingles to protect this<br />
important area.<br />
Apply the shingles with an 210 mm (8 ¼") exposure (even with notch), beginning at the<br />
bottom of the hip, or from the end of the ridge opposite the direction of the prevailing<br />
winds. Form the shingle to the roof deck prior to nailing. For steeper roofs, it may be<br />
necessary to push down slightly on the sides of the shingle. Use two nails, one on each side<br />
of the shingle, located 19 mm (¾") back from the shingle notch. In high wind areas, seal<br />
down each IKO UltraHP shingle with two 25 mm (1") spots of asphalt plastic cement. For<br />
added roof definition, IKO UltraHP may also be installed at gable and rake edges.<br />
Several manufacturers now supply specialized ridge vents. To use these vents, install shingle<br />
courses up the roof to the ridge so that the ridge caps will cover the sealing strip on both<br />
faces of the roof at the ridge.<br />
Cut away the roof decking to reveal the appropriate space based on vent manufacturer’s<br />
specifications. At both ends of the ridge, apply ridge caps as already outlined, to cover<br />
at least 300 mm (12") of the ridge. Center the ridge vent over the ridge, and overlap the<br />
installed ridge caps so that the nails and sealing strip are covered. Nail to the deck using the<br />
nailing marks supplied by the vent manufacturer. Nails should be a minimum of 50 mm (2")<br />
to ensure penetration through vent, shingle and into roof deck.<br />
31
PART 14<br />
Inspection and Clean Up<br />
Beginning from the end of the ridge opposite the direction of the prevailing winds, apply ridge<br />
caps over the ridge vent, exposing each piece in the same manner as be<strong>for</strong>e. Nail the caps to<br />
the ridge vent following the nailing guide on the vent, as provided by the vent manufacturer.<br />
Part 14<br />
Inspection and Clean Up<br />
Be<strong>for</strong>e leaving the job, it is necessary to clean up all debris from the<br />
roof, valleys and gutters.<br />
Remove the protective tarps you laid down earlier to easily get rid of old shingles, wrappers,<br />
granules and nails. It’s recommended you flush out eavestroughs to ensure unobstructed<br />
water flow, and to give your job a professional finish. The use of a magnetic sweeper is<br />
recommended to rid the yard and driveway of nails and metallic debris.<br />
Part 15<br />
Roof Care and Maintenance<br />
Congratulations! We knew you could do it.<br />
While your roof will provide years of protection, there are some aspects of continuing roof<br />
care that you should be aware of to ensure maximum roof per<strong>for</strong>mance.<br />
Keep gutters and roof surfaces clear of all debris. This will allow water to flow freely off the<br />
roof. Keep trees trimmed to prevent damage from branches scuffing the roof surface.<br />
Make semi-annual inspections of the roof to evaluate its general condition in terms of<br />
potential leakage problems. The best time <strong>for</strong> this in the spring and fall after the severe<br />
weather conditions have passed.<br />
Inspect the underside of the roof deck from the attic to detect leaks. Flashings are the most<br />
vulnerable points. Water stains will be evident if there has been some leakage or severe<br />
condensation.<br />
Part 16<br />
Products<br />
IKO manufactures a full line of asphalt roofing shingles. These shingles feature fiberglass<br />
mats, and are available in several popular styles in a variety of colors.<br />
Now that you’ve seen how easy it is to re-roof your home, it’s time to<br />
select the shingle that will exactly meet your requirements.<br />
32
Products PART 16<br />
We make one of the finest 3-Tab shingles on the market: Time-tested and true, IKO<br />
Traditional 3-Tab shingles are one of our most popular shingle designs. The traditional<br />
3-Tab design shingle gets its name from the three tabs incorporated into its profile.<br />
IKO Traditional 3-Tab shingles, the Marathon Series, are available in a wide variety of<br />
colors and available with Limited Warranty lengths of 30, 25 or 20 years and Limited Wind<br />
Warranty coverage up to 60 miles per hour or 97 kilometers per hour.<br />
Traditional 3-Tab shingle<br />
For dimensional thickness and strength, choose IKO laminated<br />
architectural shingles<br />
IKO Crowne Slate, with its hybrid, two-piece construction is coated<br />
with our own IKO-SBS modified asphalt which makes these shingles<br />
extremely durable and impact-resistant, with a UL2218 Class 4 Rating.<br />
Their dimensional thickness and profile evokes the beautiful contours<br />
and natural appearance of slate tiles. Plus, we’ve embedded ceramiccoated<br />
copper granules into the top layer, making the roof algae<br />
resistant. This premium fiberglass-based shingle comes with a Limited<br />
Lifetime Warranty and features a Limited Algae-Resistance Warranty.<br />
Armourshake Laminated Designer shingles provide a dimensional<br />
thickness that enhances the rough-hewn, random-cut appearance,<br />
texture and profile of classic wood shakes and feature an algae resistant<br />
system with a Limited Algae-Resistance Warranty. Featuring a UL2218<br />
Class 4 Rating, this premium fiberglass-based shingle comes with a<br />
Limited Lifetime Warranty.<br />
Although Royal Estate can be installed as simply and easily as a standard<br />
laminated shingle, it offers a remarkable slate-like appearance. This<br />
shingle is distinguished by a uniquely synchronized manufacturing<br />
process which results in distinctly colored tabs. Along with a Limited<br />
Lifetime Warranty, this shingle is offered in rich hues of Harvest Slate,<br />
Mountain Slate, Shadow Slate and Taupe Slate.<br />
33
PART 16<br />
Products<br />
Grandeur stands up to the competition just as effectively as it does the<br />
weather. Most roofing shingles will provide quality protection against<br />
the simpler elements of nature, such as wind, rain, snow and average<br />
temperatures. IKO’s Grandeur shingles, with a Limited Lifetime<br />
Warranty, are designed to withstand Mother Nature’s <strong>for</strong>ces with its<br />
superior UL2218 Class 4 impact resistance rating. Engineered to last and<br />
built to per<strong>for</strong>m, providing superior resistance against thermal cycling<br />
and high winds. Grandeur shingles offer the added protection of algae<br />
resistant granules to keep the roof looking beautiful, even in regions of<br />
heavy rainfall and high humidity.<br />
The IKO Cambridge shingles are laminated to provide a remarkable<br />
dimensional thickness, not only <strong>for</strong> strength, durability and weather<br />
resistance, but also to create an extraordinarily beautiful look to your<br />
home. These premium fiberglass shingles are offered with a Limited<br />
Lifetime Warranty in a wide array of unique and striking colors. IKO<br />
Cambridge shingles are also available with an algae resistant system with<br />
a Limited Algae-Resistance Warranty.<br />
All IKO shingles are quality manufactured to IKO’s rigid specifications, using only the<br />
highest quality raw materials.<br />
IKO also offers a selection of roofing accessories, which include our Ice & Water Protection;<br />
GoldShield, ArmourGard and StormShield, Hip & Ridge products, Roof-Fast, various felts<br />
and synthetic underlayment and Leading Edge Plus Starter strips.<br />
To aid in your shingle and color selection, you can also use the IKO RoofViewer TM<br />
interactive shingle selector tool, available on-line and on CD.<br />
IKO ROOFViewer is an interactive tool<br />
which allows the customer to easily select a<br />
shingle style and color to co-ordinate with<br />
brick or siding and trim. It’s an easy way of<br />
finding out how your house will look with<br />
a particular shingle.<br />
34<br />
To ensure complete satisfaction, please make your final color selection<br />
from several full size shingles and view a sample of the product<br />
installed on a home.
Products PART 16<br />
Please note product availability varies by plant. For additional in<strong>for</strong>mation on IKO’s full<br />
line of superior roofing products, talk to your IKO dealer, visit the website at www.iko.com,<br />
or contact United States 1-888-IKO-Roof, Eastern Canada 1-888-766-2468 or Western<br />
Canada 1-800-661-1034.<br />
Thank you <strong>for</strong> considering IKO <strong>Roofing</strong> Products.<br />
35
GLOSSARY<br />
Glossary<br />
Algae Discoloration: A type of black roof discoloration caused by algae. Sometimes referred<br />
to as fungus growth.<br />
Asphalt: A bituminous waterproofing agent applied to roofing materials during<br />
manufacture.<br />
Asphalt Plastic Cement: An asphalt-based cement used to bond roofing materials. Also<br />
known as flashing cement or mastic; typically con<strong>for</strong>ms to ASTM D 4586 (Asbestos Free) or<br />
CGSB 37-GP-5MA.<br />
Backsurfacing: Fine mineral matter applied to the back side of shingles to keep them from<br />
sticking together. IKO uses backsurfacing materials such as talc, dolomite and mineral fines.<br />
Blisters: Bubbles that may appear on the surface of asphalt roofing after installation.<br />
Bridging: A method of re-roofing with larger-sized shingles.<br />
Bundle: A package of shingles.<br />
Butt Edge: The lower edge of the shingle tabs.<br />
Caulk: To fill a joint with mastic or asphalt cement to prevent leaks.<br />
Chalk Line: A line made on the roof by snapping a taut string or cord dusted with chalk.<br />
Used <strong>for</strong> alignment purposes.<br />
Closed Cut Valley: A method of valley treatment in which shingles from one side of the<br />
valley extend across the valley while shingles from the other side are trimmed 50 mm (2")<br />
from the valley centerline. The valley flashing is not exposed.<br />
Counter Flashing: That portion of the flashing attached to a vertical surface to prevent<br />
water from migrating behind the base flashing.<br />
Course: A row of shingles or roll roofing running the length of the roof.<br />
Coverage: Amount of weather protection provided by the roofing material. Depends on the<br />
number of layers of material between the exposed surface of the roofing and the deck; i.e.,<br />
single coverage, double coverage, etc.<br />
Cricket: A peaked saddle construction at the back of a chimney to prevent the accumulation<br />
of snow and ice, and to deflect water around the chimney.<br />
Cut-out: The open portions of a strip shingle between the tabs.<br />
Deck: The wooden surface, installed over the supporting framing members, to which the<br />
roofing is applied.<br />
Drip Edge: A non-corrosive, non-staining material used along the eaves and rakes to allow<br />
water run-off to drip clear of underlying construction.<br />
Eaves: The horizontal, lower edge of a sloped roof.<br />
Exposure: That portion of the roofing exposed to the weather after installation. For<br />
example, the exposure of IKO’s Cambridge shingles is 149 mm (5 ⅞").<br />
Fiberglass Mat: An asphalt roofing base material manufactured from glass fibers.<br />
36
GLOSSARY<br />
Flashing: Pieces of metal or roll roofing used to prevent seepage of water into a building<br />
around any intersection or projection in a roof such as vent pipes, chimneys, adjoining<br />
walls, dormers, and valleys. Galvanized metal flashing should be minimum 28-gauge.<br />
Granules: Ceramic-coated colored crushed rock that is applied to the exposed surface of<br />
asphalt roofing products. IKO makes its own granules at our Madoc, Ontario, and Ashcroft,<br />
British Columbia granule plants. Granules protect the asphalt coating from the sun’s rays,<br />
add color to the product and enhance fire resistance.<br />
Gutter: The trough that channels water from the eaves to the downspout. Also known as an<br />
eavestrough.<br />
Hip: The inclined external angle <strong>for</strong>med by the intersection of two sloping roof planes. Runs<br />
from the ridge to the eaves.<br />
Hip Shingles: Shingles used to cover the inclined external angle <strong>for</strong>med by the intersection<br />
of two sloping roof planes. IKO makes specific Hip and Ridge, Hip & Ridge 12 and<br />
UltraHP TM shingles <strong>for</strong> this pourpose.<br />
Ice Dam: Condition <strong>for</strong>med at the lower roof edge by the thawing and re-freezing of melted<br />
snow on the overhang. Can <strong>for</strong>ce water up and under shingles, causing leaks.<br />
Laminated Shingles: Strip shingles containing more than one layer of tabs to create extra<br />
thickness. Also called three-dimensional shingles or architectural shingles. IKO’s Crowne<br />
Slate, Grandeur, Cambridge, Royal Estate and Armourshake are all laminated shingles.<br />
Low Slope Application: Method of installing asphalt shingles on roof slopes 2:12 (9.5°) -<br />
4:12 (18.4°).<br />
Mansard Roof: A type of roof containing two sloping planes of different pitch on each of<br />
four sides. The lower plane has a much steeper pitch than the upper, often approaching<br />
vertical. Contains no gables.<br />
Mineral-Surfaced <strong>Roofing</strong>: Asphalt shingles and rolled roofing that are covered with<br />
granules.<br />
Nesting: A method of re-roofing with new asphalt shingles over old shingles in which the<br />
top edge of the new shingle is butted against the bottom edge of the existing shingle tab.<br />
Offset: The distance between the edge of one shingle course and the edge of the next<br />
successive shingle course.<br />
Open Valley: Method of valley construction in which shingles on both sides of the valley are<br />
trimmed along a chalk line snapped on each side of the valley. Shingles do not extend across<br />
the valley. Valley flashing is exposed.<br />
Racking: <strong>Roofing</strong> application method in which shingle courses are applied vertically up the<br />
roof rather than across and up. Typically, this is not a recommended procedure.<br />
Rake: The inclined edge of a sloped roof over a wall.<br />
Release Tape: A plastic film strip that is applied to the back of self-sealing shingles. This<br />
strip prevents the shingles from sticking together in the bundles only, and does not need to<br />
be removed <strong>for</strong> application.<br />
Ridge: The uppermost, horizontal external angle <strong>for</strong>med by the intersection of two sloping<br />
roof planes.<br />
37
GLOSSARY <br />
Rise: The vertical distance from the eaves line to the ridge.<br />
Run: The horizontal distance from the eaves to a point directly under the ridge. One half<br />
the span.<br />
Self-Adhered Eave and Flashing Membrane: A self-adhering bituminous waterproofing<br />
shingle underlayment designed to protect against water infiltration due to ice dams<br />
and wind-driven rain. IKO offers three ice and water protector products: GoldShield,<br />
ArmourGard and StormShield, which are generally available in various sizes.<br />
Self-Sealing Strip or Spot: Factory-applied adhesive that bonds shingle courses together<br />
when exposed to the heat of the sun after application.<br />
Shading: Slight differences in shingle color that may occur as a result of normal<br />
manufacturing operations.<br />
Slope: The degree of roof incline expressed as the ratio of the rise, in inches, to the run, in<br />
inches. (e.g. 18.5° (4:12) slope)<br />
Soffit: The finished underside of the eaves, which should contain holes or per<strong>for</strong>ations to<br />
provide air intake <strong>for</strong> attic ventilation.<br />
Starter Strip: Asphalt roofing applied at the eaves that provides protection by filling in the<br />
spaces under the cut-outs and joints of the first course of shingles. IKO’s Leading Edge Plus<br />
is a pre-made starter strip product ideally suited <strong>for</strong> this application.<br />
Step Flashing: Flashing application method used where a vertical surface meets a sloping<br />
roof plane.<br />
Tab: The exposed portion of strip shingles defined by cut-outs.<br />
Underlayment: Asphalt saturated felt, such as IKO’s AM 15 Asphalt Saturated Felt,<br />
RoofGard-SB or RoofGard-Cool Grey Synthetic Underlayments, used beneath roofing to<br />
provide additional protection <strong>for</strong> the deck.<br />
Valley: The internal angle <strong>for</strong>med by the intersection of two sloping roof planes.<br />
Vent: Any outlet <strong>for</strong> air that protrudes through the roof deck such as a pipe or stack. Any<br />
device installed on the roof, gable or soffit <strong>for</strong> the purpose of ventilating the underside of the<br />
roof deck.<br />
Woven Valley: Method of valley construction in which shingles from both sides of the valley<br />
extend across the valley and are woven together by overlapping alternate courses as they are<br />
applied. The valley flashing is not exposed.<br />
38
For additional in<strong>for</strong>mation on IKO’s full line<br />
of superior roofing products, please call:<br />
United States 1-888-IKO-ROOF<br />
Eastern Canada 1-888-766-2468,<br />
Western Canada 1-800-661-1034,<br />
or visit our web site at: www.iko.com<br />
Note: The in<strong>for</strong>mation in this literature is subject to change<br />
without notice. All values shown are approximate. IKO assumes<br />
no responsibility <strong>for</strong> errors that may appear in this literature.<br />
© Copyright 02/11 MR1M001 - English