Plans for depron F16 pusher prop - Lake Sawyer Hawks
Plans for depron F16 pusher prop - Lake Sawyer Hawks
Plans for depron F16 pusher prop - Lake Sawyer Hawks

Create successful ePaper yourself
Turn your PDF publications into a flip-book with our unique Google optimized e-Paper software.
<strong>Plans</strong> <strong>for</strong> <strong>depron</strong> <strong>F16</strong> <strong>pusher</strong> <strong>prop</strong><br />
First I want to thank ezonemag.com <strong>for</strong> their great website, this goldmine of<br />
knowledge.<br />
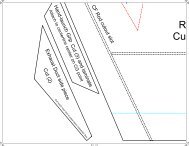
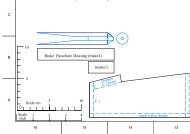
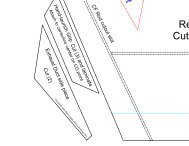
These plans are based on my previous <strong>F16</strong>. The plans are drawn by hand on A4<br />
paper and then scanned to a PDF file. There is a construction drawing that shows all<br />
the pieces in place and a parts template drawing. All the drawings are tiled so it takes<br />
some time to put everything together.There is a number/letter on each tile. Start in<br />
the LH top corner with 1A. Go 1B, 1C, 1D etc <strong>for</strong> horizontal tiles. Go 2A, 3A, 4A etc.<br />
<strong>for</strong> vertical tiles All parts are numbered using the stepnr. they are used in. For<br />
example pieces 1A and 1B and 1C are the three pieces you need in step 1.<br />
The new <strong>F16</strong> is a little bit different from the old one <strong>for</strong> the following reasons:<br />
-The size is about 10 % smaller. The AUW of the old one was 530 grammes which<br />
was just a little bit to much <strong>for</strong> my power system. It flew fine but I didn’t have a big<br />
reserve.<br />
-This one only has tailerons instead of ailerons and a full flying elevator <strong>for</strong> much<br />
easier building<br />
The aircraft is made from 6 and 3 mm <strong>depron</strong>. All bonds are made with styrofoam<br />
safe CA and accelerator. When I had to carve and sand after laminating several<br />
pieces of <strong>depron</strong> (nosecone) I did not use accelerator because it makes the CA too<br />
hard to sand. Spars and firewall are glued with 5 min epoxy.<br />
In some areas it takes some sanding and carving, but other than that it is a<br />
conventional contsruction. The canopy is made with the thermoplastic bottleshrinking<br />
method. The wings have a 5mm diameter CF spar and balsa leading edges. The<br />
nosetip is full balsa and the belly is covered with a glass/resin strip to protect it during<br />
landing (this under –belly big intake damages easily).<br />
My power system consists of the following:<br />
PJ550 Brushless motor (60 grammes)<br />
Kokam 1200 3S1P battery (75 grammes)<br />
Jeti 8 amp BEC controller (9 grammes)<br />
Multplex 4 channel mini receiver (10 grammes)<br />
Two mini servo’s (8 grammes each)<br />
I measured 450 grammes static thrust with 8 amps, and 6700 RPM and a 9X4,7<br />
<strong>prop</strong>. Handlaunches were not a problem but I didn’t get very high speeds with this<br />
<strong>prop</strong>ellor. I guess I need a different set-up <strong>for</strong> that.
Points to consider be<strong>for</strong>e building:<br />
-My motor mounts very easily with a flange and four screws on a vertical (bulkhead)<br />
surface. If your motor mounts differently you already have to consider how to adapt<br />
be<strong>for</strong>e you start building.<br />
-The equipment bay below the canopy cover measures 180X40X40 mm. make sure<br />
that your battery will fit in the nose. You need all the weight you can get in the nose<br />
to get the C of G right.<br />
Tools<br />
-Sharp hobby knife, and my two trusty sanding blocks. One side of the block has<br />
coarse sandpaper glued to it and the other side fine. So when you’re sanding it is just<br />
a matter of turning the block when you go from coarse sanding to finetuning.<br />
Same with the broomhandle sander <strong>for</strong> round shapes.<br />
-A tableknife to score panel lines in the <strong>depron</strong>.
Building<br />
Step 1<br />
Cut out piece 1A and 1B .I drew the locations <strong>for</strong> the <strong>for</strong>mers on with a pen <strong>for</strong> future<br />
ref.<br />
Cut the 5mm diameter CF rod to length. Make a slot in the top of piece 1A so that the<br />
CF rods are embedded halfway into the <strong>depron</strong>, and glue with epoxy.<br />
Push piece 1B on top of the CF rods so they make a mark. Make a slot in piece 1B.<br />
Bevel 1B as indicated on the plans (from 6 to 3 mm not 0 mm). To laminate both<br />
pieces I used foamsafe CA only. Apply around edges and on spots in the middle.<br />
Foamsafe CA does not cure as fast as normal CA on balsawood so you have enough<br />
time to install the piece and weigh it down with some books. Should be fully cured<br />
after a few minutes.<br />
Draw the profile <strong>for</strong>ming lines on top of the wing. Bevel top piece from the thickest<br />
point to leading and trailing edges. Do not bevel bottom piece 1A. I used masking<br />
tape to get a clean straight edge where the fuselage will be.This is important <strong>for</strong> later.<br />
After beveling just slightly round of the top and the wingprofile is finshed. This way<br />
you’re sure both wings have the same profile.<br />
Cut out and slot two pieces 1C (3 mm <strong>depron</strong> 30 X 100 mm) so they can be glued on<br />
the CF spars.
Glue 4 mm wide balsastrips to the leading edge and sand to shape.<br />
Cut and glue piece 2A to frame using the penlines drawn be<strong>for</strong>e.<br />
Cut and glue <strong>for</strong>mers 2B, D, E, and F to frame<br />
Cut and glue pieces 3A, B, C and D. Bevel 3A so it is flush with the <strong>for</strong>mers, and can<br />
be sheeted later.<br />
Install push rod outer tubes. Cut them flush with bottom so frame can still be built on<br />
a flat surface. They do have to exit with a pretty shallow angle on the bottom so they<br />
approach the horns on the right angle. Test with inner tubes, should run very free.