SHARPER IMAGE DIGITAL DOUBLE FRYER INSTRUCTIONS 2
SHARPER IMAGE DIGITAL DOUBLE FRYER INSTRUCTIONS 2
SHARPER IMAGE DIGITAL DOUBLE FRYER INSTRUCTIONS 2

You also want an ePaper? Increase the reach of your titles
YUMPU automatically turns print PDFs into web optimized ePapers that Google loves.
Customer Service: 1-800-423-4248<br />
Printed in China<br />
Digital Double Deep Fryer ITEM NO.8387SI.<br />
The Sharper Image® name and logo are registered trademarks.<br />
Manufactured and Marketed by EMSON®. New York, NY 10001, USA<br />
under license.<br />
© The Sharper Image. All Rights Reserved.<br />
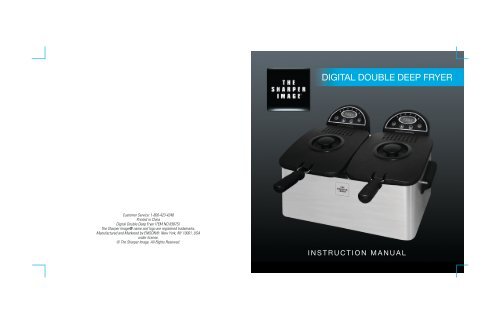
<strong>DIGITAL</strong> <strong>DOUBLE</strong> DEEP <strong>FRYER</strong><br />
INSTRUCTION MANUAL
CONTENTS<br />
IMPORTANT SAFEGUARDS............................................................................................................. 3<br />
UNPACKING/BEFORE USE............................................................................................................... 5<br />
PARTS AND FEATURES ................................................................................................................... 6<br />
USAGE.............. ............................................................................................................................... 7<br />
SUGGESTED COOKING TIMES......................................................................................................... 9<br />
RESET BUTTON............................................................................................................................... 9<br />
CLEANING ...................................................................................................................................... 10<br />
2
IMPORTANT SAFEGUARDS IMPORTANT SAFEGUARDS<br />
Before using the electrical appliance, the following basic precautions should always be followed including the<br />
following:<br />
1. Read all instructions.<br />
2. Keep oven out of reach of children.<br />
3. Remove all packaging plastics and other materials from unit before operating. Wash all removable accessories before<br />
using for the first time.<br />
4. Before use check that the voltage of wall outlet corresponds to the one shown on the rating plate.<br />
5. Do not operate any appliance with a damaged cord or plug or after the appliance malfunctions, or is dropped or damaged<br />
in any manner. Return appliance to the nearest authorized service facility for examination, repair or electrical or mechanical<br />
adjustment.<br />
6. If the supply cord is damaged it must be replaced by the manufacturer or an authorized service agent or a qualified<br />
technician in order to avoid a hazard.<br />
7. Do not let cord hang over edge of table or hot surface.<br />
8. Do not immerse plug, cord or housing into water due to the risk of electric shock.<br />
9. Close supervision is necessary when your appliance is being used near children.<br />
10. This appliance is not intended for use by persons (including children) with reduced physical, sensory or mental capabilities,<br />
or lack of experience and knowledge, unless they have been given supervision or instruction concerning use of the appliance<br />
by a person responsible for their safety. Children should be supervised to ensure that they do not play with the appliance.<br />
11. Do not touch hot surfaces, use knobs or handles.<br />
12. Make sure the appliance is clean and dry prior to use.<br />
13. Do not place near hot gas or electric burner.<br />
14. The use of accessories not recommended by the manufacturer may cause injuries to persons.<br />
15. Oversized foods must not be inserted in the appliance as they may cause a fire or risk of electrical shock.<br />
16. Do not operate the appliance for other than its intended use.<br />
17. Do not use outdoors.<br />
18. Do not move the appliance when in use.<br />
19. Use extreme caution when handling or disposing of hot oils or other hot liquids.<br />
20. Always turn the unit OFF before removing the plug from the wall outlet.<br />
21. A fire may occur if the appliance is covered or touching flammable material including curtains, draperies, walls and the like<br />
when in operation.<br />
22. Do not clean with metal scouring pads. Pieces can break off the pad and touch electrical parts, involving a risk of electrical<br />
shock.<br />
3<br />
23. Do not store any materials other than manufacturer's recommended accessories in this unit when not in use.<br />
24. Do not place any of the following materials in the unit: paper, cardboard, plastic and / or similar non-food materials.<br />
25. Servicing and repair should only be conducted by a qualified technician.<br />
WARNING: CAUTION HOT SURFACES: This appliance contains hot oil and generates heat during use.<br />
Proper precautions must be taken to prevent the risk of burns, fires, or other injury to persons or damage to property.<br />
CAUTION: This appliance is hot during operation and retains heat for some time after turning off. Always use oven mitts when<br />
handling hot materials and allow metal parts to cool before cleaning.<br />
- Position the appliance so that it is never against a wall or in a corner, against curtains or upholstery.<br />
- When operating the appliance on a work surface keep the surrounding areas clear and free from clutter. Ensure adequate air<br />
space surrounding the appliance for circulation.<br />
- Do not place anything on top of the appliance while it is operating or while it is hot.<br />
- Do not operate this appliance with other major appliances plugged into the same power socket - there is a risk of blowing<br />
the fuse.<br />
- Do not touch the hot appliance surfaces while the unit is on or while cooling.<br />
- All users of this appliance must read and understand this User’s Manual before operating or cleaning this appliance.<br />
- If this appliance begins to malfunction during use, immediately unplug the cord. Do not use or attempt to repair the<br />
malfunctioning appliance.<br />
- Do not leave this appliance unattended during use.<br />
SAVE THESE <strong>INSTRUCTIONS</strong><br />
FOR HOUSEHOLD USE ONLY.<br />
Do not attempt to repair the appliance, contact a qualified service technician.<br />
A short power supply cord is provided to reduce the hazards resulting from entanglement or tripping over long cord.<br />
Do not use extension cord as it can be pulled on by children causing the unit to tip over.<br />
POLARIZED PLUG<br />
This appliance has a polarized plug (one blade is wider than the other). To reduce the risk of electric shock, this plug will fit<br />
in a polarized outlet only one way. If the plug does not fit fully into the outlet, reverse the plug. If it still does not fit, contact a<br />
qualified electrician. Do not attempt to modify the plug in any way.<br />
4
UNPACKING - BEFORE FIRST USE<br />
UNPACKING - BEFORE FIRST USE<br />
1. Remove all printed documents and any other packaging materials.<br />
2. Pull out all removable parts (oil containers, lids, frying baskets and handles) and wash gently with mild soap and hot water.<br />
CAUTION: Do not immerse the power cord and digital control panel with heating element of the deep fryer into any liquids.<br />
3. Dry all parts thoroughly before assembling. Refer to PARTS AND FEATURES part of the manual on next page for reference.<br />
PACKAGE CONTENTS:<br />
MAIN <strong>FRYER</strong> BODY<br />
<strong>DIGITAL</strong> CONTROL PANEL WITH HEATING ELEMENTS (2)<br />
3 QT. OIL CONTAINERS (2)<br />
FRYING BASKETS (2)<br />
BASKET HANDLES (2)<br />
<strong>FRYER</strong> LIDS (2)<br />
DETACHABLE POWER CORDS (2)<br />
5<br />
3<br />
9<br />
9<br />
2<br />
10<br />
TIME<br />
INDICATOR<br />
SELECT KEY<br />
<strong>DIGITAL</strong> CONTROL PANEL<br />
6<br />
PARTS AND FEATURES<br />
10<br />
<strong>DIGITAL</strong><br />
DISPLAY<br />
3<br />
7<br />
4<br />
1<br />
6<br />
INCREASE KEY REDUCE KEY<br />
6<br />
1. Carrying Handle<br />
2. Main Body<br />
3. Basket Handle<br />
4. 3 Qt. Oil Container (2)<br />
5. Frying Basket (2)<br />
6. Digital Control Panel (2)<br />
7. Heating Element (2)<br />
8. Detachable Power Cord (2)<br />
9. Fryer Lid<br />
10. Ventillation Holes<br />
5<br />
TEMPERATURE<br />
INDICATOR<br />
POWER/<br />
READY<br />
INDICATOR<br />
LIGHT<br />
ON/OFF KEY<br />
8
USAGE (Refer to p. 6 for Parts Identification) USAGE (Refer to p. 6 for Parts Identification)<br />
TIPS<br />
- When frying several types of food, always fry the food that uses the lowest temperature setting first.<br />
- Do not mix different types of oil for frying.<br />
- Foods that are pre-cooked may take less time to fry than raw foods.<br />
- Replace the oil after 10-15 uses, unless it becomes brown and thick sooner.<br />
DIAGRAM A<br />
OPERATING YOUR <strong>FRYER</strong>:<br />
1. Make sure the Deep Fryer is unplugged.<br />
2. Bring the handle of the basket from its stored position. Press into clip until secure. Refer to<br />
Diagram A on right.<br />
3. Fill the oil tank with your choice of oil between the MIN and MAX markings. Use only good<br />
quality frying oil (peanut oil, vegetable oil, pure corn oil, sunflower oil, canola oil, light olive oil).<br />
Do not mix oils. Do not fill over the MAX marking or lower than the MIN marking.<br />
4. Connect the plug to the back of the unit. Refer to Diagram B on right. Make sure the connection<br />
is properly secured.<br />
5. Plug the other end of the power cord into an outlet, the digital panel will flicker --:-- and a beep<br />
will sound.<br />
6. Press the Select button to choose between setting the Time or Temperature.<br />
When the display shows 250°F and the temperature indicator icon lights up, it is ready to accept<br />
your temperature setting.<br />
DIAGRAM B<br />
7. Press the + (increase) button or – (decrease) button to set the desired temperature according<br />
to desired recipe. Temperature increases or decreases by 25 degrees. The temperature ranges<br />
between 250°F - 375°F.<br />
8. Once the temperature has been set, press the Select button again to set the time. The Time indicator icon will light up, it will<br />
display the default temperature of 00:00.<br />
9. Press the + (increase) button or – (decrease) button to set the desired frying time. The time increases or decreases by<br />
1 minute (maximum time setting is 99:00). Set the time according to desired recipe.<br />
10. After setting the Timer and Temperature, press the ON/OFF button to start the deep fryer. The Power/Ready indicator light<br />
will turn red.<br />
11. While the oil is preheating, prepare the food that is going to be fried. When the set temperature has been reached, the<br />
Power/Ready indicator light will turn GREEN.<br />
7<br />
12. Place the desired food into the basket. Do not overfill the basket. Make sure the food is as dry as possible. Do not place foods that<br />
are wet or have ice particles, it may cause HOT OIL SPLATTER. When frying frozen food, clear off any ice particles and thaw food<br />
thoroughly.<br />
13. Lower basket of food into hot oil and cover fryer with lid.<br />
14. When the Timer is on display and you would like to check on the temperature setting, simply press the Select button, the unit<br />
will beep and display the temperature, then flash back to the Timer.<br />
15. When the desired cooking time has elapsed reaching 00:00, the unit will automatically shut off and an indicator alarm will sound.<br />
16. When adding new food to be fried during the frying process, the oil temperature may drop. The GREEN Power/Ready indicator<br />
light will periodically change to RED light and back while the oil temperature is being adjusted.<br />
WARNING: DO NOT TOUCH THE CONTROL PANEL WHEN THE FOOD IS FRYING.<br />
HOT STEAM MAY ESCAPE AND CAUSE BODILY HARM.<br />
AFTER THE FOOD IS FRIED:<br />
1. Once food is done cooking, press the ON/OFF button to turn the unit off.<br />
2. Carefully remove the lid. WARNING: Removing the lid will release hot steam. Take extreme care when handling.<br />
Keep face and bare skin clear of the steam release. Hang the basket on the hook and let excessive oil drip into the oil pot.<br />
3. Take out the basket and place the food on paper towels to absorb excess oil. Do not touch the basket while it is still hot.<br />
Always use the handle.<br />
4. Transfer food to a clean dish. Discard the paper towels.<br />
5. Place the basket back into the deep fryer.<br />
6. Unplug the unit. Do not move the deep fryer until it is cooled entirely.<br />
7. Refer to cleaning instructions on page 10.<br />
8
SUGGESTED COOKING TIMES - RESET BUTTON<br />
NOTE: The frying times given in the chart are only a guide and should be adjusted accordingly to<br />
the quantity of food being fried.<br />
FOOD TEMPERATURE WEIGHT (GRAMS) COOK TIME<br />
Shrimp<br />
275 °F<br />
250 (8.8 oz)<br />
3-5 minutes<br />
Onion<br />
275 °F<br />
150 (5.3 oz)<br />
3-4 minutes<br />
Mushrooms<br />
275 °F<br />
300 (10.5 oz) 6-8 minutes<br />
Fish Filet<br />
300 °F<br />
250 (8.8 oz)<br />
5-6 minutes<br />
Fish Filet in Batter<br />
300 °F<br />
400 (14 oz)<br />
6-8 minutes<br />
Fish Cakes or Balls<br />
300 °F<br />
400 (14 oz)<br />
6-8 minutes<br />
Sliced Meat<br />
350 °F<br />
400 (14 oz)<br />
7-10 minutes<br />
Steak<br />
350 °F<br />
400 (14 oz)<br />
7-10 minutes<br />
Chicken Strips<br />
350 °F<br />
500 (17.6 oz) 7-10 minutes<br />
French Fries (1st time)<br />
375 °F<br />
500 (17.6 oz) 6-10 minutes<br />
French Fries (2nd time)<br />
375 °F<br />
250 (8.8 oz)<br />
3-5 minutes<br />
*French Fries being fried a 2nd time will be lighter and crispier.<br />
RESET BUTTON:<br />
If your deep fryer’s heating elements shut off in the middle of frying and do not come back on, unplug the unit. Allow it to cool<br />
off up to 10 minutes. Plug the power cord back in and power back on. If the deep fryer still does not power on or heat up,<br />
the unit needs to be reset. Unplug the deep fryer from the power outlet.<br />
Locate the Reset Button on the control box. It is located on the back of the control box next to the power cord socket.<br />
The Reset Button is located inside a small hole. Use a small thin tool to insert into the small hole. Press in on the Reset<br />
Button. Plug the power cord back in and power back on.<br />
9<br />
CLEANING THE DEEP <strong>FRYER</strong><br />
CLEANING AND CARE<br />
1. Remove the lid and basket.<br />
WARNING: Before cleaning the deep fryer, make sure that it is disconnected from<br />
the power outlet, make sure the unit and the oil has completely cooled. Oil retains<br />
its temperature for a long period after use. Do not attempt to carry or move the<br />
deep fryer while the oil is hot.<br />
2. Wait for the fryer to cool. Remove the fryer basket (if still inside unit).<br />
Lift out the Digital Control Panel assembly & Heating element.<br />
3. Remove the oil pot and pour out the oil.<br />
5. The oil containers, the main body (stainless steel), the fryer baskets<br />
and lids are all dishwasher safe. You may also wash those in warm water<br />
with mild detergent. The Digital Control Panels with Heating Elements and<br />
power cords are NOT dishwasher safe.<br />
6. The Control Panel & Heating Element should be wiped clean with absorbent<br />
paper towels. Then use a damp cloth and a mild soap to clean.<br />
WARNING: Do not immerse the Digital Control Panel & Heating Element into<br />
water to clean.<br />
7. Dry all parts thoroughly.<br />
Note: Do not use abrasive scrubbing brushes or chemical cleaners<br />
to clean the unit.<br />
10<br />
OIL<br />
CONTAINER