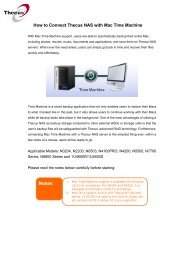
How to Connect Thecus NAS with Mac Time Machine
How to Connect Thecus NAS with Mac Time Machine
How to Connect Thecus NAS with Mac Time Machine

You also want an ePaper? Increase the reach of your titles
YUMPU automatically turns print PDFs into web optimized ePapers that Google loves.
<strong>How</strong> <strong>to</strong> Back Up <strong>Thecus</strong> <strong>NAS</strong> <strong>with</strong> <strong>Mac</strong> <strong>Time</strong> <strong>Mac</strong>hine<br />
With <strong>Mac</strong> <strong>Time</strong> <strong>Mac</strong>hine support, users are able <strong>to</strong> au<strong>to</strong>matically backup their entire <strong>Mac</strong>,<br />
including pho<strong>to</strong>s, movies, music, documents and applications, and save them on <strong>Thecus</strong> <strong>NAS</strong><br />
servers. When ever the need arises, users can simply go back in time and recover their files<br />
quickly and effortlessly.<br />
<strong>Time</strong> <strong>Mac</strong>hine is a smart backup application that not only enables users <strong>to</strong> res<strong>to</strong>re their <strong>Mac</strong>s<br />
<strong>to</strong> what it looked like in the past, but it also allows users <strong>to</strong> continue working <strong>with</strong> their <strong>Mac</strong>s<br />
while all backup tasks take place in the background. One of the main advantages of utilizing a<br />
<strong>Thecus</strong> <strong>NAS</strong> as backup s<strong>to</strong>rage compared <strong>to</strong> other external HDDs or s<strong>to</strong>rage units is that the<br />
user’s backup files will be safeguarded <strong>with</strong> <strong>Thecus</strong>’ advanced RAID technology. Furthermore,<br />
connecting <strong>Mac</strong> <strong>Time</strong> <strong>Mac</strong>hine <strong>with</strong> a <strong>Thecus</strong> <strong>NAS</strong> server is the simplest thing ever; <strong>with</strong>in a<br />
few clicks of a mouse, users will be ready <strong>to</strong> go.<br />
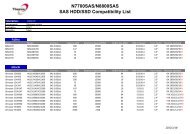
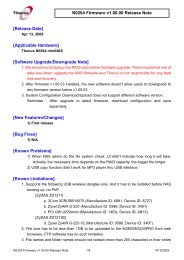
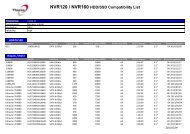
Applicable Models: N0204, N2200, N0503, N4100PRO, N4200, N5500, N7700<br />
Series, N8800 Series and 1U4600R/1U4600S<br />
Please read the notes below carefully before starting:<br />
Notes<br />
1. <strong>Mac</strong> <strong>Time</strong> <strong>Mac</strong>hine support is available on firmware<br />
v3.02.01 and above. For N0204 and N2200, it is<br />
available on firmware v3.00.11 and above.<br />
2. <strong>Mac</strong> OS X version 10.6.4 <strong>with</strong> <strong>Thecus</strong> N7700 <strong>NAS</strong><br />
server v3.03.00.4 is used in this <strong>How</strong>To Guide, but<br />
all versions of OS X above 10.5 are supported.
Part .1 –<strong>Thecus</strong> <strong>NAS</strong> Setup<br />
1. In the web user interface, click on AFP under System Network <strong>to</strong> open the<br />
AFP support page.<br />
2. On the AFP Support page, enable both AFP Server and <strong>Time</strong> <strong>Mac</strong>hine,<br />
then click on the Apply but<strong>to</strong>n on proceed.<br />
*On the <strong>Thecus</strong> N7700, create a folder and set it as “public”, in this case the folder has been<br />
named <strong>Time</strong> <strong>Mac</strong>hine, this folder will be mounted in the next step <strong>to</strong> allow the program <strong>Time</strong><br />
<strong>Mac</strong>hine <strong>to</strong> see it and use it as a backup disk.
Part .2 – <strong>Connect</strong>ing <strong>Thecus</strong> <strong>NAS</strong> <strong>with</strong> <strong>Mac</strong> <strong>Time</strong> <strong>Mac</strong>hine<br />
1. Next, on desk<strong>to</strong>p of your the <strong>Mac</strong>, click on Go, then click on <strong>Connect</strong> <strong>to</strong><br />
Server <strong>to</strong> open the <strong>Connect</strong> <strong>to</strong> Server widow.<br />
2. On the <strong>Connect</strong> <strong>to</strong> Server window, in the Server Address field, please<br />
enter: *afp:// followed by your <strong>Thecus</strong> <strong>NAS</strong> IP address. Then click<br />
<strong>Connect</strong> <strong>to</strong> proceed.<br />
Notes<br />
1. AFP stands for Apple Filing Pro<strong>to</strong>col
3. The screen below will appear showing you that the <strong>Thecus</strong> N7700 has<br />
been located. Select Registered User and enter the name and password<br />
of a local user. Next, click <strong>Connect</strong> <strong>to</strong> proceed.<br />
Notes<br />
You may not be able <strong>to</strong> login as an administra<strong>to</strong>r. You will have <strong>to</strong> login<br />
<strong>with</strong> the name and password of a local user on <strong>Thecus</strong> <strong>NAS</strong>.<br />
Please refer <strong>to</strong> user’s manual on how <strong>to</strong> create local users on <strong>Thecus</strong> <strong>NAS</strong>.<br />
http://www.thecus.com/download.php?type=m<br />
4. When connected successfully, a new window will appear showing you the<br />
available folders in which you can select <strong>to</strong> s<strong>to</strong>re your backup files. In this<br />
guide, we will select the <strong>Time</strong> <strong>Mac</strong>hine folder created previously (refer <strong>to</strong><br />
part.1, step 2). Next, click on the OK but<strong>to</strong>n <strong>to</strong> proceed.
5. The window below will appear showing that the <strong>Time</strong> <strong>Mac</strong>hine folder has<br />
been mounted successfully as a shared folder.<br />
6. Now, return <strong>to</strong> the <strong>Mac</strong> desk<strong>to</strong>p, right click on the <strong>Time</strong> <strong>Mac</strong>hine icon in the<br />
dock and click Open <strong>Time</strong> <strong>Mac</strong>hine Preferences <strong>to</strong> open <strong>Time</strong> <strong>Mac</strong>hine.
7. Next, click the Select Backup Disk but<strong>to</strong>n.<br />
8. A new window will appear showing the available backup folder and s<strong>to</strong>rage<br />
space in which you can select and backup your files. Here, we will select the<br />
<strong>Time</strong> <strong>Mac</strong>hine folder previously mounted. Next, click “Use for Backup” <strong>to</strong><br />
proceed.<br />
9. Alright! You are all set and ready <strong>to</strong> go. Just remember <strong>to</strong> switch on the<br />
<strong>Time</strong> <strong>Mac</strong>hine <strong>to</strong> start backing up your <strong>Mac</strong>.
--End--<br />
For any questions regarding this <strong>How</strong>-<strong>to</strong> Guide, please email us:<br />
webmaster@thecus.com<br />
For more <strong>How</strong>-<strong>to</strong> Guides, please go <strong>to</strong>:<br />
<strong>Thecus</strong> Classroom<br />
Copyright © 2011 <strong>Thecus</strong> ® Technology Corporation. All rights reserved.