Create successful ePaper yourself
Turn your PDF publications into a flip-book with our unique Google optimized e-Paper software.
Y.E.S. <strong>Box</strong> <strong>N2100</strong><br />
Your Enhanced Storage<br />
User’s Manual
Copyright and Trademarks<br />
Copyright © 2005 <strong>Thecus</strong> Technology Corporation. Specifications are subject to change<br />
without notice. All rights reserved. <strong>Thecus</strong> is a registered trademark of <strong>Thecus</strong> Technology<br />
Corp. Microsoft, Windows, and the Windows logo are registered trademarks of Microsoft<br />
Corporation. Apple, iTunes and Apple OS X are registered trademarks of Apple Computers,<br />
Inc. All other trademarks and brand names are the property of their respective owners.<br />
About This Manual<br />
All information in this manual has been carefully verified to ensure its correctness. In case<br />
of an error, please provide us with your feedback. <strong>Thecus</strong> Technology Corporation<br />
reserves the right to modify the contents of this manual without notice.<br />
Limited Warranty<br />
<strong>Thecus</strong> Technology Corporation guarantees all components of <strong>Thecus</strong> <strong>N2100</strong> are<br />
thoroughly tested before they leave the factory and should function normally under general<br />
usage. In case of any system malfunctions, <strong>Thecus</strong> Technology Corporation and its local<br />
representatives and dealers are responsible for repair without cost to the customer if the<br />
product fails within the warranty period and under normal usage. <strong>Thecus</strong> Technology<br />
Corporation is not responsible for any damage or loss of data deemed to be caused by its<br />
products. It is highly recommended that users conduct necessary back-up practices.<br />
Product name: <strong>Thecus</strong> <strong>N2100</strong><br />
Manual Version: 2.1<br />
Release Date: November 2006<br />
1
Table of Content<br />
Chapter 1 Introduction .........................................................................................................1<br />
Package Contents ........................................................................................................1<br />
Hardware Overview ......................................................................................................1<br />
Front Panel............................................................................................................1<br />
Back Panel ............................................................................................................3<br />
Hard Disk Installation....................................................................................................3<br />
Connect & Setup the YES <strong>Box</strong> <strong>N2100</strong>..........................................................................6<br />
Installation Wizard ........................................................................................................6<br />
Chapter 2 System Management ........................................................................................11<br />
System Web Management Login................................................................................11<br />
Product Information ....................................................................................................11<br />
System Status......................................................................................................12<br />
System Information..............................................................................................13<br />
Printer..................................................................................................................14<br />
Setup Hard Disks and File Folders .............................................................................16<br />
Hard Disks Information ........................................................................................16<br />
Configure RAID Settings .....................................................................................17<br />
Manage Folders...................................................................................................19<br />
USB Storage Expansion ......................................................................................24<br />
Configure Network Settings ........................................................................................25<br />
LAN 1 Configuration ............................................................................................25<br />
LAN 2 Configuration ............................................................................................26<br />
WLAN Configuration (optional)............................................................................28<br />
Configure Network Services ................................................................................30<br />
SMB/CIFS Setup .................................................................................................31<br />
Apple Network .....................................................................................................32<br />
FTP Server Setup................................................................................................33<br />
iTunes Configuration............................................................................................34<br />
Media Manager Settings (for Media Server edition only).....................................35<br />
User and Group Management ....................................................................................38<br />
Local User Configuration .....................................................................................38<br />
Local Groups Configuration.................................................................................39<br />
Additional System Settings .........................................................................................42<br />
Notification Configuration ....................................................................................42<br />
System Logs........................................................................................................43<br />
Time Settings.......................................................................................................44<br />
System Configuration Backup & Restore ............................................................45<br />
Module Management...........................................................................................46<br />
i
Reset to Factory Default Settings........................................................................47<br />
Upgrading System Firmware ...............................................................................48<br />
Change Administrator Password .........................................................................48<br />
Shutdown and Reboot System ............................................................................49<br />
Logout .................................................................................................................49<br />
Language Selection.............................................................................................50<br />
Chapter 3 How to use YES <strong>Box</strong> <strong>N2100</strong> .............................................................................51<br />
Manage Files & Folders..............................................................................................51<br />
WebDisk Setup....................................................................................................51<br />
iTunes® Server Setup .........................................................................................53<br />
Photo Gallery Setup ............................................................................................54<br />
Windows XP Publish Wizard ...............................................................................57<br />
Mapping the Client PC to the YES <strong>Box</strong> <strong>N2100</strong> ...........................................................65<br />
Mapping a Network Drive (Windows) ..................................................................65<br />
Mapping a Network Drive (Apple OS X) ..............................................................67<br />
File Backup.................................................................................................................68<br />
<strong>Thecus</strong> Backup Utility ..........................................................................................68<br />
Windows XP Data Backup...................................................................................69<br />
Mac OS X Backup Utilities...................................................................................71<br />
Appendix A : Troubleshooting Guide..................................................................................72<br />
Forgotten Network IP Address....................................................................................72<br />
When RAID status is in Degraded mode ....................................................................72<br />
File System Check Utility ............................................................................................75<br />
Forgotten Password....................................................................................................77<br />
Error Detection ...........................................................................................................78<br />
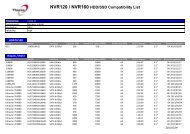
If you are using JBOD with one disk and you would like to add a second disk … ......79<br />
If you are using JBOD with two disks and one of the disk failed… .............................79<br />
If you are using RAID 0 and one of the disks failed… ................................................79<br />
Solving Problems........................................................................................................79<br />
<strong>N2100</strong> simple diagnosis flowchart ..............................................................................80<br />
Appendix B: RAID Basics ..................................................................................................83<br />
RAID Introduction .......................................................................................................83<br />
Benefits ...............................................................................................................83<br />
Improved Performance ........................................................................................83<br />
Data Security.......................................................................................................83<br />
RAID Configuration..............................................................................................83<br />
Appendix C: Product Specifications ...................................................................................86<br />
Appendix D: Licensing Information ....................................................................................88<br />
Source code availability ..............................................................................................88<br />
ii
Chapter 1 Introduction<br />
Thank you for choosing the <strong>Thecus</strong> YES <strong>Box</strong> <strong>N2100</strong>. With rich built-in software applications,<br />
the YES <strong>Box</strong> <strong>N2100</strong> enables simple and secure distribution of all types of digital files, such<br />
as music, photos, and data via an IP network. The YES <strong>Box</strong> <strong>N2100</strong> provides high data<br />
availability and fault protection using a RAID structure. There are two Gigabit Ethernet ports<br />
which enhance network efficiency, enable advanced file management functions, multiple<br />
application sharing, and faster data response all at once. The YES <strong>Box</strong> <strong>N2100</strong> allows data<br />
consolidation and sharing between Windows (SMB/CIFS), UNIX/Linux, and Apple OS X<br />
environments. The YES <strong>Box</strong> <strong>N2100</strong>’s user-friendly web management interface supports<br />
multiple languages. Take the time now to read through this user’s manual and get the most<br />
out of your YES <strong>Box</strong> <strong>N2100</strong>.<br />
Package Contents<br />
� <strong>Thecus</strong> YES <strong>Box</strong> <strong>N2100</strong><br />
� Accessory Pack:<br />
� Power cord<br />
� RJ-45 Ethernet cable<br />
� Hard disk screws<br />
� Installation CD<br />
� Quick Installation Guide<br />
� Warranty card<br />
Hardware Overview<br />
Front Panel<br />
Power Button Power on/off YES <strong>Box</strong> <strong>N2100</strong>.<br />
Press and hold the button for 5 seconds to power off.<br />
Power LED Blue: System power on<br />
System Status LED Blinking orange: System startup<br />
1
HDD 1 LED<br />
(blue/red)<br />
HDD 2 LED<br />
(blue/red)<br />
LAN 1 LED (green)<br />
LAN 2 LED (green)<br />
Blinking red: System error<br />
Off: System startup complete; system operating<br />
normally<br />
Blue: HDD 1 detected<br />
Blinking blue: Active HDD 1 data transfer<br />
Red : HDD 1 error detected<br />
Blinking red: HDD 1 capacity is nearly full (90% or<br />
more)<br />
* If RAID is configured, capacity is based on the entire<br />
RAID system.<br />
Blue: HDD 2 installed<br />
Blinking blue: Active HDD 2 data transfer<br />
Red: HDD 2 error<br />
Blinking red: HDD 2 capacity is nearly full (90% or<br />
more)<br />
* If RAID is configured, capacity is based on the entire<br />
RAID system.<br />
Blinking green: Network activity<br />
Blinking green: Network activity<br />
USB LED<br />
USB Device Connection:<br />
Blinking blue (5 seconds): USB device connected<br />
successfully. *For universal USB memory card readers,<br />
the USB LED will blink blue when one or more cards<br />
are mounted successfully.<br />
Blinking red (5 seconds): USB device connection<br />
failure<br />
Data Transfer:<br />
Blinking blue: Active data transfer<br />
Blinking red: USB device read/write error<br />
USB Port USB 2.0 port for USB storage expansion.<br />
One-Button USB Copy will only copy the front USB<br />
Port.<br />
One-Button USB Push the button to copy the entire USB volume to the<br />
Copy<br />
<strong>N2100</strong>. Files are stored in a folder named by current<br />
time stamp: (YearMonthDayHHMM)<br />
Warning: Before pushing the USB Copy button, make<br />
2
sure the USB device is connected successfully. Please<br />
refer to the section on USB LED.<br />
Back Panel<br />
LAN 1/LAN 2: High speed connections to your network hub/switch.<br />
Power Socket: Connect the power cord, ideally to a surge protector.<br />
Hard Disk Installation<br />
The YES <strong>Box</strong> <strong>N2100</strong> supports up to two Serial ATA (SATA) hard disks.<br />
To install hard disks into the YES <strong>Box</strong> <strong>N2100</strong>, please follow the diagrams below:<br />
1. Remove two screws located on the back of the unit using a Philips screwdriver.<br />
2. Unfasten four mounting screws.<br />
3
3. Lift up the hard disk cage by pulling up the top panel of the YES <strong>Box</strong> <strong>N2100</strong>.<br />
4. Carefully insert a standard 3.5” SATA hard disk into the cage, and secure the<br />
Note:<br />
hard disk with screws from the included accessory pack.<br />
- Disk 1 is at the bottom of the drive cage.<br />
4
5. If you are installing two hard disks, please insert the second hard disk at the top<br />
Note:<br />
of the cage and secure it with screws from the included accessory pack.<br />
- Properly secure the HDDs to the cage to prevent damage to the connectors<br />
and help cooling of the disk drives.<br />
6. Carefully lower the hard disk tray back into the YES <strong>Box</strong> <strong>N2100</strong>.<br />
After making sure the tray is in place and the connectors are aligned, secure the<br />
hard disk tray with screws.<br />
5
Connect & Setup the YES <strong>Box</strong> <strong>N2100</strong><br />
1. Connect the first Ethernet port (LAN 1) to your network hub/router.<br />
2. Plug in the power cord and turn on the system.<br />
3. Make sure system is running properly by checking all front panel LEDs for any<br />
error indications. The system will beep for one second to notify that it is ready<br />
for use.<br />
Installation Wizard<br />
The handy <strong>Thecus</strong> Setup Wizard makes configuring your YES <strong>Box</strong> <strong>N2100</strong> a snap.<br />
To configure the YES <strong>Box</strong> <strong>N2100</strong> using the Setup Wizard, perform the following<br />
steps:<br />
Complete the following steps for basic system configurations.<br />
6
1. Insert the installation CD into your CD-ROM drive (the host PC must have<br />
connection to the above network).<br />
2. The Setup Wizard should launch automatically. If not, please browse your<br />
CD-ROM drive and double click on Setup.exe<br />
3. The Setup Wizard will start and automatically detect all YES <strong>Box</strong> <strong>N2100</strong>s on<br />
your network. If none are found, please check your connection and refer to the<br />
Troubleshooting Guide at the back of the YES <strong>Box</strong> <strong>N2100</strong> User’s Manual.<br />
4. Select the YES <strong>Box</strong> <strong>N2100</strong> that you like to configure.<br />
5. Login with the default administrator account and password. The default account<br />
and password are both “admin”.<br />
7
6. Name your YES <strong>Box</strong> <strong>N2100</strong> system and configure the network IP address. If<br />
your router is configured as a DHCP Server, configuring the YES <strong>Box</strong> <strong>N2100</strong> to<br />
automatically obtain an IP address is recommended. You may also use a static<br />
IP address and enter the DNS Server address manually.<br />
7. Enable the services you wish to make publicly accessible. The YES <strong>Box</strong> <strong>N2100</strong><br />
offers FTP Server and iTunes® Server options.<br />
8. Refer to the following chart and select the hard disk configuration that best suits<br />
your usage model.<br />
RAID 0 – Spanning: Combine 2 physical hard disks into one or more logical<br />
drives. Data is separated into threads and stored across both physical drives for<br />
increased performance.<br />
RAID 1 – Mirroring: Use the second hard disk as a mirror image of the first hard<br />
disk for increased reliability.<br />
JBOD – Expansion: Similar to RAID 0, but files are stored in whole on any<br />
available hard disks.<br />
8
Setup Options Higher Performance Increased Reliability<br />
1 Disk JBOD No No<br />
2 Disk RAID 0 Yes No<br />
2 Disk RAID 1 Yes Yes<br />
2 Disk JBOD No No<br />
Warning:<br />
- Creating a RAID array will destroy all data on the delected disks.<br />
9. Change the default administrator password.<br />
10. Finished! Access the current YES <strong>Box</strong> <strong>N2100</strong> administrator webpage by<br />
pressing the “Web Management” button. You can also configure another YES<br />
<strong>Box</strong> <strong>N2100</strong> at this point.<br />
9
Chapter 2 System Management<br />
The YES <strong>Box</strong> <strong>N2100</strong> provides an easily accessible web management interface. The<br />
administrator may configure and monitor the YES <strong>Box</strong> <strong>N2100</strong> anywhere on the network.<br />
System Web Management Login<br />
Make sure your network is connected to the Internet. To access the YES <strong>Box</strong> <strong>N2100</strong><br />
management webpage:<br />
1. Type the <strong>N2100</strong>’s IP address into your browser. (Default IP address is<br />
http://192.168.1.100)<br />
Note:<br />
- Your computer’s network IP address must be on the same subnet as the<br />
YES <strong>Box</strong> <strong>N2100</strong>. If the <strong>N2100</strong> has default IP address of 192.168.1.100,<br />
your managing PC IP address must be 192.168.1.x, where x is a number<br />
between 1 and 254, but not 100. See the appendix for more information on<br />
IP settings.<br />
2. Login to the system using factory default administrator user name and password:<br />
User Name: admin<br />
Password: admin<br />
If you changed your password in the setup wizard, use the new password.<br />
Product Information<br />
Once you login, you will first see the basic Product Information page providing<br />
Manufacturer, Product No., Firmware Version, and Up Time information.<br />
11
System Status<br />
From the Status menu, choose the System item, and the System Status Information<br />
screen appears. This screen provides basic system status information.<br />
CPU Loading (%) Displays current CPU workload of the <strong>N2100</strong>.<br />
System Temperature Shows current system processor temperature.<br />
HDD Temperature Shows current hard disk drive temperature.<br />
Fan RPM Shows cooling fan speed in revolutions per minute<br />
(RPM).<br />
Fan Speed Control Select to control the current fan speed.<br />
Normal: Default fan speed control.<br />
High: Fan will always running at full speed.<br />
Note: When the fan speed is set to high, <strong>N2100</strong> will<br />
generate more noise than usual.<br />
Up Time Shows how long the system has been running.<br />
12
System Information<br />
From Status menu, choose the Info item, and the System Information screen<br />
appears. You can change the system information that appears on the Login page by<br />
entering the new information here and pressing Apply to confirm.<br />
System Description Shows the system description that would also appear<br />
on the Login page.<br />
13
Printer<br />
From the Status menu, choose the Printer item, and the Printer Information<br />
screen appears. The Printer Information screen provides the following information<br />
about the USB printer connected to the USB port.<br />
Manufacturer Displays the name of the USB printer manufacturer.<br />
Model Displays the model of the USB printer.<br />
Status Displays the status of the USB printer.<br />
Printer Queue Click to remove all documents from printer queue<br />
If a corrupt print job is sent to a printer, printing may suddenly fail. If your print jobs<br />
seem to be locked up, press the Remove All Documents button to clear the print<br />
queue may resolve the issue.<br />
Print Server Setup (Windows XP SP2)<br />
1. Connect the USB printer to one of the USB ports (Preferably the rear USB ports;<br />
front USB ports can be used for external HDD enclosures).<br />
2. Go to “Printers and Faxes” on your Start Menu<br />
3. Click on “Add Printer” under File menu<br />
4. Add printer Wizard appears on your screen. Click on “Next” button.<br />
5. Select “A network printer, or a printer attached to another computer” option<br />
6. Select “Connect to a printer on the Internet or on a home or office network”,<br />
14
and enter “http://<strong>N2100</strong>_IP_ADDRESS:631/printers/usb-printer” into the URL<br />
field.<br />
7. Your Windows system will ask you to install drivers for your printer. Select<br />
correct driver for your printer.<br />
8. Your Windows system will ask you if you want to set this printer as “Default<br />
Printer”. Select Yes and all your print jobs will be submitted to this printer by<br />
default. Click on “Next” button.<br />
9. Click on “Finish” button.<br />
Note:<br />
- Not all USB printers are supported. Please check <strong>Thecus</strong> website for a list<br />
of supported printers.<br />
- Note that if a multi-function (all-in-one) printer is attached to the <strong>N2100</strong> YES<br />
<strong>Box</strong>, usually only the printing and fax functions will work. Other features,<br />
such as scanning, probably will not function.<br />
15
Setup Hard Disks and File Folders<br />
The Storage menu provides disk information and allows you to configure both RAID<br />
modes and file sharing.<br />
Hard Disks Information<br />
From the Storage menu, choose the Disks item and the Disks Information screen<br />
appears. On the Disk Information table, a blank line shows that this particular disk<br />
slot is empty. If there is a problem with a disk, the Status column will display “Failed”.<br />
This page will also show all external USB hard disks that are currently connected to<br />
the system.<br />
Disk No. Indicates the hard disk slot location.<br />
Capacity Shows the hard disk capacity in megabytes.<br />
Model Displays the hard disk model name.<br />
Firmware Shows the hard disk firmware version.<br />
Status Indicates the status of hard disks, and can read either OK or<br />
Failed.<br />
Refresh Press Refresh to rescan all USB ports and hard disk slots for<br />
new disks.<br />
Disk Power Administrator can decide the length of inactivity before the<br />
Management hard disk drives spin down.<br />
Note:<br />
- Some services will scan the content directories, and this will keep the hard<br />
disk drives from spinning down.<br />
16
Configure RAID Settings<br />
From the Storage menu, choose the RAID item, and the RAID Information screen<br />
appears. The displayed information includes total RAID system capacity, RAID<br />
status, and the current RAID setting. To configure your RAID settings, press the<br />
Config button and the RAID Configuration screen appears.<br />
RAID Level Shows the type of RAID used in the system.<br />
Total Capacity Shows the total storage capacity after the RAID<br />
configuration.<br />
Status Indicates the status of the RAID, and can read either<br />
Healthy or Failed.<br />
Used Percentage Displays the percentage of used RAID capacity.<br />
Stripe Size Shows the current hard disk stripe size.<br />
Remaining Time Indicates the time remaining during RAID building<br />
process.<br />
See Appendix B for basic information on RAID.<br />
17
RAID Configuration<br />
You can set the storage volume as JBOD, RAID 0, or RAID 1. Configuration is<br />
usually required only when you first set up the device. A brief description of each<br />
RAID setting follows:<br />
JBOD The storage volume is a single HDD with no RAID support.<br />
RAID 0 Provides data striping but no redundancy. Improves performance<br />
but not fault tolerance. At least 2 HDDs are required.<br />
RAID 1 Offers disk mirroring. Provides twice the read rate of single disks,<br />
but same write rate. Supports 2 HDDs. This option protects<br />
against single hard disk failure and provides data redundancy.<br />
RAID Check the box of the hard disk you wish to add to the storage<br />
volume.<br />
Stripe size This sets the stripe size to maximize performance of sequential<br />
files in a storage volume. Keep the 64K setting unless you require<br />
a special file storage layout in the storage volume. A larger stripe<br />
size is better for large files.<br />
Note: This option is not available in RAID 1.<br />
Create Press this button to configure the file system and create a RAID<br />
storage volume.<br />
Remove Press this button to nullify the RAID storage volume.<br />
Warning:<br />
Creating RAID will destroy all data on the selected disks.<br />
18
If you are using JBOD with only one disk and you would like to add a second disk,<br />
please refer to Appendix A.<br />
How to Remove RAID<br />
1. On the RAID Configuration screen click on the Remove button.<br />
2. The system automatically rebuilds and you can create a new RAID array.<br />
Warning:<br />
- Removing RAID will destroy all data in the current RAID system. The data<br />
will not be recoverable.<br />
Manage Folders<br />
From the Storage menu, choose Folder, and the Folder screen appears. This<br />
screen allows you to create and configure folders on the YES <strong>Box</strong> <strong>N2100</strong> volume.<br />
Folder name Displays the name of the folder.<br />
Description Provides a description of the folder.<br />
ACL Press ACL (Access Control List) to configure which users have<br />
access to this folder.<br />
Edit Press this button to enter the Edit screen and modify the<br />
folder’s name and description.<br />
19
Del Press this button to delete the folder. A screen appears asking<br />
to confirm the deletion.<br />
Add Press this button and the Add Folder screen appears, from<br />
which you can add a new folder.<br />
Add Folder<br />
In the Folder screen press Add button and the Add Folder screen appears. This<br />
screen allows you to add a folder. After entering the information, press Apply to<br />
create new folder.<br />
Folder Name Enter the name of the folder.<br />
Description Provide a description the folder.<br />
Browseable Enable users to browse the folder content<br />
Public Admit or deny public access to this folder<br />
Note:<br />
- Folder names are limited to 60 characters. Systems running Windows 98 or<br />
earlier may not support file names longer than 15 characters.<br />
20
Edit Folder<br />
From the Folder screen, press the Edit button and the Edit Share screen appears.<br />
This screen allows you to change folder information. After entering the information,<br />
press Submit to apply the changes.<br />
Folder Name Display the name of the current folder.<br />
Description Change the description of the current folder.<br />
Browseable Enable users to browse the folder content.<br />
Public Admit of deny public access to this folder.<br />
21
Delete Folder<br />
To delete a folder, press the Del button from the specified folder row. The system will<br />
confirm folder deletion. Press OK to delete the folder permanently or Cancel to go<br />
back to the folder list.<br />
Warning:<br />
- All the data stored in the folder will be deleted once the folder is deleted.<br />
The data will not be recoverable.<br />
Folder Access Control List (ACL)<br />
From the Folder screen press the ACL button, and the Access Control List screen<br />
appears. This screen allows you to configure access to specific folder for the users<br />
and groups. Select a user or a group from the left hand column and then choose<br />
Deny, Read Only, or Writable to configure their access level. Press the Submit<br />
button to confirm settings.<br />
Deny Denies access to users or groups who are displayed in this column.<br />
Read Only Provides Read Only access to users or groups who are displayed in<br />
this column.<br />
Writable Provides Write access to users or groups who are displayed in this<br />
column.<br />
Remove Removes the selected user or group from the column in order to<br />
reset their access privileges.<br />
Submit Submits and confirms settings.<br />
22
Service Folder<br />
The YES <strong>Box</strong> <strong>N2100</strong> automatically creates folders for its built-in applications: Web<br />
Photo Server, Tunes Server, USB One-Button Copy, and USB HDD.<br />
These special folders are created when the RAID is created. To manage these<br />
service folders, select Service Folder from the Storage menu. You may edit these<br />
folders and use the Access Control List to control access to them.<br />
Note:<br />
- To see the special folders, RAID must be created first.<br />
23
USB Storage Expansion<br />
The YES <strong>Box</strong> <strong>N2100</strong> supports external USB hard disks through its three USB ports.<br />
Once a USB hard disk has successfully mounted, the entire volume will be copied<br />
automatically to the default USB HDD folder. The YES <strong>Box</strong> <strong>N2100</strong> supports up to 6<br />
USB external storage devices. All file names on the USB disk volume are case<br />
sensitive.<br />
Note:<br />
- If you want to write to an USB storage device, the file system must be<br />
FAT32.<br />
USB storage FAT32 partition NTFS partition<br />
Read OK OK<br />
Write OK NO<br />
24
Configure Network Settings<br />
Use the Network menu to make network configuration settings as well as service support<br />
settings.<br />
LAN 1 Configuration<br />
From the Network menu, choose LAN 1, and the Network Configuration screen<br />
appears. This screen displays the network parameters of the system. You may<br />
change any of these items and press Apply to confirm your settings. See a<br />
description of each item in following table:<br />
Host name Host name to identify the YES <strong>Box</strong> <strong>N2100</strong> on the network.<br />
Domain name Specifies the domain name of the YES <strong>Box</strong> <strong>N2100</strong>.<br />
MAC Address MAC address of the network interface.<br />
Jumbo Frame Enable/Disable Jumbo Frame Support of the LAN 1 network<br />
Support interface on your YES <strong>Box</strong> <strong>N2100</strong>.<br />
LAN 1 Port LAN 1 IP can be set to a Static IP address or Dynamic IP<br />
address.<br />
Static: Administrator has to enter IP, Netmask, Gateway,<br />
DNS Server fields.<br />
Dynamic: If there is already a DHCP server on your network,<br />
you can let the DHCP server assign an IP address to your<br />
<strong>N2100</strong>.<br />
IP IP address of the LAN 1 network interface<br />
Netmask Network mask, which is generally: 255.255.255.0<br />
Gateway Default Gateway IP address.<br />
DNS Server Domain Name Service (DNS) server IP address<br />
IP Sharing<br />
Mode<br />
When enabled, traffic on LAN 2 will be directed to LAN 1.<br />
Note:<br />
- Only use Jumbo Frame settings when operating in a Gigabit environment<br />
where all other clients have Jumbo Frame Setting enabled.<br />
- Enabling DHCP automatically turns on UPnP—see the Service Support<br />
Screen.<br />
- If you are only using one LAN port, we suggest you use LAN 1 and disable<br />
IP Sharing Mode. This will result in higher throughput.<br />
25
- A correct DNS setting is vital to networks services, such as SMTP and NTP.<br />
Warning:<br />
- Most of Fast Ethernet (10/100) Switches / Routers do not support Jumbo<br />
Frame and you will not be able to connect to your YES <strong>Box</strong> <strong>N2100</strong> after<br />
Jumbo Frame is turned on. If this happens, turn off the YES <strong>Box</strong> <strong>N2100</strong>.<br />
Then, power on the YES <strong>Box</strong> <strong>N2100</strong> and immediately press and hold the<br />
Reset button on the back of the unit for 10 seconds. This will reset your<br />
network settings, password, and turn off Jumbo Frame Support<br />
LAN 2 Configuration<br />
The YES <strong>Box</strong> <strong>N2100</strong> supports a second network connection for higher service<br />
availability. To configure the second network connection, choose LAN 2 from the<br />
Network menu.<br />
MAC Address Displays the MAC address of the LAN2 network interface.<br />
Jumbo Frame Enable/Disable Jumbo Frame Support of the LAN 2<br />
Support<br />
network interface on your YES <strong>Box</strong> <strong>N2100</strong>.<br />
IP Specifies the IP address of the LAN2 network interface.<br />
Netmask Specifies the Network Mask of the LAN2 network interface.<br />
26
Note:<br />
- Only use Jumbo Frame settings when operating in a Gigabit environment<br />
where all other clients with Jumbo Frame Setting enabled.<br />
Warning:<br />
- Most Fast Ethernet (10/100) Switches / Routers do not support Jumbo<br />
Frame and you will not be able to connect to your YES <strong>Box</strong> <strong>N2100</strong> after<br />
Jumbo Frame is turned on. If this happens, turn off the YES <strong>Box</strong> <strong>N2100</strong>.<br />
Then, power on the YES <strong>Box</strong> <strong>N2100</strong> and immediately press and hold the<br />
Reset button on the back for 10 seconds. This will reset your network<br />
settings, password, and turn off Jumbo Frame Support.<br />
- LAN 1 and LAN 2 have to be on different LAN segments, e.g. 192.168.1.x<br />
for LAN 1and 192.168.2.x for LAN 2.<br />
DHCP Server Configuration<br />
The YES <strong>Box</strong> <strong>N2100</strong> supports a DHCP Server on second network interface.<br />
DHCP Server Enable/Disable DHCP server on LAN 2.<br />
Start IP Specifies the starting IP address available to be leased.<br />
End IP Specifies the end IP address available to be leased.<br />
DNS Server Displays the Domain Name Service (DNS) server IP address.<br />
Note:<br />
- LAN 2 will use the DNS server specified in the LAN 1 configuration.<br />
27
WLAN Configuration (optional)<br />
The YES <strong>Box</strong> <strong>N2100</strong> supports wireless LAN connection. The YES <strong>Box</strong> <strong>N2100</strong> will<br />
act as a wireless access point (AP) on your network. The WLAN section will<br />
automatically appear when YES <strong>Box</strong> <strong>N2100</strong> detects a mini PCI wireless LAN card or<br />
a USB dongle. Choose WLAN from the Network menu and Wireless LAN<br />
Configuration page will appear.<br />
Note :<br />
- Currently supported mini PCI wireless LAN cards are: MSI MS-6833B, CNet<br />
CWM-854 and Gemtek WMIR-174G.<br />
- Currently supported USB wireless dongles are: 3Com 3CRUSB10075,<br />
Zyxel G220USB, PCI GW-US54mini. USB dongles have to be connected<br />
before YES <strong>Box</strong> <strong>N2100</strong> is powered up.<br />
MAC Address Displays the MAC address of the wireless network<br />
interface.<br />
IP Specifies the IP address of the WLAN network interface.<br />
Netmask Specifies the Network Mask of the WLAN network<br />
interface.<br />
ESSID Specifies the name of the wireless network.<br />
Extended Service Set Identifier (ESSID) is the name<br />
28
designated for a specific wireless local area network<br />
(WLAN).<br />
ESSID Broadcast Enable/disable ESSID Broadcast.<br />
Enabling this feature broadcasts the ESSID across the<br />
network.<br />
Channel Specifies the channel of the wireless network.<br />
All devices on the network must share the same channel.<br />
Auth Mode Select Open System to communicate the key across the<br />
network.<br />
Select Shared to limit communication to only those<br />
devices that share the same WEP key settings.<br />
WEP enable Select Enable to enter the WEP key.<br />
Select Disable to disable the WEP key.<br />
WEP has to be enabled when Auth Mode is set to<br />
Shared.<br />
Key Length The WEP Key can be set to 64 bit or 128 bit.<br />
The WEP key may be constructed with these<br />
alphanumeric characers: 0~9 and A~F.<br />
When length is set to 64, you must enter 10 characters.<br />
(e.g. 2FAB2CAFE0)<br />
When length is set to 128, you must enter 26 characters.<br />
(e.g.1234567890ABCDEF1234567890)<br />
WEP KEY 1 Select WEP Key 1.<br />
WEP KEY 2 Select WEP Key 2.<br />
WEP KEY 3 Select WEP Key 3.<br />
WEP KEY 4 Select WEP Key 4.<br />
DHCP Server Enable/Disable DHCP server on wireless network.<br />
Start IP Specifies the starting IP address available to be leased.<br />
End IP Specifies the end IP address available to be leased.<br />
DNS Server Displays the Domain Name Service (DNS) server IP<br />
address.<br />
Note:<br />
- The WLAN must have different segment setting from LAN 1 and LAN 2.<br />
- The WLAN will use the DNS server specified in the LAN 1 configuration.<br />
DHCP Server Configuration<br />
29
The YES <strong>Box</strong> <strong>N2100</strong> supports a DHCP Server on WLAN interface.<br />
DHCP Server Enable/Disable DHCP server on WLAN.<br />
Start IP Specifies the starting IP address available to be leased.<br />
End IP Specifies the end IP address available to be leased.<br />
DNS Server Displays the Domain Name Service (DNS) server IP address.<br />
Note:<br />
- The WLAN will use the DNS server specified on LAN 1.<br />
- The IP Sharing Mode setting on LAN 1 will have the same effect on WLAN<br />
traffic as on LAN 2.<br />
Configure Network Services<br />
From the Network menu, choose the Service item, and the Service Support<br />
30
screen appears. This screen displays the service support parameters of the system.<br />
You can change any of these items and press Apply to confirm your settings. A<br />
description of each item follows:<br />
WebDisk Support Enable or disable WebDisk support. Enter the<br />
port number if this option is enabled.<br />
Secure WebDisk Support Enable or disable secure WebDisk support.<br />
Enter the port if this option is enabled.<br />
SMB/CIFS Enable or disable SMB/CIFS protocol for<br />
Windows, Apple, Unix drive mapping.<br />
UPnP<br />
Enable or disable Universal Plug and Play<br />
protocol. UPnP helps to find the IP address of<br />
the <strong>N2100</strong>.<br />
Note:<br />
- Disable HTTP support and Enable Secure HTTP support to guarantee<br />
secure access.<br />
- In some environments, due to security concerns, you may wish to disable<br />
SMB/CIFS as a precaution against computer viruses.<br />
SMB/CIFS Setup<br />
YES <strong>Box</strong> <strong>N2100</strong> can act as a Samba server, enabling users to share files using<br />
31
SMB/CIFS protocol. From the Network menu, choose the SMB/CIFS item, and the<br />
SMB/CIFS Setup screen appears. You are allowed to change any of these items<br />
and press Apply to confirm your settings. A description of each item follows:<br />
Sharing If you are using Microsoft Windows®, enable this<br />
service to access the files on the <strong>N2100</strong> by mapping a<br />
network drive.<br />
WINS Specify the WINS server IP address, if your network<br />
has a WINS server installed. <strong>N2100</strong> will automatically<br />
register its name and IP address with WINS service.<br />
Work Group/Domain To specify your <strong>N2100</strong> as a member of a workgroup<br />
or domain, enter the appropriate information into this<br />
field.<br />
Note:<br />
- SMB/CIFS service also allows file sharing from Mac OSX and Linux<br />
platforms.<br />
- Once a Mac OS accesses a share folder, it will create a file<br />
named .DS_Store, and directories named Temporary items, Network Trash<br />
Folder, .Apple Double, Apple Desktop and AppleDB in the share folder.<br />
Apple Network<br />
32
From the Network menu, choose the Applet Network item, and the Apple Network<br />
Configuration screen appears. This screen displays the Apple Filing Protocol<br />
configuration items. You can change any of these items and press Apply to confirm<br />
your settings. A description of each item follows:<br />
Apple File Service Enable Apple File Service to use <strong>N2100</strong> on MAC<br />
OS-based system.<br />
MAC CHARSET If your operating system does not support Unicode (e.g.<br />
MAC OS9/8), select the same language as your OS<br />
here in order to properly view the files and directories on<br />
the server.<br />
Zone Specifies Zone for Applet Talk service.<br />
If your AppleTalk network uses extended networks and<br />
is assigned with multiple zones, assign a zone name to<br />
<strong>N2100</strong>. If you do not want to assign a network zone,<br />
enter an asterisk (*) to use the default setting.<br />
FTP Server Setup<br />
YES <strong>Box</strong> <strong>N2100</strong> can act as a FTP server, enabling users to download and upload<br />
files with their favorite FTP programs. From the Network menu, choose the FTP<br />
item, and the FTP Service Setup screen appears. You can change any of these<br />
items and press Apply to confirm your settings. A description of each item follows:<br />
33
FTP Enable FTP Service on the <strong>N2100</strong>.<br />
Port Specifies the port number of an incoming connection on a<br />
non-standard port.<br />
FTP ENCODE If your FTP client or operating system does not support<br />
Unicode (e.g. Windows® 95/98/ME or MAC OS9/8), select<br />
the same encoding as your OS here in order to properly view<br />
the files and directories on the server. Available options are<br />
BIG5, HZ, GB2312, GB18030, ISO, EUC-JP, SHIFT-JIS and<br />
UTF-8.<br />
To access the share folder in <strong>N2100</strong> YES <strong>Box</strong>, use the appropriate user login and<br />
password set up in Accounts > Users page. Access control to each share folder is<br />
set up in Storage > Folder > ACL page.<br />
When trying to access <strong>N2100</strong> YES <strong>Box</strong> anonymously, just enter “anonymous” as the<br />
user name, and the anonymous user will be able to access all the share folders that<br />
are set to public. Anonymous FTP users are allowed to upload and download files<br />
but not delete files in the share folders.<br />
iTunes Configuration<br />
With the built-in iTunes server capability, the YES <strong>Box</strong> <strong>N2100</strong> enables digital music<br />
to be shared and played anywhere!<br />
From the Network menu, choose the iTunes item, and the iTunes Configuration<br />
screen appears. You may enable or disable iTunes Service from here. Once enabled,<br />
34
enter correct information for each field. See the following table for a detailed field<br />
description. Press Apply to save your configuration.<br />
iTunes Enable or disable iTunes Service.<br />
Server Name Name used to identify the YES <strong>Box</strong> <strong>N2100</strong> to iTunes<br />
clients.<br />
Password Enter password to control access to your iTunes music.<br />
Rescan Interval Rescan interval in seconds.<br />
MP3 Tag Encode Specify tag encoding for MP3 files stored in <strong>N2100</strong>. All ID3<br />
Note:<br />
tags will be send out in UTF-8 format.<br />
- The server same can be different from your host name.<br />
- Rescan will interrupt Disk Power Management.<br />
Media Manager Settings (for Media Server edition only)<br />
With the built-in Media Server capability, the YES <strong>Box</strong> <strong>N2100</strong> provides media<br />
streaming service to stand-alone networked home media adapters that support the<br />
UPnP AV protocol or are Digital Living Network Alliance (DLNA) standard compliant.<br />
Follow the steps below to install the Media Server onto your YES <strong>Box</strong> <strong>N2100</strong>.<br />
35
Install Media Server<br />
1. Go to firmware upgrade page by click on System > Firmware Upgrade menu<br />
item.<br />
2. Click on the Browse button to browse your companion CD, and select the<br />
media server software, Media_Server_<strong>N2100</strong>_v10.bin.<br />
3. Click on Apply button to start the Media Server installation.<br />
4. After the Media Server is installed, the YES <strong>Box</strong> will reboot. After the YES <strong>Box</strong> is<br />
rebooted, the Media Server is ready for use.<br />
Media Server Operation<br />
Media Server Enable/disable Media Server Service.<br />
Media Folder Select the folder that contains media files to be shared.<br />
Add Click on Add button to add the selected media folder into<br />
Media Server sharing folders.<br />
Rescan Rescan for new contents in the selected media folder.<br />
Remove Remove the selected folder from the Media Server. The<br />
content in the folder will not be accessible to the Media Server.<br />
36
Universal Plug and Play (UPnP)<br />
Universal Plug and Play (UPnP) is a set of computer network protocols promulgated<br />
by the UPnP Forum. The goals of UPnP are to allow devices to connect seamlessly<br />
and to simplify the implementation of networks in the home (data sharing,<br />
communications, and entertainment) and corporate environments. UPnP achieves<br />
this by defining and publishing UPnP device control protocols built upon open,<br />
Internet-based communication standards.<br />
Please check the UPNP website for more information (http://www.upnp.org).<br />
Digital Living Network Alliance (DLNA)<br />
The Digital Living Network Alliance (DLNA), (formely: Digital Home Working Group),<br />
is an alliance of leading companies in the consumer electronics, mobile and<br />
personal computer industries.<br />
Its aim is to align the companies and have industry standards, which will allow<br />
products from all companies to be compatible with each other and to enable a<br />
network of electronic devices in the home. In this way consumers will be able to<br />
enjoy digital living easily and seamlessly.<br />
Please check the DLNA website for more information (http://www.dlna.org)<br />
37
User and Group Management<br />
The YES <strong>Box</strong> <strong>N2100</strong> has built-in user database that allows administrator to manage user<br />
access using different group policies.<br />
Local User Configuration<br />
From the Accounts menu, choose the Users item, and the Local User<br />
Configuration screen appears. This screen allows you to Add, Modify, and Delete<br />
local user.<br />
Add Press the Add button to add a user to the list of local users.<br />
Modify Press the Modify button to modify a local user.<br />
Delete Press the Delete button to delete a selected user from the system.<br />
How to Add a User<br />
1. Click on Add button in Local User Configuration, and Local User Setting<br />
screen appears.<br />
2. In the Local User Setting screen, enter a name in the User Name box.<br />
3. Enter a password in the Password box and re-enter the password in the<br />
Confirm box.<br />
4. Select which group the user will belong to. Group Members is a list of groups<br />
38
this user belongs to. Group List is a list of groups this user does not belong to.<br />
Use the > buttons to have this user join or leave a group.<br />
5. Press the Apply button and the user is created.<br />
Note:<br />
- All users will be in the “users” group.<br />
How to Remove a User<br />
1. Select an existing user from the Local User Configuration screen.<br />
2. Click on Delete button and the user is deleted from the system.<br />
How to Modify a User<br />
1. Select an existing user from the Local User Configuration screen.<br />
2. Click on the Modify button, and Local User Setting screen appears<br />
3. Enter a new password and re-enter to confirm, or use the > buttons to<br />
have this user join or leave a group. Click on the Apply button to save your<br />
changes.<br />
Local Groups Configuration<br />
From the Accounts menu, choose Groups item, and the Local Groups<br />
39
Configuration screen appears. This screen allows you to Add, Modify, and Delete<br />
local group.<br />
Add Press the Add button to add a group to the list of local groups.<br />
Modify Press the Modify button to modify a local group.<br />
Delete Press the Delete button to delete a selected group from the system.<br />
How to Add a Group<br />
1. In the Groups screen, click on the Add button.<br />
2. The Local Group Setting screen appears.<br />
3. Enter a Group Name, and select users to be in this group from the Users List<br />
by adding them to the Members List.<br />
4. Click on the Apply button.<br />
40
How to Delete a Group<br />
1. In the Groups screen, select a group name from the list.<br />
2. Press Delete to delete the group from the system.<br />
How to Modify a Group<br />
1. In the Groups screen, select a group name from the list.<br />
2. Press Modify button to modify the members in a group.<br />
3. To add a user into a group, select the user from the Users List, press the > button.<br />
5. Click the Apply button to save your changes.<br />
41
Additional System Settings<br />
Use the System menu to configure system administration functions.<br />
Notification Configuration<br />
From the System menu, choose the Notification item, and the Notification<br />
Configuration screen appears. This screen lets you make settings for notification in<br />
case of system problems. Press Apply to confirm all settings. See following table for<br />
a detailed description of each item.<br />
Beep Notification Enable/disable the system beeper that beeps when a<br />
problem occurs.<br />
Email Notification Enable/disable email notifications of system problems.<br />
SMTP Server Specifies the hostname/IP address of the SMTP server.<br />
Port Specifies the port to send outgoing notification emails.<br />
Auth Type Select the SMTP Server account authentication type.<br />
SMTP Account ID Set the SMTP Server Email account ID.<br />
Account<br />
Password<br />
Enter a new password.<br />
Confirm Account<br />
password<br />
Confirm a new password.<br />
Receiver’s E-mail Add one or more recipient’s email addresses to receive<br />
Address<br />
email notifications.<br />
Test E-Mail Click to send out test e-mails to make sure the settings<br />
are correct.<br />
Note:<br />
- Consult with your mail server administrator for the email server information.<br />
42
System Logs<br />
From the System menu, choose the Logs item and the System Logs screen<br />
appears. This screen shows a history of system usage and important events such as<br />
RAID status, network information, and system booting. See the following table for a<br />
detailed description of each item:<br />
Truncate All Log File Clear all log files.<br />
I >>I Use the forward ( > >>I ) and backward ( I
Time Settings<br />
From the System menu, choose the Time item and the Time screen appears. Set<br />
the desired date, time, time zone and NTP Server. You can change any of these<br />
items and press Apply to confirm your settings. You can elect to synchronize the<br />
system time on the <strong>N2100</strong> YES <strong>Box</strong> with a NTP (Network Time Protocol) server.<br />
See the following table for a detailed description of each item.<br />
Date Sets the system date.<br />
Time Sets the system time.<br />
Time Zone Sets the system time zone.<br />
NTP Server Select Yes to allow the <strong>N2100</strong> to synchronize with the NTP<br />
server shown below.<br />
Select Manually to allow the <strong>N2100</strong> to synchronize with an NTP<br />
server of your choice.<br />
Select No to disallow the <strong>N2100</strong> to synchronize with an NTP<br />
server.<br />
Warning:<br />
- If an NTP server is selected or entered, please make sure your <strong>N2100</strong>’s<br />
network has been setup to access the NTP server.<br />
44
System Configuration Backup & Restore<br />
From the System menu, choose the Config Mgmt item and the System<br />
Configuration Backup/Restore screen appears. From here you can download or<br />
upload system configurations. See the following table for a detailed description of<br />
each item.<br />
Download Save and export current system configuration.<br />
Upload Import a saved configuration file to overwrite current system<br />
configuration.<br />
45
Module Management<br />
From the System menu, choose the Module Mgmt item and the Module<br />
Management screen appears. You can install separate software modules into your<br />
<strong>N2100</strong>.<br />
Module File Location of the module file.<br />
Browse Click to browse the folder of your PC to find the module files.<br />
Install Click to install module into your <strong>N2100</strong>.<br />
Uninstall Click to uninstall module.<br />
Enable/Disable Click to enable/disable a module.<br />
Check Update Click to check for new versions of the module.<br />
Note: Not all the module supports this function.<br />
Name Displays the name of the module.<br />
Version Displays the module version.<br />
Description The description of the module.<br />
Enable Displays whether the module has been enabled or not.<br />
Status Displays the status of the module.<br />
Note:<br />
- Modules will be released by <strong>Thecus</strong> separately from the standard NAS<br />
firmware.<br />
46
Reset to Factory Default Settings<br />
From the System menu, choose the Factory Default item and the Reset to Factory<br />
Default screen appears. Press Apply to reset the YES <strong>Box</strong> <strong>N2100</strong> to factory default<br />
settings.<br />
Warning:<br />
- Resetting to factory defaults will not erase the data stored in the hard disks<br />
but will revert all the settings to the factory default values.<br />
47
Upgrading System Firmware<br />
From the System menu, choose the Firmware Upgrade item and the Firmware<br />
Upgrade screen appears.<br />
Follow the steps below to upgrade your firmware<br />
1. Use the Browse button to find the firmware file.<br />
2. Press Apply.<br />
3. The beeper beeps and the system’s Busy LED blinks until the upgrade is<br />
complete.<br />
Note:<br />
- The beeper only beeps if it is enabled in the System Notification menu.<br />
- Check <strong>Thecus</strong> website for the latest firmware release and release notes.<br />
Change Administrator Password<br />
From the System menu, choose the Administrator Password item and the<br />
Change Administrator Password screen appears. Press Apply to confirm<br />
password changes. See the following table for a detailed description of each item.<br />
New Password Type in a new administrator password<br />
Confirm Password Type the new password again to confirm.<br />
48
Shutdown and Reboot System<br />
From the System menu, choose Reboot & Shutdown item, and the<br />
Shutdown/Reboot System screen appears. Press Reboot to restart the system or<br />
Shutdown to turn the system off.<br />
Logout<br />
To logout of System Web Management, choose Logout from System Menu.<br />
49
Language Selection<br />
The YES <strong>Box</strong> <strong>N2100</strong> web user interface supports multiple languages. Choose the<br />
Language menu and the Change Language screen appears. This screen allows<br />
you to select preferred language for the system menu. Press Apply to confirm your<br />
selection.<br />
50
Chapter 3 How to use YES <strong>Box</strong> <strong>N2100</strong><br />
Once the YES <strong>Box</strong> <strong>N2100</strong> is setup and operating, users on the network may manage all<br />
varieties of digital music, photos, or files using their web browser. To manage your personal<br />
files or access public files on the YES <strong>Box</strong> <strong>N2100</strong>, just enter the YES <strong>Box</strong>’s IP address into<br />
your browser.<br />
Manage Files & Folders<br />
The buttons on the login page are WebDisk, Music, Gallery, and Login buttons.<br />
To access files, music or photos on the YES <strong>Box</strong> <strong>N2100</strong>, click on the WebDisk,<br />
Music, or Gallery buttons respectively.<br />
WebDisk Setup<br />
When any user clicks on the WebDisk button, they will see all available public<br />
folders.<br />
51
When they click on the name of a public folder, they will see the files within that<br />
folder.<br />
When user clicks on a file name, the file will be downloaded.<br />
Back Move up to the parent folder.<br />
File Search Search for specific files or<br />
folders.<br />
Sort Arrange all files and folders by<br />
type, name, size, or last modified<br />
date.<br />
Delete Delete the selected files or<br />
folders.<br />
NOTE: This button will appear<br />
only if the user has write access<br />
to the folder.<br />
52
Page Number Use this to navigate when<br />
multiple pages are required to list<br />
the contents of the selected<br />
directories.<br />
Create New Enter a new folder name and<br />
Folder press the Create button.<br />
NOTE: This function will appear<br />
only if the user has write access<br />
to the folder.<br />
Upload Files Browse to the desired file location<br />
and press the Upload button.<br />
NOTE: This function will appear<br />
only if the user has write access<br />
to the folder.<br />
Login Click on the Login button to log<br />
into the YES <strong>Box</strong> <strong>N2100</strong>.<br />
For more information on how to setup user rights to the folders, please check Folder<br />
Access Control List (ACL) section.<br />
To access folders with access control, you must first login with a local user account.<br />
To log in, please click on the login button on the lower right hand corner.<br />
iTunes® Server Setup<br />
To manage your digital music and share it with iTunes clients on the network, click on<br />
53
the Music button from the left panel.<br />
You can use the WebDisk function to manage your digital music, or you can manage<br />
through SMB/CIFS (see SMB/CIFS Setup section).<br />
Photo Gallery Setup<br />
To manage your photo gallery or see other photo albums, click on the Gallery button<br />
from the left panel.<br />
You will see your own Photo Gallery and all public Photo Albums on the network.<br />
To manage any picture files, you must first select the item by clicking its check box.<br />
Manage Your Album and Photos<br />
Make Cover Make selected photo your cover picture.<br />
Back Move up to the parent folder.<br />
Add Add a new album or photos.<br />
Edit Edit the name and description of the selected album or<br />
photo. Each name is limited to 20 characters and each<br />
description is limited to 255 characters.<br />
Delete Delete the selected albums or photos.<br />
Note:<br />
- Only logged in users will see these icons.<br />
- To prevent system errors, the YES <strong>Box</strong> <strong>N2100</strong> sets the following limitations<br />
on photo files:<br />
� Each file upload is limited to a size of 4MB. Files exceeding 4MB will<br />
NOT be uploaded and no error message will appear.<br />
� Only these photo file types will be uploaded: *.jpg, *.gif, *.bmp, *.png,<br />
*.pcx, *.psd, *.bmp.<br />
� If duplicate file names exist during upload process, system will add a<br />
number in front of the original file name ( abc�1abc)<br />
Create Album<br />
Click on the Add button to create a new album.<br />
54
Enter a name for the album, and enter a description if you wish. Then, click on the<br />
Create Album button.<br />
Password Protect an Album<br />
Select the album to be protected, click on the Edit button, and the Album Edit<br />
screen will appear. The owner of the album can enter an album password to protect<br />
the album, so that only people with the correct password can view the album.<br />
55
Uploading Pictures to an Album<br />
When the album is created, click on the album icon to enter the album. Initially the<br />
album is empty. Click on the Add button to upload pictures into the album. The<br />
Upload Photos screen will appear. Users can select and upload up to 8 pictures at a<br />
time.<br />
Once the picture is uploaded, you can view it in the album. The owner of the album<br />
can Delete or Modify the pictures with the Delete or Modify buttons on the top right<br />
hand corner.<br />
56
Windows XP Publish Wizard<br />
There are many ways for a local user to upload pictures into their photo album.<br />
Users of Windows XP can upload thru Windows XP Publish Wizard.<br />
1. Click on the XP Publishing Wizard icon.<br />
2. The XP Web Publishing Wizard Client screen appears. Click on the link to<br />
install the Publishing Wizard.<br />
57
3. Windows XP will ask whether you want to run or save this file. Click on the Run<br />
button.<br />
4. Once the Wizard is installed, use the Windows file manager to browse the folder<br />
that contains the picture you want to publish. On the left pane, the will be an icon<br />
“Publish this folder to the Web”.<br />
5. Click on this icon and Web Publishing Wizard will start.<br />
58
6. Select the pictures you want to publish to the Photo Web Server by placing a<br />
check mark on the top left hand corner of the picture. Click on the Next button.<br />
7. You PC will start to connect to the Photo Web Server.<br />
8. Select Y.E.S. box Photo Gallery Wizard to publish you pictures to the <strong>N2100</strong>.<br />
59
9. Login into the <strong>N2100</strong> with your local username and password.<br />
10. The <strong>N2100</strong> will then display the welcome page.<br />
11. Create your album by entering an album name and click on the Create Album<br />
button.<br />
60
12. Select the album you want to upload your pictures to.<br />
13. Confirm the target album.<br />
14. Windows will show picture upload in progress.<br />
61
15. When the upload is finished, the Wizard will ask you whether if you want to go to<br />
the website. Click on the Finish button to go to your Photo Web Server.<br />
16. Click on the user’s icon to go to the user’s album.<br />
17. You will see the user’s album list. Click on MyAlbum.<br />
62
18. You will see the pictures just selected in the album.<br />
EXIF Information<br />
Click on the one of the pictures. The EXIF information of the picture will be displayed<br />
next to the picture.<br />
63
Slide Show<br />
You can click on the Start Slide Show icon on the top right hand corner to start the<br />
slide show.<br />
To stop the slide show, click on the Stop Slide Show icon on the top right hand<br />
corner.<br />
64
Mapping the Client PC to the YES <strong>Box</strong> <strong>N2100</strong><br />
Mapping a Network Drive (Windows)<br />
You can map share folders on the YES <strong>Box</strong> <strong>N2100</strong> so that you can access them<br />
through the My Computer folder in Windows. You can connect to the shared network<br />
folders on the YES <strong>Box</strong> <strong>N2100</strong> as follows:<br />
1. Go to the My Documents folder in Windows.<br />
2. In the menu bar, select Tools and then Map Network Drive…<br />
65
3. The Map Network Drive window appears.<br />
4. Assign a drive letter for the share folder.<br />
5. Use the Browse button to find the folder over your network. Alternatively, you<br />
may enter the folder name you wish to connect to or its IP address.<br />
6. Click Finish. When the Connect As… window appears, enter a user name and<br />
password.<br />
7. Click OK. The share folder appears as the drive you assigned. You can now<br />
access this folder as though it were a drive on your computer.<br />
66
Mapping a Network Drive (Apple OS X)<br />
On an Apple computer, you can connect to shared computers and servers using a<br />
network address.<br />
1. Choose Go > Connect to Server…<br />
2. Enter the network address for the server in the Server Address text box.<br />
When connecting using SMB/CIFS protocol, type:<br />
smb://192.168.1.100/Folder1<br />
When connecting using AFP protocol, type:<br />
afp://192.168.1.100/Folder1<br />
Click Connect.<br />
3. When MAC OS X is trying to connect <strong>N2100</strong>, it will ask for a User Name and<br />
Password which has access to the folder.<br />
4. When MAC OS X connected to <strong>N2100</strong> successfully, an icon representing the<br />
folder will appear on the MAC OS X desktop. You can access the folder by<br />
double clicking on the icon.<br />
67
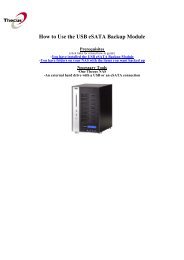
File Backup<br />
There are a number of ways to back up your data to your YES <strong>Box</strong> <strong>N2100</strong>.<br />
<strong>Thecus</strong> Backup Utility<br />
The <strong>Thecus</strong> Backup Utility is on your Installation CD. When you click on the CD, the<br />
Backup Utility will be installed under Program Groups > <strong>Thecus</strong> > <strong>Thecus</strong> Backup<br />
Utility. If it is not installed, you can copy the file (<strong>Thecus</strong> Backup Utility.exe) to a<br />
convenient location on your hard disk and double click to execute it.<br />
When you execute this utility for the first time, it will ask you whether to create a DB<br />
file. Click Yes.<br />
Note: If you can not find <strong>Thecus</strong> Backup Utility on your CD, please download it from<br />
the <strong>Thecus</strong> website.<br />
1. Click Add to create a Backup task.<br />
2. The Add new task dialogbox appears.<br />
Task Specifies a name for the current task.<br />
Source Click to specify the source folder/file location.<br />
Incremental Click to specify whether the backup will be<br />
incremental.<br />
If unchecked, the backup will be full backup.<br />
Destination Click to specify the destination folder/file location.<br />
Excluded extensions Files with these file name extensions will be skipped<br />
and not back up to the destination.<br />
Comments If you with, enter comments here for your record.<br />
68
3. To schedule the task to run at regular intervals, click on the schedule icon for<br />
that task. You can schedule the task to run Monthly or Weekly.<br />
4. To check the log for that task, click on the log icon for that task.<br />
Note:<br />
- <strong>Thecus</strong> Backup Utility also supports MAC OS X. Just copy the <strong>Thecus</strong><br />
Backup Utility.dmg to your MAC OS X machine and double click to execute<br />
it.<br />
Windows XP Data Backup<br />
If you use Windows XP Professional, you can also use the Windows Backup Utility<br />
(Ntbackup.exe) to backup your files.<br />
Installing the Windows XP Home Edition Backup Utility<br />
If you use Windows XP Home Edition, follow these steps to install the utility:<br />
1. Insert the Windows XP CD into a drive and double-click the CD icon in My<br />
69
Computer.<br />
2. When the Welcome to Microsoft Windows XP screen appears, click Perform<br />
Additional Tasks.<br />
3. Click Browse this CD.<br />
4. In Windows Explorer, navigate to ValueAdd > Msft > Ntbackup.<br />
5. Double-click Ntbackup.msi to install the backup utility.<br />
Using Windows Backup Utility<br />
By default, the backup utility uses a wizard. To begin backup:<br />
1. Click Start, and point to All Programs > Accessories > System Tools ><br />
Backup to start the wizard.<br />
2. Click Next to skip past the opening page. Choose Backup files and settings<br />
from the second page, and then click Next.<br />
3. Select which option you want to back up.<br />
4. Click Next and in the Backup Type, Destination, and Name page specify a<br />
back up location using the Browse button.<br />
5. Find and select the drive that specifies your YES <strong>Box</strong> <strong>N2100</strong> as your backup<br />
destination and click Next.<br />
6. Click Next to display the wizard’s final page and click Finish to start backing up.<br />
70
Mac OS X Backup Utilities<br />
Mac OS X does not include any backup software. However, there are a number of<br />
backup solutions available for the Mac OS X, including: iBackup, Psyncx, iMSafe,<br />
Rsyncx, Folder Synchronizer X, Tri-BACKUP, Impression, Intego Personal Backup,<br />
SilverKeeper, and Apple's dotMac Backup utility to name just a few. To find even<br />
more freeware and shareware backup utilities to choose from, go to VersionTracker<br />
or MacUpdate and search on "backup".<br />
71
Appendix A: Troubleshooting Guide<br />
This appendix covers troubleshooting, including error detection and how to deal with a<br />
damaged hard drive.<br />
Forgotten Network IP Address<br />
If you forget your network IP address and have no physical access to the system,<br />
you can use the setup wizard to retrieve the IP of your <strong>N2100</strong>.<br />
1. Start the Setup Wizard, and it will automatically detect all <strong>Thecus</strong> IP storage<br />
products on your network.<br />
2. You should be able to find the IP address of the <strong>N2100</strong> which you have<br />
forgotten in the “Device discovery” screen.<br />
When RAID status is in Degraded mode<br />
When you find the RAID status is in Degraded mode, it means that one of the disk is<br />
bad in RAID 1. Follow the procedures below to rebuild your RAID.<br />
72
1. Power down the YES <strong>Box</strong> <strong>N2100</strong>.<br />
2. Replace the bad disk. To do this, follow the steps outlined in “Hard Disk<br />
Installation”.<br />
3. Power on the YES <strong>Box</strong> <strong>N2100</strong>, and log in as admin.<br />
4. Go to Storage > RAID page, and click on the Config button.<br />
5. Check on the check box new disk in the RAID column to add into RAID, and<br />
click on the Create button to rebuild RAID.<br />
73
6. System will rebuild your RAID. At this time, your data is still accessible and<br />
intact. During RAID rebuild, the performance of the system is lower than normal.<br />
If possible, we suggest not using the machine until it is fully rebuilt. The time<br />
required to rebuild depends on the size of your hard disks.<br />
74
File System Check Utility<br />
Press the reset button during booting process, and <strong>N2100</strong>’s LAN 1 IP address will be<br />
set to 192.168.1.100 temporarily. At this time all the file services will be stopped.<br />
Warning:<br />
- File System Check Utility works only with LAN 1 not LAN 2.<br />
1. When you point your browser to 192.168.1.100, you will see the following<br />
screen.<br />
2. If you select “Run file system check” option, the file system check utility will be<br />
started, and last 20 lines of the result will be displayed in your browser.<br />
75
3. When the file system check is finished, the result will be displayed in your<br />
browser.<br />
NOTE:<br />
- If the file system is corrupted beyond repair, you may have to remove RAID<br />
and recreate the file system.<br />
76
Forgotten Password<br />
Press the reset button during booting process, and <strong>N2100</strong>’s LAN 1 IP address will be<br />
set to 192.168.1.100 temporarily. At this time all the file services will be stopped.<br />
1. When you point your browser to 192.168.1.100, you will see the following<br />
screen.<br />
77
2. If you select “Reset to Factory Default” option, the system will be reset. Below<br />
are the default system settings:<br />
Admin password � admin<br />
LAN 1 IP address � 192.168.1.100<br />
LAN 1 IP Gateway � 192.168.1.1<br />
LAN 1 Jumbo Frame Support � Off<br />
LAN 2 IP � 192.168.1.100<br />
LAN 2 Jumbo Frame Support � Off<br />
HTTP Port � 80<br />
HTTPS port � 443<br />
Error Detection<br />
There are three ways the system detects an error and lets you know there is a<br />
problem.<br />
1. The Error LED on the bottom left of the system’s front panel glows red.<br />
2. The Access/Error LED on the bottom right of a hard disk drive glows a steady<br />
red.<br />
Note:<br />
- Each hard disk drive has two LED indicators. The top LED is for power and<br />
the bottom LED shows either access or error.<br />
3. A beeping sound from the system means the same as the Error LED.<br />
78
If you are using JBOD with one disk and would like to add a second disk …<br />
If you started with one disk in JBOD mode, you can add a second disk at a later time.<br />
When the second disk is installed, you can just select the second disk and click on<br />
the Create button to create a volume equal to the size of two disks installed.<br />
The data in the first disk will be preserved. During JBOD expansion, all the file<br />
services will be stopped. The time for expansion depends on the size of the disks<br />
installed. All the file services will be resumed after the expansion is finished.<br />
If you are using JBOD with two disks and one of the disk failed…<br />
If your first disk fails, then all the data is lost.<br />
If your second disk fails, then the system will try to mount the disk, and you might still<br />
be able to access the data in the first disk under read only mode. At this time, you<br />
should try to recover as much data as you can to a different storage location.<br />
Replace the failed disk and rebuild your RAID.<br />
If you are using RAID 0 and one of the disks failed…<br />
RAID 0 offers no data protection. If any of disks fails, all data is lost.<br />
Solving Problems<br />
When the system detects an error:<br />
1. Login to the YES <strong>Box</strong> <strong>N2100</strong> using your browser.<br />
2. Go to the System menu and choose the Logs item.<br />
3. The System Log screen appears.<br />
4. Click the Error button and all recorded errors appear. These log entries help<br />
you diagnose the problem. Most errors are due to improper use of the device or<br />
hard drive damage. If hard drive damage is the problem, see the section that<br />
follows.<br />
5. If you are unable to solve the problem, please contact your dealer.<br />
79
<strong>N2100</strong> Simple Diagnosis Flowchart<br />
This flowchart is meant to provide a simple and quick procedure to identify which<br />
part of the <strong>N2100</strong> has failed.<br />
Procedure:<br />
1. Don’t insert any HDDs into the <strong>N2100</strong> system. Attach the power cord and then<br />
reset the IP address and admin password to the default settings.<br />
a) Power on the <strong>N2100</strong> and immediately press the Reset button for 10 seconds.<br />
b) This resets the <strong>N2100</strong> to its default IP address and password settings.<br />
Default IP: 192.168.1.100<br />
Default admin password: admin<br />
1.<br />
The reset button is near the LAN connector.<br />
2. Attach the power cord and connect the LAN cable between the <strong>N2100</strong> and a PC.<br />
Don’t use a hub.<br />
3. Turn on the <strong>N2100</strong> and check the front panel. The power LED should glow blue<br />
after power button is pressed. Then, the Busy LED starts blinking orange for<br />
around 60 seconds. After that, the busy LED turns off. If the busy LED keeps<br />
blinking orange for more than 3 minutes, the firmware may be corrupted during<br />
80
improper firmware upgrade procedures. It means the motherboard doesn’t work<br />
any more and needs to be repaired.<br />
4. Set the IP address of a PC or NB as 192.168.1.111, and then access the login<br />
webpage. Make sure the <strong>N2100</strong> and the PC is directly connected through a LAN<br />
cable, and not through a hub or a router.<br />
5. Check if the Admin login webpage shows up and works fine. Then check if the<br />
system status is normal and the HDD power LED works fine. In case the results<br />
are positive, it means the <strong>N2100</strong> system is functioning normally. Otherwise, the<br />
<strong>N2100</strong> may be damaged.<br />
6. Suppose the <strong>N2100</strong> is bad. If the power LED glows blue and both system and<br />
power fans work fine after power button pressed, the motherboard needs to be<br />
checked and repaired. Otherwise, the power supply unit has problems.<br />
81
0. Reset the IP Address and admin password to default setting.<br />
a) Power on the <strong>N2100</strong> and immediately press the Reset button for 10<br />
seconds.<br />
b) This resets the <strong>N2100</strong> to its default IP address and password settings.<br />
Default IP: 192.168.1.100<br />
Default admin password: admin<br />
2. Power LED<br />
glows blue and Busy<br />
LED keeps blinking?<br />
N<br />
4. Admin login &<br />
RAID status OK?<br />
Y<br />
NAS is OK<br />
1. Attach the power<br />
cord and connect<br />
LAN cable<br />
N<br />
Y<br />
3. Set the IP address<br />
of PC or NB as<br />
192.168.1.111, and<br />
then login NAS<br />
82<br />
Power<br />
supply unit<br />
is bad<br />
Firmware<br />
corrupted<br />
(MB is bad)<br />
MB is bad<br />
Y<br />
5. Power LED<br />
glows blue and system fan<br />
works?<br />
N
Appendix B: RAID Basics<br />
This appendix includes basic information about RAID and RAID settings.<br />
RAID Introduction<br />
A Redundant Array of Independent Disks (RAID) is an array of several hard disks<br />
that provide data security and high performance. A RAID system accesses several<br />
hard disks simultaneously, which improves I/O performance over a single hard disk.<br />
Data security is enhanced by a RAID, since data loss due to a hard disk failure is<br />
minimized by regenerating redundant data from the other RAID hard disks.<br />
Benefits<br />
RAID improves I/O performance, and increases data security through fault tolerance<br />
and redundant data storage.<br />
Improved Performance<br />
RAID provides access to several hard disk drives simultaneously, which greatly<br />
increases I/O performance.<br />
Data Security<br />
Hard disk drive failure unfortunately is a common occurrence. A RAID helps prevent<br />
against the loss of data due to hard disk failure. A RAID offers additional hard disk<br />
drives that can avert data loss from a hard disk drive failure. If a hard drive fails, the<br />
RAID volume can regenerate data from the data and parity stored on its other hard<br />
disk drives.<br />
RAID Configuration<br />
The <strong>N2100</strong> YES <strong>Box</strong> supports both RAID 0 and RAID 1. A RAID system divides data<br />
into smaller pieces (stripe) and saves these small pieces on two different hard disks<br />
for better performance and protection against single hard disk failure. To setup RAID<br />
on your system, you must configure stripe size and the type of RAID you wish to use.<br />
Stripe Size<br />
The system writes data in stripes across the multiple hard disks of a RAID. Since<br />
multiple disks are accessed at the same time, disk striping enhances performance.<br />
The stripes can vary in size and are interleaved sequentially.<br />
Term Definition<br />
Stripe Width The number of hard disk drives that are striped to. In a RAID<br />
with four hard disks the stripe width is four.<br />
83
Stripe Size The length of the interleaved data segments written across<br />
multiple hard disks.<br />
Example:<br />
Configure four hard disk drives as RAID 0 and the data is striped in segments.<br />
Segment One writes to HDD 1, Segment Two writes to HDD 2, and so on as below:<br />
HDD 1 Segment One<br />
Segment Five<br />
Segment Nine<br />
HDD 2 Segment Two<br />
Segment Six<br />
Segment Ten<br />
Choosing a RAID Level<br />
The YES <strong>Box</strong> <strong>N2100</strong> supports standard RAID levels 0 and 1. You choose a RAID<br />
level when you create a system volume. The factors for selecting a RAID level are:<br />
� Your requirements for performance<br />
� Your need for data security<br />
� Number of hard disk drives in the system<br />
� Capacity of hard disk drives in the system<br />
The following is a description of each RAID level and its pros and cons:<br />
RAID Application Pros Cons No. of Fault<br />
HDDs Tolerant<br />
0 Best suited for High If any HDD 1~32 No<br />
non-critical data performance fails, all<br />
that requires<br />
high<br />
performance.<br />
Description:<br />
Data is divided<br />
into blocks and<br />
sequentially<br />
distributed.<br />
for large files data is lost<br />
1 Best suited for Excellent Half the 2 Yes<br />
read-intensive Data hard disk<br />
fault-tolerant Security space<br />
84
systems.<br />
Description:<br />
Data is<br />
duplicated on<br />
another HDD<br />
(mirroring).<br />
85<br />
available.<br />
Performan<br />
ce<br />
impaired<br />
during<br />
rebuild.<br />
RAID 0<br />
RAID 0 is best suited for applications that need high bandwidth but do not require a<br />
high level of data security. The RAID 0 level provides the best performance of all the<br />
RAID levels, but it does not provide data redundancy.<br />
RAID 0 uses disk striping and breaking up data into blocks to write across all hard<br />
drives in the volume. The system can then use multiple hard drives for faster read<br />
and write. The stripe size parameter that was set when the RAID was created<br />
determines the size of each block. No parity calculations complicate the write<br />
operation.<br />
HDD 1 Segment One<br />
Segment Five<br />
Segment Nine<br />
HDD 2 Segment Two<br />
Segment Six<br />
Segment Ten<br />
RAID 1<br />
RAID 1 mirrors all data from one hard disk drive to a second one hard disk drive,<br />
providing complete data redundancy. However, the cost of data storage capacity is<br />
doubled.<br />
HDD 1 Segment One<br />
Segment Two<br />
Segment Three<br />
Segment Four<br />
HDD 2 Segment One Mirrored<br />
Segment Two Mirrored<br />
Segment Three Mirrored<br />
Segment Four Mirrored
Appendix C: Product Specifications<br />
Core Processors<br />
Hardware Specifications<br />
Processor Intel IOP 600MHz<br />
Wired interface 2 x 10/100/1000 Mbps Ethernet Port<br />
Wireless Interface<br />
(Optional)<br />
Wireless 802.11b/g<br />
SATA Controller 2 * SATA interface<br />
Memory System DDR 128MB<br />
Mass Storage HDD 2 x bays of 3.5” SATA HDD<br />
Single capacity supported<br />
80/120/160/200/250/300/400/500GB<br />
Power System Adapter AC 100~240Volt, 50/60Hz<br />
System LED Power LED,<br />
System LED,<br />
Network LED x 2<br />
Hard drive LED, x 2<br />
USB one copy button LED<br />
Physical/Mechanical Dimensions 160(W) mm ×85(H) mm ×200(D) cm<br />
Function Specifications<br />
Disk Modes RAID Spanning (RAID 0)<br />
Mirroring (RAID 1)<br />
Expansion (JBOD)<br />
Multimedia Support iTunes® Server Supported Music Types: AAC, MP3,<br />
WAV<br />
Personal Photo Web<br />
Server<br />
Media Server<br />
(optional)<br />
Enables system users to create their<br />
own personal photo web server<br />
Built-in Mediabolic media server for<br />
easy playback of multimedia files to<br />
any DLNA CERTIFIED or UPnP AV<br />
compliant device<br />
86
Data Access Client OS Support Windows 98/ME/NT/2000/XP<br />
UNIX/Linux (by SMB/CIFS)<br />
Apple OS X/9/8<br />
Web Disk Web-based network disk<br />
SMB/CIFS SAMBA 3<br />
FTP File transmission protocol<br />
AFP Apple File Service<br />
User<br />
Authentication<br />
Local User Supports built-in user accounts<br />
Administration Windows client<br />
program<br />
Server management utility program<br />
Web-based<br />
Web-based server management<br />
administration interface<br />
Email notification Send the system messages via Email<br />
to the system administrator<br />
Authorization Supports authorization of data access by setting Read, Write<br />
and Deny options on individual users or groups.<br />
87
Appendix D: Licensing Information<br />
This product included copyrighted third-party software licensed under the terms of GNU<br />
General Public License.<br />
Please see THE GNU General Public License for extra terms and conditions of this license.<br />
Source code availability<br />
<strong>Thecus</strong> Technology Corp. has exposed the full source code of the GPL licensed<br />
software. For more information on how you can obtain our source code, please visit<br />
our web site, http://www.thecus.com.<br />
Copyrights<br />
� This product includes cryptographic software written by Eric Young<br />
(eay@cryptsoft.com)<br />
� This product includes software developed by Mark Murray<br />
� This product includes software developed by Eric Young (eay@cryptsoft.com)<br />
� This product includes software developed by the OpenSSL Project for use in the<br />
OpenSSL Toolkit (http://www.openssl.org/)<br />
� This product includes PHP, freely available from <br />
� This product includes software developed by the University of California,<br />
Berkeley and its contributors.<br />
� This product includes software developed by Winning Strategies, Inc.<br />
� This product includes software developed by the Apache Group for use in the<br />
Apache HTTP server project (http://www.apache.org/).<br />
� This product includes software developed by Softweyr LLC, the University of<br />
California, Berkeley, and its contributors.<br />
� This product includes software developed by Bodo Moeller.<br />
� This product includes software developed by Greg Roelofs and contributors for<br />
the book, "PNG: The Definitive Guide," published by O'Reilly and Associates.<br />
� This product includes software developed by the NetBSD Foundation, Inc. and<br />
its contributors.<br />
� This product includes software developed by Yen Yen Lim and North Dakota<br />
State University.<br />
� This product includes software developed by the Computer Systems<br />
Engineering Group at Lawrence Berkeley Laboratory.<br />
� This product includes software developed by the Kungliga Tekniska Högskolan<br />
and its contributors<br />
88
� This product includes software developed by the Nick Simicich<br />
� This product includes software written by Tim Hudson (tjh@cryptsoft.com)<br />
� This product includes software developed by Christopher G. Demetriou for the<br />
NetBSD Project.<br />
CGIC License Terms<br />
------------------<br />
Basic License<br />
-------------<br />
CGIC, copyright 1996, 1997, 1998, 1999, 2000, 2001, 2002, 2003,<br />
2004 by Thomas Boutell and Boutell.Com, Inc.. Permission is granted to<br />
use CGIC in any application, commercial or noncommercial, at no cost.<br />
HOWEVER, this copyright paragraph must appear on a "credits" page<br />
accessible in the public online and offline documentation of the program.<br />
Modified versions of the CGIC library should not be distributed without<br />
the attachment of a clear statement regarding the author of the<br />
modifications, and this notice may in no case be removed.<br />
Modifications may also be submitted to the author for inclusion<br />
in the main CGIC distribution.<br />
GNU GENERAL PUBLIC LICENSE<br />
Version 2, June 1991<br />
Copyright (C) 1989, 1991 Free Software Foundation, Inc.<br />
51 Franklin St, Fifth Floor, Boston, MA 02110-1301 USA<br />
Everyone is permitted to copy and distribute verbatim copies<br />
89
of this license document, but changing it is not allowed.<br />
Preamble<br />
The licenses for most software are designed to take away your<br />
freedom to share and change it. By contrast, the GNU General Public<br />
License is intended to guarantee your freedom to share and change free<br />
software--to make sure the software is free for all its users. This<br />
General Public License applies to most of the Free Software<br />
Foundation's software and to any other program whose authors commit to<br />
using it. (Some other Free Software Foundation software is covered by<br />
the GNU Library General Public License instead.) You can apply it to<br />
your programs, too.<br />
When we speak of free software, we are referring to freedom, not<br />
price. Our General Public Licenses are designed to make sure that you<br />
have the freedom to distribute copies of free software (and charge for<br />
this service if you wish), that you receive source code or can get it<br />
if you want it, that you can change the software or use pieces of it<br />
in new free programs; and that you know you can do these things.<br />
To protect your rights, we need to make restrictions that forbid<br />
anyone to deny you these rights or to ask you to surrender the rights.<br />
These restrictions translate to certain responsibilities for you if you<br />
distribute copies of the software, or if you modify it.<br />
For example, if you distribute copies of such a program, whether<br />
gratis or for a fee, you must give the recipients all the rights that<br />
you have. You must make sure that they, too, receive or can get the<br />
source code. And you must show them these terms so they know their<br />
rights.<br />
We protect your rights with two steps: (1) copyright the software, and<br />
(2) offer you this license which gives you legal permission to copy,<br />
distribute and/or modify the software.<br />
Also, for each author's protection and ours, we want to make certain<br />
that everyone understands that there is no warranty for this free<br />
software. If the software is modified by someone else and passed on, we<br />
want its recipients to know that what they have is not the original, so<br />
90
that any problems introduced by others will not reflect on the original<br />
authors' reputations.<br />
Finally, any free program is threatened constantly by software<br />
patents. We wish to avoid the danger that redistributors of a free<br />
program will individually obtain patent licenses, in effect making the<br />
program proprietary. To prevent this, we have made it clear that any<br />
patent must be licensed for everyone's free use or not licensed at all.<br />
The precise terms and conditions for copying, distribution and<br />
modification follow.<br />
91
GNU GENERAL PUBLIC LICENSE<br />
TERMS AND CONDITIONS FOR COPYING, DISTRIBUTION AND MODIFICATION<br />
0. This License applies to any program or other work which contains<br />
a notice placed by the copyright holder saying it may be distributed<br />
under the terms of this General Public License. The "Program", below,<br />
refers to any such program or work, and a "work based on the Program"<br />
means either the Program or any derivative work under copyright law:<br />
that is to say, a work containing the Program or a portion of it,<br />
either verbatim or with modifications and/or translated into another<br />
language. (Hereinafter, translation is included without limitation in<br />
the term "modification".) Each licensee is addressed as "you".<br />
Activities other than copying, distribution and modification are not<br />
covered by this License; they are outside its scope. The act of<br />
running the Program is not restricted, and the output from the Program<br />
is covered only if its contents constitute a work based on the<br />
Program (independent of having been made by running the Program).<br />
Whether that is true depends on what the Program does.<br />
1. You may copy and distribute verbatim copies of the Program's<br />
source code as you receive it, in any medium, provided that you<br />
conspicuously and appropriately publish on each copy an appropriate<br />
copyright notice and disclaimer of warranty; keep intact all the<br />
notices that refer to this License and to the absence of any warranty;<br />
and give any other recipients of the Program a copy of this License<br />
along with the Program.<br />
You may charge a fee for the physical act of transferring a copy, and<br />
you may at your option offer warranty protection in exchange for a fee.<br />
2. You may modify your copy or copies of the Program or any portion<br />
of it, thus forming a work based on the Program, and copy and<br />
distribute such modifications or work under the terms of Section 1<br />
above, provided that you also meet all of these conditions:<br />
a) You must cause the modified files to carry prominent notices<br />
stating that you changed the files and the date of any change.<br />
92
) You must cause any work that you distribute or publish, that in<br />
whole or in part contains or is derived from the Program or any<br />
part thereof, to be licensed as a whole at no charge to all third<br />
parties under the terms of this License.<br />
c) If the modified program normally reads commands interactively<br />
when run, you must cause it, when started running for such<br />
interactive use in the most ordinary way, to print or display an<br />
announcement including an appropriate copyright notice and a<br />
notice that there is no warranty (or else, saying that you provide<br />
a warranty) and that users may redistribute the program under<br />
these conditions, and telling the user how to view a copy of this<br />
License. (Exception: if the Program itself is interactive but<br />
does not normally print such an announcement, your work based on<br />
the Program is not required to print an announcement.)<br />
These requirements apply to the modified work as a whole. If<br />
identifiable sections of that work are not derived from the Program,<br />
and can be reasonably considered independent and separate works in<br />
themselves, then this License, and its terms, do not apply to those<br />
sections when you distribute them as separate works. But when you<br />
distribute the same sections as part of a whole which is a work based<br />
on the Program, the distribution of the whole must be on the terms of<br />
this License, whose permissions for other licensees extend to the<br />
entire whole, and thus to each and every part regardless of who wrote it.<br />
Thus, it is not the intent of this section to claim rights or contest<br />
your rights to work written entirely by you; rather, the intent is to<br />
exercise the right to control the distribution of derivative or<br />
collective works based on the Program.<br />
In addition, mere aggregation of another work not based on the Program<br />
with the Program (or with a work based on the Program) on a volume of<br />
a storage or distribution medium does not bring the other work under<br />
the scope of this License.<br />
3. You may copy and distribute the Program (or a work based on it,<br />
under Section 2) in object code or executable form under the terms of<br />
Sections 1 and 2 above provided that you also do one of the following:<br />
93
a) Accompany it with the complete corresponding machine-readable<br />
source code, which must be distributed under the terms of Sections<br />
1 and 2 above on a medium customarily used for software interchange; or,<br />
b) Accompany it with a written offer, valid for at least three<br />
years, to give any third party, for a charge no more than your<br />
cost of physically performing source distribution, a complete<br />
machine-readable copy of the corresponding source code, to be<br />
distributed under the terms of Sections 1 and 2 above on a medium<br />
customarily used for software interchange; or,<br />
c) Accompany it with the information you received as to the offer<br />
to distribute corresponding source code. (This alternative is<br />
allowed only for noncommercial distribution and only if you<br />
received the program in object code or executable form with such<br />
an offer, in accord with Subsection b above.)<br />
The source code for a work means the preferred form of the work for<br />
making modifications to it. For an executable work, complete source<br />
code means all the source code for all modules it contains, plus any<br />
associated interface definition files, plus the scripts used to<br />
control compilation and installation of the executable. However, as a<br />
special exception, the source code distributed need not include<br />
anything that is normally distributed (in either source or binary<br />
form) with the major components (compiler, kernel, and so on) of the<br />
operating system on which the executable runs, unless that component<br />
itself accompanies the executable.<br />
If distribution of executable or object code is made by offering<br />
access to copy from a designated place, then offering equivalent<br />
access to copy the source code from the same place counts as<br />
distribution of the source code, even though third parties are not<br />
compelled to copy the source along with the object code.<br />
94
4. You may not copy, modify, sublicense, or distribute the Program<br />
except as expressly provided under this License. Any attempt<br />
otherwise to copy, modify, sublicense or distribute the Program is<br />
void, and will automatically terminate your rights under this License.<br />
However, parties who have received copies, or rights, from you under<br />
this License will not have their licenses terminated so long as such<br />
parties remain in full compliance.<br />
5. You are not required to accept this License, since you have not<br />
signed it. However, nothing else grants you permission to modify or<br />
distribute the Program or its derivative works. These actions are<br />
prohibited by law if you do not accept this License. Therefore, by<br />
modifying or distributing the Program (or any work based on the<br />
Program), you indicate your acceptance of this License to do so, and<br />
all its terms and conditions for copying, distributing or modifying<br />
the Program or works based on it.<br />
6. Each time you redistribute the Program (or any work based on the<br />
Program), the recipient automatically receives a license from the<br />
original licensor to copy, distribute or modify the Program subject to<br />
these terms and conditions. You may not impose any further<br />
restrictions on the recipients' exercise of the rights granted herein.<br />
You are not responsible for enforcing compliance by third parties to<br />
this License.<br />
7. If, as a consequence of a court judgment or allegation of patent<br />
infringement or for any other reason (not limited to patent issues),<br />
conditions are imposed on you (whether by court order, agreement or<br />
otherwise) that contradict the conditions of this License, they do not<br />
excuse you from the conditions of this License. If you cannot<br />
distribute so as to satisfy simultaneously your obligations under this<br />
License and any other pertinent obligations, then as a consequence you<br />
may not distribute the Program at all. For example, if a patent<br />
license would not permit royalty-free redistribution of the Program by<br />
all those who receive copies directly or indirectly through you, then<br />
the only way you could satisfy both it and this License would be to<br />
refrain entirely from distribution of the Program.<br />
If any portion of this section is held invalid or unenforceable under<br />
95
any particular circumstance, the balance of the section is intended to<br />
apply and the section as a whole is intended to apply in other<br />
circumstances.<br />
It is not the purpose of this section to induce you to infringe any<br />
patents or other property right claims or to contest validity of any<br />
such claims; this section has the sole purpose of protecting the<br />
integrity of the free software distribution system, which is<br />
implemented by public license practices. Many people have made<br />
generous contributions to the wide range of software distributed<br />
through that system in reliance on consistent application of that<br />
system; it is up to the author/donor to decide if he or she is willing<br />
to distribute software through any other system and a licensee cannot<br />
impose that choice.<br />
This section is intended to make thoroughly clear what is believed to<br />
be a consequence of the rest of this License.<br />
8. If the distribution and/or use of the Program is restricted in<br />
certain countries either by patents or by copyrighted interfaces, the<br />
original copyright holder who places the Program under this License<br />
may add an explicit geographical distribution limitation excluding<br />
those countries, so that distribution is permitted only in or among<br />
countries not thus excluded. In such case, this License incorporates<br />
the limitation as if written in the body of this License.<br />
9. The Free Software Foundation may publish revised and/or new versions<br />
of the General Public License from time to time. Such new versions will<br />
be similar in spirit to the present version, but may differ in detail to<br />
address new problems or concerns.<br />
Each version is given a distinguishing version number. If the Program<br />
specifies a version number of this License which applies to it and "any<br />
later version", you have the option of following the terms and conditions<br />
either of that version or of any later version published by the Free<br />
Software Foundation. If the Program does not specify a version number of<br />
this License, you may choose any version ever published by the Free Software<br />
Foundation.<br />
10. If you wish to incorporate parts of the Program into other free<br />
96
programs whose distribution conditions are different, write to the author<br />
to ask for permission. For software which is copyrighted by the Free<br />
Software Foundation, write to the Free Software Foundation; we sometimes<br />
make exceptions for this. Our decision will be guided by the two goals<br />
of preserving the free status of all derivatives of our free software and<br />
of promoting the sharing and reuse of software generally.<br />
NO WARRANTY<br />
11. BECAUSE THE PROGRAM IS LICENSED FREE OF CHARGE, THERE IS NO<br />
WARRANTY FOR THE PROGRAM, TO THE EXTENT PERMITTED BY APPLICABLE<br />
LAW. EXCEPT WHEN OTHERWISE STATED IN WRITING THE COPYRIGHT<br />
HOLDERS AND/OR OTHER PARTIES PROVIDE THE PROGRAM "AS IS" WITHOUT<br />
WARRANTY OF ANY KIND, EITHER EXPRESSED OR IMPLIED, INCLUDING, BUT NOT<br />
LIMITED TO, THE IMPLIED WARRANTIES OF MERCHANTABILITY AND FITNESS FOR<br />
A PARTICULAR PURPOSE. THE ENTIRE RISK AS TO THE QUALITY AND<br />
PERFORMANCE OF THE PROGRAM IS WITH YOU. SHOULD THE PROGRAM<br />
PROVE DEFECTIVE, YOU ASSUME THE COST OF ALL NECESSARY SERVICING,<br />
REPAIR OR CORRECTION.<br />
12. IN NO EVENT UNLESS REQUIRED BY APPLICABLE LAW OR AGREED TO IN<br />
WRITING WILL ANY COPYRIGHT HOLDER, OR ANY OTHER PARTY WHO MAY<br />
MODIFY AND/OR REDISTRIBUTE THE PROGRAM AS PERMITTED ABOVE, BE LIABLE<br />
TO YOU FOR DAMAGES, INCLUDING ANY GENERAL, SPECIAL, INCIDENTAL OR<br />
CONSEQUENTIAL DAMAGES ARISING OUT OF THE USE OR INABILITY TO USE THE<br />
PROGRAM (INCLUDING BUT NOT LIMITED TO LOSS OF DATA OR DATA BEING<br />
RENDERED INACCURATE OR LOSSES SUSTAINED BY YOU OR THIRD PARTIES OR<br />
A FAILURE OF THE PROGRAM TO OPERATE WITH ANY OTHER PROGRAMS), EVEN<br />
IF SUCH HOLDER OR OTHER PARTY HAS BEEN ADVISED OF THE POSSIBILITY OF<br />
SUCH DAMAGES.<br />
END OF TERMS AND CONDITIONS<br />
97