
Create successful ePaper yourself
Turn your PDF publications into a flip-book with our unique Google optimized e-Paper software.
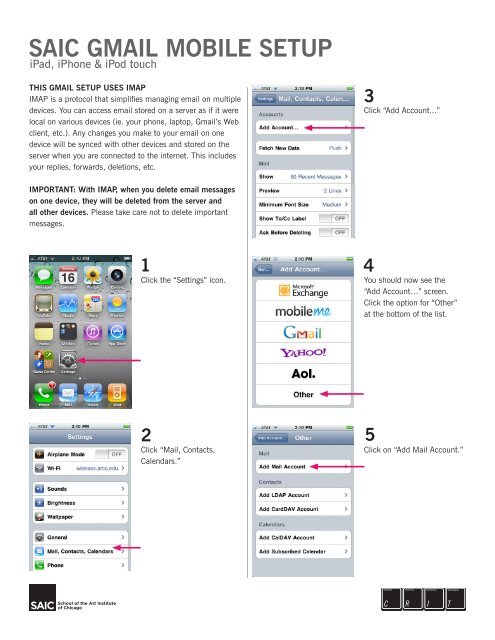
<str<strong>on</strong>g>SAIC</str<strong>on</strong>g> GMAIL MOBILE SETUP<br />
iPad, iPh<strong>on</strong>e & iPod touch<br />
THIS GMAIL SETUP USES IMAP<br />
IMAP is a protocol that simplifies managing email <strong>on</strong> multiple<br />
devices. You can access email stored <strong>on</strong> a server as if it were<br />
local <strong>on</strong> various devices (ie. your ph<strong>on</strong>e, laptop, <str<strong>on</strong>g>Gmail</str<strong>on</strong>g>’s Web<br />
client, etc.). Any changes you make to your email <strong>on</strong> <strong>on</strong>e<br />
device will be synced with other devices and stored <strong>on</strong> the<br />
server when you are c<strong>on</strong>nected to the internet. This includes<br />
your replies, forwards, deleti<strong>on</strong>s, etc.<br />
3<br />
Click “Add Account...”<br />
IMPORTANT: With IMAP, when you delete email messages<br />
<strong>on</strong> <strong>on</strong>e device, they will be deleted from the server and<br />
all other devices. Please take care not to delete important<br />
messages.<br />
1<br />
Click the “<str<strong>on</strong>g>Set</str<strong>on</strong>g>tings” ic<strong>on</strong>.<br />
4<br />
You should now see the<br />
“Add Account…” screen.<br />
Click the opti<strong>on</strong> for “Other”<br />
at the bottom of the list.<br />
2<br />
Click “Mail, C<strong>on</strong>tacts,<br />
Calendars.”<br />
5<br />
Click <strong>on</strong> “Add Mail Account.”
Steve Student<br />
sstude@saic.edu<br />
password<br />
Saic<br />
6<br />
On the New Account screen:<br />
Name: Your Name<br />
Address: Your <str<strong>on</strong>g>SAIC</str<strong>on</strong>g> email<br />
address<br />
Password: Your <str<strong>on</strong>g>SAIC</str<strong>on</strong>g> email<br />
password<br />
Descripti<strong>on</strong>: “Saic:” should<br />
automatically show. You can<br />
rename this whatever you<br />
like.<br />
Then click “Next”<br />
9<br />
Your IMAP email should now<br />
be c<strong>on</strong>figured. Make sure the<br />
switch is turned <strong>on</strong> for “Mail”<br />
If “Notes” is switched <strong>on</strong>, any<br />
notes you make in the Notes<br />
app <strong>on</strong> your iPh<strong>on</strong>e will be<br />
synced with your <str<strong>on</strong>g>SAIC</str<strong>on</strong>g> <str<strong>on</strong>g>Gmail</str<strong>on</strong>g><br />
account. They will show <str<strong>on</strong>g>up</str<strong>on</strong>g><br />
with the label “Notes” when<br />
you’re logged into the <str<strong>on</strong>g>Gmail</str<strong>on</strong>g><br />
Web client.<br />
Steve Student<br />
sstude@saic.edu<br />
Saic<br />
imap.gmail.com<br />
sstude@artic.edu<br />
7<br />
Note that the IMAP butt<strong>on</strong> is<br />
selected.<br />
Under “Incoming Mail<br />
Server,” enter the following:<br />
Host Name:<br />
imap.gmail.com<br />
User Name: Your <str<strong>on</strong>g>SAIC</str<strong>on</strong>g><br />
username (make sure to<br />
include “@artic.edu”)<br />
Password: This should<br />
already be filled in with your<br />
email password<br />
Saic<br />
10<br />
In the Accounts list, you<br />
should see your account<br />
listed by the descripti<strong>on</strong><br />
entered in step 6.<br />
If you have any questi<strong>on</strong>s…<br />
make mailto: live<br />
smtp.gmail.com<br />
sstude@artic.edu<br />
password<br />
8<br />
Scroll down to “Outgoing<br />
Mail Server,” and enter the<br />
following:<br />
Host Name:<br />
smtp.gmail.com<br />
User Name: Your <str<strong>on</strong>g>SAIC</str<strong>on</strong>g><br />
username (be sure to include<br />
“@artic.edu”)<br />
Password: Fill in your <str<strong>on</strong>g>SAIC</str<strong>on</strong>g><br />
password<br />
Click “Next”<br />
It will now verify your<br />
account informati<strong>on</strong>. This<br />
may take several minutes.