Frame-and-Panel Bed - Fine Woodworking
Frame-and-Panel Bed - Fine Woodworking
Frame-and-Panel Bed - Fine Woodworking

You also want an ePaper? Increase the reach of your titles
YUMPU automatically turns print PDFs into web optimized ePapers that Google loves.
24 in.<br />
24 in.<br />
Side<br />
31/2 in.<br />
Side<br />
1 ⁄ in.<br />
31/2 in.<br />
1 ⁄ in.<br />
17 in.<br />
17 in.<br />
ou can thank Mike Pekovich,<br />
<strong>Fine</strong> <strong>Woodworking</strong>’s art director,<br />
for designing this simple but<br />
stylish bookcase. He took a straightforward<br />
form--an oak bookcase with dado<br />
<strong>and</strong> rabbet joints--<strong>and</strong> added nice proportions<br />
<strong>and</strong> elegant curves.<br />
We agreed that screws would reinforce<br />
the joints nicely, <strong>and</strong> that gave us a design<br />
option on the sides. Choose oak<br />
plugs, <strong>and</strong> align the grain carefully, <strong>and</strong><br />
the plugs disappear. Make them from a<br />
contrasting wood, like walnut, <strong>and</strong> the<br />
rows of plugs add a nice design feature<br />
to the broad sides, hinting at the construction<br />
in a subtle way.<br />
By design the bookcase contains a<br />
number of fundamental lessons for<br />
would-be furniture-makers, <strong>and</strong> like the<br />
other projects in this video series, the<br />
whole thing can be built with just a few<br />
portable power tools: a circular saw, a<br />
drill, <strong>and</strong> a router<br />
The shelves attach to the sides with<br />
simple dadoes, <strong>and</strong> the back <strong>and</strong> backsplash<br />
drop into rabbets. Screws reinforce<br />
the dado joints <strong>and</strong> also attach the<br />
lower stretcher, <strong>and</strong> wood plugs cover<br />
the screw holes. Smaller wood screws<br />
are used to attach the plywood back.<br />
Curves add life to rectangular pieces<br />
of furniture, <strong>and</strong> Pekovich worked in<br />
three types, each irregular <strong>and</strong> organic<br />
(as opposed to radius curves that can<br />
seem mechanical). At the top are gentle<br />
curves that speed up as they move<br />
forward, each taken from a section of<br />
a French curve. At the bottom are two<br />
long curves formed with a flexible wood<br />
batten, one extending end to end on the<br />
lower stretcher, <strong>and</strong> the other a short<br />
graceful arch at the bottom of the sides,<br />
ending at a straight step at each end to<br />
suggest legs.<br />
--Asa Christiana, editor, <strong>Fine</strong> <strong>Woodworking</strong><br />
1 ⁄ in.<br />
11/2 in.<br />
1 ⁄ in.<br />
2 ⁄ in.<br />
11/2 in.<br />
2 ⁄ in.<br />
VideOs<br />
9 ⁄ in.<br />
10 in.<br />
9 ⁄ in.<br />
10 in.<br />
B y A s A C h r i s t i A n A<br />
Lumber <strong>and</strong> hardware List<br />
Part QtY size materiaL<br />
sides<br />
sheLVes<br />
62 in.<br />
back sPLash<br />
arched<br />
stretcher<br />
back<br />
screws FOr<br />
sheLVes<br />
screws FOr<br />
back<br />
62 in.<br />
41 in.<br />
41 in.<br />
48 in.<br />
48 in.<br />
3 ⁄ in.<br />
3 ⁄ in.<br />
4 in.<br />
1 ⁄ in.<br />
1 ⁄ in.<br />
4 in.<br />
1 ⁄ in.<br />
33 ⁄ in.<br />
1 ⁄ in.<br />
TAUNTON’S<br />
W<strong>Frame</strong>-<strong>and</strong>-<strong>Panel</strong> <strong>Bed</strong><br />
A project plan<br />
for building<br />
a classic bed<br />
©2009 The Taunton Press<br />
For more FREE<br />
project plans from<br />
<strong>Fine</strong> <strong>Woodworking</strong><br />
click here now<br />
S i m p l e , S t u r d y Wo r k b e n c h<br />
T<br />
S i m p l e , S t u r d y Wo r k b e n c h<br />
T<br />
From Getting Started in <strong>Woodworking</strong>, Season 2<br />
From Getting Started in <strong>Woodworking</strong>, Season 2<br />
his workbench is easy <strong>and</strong> inexpensive<br />
to build, yet is sturdy <strong>and</strong> versatile<br />
enough for any woodworker. The base is<br />
construction lumber (4x4s <strong>and</strong> 2x4s), joined<br />
simply with long bolts <strong>and</strong> short dowels. The<br />
top is two layers of MDF (medium-density<br />
fiberboard), cut from a single sheet, with<br />
enough left over to make a h<strong>and</strong>y shelf.<br />
The only tools needed to make this bench<br />
are a dri l/driver, a circular saw, <strong>and</strong> a h<strong>and</strong>held<br />
router or a router table.<br />
There is room at one end for a smal castiron<br />
woodworking vise, which is an essential<br />
tool in any woodworking shop. The vise is<br />
fitted with non-maring wooden jaws, <strong>and</strong> the<br />
jaws <strong>and</strong> benchtop receive dog holes, sized<br />
to fit a variety of h<strong>and</strong>y bench accessories.<br />
stretchers<br />
ViDeOs<br />
B y A s A C h r i s t i A n A<br />
B y A s A C h r i s t i A n A<br />
his workbench is easy <strong>and</strong> inexpensive<br />
to build, yet is sturdy <strong>and</strong> versatile<br />
enough for any woodworker. The base is<br />
construction lumber (4x4s <strong>and</strong> 2x4s), joined<br />
simply with long bolts <strong>and</strong> short dowels. The<br />
top is two layers of MDF (medium-density<br />
fiberboard), cut from a single sheet, with<br />
enough left over to make a h<strong>and</strong>y shelf.<br />
The only tools needed to make this bench<br />
are a dri l/driver, a circular saw, <strong>and</strong> a h<strong>and</strong>held<br />
router or a router table.<br />
There is room at one end for a sma l castiron<br />
woodworking vise, which is an essential<br />
tool in any woodworking shop. The vise is<br />
fitted with non-maring wooden jaws, <strong>and</strong> the<br />
jaws <strong>and</strong> benchtop receive dog holes, sized<br />
to fit a variety of h<strong>and</strong>y bench accessories.<br />
stretchers<br />
ViDeOs<br />
Y<br />
Build an Oak Bookcase<br />
From Getting Started in <strong>Woodworking</strong>, Season 2<br />
LuMber, harDware anD suppLies LisT<br />
4 8-ft.-long 2x4s, kiln-dried<br />
2 8-ft.-long 4x4s, kiln-dried<br />
1 4x8 sheet of MDF<br />
2 Hardwood pieces for vise jaws, 71/2 in. long by 3 in. wide. Front jaw can be<br />
between 1 in. <strong>and</strong> 11/2 in. thick <strong>and</strong> the rear jaw is 3/4 in. thick.<br />
1 Filer block for mounting vise, 3/4-in.-thick plywood, 4 in. wide by 6 in. long<br />
1 bo tle of yelow glue<br />
1 7-in. Groz Rapid-Action <strong>Woodworking</strong> Vise (www.woodcraft.com)<br />
4 6-ft. lengths of ⁄ -in.-dia. threaded rod<br />
16 ⁄ -in. washers<br />
16 ⁄ -in. nuts<br />
2 2-in.-long 1/4-20 bolts, nuts, washers for a taching front jaw of vise<br />
2 11/2-in.-long, 1/4-20 flathead screws for a taching rear jaw<br />
1 Box of 11/4-in.-long drywal screws for laminating benchtop<br />
4 ⁄ -in.-dia., 21/2-in.-long lag screws <strong>and</strong> washers, for a taching vise<br />
16 S-clip-type tabletop fasteners<br />
16 ⁄ -in.-dia. dowels, roughly 3 in. long<br />
LuMber, harDware anD suppLies LisT<br />
4 8-ft.-long 2x4s, kiln-dried<br />
2 8-ft.-long 4x4s, kiln-dried<br />
1 4x8 sheet of MDF<br />
2 Hardwood pieces for vise jaws, 71/2 in. long by 3 in. wide. Front jaw can be<br />
between 1 in. <strong>and</strong> 11/2 in. thick <strong>and</strong> the rear jaw is 3/4 in. thick.<br />
1 Filer block for mounting vise, 3/4-in.-thick plywood, 4 in. wide by 6 in. long<br />
1 bo tle of yelow glue<br />
1 7-in. Groz Rapid-Action <strong>Woodworking</strong> Vise (www.woodcraft.com)<br />
4 6-ft. lengths of ⁄ -in.-dia. threaded rod<br />
16 ⁄ -in. washers<br />
16 ⁄ -in. nuts<br />
2 2-in.-long 1/4-20 bolts, nuts, washers for a taching front jaw of vise<br />
2 11/2-in.-long, 1/4-20 flathead screws for a taching rear jaw<br />
1 Box of 11/4-in.-long drywal screws for laminating benchtop<br />
4 ⁄ -in.-dia., 21/2-in.-long lag screws <strong>and</strong> washers, for attaching vise<br />
16 S-clip-type tabletop fasteners<br />
16 ⁄ -in.-dia. dowels, roughly 3 in. long<br />
Long stretchers<br />
Long stretchers<br />
33 ⁄ in.<br />
9 in. 9 ⁄ in.<br />
9 in. 9 ⁄ in.<br />
Visit us online at <strong>Fine</strong>woodworking.com/star to watch a two-part video detailing how to build this workbench from star to finish.<br />
Visit us online at <strong>Fine</strong>woodworking.com/star to watch a two-part video detailing how to build this workbench from star to finish.<br />
Enjoy our entire site<br />
FREE for 14 days!<br />
450+ videos, 33-year archive,<br />
blogs, <strong>and</strong> more<br />
try it now
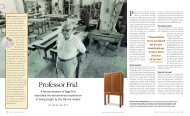
<strong>Frame</strong>-<strong>and</strong>-<strong>Panel</strong> <strong>Bed</strong><br />
Design rests on faceted legs with compound curves<br />
BY DAV I D F A Y<br />
My favorite designs have come to<br />
me unexpectedly, in a flash of an<br />
idea, far away from the drafting<br />
table. The ensuing challenge to develop<br />
that vision into a finished product requires<br />
a lot of time spent refining what may seem<br />
like small details.<br />
I begin with a sketch, nothing fancy or<br />
beautiful. The back of an envelope or napkin<br />
will do. Drawing this way frees me<br />
from the constraints of trying to perfect the<br />
piece; all I’m after is getting the inspiration<br />
down on paper.<br />
If the piece is a commission, the next step<br />
is listening to the customer. That often influences<br />
the dimensions of a project. For<br />
this bed, the customer wanted a queensized<br />
frame that could accommodate a futon<br />
mattress or a st<strong>and</strong>ard box-spring <strong>and</strong><br />
mattress set. As a result, I had to make the<br />
bed rails wide enough to accommodate an<br />
adjustable inner rail.<br />
A dimensioned drawing comes next. Although<br />
an accurate drawing can help me<br />
visualize a piece, this two-dimensional tool<br />
has limitations. That’s why I build a fullscale<br />
model of any tricky parts to work out<br />
design <strong>and</strong> construction needs <strong>and</strong> to perfect<br />
technical skills.<br />
The model allows me to evaluate how<br />
the details relate to the rest of the design.<br />
For example, I used a model to determine<br />
the proportions of the posts <strong>and</strong> rails. I experimented<br />
with the reveal at various<br />
widths. A 7 ⁄8-in. reveal looked chunky, <strong>and</strong><br />
a 5 ⁄8-in. reveal looked skinny. But when I<br />
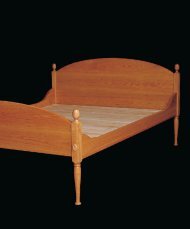
A bed made in three<br />
types of wood. The framework,<br />
including the posts, is made<br />
of cherry. The panels are resawn, slipmatched<br />
pear wood. Accent strips along<br />
the inside of the frames <strong>and</strong> along the bottoms<br />
of the bed rails are granadillo.<br />
74 FINE WOODWORKING
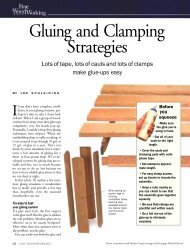
SHAPING THE BEDPOSTS<br />
Establish the outside curve ...<br />
Lay out the bedposts. The six-sided shape is<br />
drawn on the end grain first, then the lines are<br />
carried over onto the faces.<br />
tried a 3 ⁄4-in. reveal, it looked right. I also<br />
used the model to determine the size of the<br />
granadillo reveal as it related to the panel<br />
<strong>and</strong> posts <strong>and</strong> rails. Using the model, I was<br />
able to refine subtle details <strong>and</strong> their proportions.<br />
There’s nothing scientific here,<br />
no golden rules. It’s a matter of trial <strong>and</strong> error<br />
<strong>and</strong> trusting your instincts.<br />
Cut the joinery, then begin shaping<br />
The bedposts are thick at the top <strong>and</strong> get<br />
skinnier near the floor. As the thickness<br />
changes, the widths of the two faces also<br />
change. But one thing stays constant: the<br />
width of the outside edge or reveal.<br />
All of the joints that involve the bedposts<br />
are machined while the stock is still square.<br />
These joints include the tenons for the upper<br />
<strong>and</strong> lower rails of the headboard/footboard,<br />
the mortises in the bedposts, the<br />
tenons on the long rails (see the story on<br />
p. 78 to learn how to make the hidden<br />
post-to-lower-rail joints) <strong>and</strong> the grooves<br />
for the panels.<br />
Next, lay out each post’s six-sided profile<br />
on the end grain (see the left photo above).<br />
Then connect the lines from end to end<br />
along the outside of the post—use a black,<br />
thin-line pen, which is easier to see than a<br />
pencil line.<br />
The posts have three straight, flat sides<br />
(inside edge <strong>and</strong> the two adjoining sides),<br />
two curvy sides (on each side of the outside<br />
edge) where the plane twists <strong>and</strong> a<br />
curved, tapered side (the outside edge<br />
Cut the outside curve first. B<strong>and</strong>saw close<br />
to the line.<br />
... <strong>and</strong> grind the facets<br />
with the 3 ⁄4-in. reveal). Whenever possible,<br />
I make templates to lay out <strong>and</strong> cut curved<br />
parts (see the story on p. 77). I use the templates<br />
to trace layout marks, <strong>and</strong> then, after<br />
b<strong>and</strong>sawing parts to rough dimensions, I<br />
attach the templates to the stock <strong>and</strong> use<br />
them with a pattern-cutting bit.<br />
Mark the outside facet of each post using<br />
a template <strong>and</strong> b<strong>and</strong>saw the waste (see the<br />
Attach the template to the post. Clean up<br />
using a router <strong>and</strong> pattern-cutting bit.<br />
Shape the facets<br />
with an angle<br />
grinder. A 24-grit<br />
s<strong>and</strong>ing disc<br />
removes material<br />
quickly. Use long,<br />
fluid motions <strong>and</strong><br />
take light passes.<br />
middle photo above). Fair the curve by attaching<br />
the same template <strong>and</strong> trimming<br />
the post with a pattern-cutting bit, as<br />
shown in the right photo above (screw the<br />
template to the waste portions of the post).<br />
Remove the template <strong>and</strong> draw the last set<br />
of layout lines on the outside face.<br />
Use a router with a 45° bearing-guided<br />
bit to remove as much stock as possible<br />
Photos: Facing page: Ira Schrank; all others: Anatole Burkin<br />
JANUARY/FEBRUARY 1999 75
FRAME-AND-PANEL BED<br />
The access holes for the 1 ⁄2-in.-thick bolts are<br />
hidden on the inside of the lower rails.<br />
<strong>Panel</strong>s are<br />
Swiss pear wood.<br />
Removable<br />
inner support<br />
rail screwed<br />
to groove.<br />
1<br />
⁄4-in.-wide granadillo<br />
inlay, 1 ⁄4 in. proud of rail<br />
3<br />
⁄4 in.<br />
Headboard/<br />
footboard rail<br />
Granadillo border<br />
around all panels<br />
has a 3 ⁄16-in. reveal.<br />
2 in.<br />
Tenon<br />
3<br />
⁄8 in.<br />
<strong>Frame</strong>s <strong>and</strong> posts<br />
are cherry.<br />
Headboard<br />
13° bevel on<br />
top of post<br />
<strong>Panel</strong><br />
Granadillo border<br />
Groove for panels<br />
<strong>and</strong> granadillo<br />
strips is 5 ⁄16 in.<br />
deep by 5 ⁄8 in. wide<br />
Footboard<br />
1 1 ⁄4-in. rise<br />
over 60 1 ⁄2 in.<br />
2 1 ⁄4-in. rise<br />
over 60 1 ⁄2 in.<br />
2 3 ⁄4 in.<br />
4 3 ⁄4 in.<br />
Threaded nut<br />
Headboard/<br />
footboard rail<br />
28 1 ⁄2 in.<br />
42 1 ⁄2 in.<br />
Tenon<br />
1 1 ⁄4-in.<br />
rise over<br />
60 1 ⁄2 in.<br />
1 3 ⁄8 in.<br />
1 in.<br />
1 1 ⁄4 in.<br />
from the corners of the post. Next, use an<br />
angle grinder with a 24-grit s<strong>and</strong>ing disc to<br />
rough in the shape (see the bottom photo<br />
on p. 75) on the two facets of each post that<br />
curve <strong>and</strong> twist. Use long, fluid motions<br />
with this tool <strong>and</strong> don’t stop in midcut.<br />
Otherwise, you end up with flat spots that<br />
break up the curve. With a light touch, you<br />
can grind smoothly <strong>and</strong> get very close to<br />
the layout lines. It takes some practice to<br />
60 1 ⁄2 in.<br />
get a feel for shaping with a grinder, <strong>and</strong> I<br />
fine-tuned my skills using scrap stock.<br />
Clean up the post—A No. 50 Nicholson<br />
pattern-maker’s rasp is used to fine-tune<br />
the shape. A rasp is small enough that you<br />
can follow the twist on each post.<br />
To find high <strong>and</strong> low spots left by the<br />
grinder, draw diagonal pencil lines across<br />
the faces of each post. The rasp works best<br />
cutting in short, diagonal strokes. When<br />
the deep scratches left by the 24-grit disc<br />
are gone <strong>and</strong> the curves of the posts look<br />
fair, move on to a h<strong>and</strong> scraper, paying<br />
close attention to the layout lines. Hold the<br />
post up to a light to see how it’s coming<br />
along. When you run into domed sections,<br />
remove material using long, fluid motions.<br />
Clean up further using a small s<strong>and</strong>ing<br />
block. I prefer to use a small piece of medi-<br />
76 FINE WOODWORKING Drawings: Vince Babak
1 1 ⁄2 in.<br />
2 in.<br />
3<br />
⁄4 in.<br />
3 1 ⁄8 in.<br />
3<br />
⁄4 in.<br />
Make the jig<br />
Routing curved templates<br />
You don’t have to figure out the radius of a curve as<br />
long as you know the rise <strong>and</strong> run. With this method,<br />
you can make perfect templates for curved work,<br />
especially wide-radius curves. Because the method<br />
involves a trapped cut, there is some danger that<br />
the router might want to find its own path, so be<br />
prepared to turn the tool off immediately if it starts<br />
getting away from you.—D.F.<br />
Decide on the rise<br />
<strong>and</strong> run of the curve.<br />
Run<br />
Rise<br />
Cut the template<br />
Cut two pieces of MDF, each a few inches<br />
longer than the run, <strong>and</strong> tack them together<br />
to establish the angle of the rise <strong>and</strong> run.<br />
Place two nails or round shelf pins<br />
onto the template stock at a distance<br />
equal to the length of the template<br />
plus the diameter of the router bit.<br />
Attach a plunge router (equipped with a<br />
1<br />
⁄2-in. straight bit <strong>and</strong> 5 ⁄8-in. template<br />
guide) to the jig, orienting it so that the<br />
bit just touches the intersection.<br />
4 3 ⁄4 in.<br />
5 1 ⁄2 in.<br />
2 in.<br />
3<br />
⁄4 in.<br />
2 in.<br />
3<br />
⁄4 in.<br />
um-density fiberboard (MDF) with cork<br />
glued onto the face. It’s small enough (approximately<br />
1 in. by 1 1 ⁄2 in.) to maneuver<br />
along the changing curves of the post. A<br />
large s<strong>and</strong>ing block tends to straighten the<br />
curves instead of following them.<br />
Start with 180-grit s<strong>and</strong>paper <strong>and</strong> follow<br />
up with 220 grit. If you find rasp marks on<br />
the surface, go back to the scraper, which<br />
works faster than s<strong>and</strong>paper. Finally, use a<br />
Use 1 ⁄2-in. MDF for the template stock.<br />
Be sure it’s long enough to support both<br />
wings of the jig.<br />
Set the jig down <strong>and</strong><br />
push it up against the<br />
pins. Turn the router on,<br />
plunge in about 1 ⁄8 in. <strong>and</strong><br />
push the jig to the right,<br />
keeping it in contact with<br />
the pins. Repeat, taking<br />
deeper cuts until you cut<br />
through the template<br />
stock. Don’t let the router<br />
bit contact the pins. Finish<br />
cutting out the template<br />
on a b<strong>and</strong>saw.<br />
Place a large sheet of scrap below<br />
the template stock to avoid cutting<br />
the workbench.<br />
JANUARY/FEBRUARY 1999 77
Hidden bed-rail-to-post connection<br />
Decorative caps made to cover bolt holes in bedposts work fine, especially when used<br />
on traditional-looking furniture. But I didn’t want a cap to detract from the fluid shape<br />
of the posts of this bed. A friend, Mike Laine, showed me how to get a strong joint using<br />
mortise <strong>and</strong> tenons coupled with captured nuts <strong>and</strong> bolts. The joint is secure <strong>and</strong><br />
leaves no trace of its mechanics once the bed has been assembled <strong>and</strong> a mattress or<br />
futon installed.<br />
Refer to the drawing on p. 76 for the size <strong>and</strong> location of the joinery, which is cut<br />
while the stock is still square. Clamp <strong>and</strong> dry-fit the posts to the lower rails of the<br />
headboard <strong>and</strong> footboard, one at a time. Then, on the drill press, align a drill bit with<br />
the already drilled bolt hole in the post <strong>and</strong> drill through the tenon of the rail, being<br />
careful not to drill too deeply.<br />
Pocket for<br />
Allen key<br />
1<br />
⁄2-in. by 5-in.<br />
hex bolt<br />
3<br />
⁄8-in.-thick<br />
stub tenons<br />
5<br />
⁄8-in.-wide by<br />
3<br />
⁄4-in.-deep<br />
dado for bolt<br />
Threaded nuts are glued<br />
(with epoxy) onto sides of<br />
tenons of headboard/<br />
footboard lower rails.<br />
Remove the lower rail <strong>and</strong> thread the bolt through the hole <strong>and</strong> into the nut. Scribe<br />
the outline of the nut onto the tenon. The mortise for the nut captures only half its<br />
thickness; any more would weaken the tenon. To make room for the protruding half of<br />
the nut, enlarge the mortise in the bedpost around the nut with a small router <strong>and</strong> finish<br />
up with a chisel.<br />
The bolt is housed in a dado cut into the lower rails, centered between the two<br />
tenons. Mortise around the head to give you enough clearance to reach in with a hex<br />
wrench <strong>and</strong> cinch everything down. Check the joints for fit, then epoxy the nuts in<br />
place, being careful not to get any glue on the threads.—D.F.<br />
small piece of folded 220-grit paper <strong>and</strong><br />
h<strong>and</strong>-s<strong>and</strong> the surface with the grain.<br />
H<strong>and</strong>-s<strong>and</strong>ing is important because your<br />
fingers will sense any high or low spots.<br />
Lastly, break all of the edges with a rigid<br />
s<strong>and</strong>ing block <strong>and</strong> 220-grit paper, just<br />
enough to make the edges inviting to<br />
touch yet still crisp to the eye.<br />
Cut the top of each post on the chopsaw,<br />
then s<strong>and</strong> it smooth with a rigid (no cork)<br />
s<strong>and</strong>ing block, which will bring out the figure<br />
of the end grain.<br />
Headboard <strong>and</strong> footboard<br />
also have six-sided parts<br />
The upper <strong>and</strong> lower rails for the headboard<br />
<strong>and</strong> footboard are curved <strong>and</strong> have<br />
six sides to match the posts (see the drawings<br />
on p. 76). The procedure for building<br />
the headboard <strong>and</strong> footboard is similar to<br />
the posts. First, cut the joints while the<br />
stock is still square. (The only exceptions<br />
are the center stiles. Take their measurements<br />
off the frames of the headboard <strong>and</strong><br />
footboard after dry-fitting them. Cut the<br />
mortises for the center stiles by h<strong>and</strong>.)<br />
Then mark the six-sided profiles on the<br />
shoulders of all of the tenons.<br />
As you did with the posts, make a template<br />
to help lay out <strong>and</strong> cut the curves of<br />
the headboard <strong>and</strong> footboard rails. Mark<br />
the curves using the template, then roughcut<br />
the parts on the b<strong>and</strong>saw. Finish up by<br />
attaching the template to the stock <strong>and</strong> use<br />
a pattern-cutting bit <strong>and</strong> router. Before<br />
shaping the facets of the rails, cut the slots<br />
for the accent strips <strong>and</strong> panels using a<br />
router with a slot-cutting bit.<br />
The same methods <strong>and</strong> tools used on the<br />
posts are used to mark, cut <strong>and</strong> shape the<br />
rails. The center divider is cut like the rails;<br />
the tenons are cut first on the tablesaw.<br />
Then the tapered angles are cut; the bevels<br />
are shaped with a grinder.<br />
A granadillo border separates frame<br />
from panel—The panels in this bed are<br />
made of Swiss pear wood, <strong>and</strong> the frame,<br />
posts <strong>and</strong> rails are made of cherry. Although<br />
in time the cherry will darken more<br />
than the pear wood, the contrast in color<br />
between them, after milling, is subtle. To<br />
separate the two woods visually, the frame<br />
is inlaid with strips of granadillo, a deep,<br />
rich, purple-brown wood. The strips of<br />
granadillo surround each panel. A strip of<br />
granadillo is also inlaid along the bottom<br />
edge of the bed’s rails.<br />
78 FINE WOODWORKING
INLAY ADDS<br />
CONTRAST<br />
Degree of separation.<br />
Granadillo provides contrast<br />
<strong>and</strong> separation between<br />
the similarly toned<br />
cherry <strong>and</strong> pear wood.<br />
Before the joint is assembled.<br />
The granadillo strips are glued into<br />
the grooves for the panels using a<br />
battery of small spring clamps.<br />
Mill the granadillo strips wide <strong>and</strong> long.<br />
(Rip all of the granadillo straight; the strips<br />
will bend to conform to the curve of the<br />
rails.) Then clamp up the rails <strong>and</strong> stiles<br />
<strong>and</strong> take your measurements for the<br />
granadillo. Cut the strips to size, then glue<br />
them in place using lots of spring clamps.<br />
Where the strips intersect, use a butt joint.<br />
Take measurements for the panels while<br />
the headboard <strong>and</strong> footboard are clamped<br />
together. Then transfer these measurements<br />
onto 1 ⁄4-in.-thick particleboard or<br />
plywood <strong>and</strong> cut these out on the b<strong>and</strong>saw.<br />
Because of the number of curves,<br />
there’s usually a bit of tweaking to get<br />
everything right. Once you have a good fit,<br />
use the 1 ⁄4-in.-thick panels as templates for<br />
the real thing.<br />
The pear-wood panels are resawn <strong>and</strong><br />
slip-matched. Leave about 1 ⁄8 in. of extra<br />
space for every 12 in. of panel to allow for<br />
expansion <strong>and</strong> contraction of the wood.<br />
When gluing up the frame, put a dab of<br />
glue in the center of each rail’s groove to<br />
keep the panel centered.<br />
This bed frame is compatible with a futon<br />
or a box-spring <strong>and</strong> mattress set. To allow<br />
for that, cut two dadoes—one high, one<br />
low—on each long rail. For the futon, two<br />
removable inner rails are screwed to the<br />
upper grooves. (You’ll also need slats to<br />
support the futon.) For use with a traditional<br />
mattress set, the inner rails are attached<br />
to the lower groove, <strong>and</strong> the box spring<br />
rests on the inner rails.<br />
Movable inner rail accommodates two types of mattresses. Placed in the lower groove, the<br />
rail is positioned for a box-spring <strong>and</strong> mattress set. In the upper slot, the rail accepts a futon<br />
(using slats for support).<br />
Finish with h<strong>and</strong>-rubbed oil<br />
I used a low-gloss tung oil to finish the<br />
bed, applying three coats over three days.<br />
When applying the first coat, the wood will<br />
be thirsty <strong>and</strong> absorb a lot of finish. Apply<br />
a liberal amount of oil to one section at a<br />
time, such as one panel. Rub off the excess<br />
after a couple of minutes <strong>and</strong> move on to<br />
another section. After a day, go over the entire<br />
piece with a green 3M scrub pad, lightly<br />
rubbing off raised grain <strong>and</strong> built-up oil.<br />
On the second day, apply a thin coat of<br />
oil, again working in small sections, <strong>and</strong><br />
wipe with a clean cloth after a few minutes.<br />
For a splotch-free finish, remove the excess<br />
before it begins to dry <strong>and</strong> get gummy. On<br />
the third day, apply a final coat, the same<br />
way as the second, but use even less oil.<br />
When using oil, less is better. <br />
David Fay builds custom furniture in Oakl<strong>and</strong>,<br />
Calif.<br />
JANUARY/FEBRUARY 1999 79