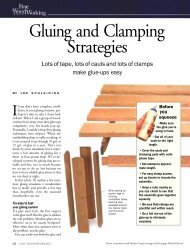
Picture Framing - Fine Woodworking
Picture Framing - Fine Woodworking
Picture Framing - Fine Woodworking

You also want an ePaper? Increase the reach of your titles
YUMPU automatically turns print PDFs into web optimized ePapers that Google loves.
24 in.<br />
24 in.<br />
Side<br />
31/2 in.<br />
Side<br />
1 3 ⁄16 in.<br />
31/2 in.<br />
1 3 ⁄16 in.<br />
17 in.<br />
17 in.<br />
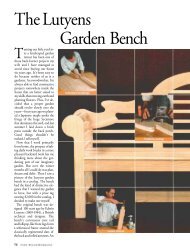
ou can thank Mike Pekovich,<br />
<strong>Fine</strong> <strong>Woodworking</strong>’s art director,<br />
for designing this simple but<br />
stylish bookcase. He took a straightforward<br />
form--an oak bookcase with dado<br />
and rabbet joints--and added nice proportions<br />
and elegant curves.<br />
We agreed that screws would reinforce<br />
the joints nicely, and that gave us a design<br />
option on the sides. Choose oak<br />
plugs, and align the grain carefully, and<br />
the plugs disappear. Make them from a<br />
contrasting wood, like walnut, and the<br />
rows of plugs add a nice design feature<br />
to the broad sides, hinting at the construction<br />
in a subtle way.<br />
By design the bookcase contains a<br />
number of fundamental lessons for<br />
would-be furniture-makers, and like the<br />
other projects in this video series, the<br />
whole thing can be built with just a few<br />
portable power tools: a circular saw, a<br />
drill, and a router<br />
The shelves attach to the sides with<br />
simple dadoes, and the back and backsplash<br />
drop into rabbets. Screws reinforce<br />
the dado joints and also attach the<br />
lower stretcher, and wood plugs cover<br />
the screw holes. Smaller wood screws<br />
are used to attach the plywood back.<br />
Curves add life to rectangular pieces<br />
of furniture, and Pekovich worked in<br />
three types, each irregular and organic<br />
(as opposed to radius curves that can<br />
seem mechanical). At the top are gentle<br />
curves that speed up as they move<br />
forward, each taken from a section of<br />
a French curve. At the bottom are two<br />
long curves formed with a flexible wood<br />
batten, one extending end to end on the<br />
lower stretcher, and the other a short<br />
graceful arch at the bottom of the sides,<br />
ending at a straight step at each end to<br />
suggest legs.<br />
--Asa Christiana, editor, <strong>Fine</strong> <strong>Woodworking</strong><br />
1 3 ⁄16 in.<br />
11/2 in.<br />
1 3 ⁄16 in.<br />
2 7 ⁄8 in.<br />
11/2 in.<br />
2 7 ⁄8 in.<br />
9 5 ⁄8 in.<br />
10 in.<br />
9 5 ⁄8 in.<br />
10 in.<br />
B y A s A C h r i s t i A n A<br />
Lumber and hardware List<br />
Part QtY size materiaL<br />
sides 2 3/4 in. x 11 in. x 52 in. Oak<br />
sheLVes 5 3/4 in. x 10 5/8 in. x 27 in. Oak<br />
back sPLash 1 3/4 in. x 3 1/4 in. x 27 1/2 in. Oak<br />
arched<br />
1 3/4 in. x 3 in. x 26 1/2 in. Oak<br />
stretcher<br />
Oak veneer<br />
back 1 1/4 in. x 27 1/2 in. x 45 3/4 in.<br />
plywood<br />
screws FOr<br />
30 #12 x 2 in. flat head screws Steel<br />
sheLVes<br />
screws FOr<br />
24 #6 x 3/4 in. flat head screws Steel<br />
back<br />
62 in.<br />
62 in.<br />
41 in.<br />
41 in.<br />
48 in.<br />
48 in.<br />
3 5 ⁄16 in.<br />
3 5 ⁄16 in.<br />
4 in.<br />
1 3 ⁄4 in.<br />
1 3 ⁄4 in.<br />
4 in.<br />
1 3 ⁄4 in.<br />
33 5 ⁄8 in.<br />
VideOs<br />
Go to <strong>Fine</strong>woodworking.com/start to watch a multi-part video detailing how to build this bookcase from start to finish.<br />
1 3 ⁄4 in.<br />
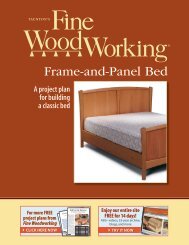
TAUNTON’S<br />
W<strong>Picture</strong> <strong>Framing</strong><br />
A project plan for<br />
professional-quality,<br />
custom frames at a<br />
fraction of the cost<br />
For more FREE<br />
project plans from<br />
<strong>Fine</strong> <strong>Woodworking</strong><br />
CLICK HERE NOW!<br />
Simple, Sturdy Workbench<br />
T<br />
Simple, Sturdy Workbench<br />
T<br />
From Getting Started in <strong>Woodworking</strong>, Season 2<br />
From Getting Started in <strong>Woodworking</strong>, Season 2<br />
his workbench is easy and inexpensive<br />
to build, yet is sturdy and versatile<br />
enough for any woodworker. The base is<br />
construction lumber (4x4s and 2x4s), joined<br />
simply with long bolts and short dowels. The<br />
top is two layers of MDF (medium-density<br />
fiberboard), cut from a single sheet, with<br />
enough left over to make a handy shelf.<br />
The only tools needed to make this bench<br />
are a dri l/driver, a circular saw, and a handheld<br />
router or a router table.<br />
There is room at one end for a smal castiron<br />
woodworking vise, which is an essential<br />
tool in any woodworking shop. The vise is<br />
fitted with non-maring wooden jaws, and the<br />
jaws and benchtop receive dog holes, sized<br />
to fit a variety of handy bench accessories.<br />
stretchers<br />
ViDeOs<br />
B y A s A C h r i s t i A n A<br />
B y A s A C h r i s t i A n A<br />
his workbench is easy and inexpensive<br />
to build, yet is sturdy and versatile<br />
enough for any woodworker. The base is<br />
construction lumber (4x4s and 2x4s), joined<br />
simply with long bolts and short dowels. The<br />
top is two layers of MDF (medium-density<br />
fiberboard), cut from a single sheet, with<br />
enough left over to make a handy shelf.<br />
The only tools needed to make this bench<br />
are a dri l/driver, a circular saw, and a handheld<br />
router or a router table.<br />
There is room at one end for a sma l castiron<br />
woodworking vise, which is an essential<br />
tool in any woodworking shop. The vise is<br />
fitted with non-maring wooden jaws, and the<br />
jaws and benchtop receive dog holes, sized<br />
to fit a variety of handy bench accessories.<br />
stretchers<br />
ViDeOs<br />
Y<br />
Build an Oak Bookcase<br />
From Getting Started in <strong>Woodworking</strong>, Season 2<br />
LuMber, harDware anD suppLies LisT<br />
4 8-ft.-long 2x4s, kiln-dried<br />
2 8-ft.-long 4x4s, kiln-dried<br />
1 4x8 sheet of MDF<br />
2 Hardwood pieces for vise jaws, 71/2 in. long by 3 in. wide. Front jaw can be<br />
between 1 in. and 11/2 in. thick and the rear jaw is 3/4 in. thick.<br />
1 Fi ler block for mounting vise, 3/4-in.-thick plywood, 4 in. wide by 6 in. long<br />
1 bo tle of ye low glue<br />
1 7-in. Groz Rapid-Action <strong>Woodworking</strong> Vise (www.woodcraft.com)<br />
4 6-ft. lengths of 3 ⁄8-in.-dia. threaded rod<br />
16 3 ⁄8-in. washers<br />
16 3 ⁄8-in. nuts<br />
2 2-in.-long 1/4-20 bolts, nuts, washers for a taching front jaw of vise<br />
2 11/2-in.-long, 1/4-20 flathead screws for attaching rear jaw<br />
1 Box of 11/4-in.-long drywal screws for laminating benchtop<br />
4 3 ⁄8-in.-dia., 21/2-in.-long lag screws and washers, for a taching vise<br />
16 S-clip-type tabletop fasteners<br />
16 3 ⁄8-in.-dia. dowels, roughly 3 in. long<br />
LuMber, harDware anD suppLies LisT<br />
4 8-ft.-long 2x4s, kiln-dried<br />
2 8-ft.-long 4x4s, kiln-dried<br />
1 4x8 sheet of MDF<br />
2 Hardwood pieces for vise jaws, 71/2 in. long by 3 in. wide. Front jaw can be<br />
between 1 in. and 11/2 in. thick and the rear jaw is 3/4 in. thick.<br />
1 Fi ler block for mounting vise, 3/4-in.-thick plywood, 4 in. wide by 6 in. long<br />
1 bottle of ye low glue<br />
1 7-in. Groz Rapid-Action <strong>Woodworking</strong> Vise (www.woodcraft.com)<br />
4 6-ft. lengths of 3 ⁄8-in.-dia. threaded rod<br />
16 3 ⁄8-in. washers<br />
16 3 ⁄8-in. nuts<br />
2 2-in.-long 1/4-20 bolts, nuts, washers for attaching front jaw of vise<br />
2 11/2-in.-long, 1/4-20 flathead screws for attaching rear jaw<br />
1 Box of 11/4-in.-long drywal screws for laminating benchtop<br />
4 3 ⁄8-in.-dia., 21/2-in.-long lag screws and washers, for attaching vise<br />
16 S-clip-type tabletop fasteners<br />
16 3 ⁄8-in.-dia. dowels, roughly 3 in. long<br />
Long stretchers<br />
Long stretchers<br />
33 5 ⁄8 in.<br />
9 in. 9 3 ⁄16 in.<br />
9 in. 9 3 ⁄16 in.<br />
Visit us online at <strong>Fine</strong>woodworking.com/star to watch a two-part video detailing how to build this workbench from star to finish.<br />
Visit us online at <strong>Fine</strong>woodworking.com/star to watch a two-part video detailing how to build this workbench from star to finish.<br />
See how our magazine<br />
makes you a better<br />
woodworker<br />
SUBSCRIBE TODAY!
All About <strong>Picture</strong><br />
Make professional-quality, custom frames at a fraction of the cost<br />
<strong>Framing</strong> is something woodworkers tend to shy<br />
away from: It may be fear of damaging an irreplaceable<br />
piece of art or of putting less-than-perfect<br />
miter joints on display. Frames tend to get scrutinized<br />
because they are the vehicles for displaying art; and because<br />
art is critiqued up close, the frame will be, too.<br />
The good news is that professional-quality frames<br />
are not hard to make. The techniques are mostly familiar<br />
to woodworkers, there is only a modest outlay<br />
on tools and jigs, and frame stock can be purchased<br />
ready-made or built from scratch in your shop.<br />
Artwork determines frame size and design<br />
Art falls into two main categories when it comes to<br />
framing with and without glass: If the art is on paper,<br />
you should consider using a backing board, a mat, and<br />
glass as well as a frame; paintings on canvas look best<br />
with just a frame. The backing board keeps the art flat<br />
and secure, the glass protects the art from damage,<br />
and the mat keeps the art and glass from contacting<br />
each other and sticking together.<br />
When it comes to mats, wider is better. Mats cut<br />
narrower than 2 1 ⁄2 in. do not add much to the appearance<br />
of the framing. Aim for a mat that is 3 in.<br />
to 4 in. wide. Another option is to use two layers of<br />
mats, known as double matting, to give the framing<br />
a greater depth.<br />
You need to visit a local picture-frame shop to select<br />
the mat, and to have it, the glass, and the backing<br />
board cut to size. Ask for acid-free materials in both<br />
Three options for frames<br />
B U I LT- U P M O L D I N G<br />
F R O M T R I M S T O C K<br />
Often a piece of ready-made molding will provide<br />
the inspiration for you to build a similar<br />
design from trim stock. Architectural trim<br />
moldings come in a large range of sizes<br />
and styles, but in most cases you will have<br />
to create a base and a rabbet. In this example,<br />
I started with a piece of poplar 3 ⁄4 in.<br />
thick by 1 3 ⁄4 in. wide. I cut a rabbet 3 ⁄4 in.<br />
wide by 1 ⁄2 in. deep on the tablesaw, and on<br />
the other side I routed a rabbet 1 ⁄4 in. wide<br />
by 1 ⁄2 in. deep to hold the art. I then glued<br />
egg-and-dart trim to the wider rabbet and a<br />
strip of beading to the top surface.<br />
Because the trim pieces may not match,<br />
paint is a better finishing option than stain.<br />
I sprayed a coat of gesso (a combination of<br />
plaster and glue) on this frame, followed by<br />
black and then bronze paint. After it dried,<br />
I rubbed the frame with 000 steel wool, then<br />
applied black wax to “age” it.<br />
Rabbet for<br />
artwork<br />
Base<br />
molding<br />
Beaded<br />
molding<br />
Rabbet<br />
for trim<br />
Egg-anddart<br />
trim<br />
Rabbet the base and attach the trim. After cutting the rabbet for the<br />
egg-and-dart molding on the tablesaw (above left), mill the rabbet for<br />
the artwork on the router table (above right). Glue the egg-and-dart trim<br />
to the rabbeted base, then add the beaded molding.<br />
68<br />
Photos: Mark Schofield
<strong>Framing</strong><br />
B Y R O B E R T H A M O N<br />
the mat and the backing board. The additional charge<br />
is worth the protection it affords your artwork. Once you<br />
have all of these pieces cut to size, only then can<br />
you calculate the frame’s dimensions.<br />
Frame size refers to the dimensions of the artwork,<br />
not the outer size of the frame itself. When determining<br />
the size of a frame, measure to the inside of the rabbet.<br />
To allow for wiggle room, add an extra 1 ⁄8 in. in each<br />
direction. For example, a 16-in. by 20-in. piece of art<br />
gets a frame sized 16 1 ⁄8 in. by 20 1 ⁄8 in. When cutting<br />
the molding to rough length, add twice the width of the<br />
frame molding plus an inch or two as a safety margin.<br />
Your picture frame must have a rabbet deep enough<br />
to secure the thickness of what you intend to frame.<br />
Mat board is 1 ⁄16 in. thick, backing typically is 3 ⁄16 in.<br />
thick, and glass is 1 ⁄8 in. thick. Most commercial<br />
frames have a rabbet depth of about 1 ⁄2 in.<br />
to allow for double mats and to leave enough space<br />
for fasteners to keep the contents in the frame. The<br />
standard width of the rabbet is 1 ⁄4 in.<br />
Miter corners on a special sled<br />
Two factors are crucial for making mitered corners that<br />
fit perfectly. First, the 45° angles must be accurate.<br />
Second, the molding pieces that are opposite each<br />
other must be exactly the same length.<br />
Cutting picture-frame miters on a tablesaw<br />
using a standard miter gauge is a real challenge.<br />
Problems include small amounts of play<br />
in the miter gauge and lack of support for the molding<br />
M O L D I N G F R O M<br />
S C R AT C H<br />
Although a frame does not<br />
require the strength of a<br />
hardwood, if you do use one,<br />
keep the design simple to<br />
show the figure of the grain<br />
to its best advantage. To<br />
make a frame with curves,<br />
use a softwood instead.<br />
White pine, fir, and spruce<br />
are easy to work, but if you<br />
plan to stain the frame, select<br />
the wood carefully to avoid<br />
streaks that may distract<br />
from the artwork.<br />
The molding can be cut<br />
on a shaper, a router table,<br />
or with a molding head on<br />
the tablesaw.<br />
R E A DY- M A D E<br />
M O L D I N G<br />
You can get the same finished<br />
moldings—ranging from classical<br />
to contemporary—that are<br />
available to framing shops (see<br />
Sources of Supply on p. 72). Or<br />
you can purchase unfinished<br />
moldings if you want to stain<br />
or paint the frame to match<br />
the artwork. Avoid moldings<br />
that have rounded edges on<br />
the base or a deep curve in the<br />
back because it will be harder<br />
to clamp the frame when it is<br />
being glued together.<br />
Block print, this page: Laura Wilder M A R C H / A P R I L 2 0 0 5 69
Cut perfect miters on the tablesaw<br />
Unlike most tablesaw sleds, this one has two fences of different<br />
lengths. A short fence is used to make the first cut on the righthand<br />
side of the molding; a long fence is used to cut the lefthand<br />
miter. The longer fence incorporates a ruler and a<br />
stop block that allow moldings to be cut to precise<br />
and repeatable lengths. Hold-downs support<br />
stock over its entire length.<br />
5 3 ⁄4 in.<br />
Metal ruler,<br />
2 in. wide<br />
Stop block<br />
STOP-BLOCK DETAIL<br />
Threaded knob<br />
and screw<br />
Metal<br />
ruler<br />
Fence<br />
base<br />
Metal ruler<br />
Molding<br />
Fence<br />
base<br />
M AT C H<br />
T H E F R A M E<br />
T O T H E<br />
A R T W O R K<br />
Art on paper usually<br />
is surrounded by<br />
one or more mats<br />
and protected with<br />
glass before being<br />
framed (top). Oil<br />
paintings or reproductions<br />
may look<br />
best with just a<br />
frame and no mat<br />
or glass (bottom).<br />
Stop<br />
block<br />
Nut glued to<br />
stop block<br />
near the blade. The traditional solution has been to<br />
build a miter sled or a sliding miter jig that eliminates<br />
any movement and supports the full length of the<br />
workpiece up to the blade. Clamps or hold-downs<br />
add to the jig’s accuracy. You may have a jig already,<br />
but to cut picture-frame molding, you need a jig with<br />
two further attributes: It must provide an accurate way<br />
to measure and cut the lengths of molding so that the<br />
opposing sides are exactly the same, and it must be<br />
designed to cut the outside edge of the molding first<br />
to eliminate splintering on the most visible edge of<br />
the frame.<br />
My jig (see the drawings above) is designed to miter<br />
picture frames. Rather than the typical square board, it<br />
is a rectangle, aligned to the miter-gauge slots at a 45°<br />
angle. Instead of two fences of equal length, one is short<br />
ACCURATE FRAME<br />
DIMENSIONS<br />
The size of a frame<br />
is measured from the<br />
inside of the rabbet,<br />
so the jig and the stop<br />
block are designed to<br />
take this into account.<br />
for making the first cut on each section of molding,<br />
while the fence for the second cut is 36 in. long—the<br />
practical limit for cutting frames on a tablesaw. Each<br />
fence consists of a base with a ruler attached to it. The<br />
ruler on the long fence allows you to measure each<br />
piece accurately before it is cut. An adjustable stop<br />
helps make accurate duplicate pieces.<br />
When cutting frame molding, always cut the longer<br />
sides first. If you should err, you still will be able to cut<br />
the longer piece into a shorter side. With your roughcut<br />
section of molding secured to the short fence,<br />
miter the right-hand end. Move the molding to the<br />
long fence, using the ruler to establish the desired<br />
length. Clamp the molding and set the adjustable stop<br />
at the end of the molding. Cut the left-hand miter. The<br />
parallel section of molding is cut in the same way,<br />
70 F I N E W O O D W O R K I N G<br />
Drawings: John Hartman; painting, this page: William Godfrey
Hold-down, 1 ⁄4 in. thick by<br />
1 in. wide by 7 in. long<br />
Knob<br />
Fence base,<br />
1<br />
⁄4 in. thick by<br />
1 1 ⁄2 in. wide<br />
T-bolt<br />
Metal ruler,<br />
2 in. wide,<br />
facedown<br />
5 3 ⁄4 in.<br />
The first miter cut. Clamp the piece of<br />
molding, rough-cut to length, to the short<br />
fence of the jig to cut the right-hand miter.<br />
Runner<br />
3<br />
⁄4-in.-wide minitrack<br />
for hold-downs<br />
Sawkerf<br />
Key prevents the<br />
jig from tipping.<br />
Plywood base,<br />
14 in. by 46 in.<br />
The second cut. Clamp the molding to the<br />
long fence and set the stop block at the correct<br />
distance from the blade (above). Then<br />
cut the left-hand miter (below).<br />
but now you have a stop, making the two sections<br />
identical in length.<br />
Glue and strengthen the frame<br />
With all four sides cut, you’re now ready to assemble<br />
the frame. Most of the strength in the miter joint comes<br />
from the glue but only if the pieces are clamped together<br />
firmly and accurately. My favorite clamping<br />
method is a miter vise, but other methods include a<br />
strap clamp, especially with the use of corner blocks,<br />
and a four-corner clamp that uses threaded rods.<br />
Nails can be added to reinforce the joint. Most framers<br />
drill a hole using a slightly smaller nail chucked in<br />
an electric drill. Nails can be added while the frame is<br />
secured in a miter clamp, or with the frame braced to<br />
absorb the blows of the hammer. To lessen the chance<br />
M A R C H / A P R I L 2 0 0 5 71
Two options for gluing miters<br />
of splitting the wood, make sure the nail is driven with<br />
the dominant edge perpendicular to the grain.<br />
The best clamp.<br />
An old-fashioned<br />
heavy-duty miter<br />
clamp works best to<br />
glue frames together<br />
(right). A pair of<br />
clamps allows<br />
you to glue a frame<br />
in two steps. For<br />
smaller frames,<br />
threaded rods and<br />
corner blocks are<br />
the clamping method<br />
of choice (below).<br />
O R<br />
Fit the artwork into the frame<br />
Your framing project is not done until it is hanging on<br />
the wall. A painting on canvas will require fastening<br />
only into the rabbet from the back of the frame. <strong>Picture</strong><br />
framers call this “fitting.” Fitting items with mats and<br />
glass is slightly different: Lay the glass, mat, picture,<br />
and backing board faceup while you clean the glass.<br />
Spray a nonammonia cleaner onto a section of folded<br />
paper towel and wipe the glass from the center toward<br />
your other hand that is holding the edge of the package<br />
to prevent movement. Turn over the glass by the<br />
edges and repeat until it is free of specks. Then place<br />
the frame over the package, slide it to the edge of the<br />
table, grip the whole thing, and flip it over.<br />
Fastening everything into the frame is easiest with<br />
a point driver, especially if it is a hardwood frame.<br />
The hand tool looks like a staple gun, but it shoots<br />
a 5 ⁄8-in.-long point out the front into the inside of the<br />
rabbet. Alternative methods include using a brad setter,<br />
glazing points, or S-clips (see the left photos on<br />
the facing page).<br />
Seal the back with gummed-paper box tape to prevent<br />
insects and dust from getting into the frame enclosure.<br />
Moisten the tape, press it into place, and trim<br />
any excess. Do not use self-adhesive tape because the<br />
oils soak into the frame and backing board, and the<br />
tape eventually comes off.<br />
To wire the back of the frame, use two screw eyelets<br />
and twisted picture wire. Hardware stores sell these in<br />
packages rated for different picture weights. About a<br />
quarter to a third of the way from the top of the frame,<br />
puncture the back with an awl. Start the eyelet in the<br />
hole and then, using the awl inserted into the eye, turn<br />
the eyelet into the frame until it is secure. In softer<br />
woods, screw the eyelet all the way down. Loop the<br />
wire through the eye twice and wrap the small excess<br />
around the wire. The other end gets the same treatment,<br />
after the wire is pulled tight to eliminate slack. You<br />
have the correct tension if only two of your fingers can<br />
fit between the wire and the back of the frame. Now<br />
you are ready to hang your work for all to enjoy. <br />
Robert Hamon is a professional picture framer in Mission, Kan.<br />
Reinforce the miter joint. Use a nail to<br />
drill a hole horizontally in each corner of<br />
the frame. Then hammer in a nail slightly<br />
larger than the hole. A miter clamp lets<br />
you nail the joint while the glue dries.<br />
S O U R C E S<br />
O F S U P P L Y<br />
Dick Blick<br />
800-828-4548<br />
www.dickblick.com<br />
Lee Valley Tools Ltd.<br />
800-871-8158; www.leevalley.com<br />
Van Dyke’s Restorers<br />
800-558-1234; www.vandykes.com<br />
Woodworker’s Supply<br />
800-645-9292; www.woodworker.com<br />
72<br />
F I N E W O O D W O R K I N G
Secure the artwork in the frame<br />
F O U R WAY S T O FA S T E N E V E R Y T H I N G I N S I D E<br />
Points. The easiest way to<br />
fasten the art is to use a point<br />
driver, which inserts arrowheaded<br />
points into the frame.<br />
O R<br />
First, clean the glass. Clean both sides of the glass<br />
with nonammonia-based glass cleaner. Then lower the<br />
frame onto the art package. Slide the art-and-frame<br />
combination to the edge of the table and flip it over to<br />
add the fasteners (left).<br />
Brads. Using a brad setter<br />
rather than a hammer lessens<br />
the chances of damaging the<br />
frame.<br />
O R<br />
Glazing points. Drive glazing<br />
points into the frame with<br />
a broad-tipped screwdriver. A<br />
block braces the pressure on<br />
the frame.<br />
O R<br />
Then seal in the artwork. Attach gummed-paper box<br />
tape to the back of the frame to prevent dust or insects<br />
from getting into the framing.<br />
S-clips. These clips are available<br />
in different sizes to match<br />
the distance the artwork is below<br />
the back of the frame.<br />
Now hang it by a wire. The picture is hung using eyelets<br />
and twisted picture wire. Tension the wire until you<br />
can just fit two fingers under it.<br />
M A R C H / A P R I L 2 0 0 5 73