Picture Framing - Fine Woodworking
Picture Framing - Fine Woodworking
Picture Framing - Fine Woodworking

You also want an ePaper? Increase the reach of your titles
YUMPU automatically turns print PDFs into web optimized ePapers that Google loves.
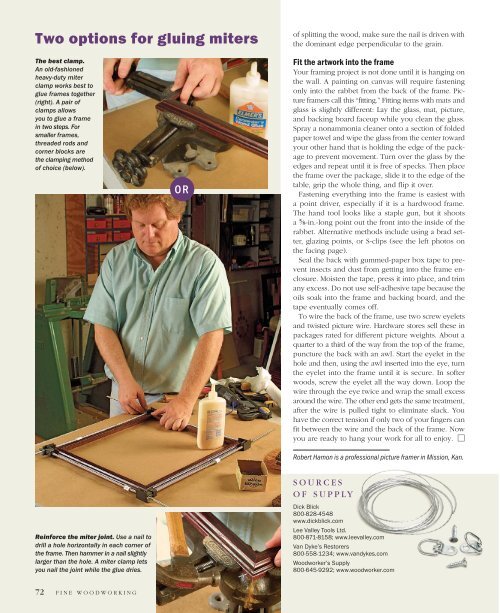
Two options for gluing miters<br />
of splitting the wood, make sure the nail is driven with<br />
the dominant edge perpendicular to the grain.<br />
The best clamp.<br />
An old-fashioned<br />
heavy-duty miter<br />
clamp works best to<br />
glue frames together<br />
(right). A pair of<br />
clamps allows<br />
you to glue a frame<br />
in two steps. For<br />
smaller frames,<br />
threaded rods and<br />
corner blocks are<br />
the clamping method<br />
of choice (below).<br />
O R<br />
Fit the artwork into the frame<br />
Your framing project is not done until it is hanging on<br />
the wall. A painting on canvas will require fastening<br />
only into the rabbet from the back of the frame. <strong>Picture</strong><br />
framers call this “fitting.” Fitting items with mats and<br />
glass is slightly different: Lay the glass, mat, picture,<br />
and backing board faceup while you clean the glass.<br />
Spray a nonammonia cleaner onto a section of folded<br />
paper towel and wipe the glass from the center toward<br />
your other hand that is holding the edge of the package<br />
to prevent movement. Turn over the glass by the<br />
edges and repeat until it is free of specks. Then place<br />
the frame over the package, slide it to the edge of the<br />
table, grip the whole thing, and flip it over.<br />
Fastening everything into the frame is easiest with<br />
a point driver, especially if it is a hardwood frame.<br />
The hand tool looks like a staple gun, but it shoots<br />
a 5 ⁄8-in.-long point out the front into the inside of the<br />
rabbet. Alternative methods include using a brad setter,<br />
glazing points, or S-clips (see the left photos on<br />
the facing page).<br />
Seal the back with gummed-paper box tape to prevent<br />
insects and dust from getting into the frame enclosure.<br />
Moisten the tape, press it into place, and trim<br />
any excess. Do not use self-adhesive tape because the<br />
oils soak into the frame and backing board, and the<br />
tape eventually comes off.<br />
To wire the back of the frame, use two screw eyelets<br />
and twisted picture wire. Hardware stores sell these in<br />
packages rated for different picture weights. About a<br />
quarter to a third of the way from the top of the frame,<br />
puncture the back with an awl. Start the eyelet in the<br />
hole and then, using the awl inserted into the eye, turn<br />
the eyelet into the frame until it is secure. In softer<br />
woods, screw the eyelet all the way down. Loop the<br />
wire through the eye twice and wrap the small excess<br />
around the wire. The other end gets the same treatment,<br />
after the wire is pulled tight to eliminate slack. You<br />
have the correct tension if only two of your fingers can<br />
fit between the wire and the back of the frame. Now<br />
you are ready to hang your work for all to enjoy. <br />
Robert Hamon is a professional picture framer in Mission, Kan.<br />
Reinforce the miter joint. Use a nail to<br />
drill a hole horizontally in each corner of<br />
the frame. Then hammer in a nail slightly<br />
larger than the hole. A miter clamp lets<br />
you nail the joint while the glue dries.<br />
S O U R C E S<br />
O F S U P P L Y<br />
Dick Blick<br />
800-828-4548<br />
www.dickblick.com<br />
Lee Valley Tools Ltd.<br />
800-871-8158; www.leevalley.com<br />
Van Dyke’s Restorers<br />
800-558-1234; www.vandykes.com<br />
Woodworker’s Supply<br />
800-645-9292; www.woodworker.com<br />
72<br />
F I N E W O O D W O R K I N G