Picture Framing - Fine Woodworking
Picture Framing - Fine Woodworking
Picture Framing - Fine Woodworking
You also want an ePaper? Increase the reach of your titles
YUMPU automatically turns print PDFs into web optimized ePapers that Google loves.
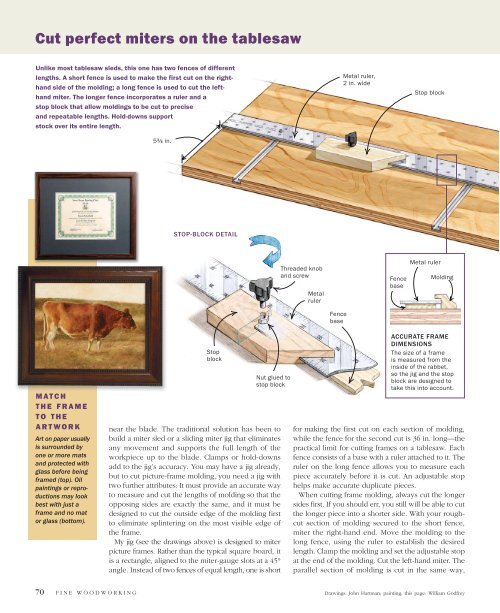
Cut perfect miters on the tablesaw<br />
Unlike most tablesaw sleds, this one has two fences of different<br />
lengths. A short fence is used to make the first cut on the righthand<br />
side of the molding; a long fence is used to cut the lefthand<br />
miter. The longer fence incorporates a ruler and a<br />
stop block that allow moldings to be cut to precise<br />
and repeatable lengths. Hold-downs support<br />
stock over its entire length.<br />
5 3 ⁄4 in.<br />
Metal ruler,<br />
2 in. wide<br />
Stop block<br />
STOP-BLOCK DETAIL<br />
Threaded knob<br />
and screw<br />
Metal<br />
ruler<br />
Fence<br />
base<br />
Metal ruler<br />
Molding<br />
Fence<br />
base<br />
M AT C H<br />
T H E F R A M E<br />
T O T H E<br />
A R T W O R K<br />
Art on paper usually<br />
is surrounded by<br />
one or more mats<br />
and protected with<br />
glass before being<br />
framed (top). Oil<br />
paintings or reproductions<br />
may look<br />
best with just a<br />
frame and no mat<br />
or glass (bottom).<br />
Stop<br />
block<br />
Nut glued to<br />
stop block<br />
near the blade. The traditional solution has been to<br />
build a miter sled or a sliding miter jig that eliminates<br />
any movement and supports the full length of the<br />
workpiece up to the blade. Clamps or hold-downs<br />
add to the jig’s accuracy. You may have a jig already,<br />
but to cut picture-frame molding, you need a jig with<br />
two further attributes: It must provide an accurate way<br />
to measure and cut the lengths of molding so that the<br />
opposing sides are exactly the same, and it must be<br />
designed to cut the outside edge of the molding first<br />
to eliminate splintering on the most visible edge of<br />
the frame.<br />
My jig (see the drawings above) is designed to miter<br />
picture frames. Rather than the typical square board, it<br />
is a rectangle, aligned to the miter-gauge slots at a 45°<br />
angle. Instead of two fences of equal length, one is short<br />
ACCURATE FRAME<br />
DIMENSIONS<br />
The size of a frame<br />
is measured from the<br />
inside of the rabbet,<br />
so the jig and the stop<br />
block are designed to<br />
take this into account.<br />
for making the first cut on each section of molding,<br />
while the fence for the second cut is 36 in. long—the<br />
practical limit for cutting frames on a tablesaw. Each<br />
fence consists of a base with a ruler attached to it. The<br />
ruler on the long fence allows you to measure each<br />
piece accurately before it is cut. An adjustable stop<br />
helps make accurate duplicate pieces.<br />
When cutting frame molding, always cut the longer<br />
sides first. If you should err, you still will be able to cut<br />
the longer piece into a shorter side. With your roughcut<br />
section of molding secured to the short fence,<br />
miter the right-hand end. Move the molding to the<br />
long fence, using the ruler to establish the desired<br />
length. Clamp the molding and set the adjustable stop<br />
at the end of the molding. Cut the left-hand miter. The<br />
parallel section of molding is cut in the same way,<br />
70 F I N E W O O D W O R K I N G<br />
Drawings: John Hartman; painting, this page: William Godfrey


