Installation Instructions - Brass Craft
Installation Instructions - Brass Craft
Installation Instructions - Brass Craft

Create successful ePaper yourself
Turn your PDF publications into a flip-book with our unique Google optimized e-Paper software.
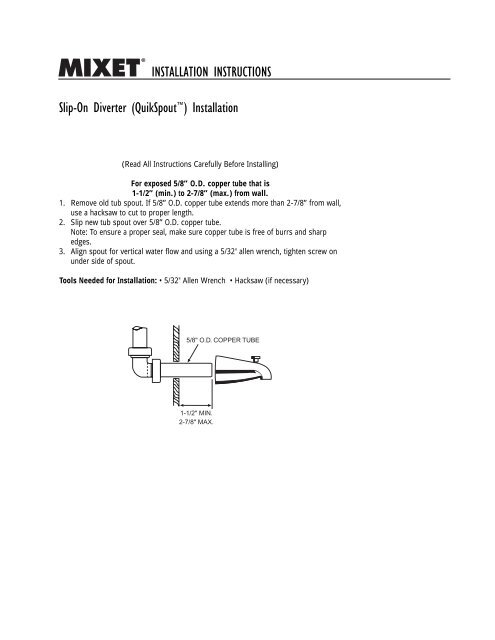
INSTALLATION INSTRUCTIONS<br />
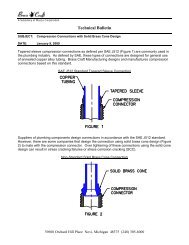
Slip-On Diverter (QuikSpout ) <strong>Installation</strong><br />
(Read All <strong>Instructions</strong> Carefully Before Installing)<br />
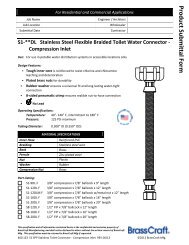
For exposed 5/8” O.D. copper tube that is<br />
1-1/2” (min.) to 2-7/8” (max.) from wall.<br />
1. Remove old tub spout. If 5/8” O.D. copper tube extends more than 2-7/8” from wall,<br />
use a hacksaw to cut to proper length.<br />
2. Slip new tub spout over 5/8” O.D. copper tube.<br />
Note: To ensure a proper seal, make sure copper tube is free of burrs and sharp<br />
edges.<br />
3. Align spout for vertical water flow and using a 5/32" allen wrench, tighten screw on<br />
under side of spout.<br />
Tools Needed for <strong>Installation</strong>: • 5/32" Allen Wrench • Hacksaw (if necessary)<br />
5/8" O.D. COPPER TUBE<br />
1-1/2" MIN.<br />
2-7/8" MAX.
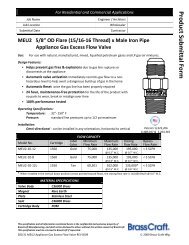
IP Diverter <strong>Installation</strong><br />
INSTALLATION INSTRUCTIONS<br />
(Read All <strong>Instructions</strong> Carefully Before Installing)<br />
1. Unthread present tub spout.<br />
2. If not already in place, install 1/2" pipe nipple to extend 3/4" out from finished wall.<br />
If buying a new nipple, do not forget to measure distance (X) from finished wall to<br />
face of fitting inside wall. Add 1/2" for threads inside fitting.<br />
3. Thread new tub spout directly to 1/2" nipple. Use pipe thread tape or pipe dope on<br />
all threaded connections.<br />
4. Align for vertical flow, tighten spout as tight as possible by hand only. DO NOT<br />
use wrench.<br />
Tools Needed for <strong>Installation</strong>: Pipe thread tape or pipe dope<br />
1/2"<br />
X<br />
1/2" Min<br />
3/4” Max<br />
TOTAL<br />
NIPPLE LENGTH
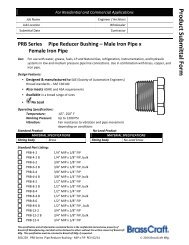
Typical Cartridge <strong>Installation</strong><br />
INSTALLATION INSTRUCTIONS<br />
(Read All <strong>Instructions</strong> Carefully Before Installing)<br />
1.Turn off water supply. Remove the volume and temperature control handles and the<br />
escutcheon.<br />
2.Remove stem retainer nut by turning counterclockwise with an adjustable wrench.<br />
3.Remove old stem assembly with twisting pulling motion using the temperature<br />
handle as a tool. Push new stem assembly in place with twisting motion until brass<br />
ring comes in contact with valve body. Red mark on stem assembly must point up.<br />
4.Tighten new stem retainer nut clockwise with an adjustable wrench until snug. There<br />
should be no endplay in the assembly after the stem retainer nut is installed. If the<br />
temperature handle seems to turn too freely, tighten stem retainer nut slightly by<br />
turning clockwise. If temperature handle seems to turn too tightly, loosen stem<br />
retainer nut slightly by turning counterclockwise.<br />
5.Replace escutcheon and control handles. Turn on water supply.<br />
Tools Needed for <strong>Installation</strong>:<br />
• Screwdriver<br />
• Adjustable Wrench<br />
STEM ASSEMBLY<br />
STEM<br />
RETAINER NUT<br />
ESCUTCHEON<br />
TEMPERATURE<br />
CONTROL<br />
HANDLE<br />
WASHERS<br />
VOLUME<br />
CONTROL<br />
HANDLE
INSTALLATION INSTRUCTIONS<br />
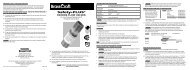
Handle <strong>Installation</strong><br />
(Read All <strong>Instructions</strong> Carefully Before Installing)<br />
1. Unthread and remove retaining screw.<br />
2. Gently remove volume control handle and temperature control handle.<br />
3. Slip new temperature control handle over stem.<br />
4. Replace volume control handle and secure with retaining screw.<br />
Tools Needed for <strong>Installation</strong>: Screwdriver<br />
Retaining<br />
Screw<br />
Volume<br />
Control<br />
Handle<br />
Temperature<br />
Control<br />
Handle<br />
Stem<br />
OR
INSTALLATION INSTRUCTIONS<br />
Trim Kit (Standard Handle) <strong>Installation</strong><br />
(Read All <strong>Instructions</strong> Carefully Before Installing)<br />
1. Turn off water supply. Remove the volume and temperature control handles<br />
and the escutcheon.<br />
2. Replace escutcheon and control handles. Turn on water supply.<br />
Tools Needed for <strong>Installation</strong>:<br />
• Screwdriver • Adjustable Wrench<br />
ESCUTCHEON<br />
STEM<br />
ASSEMBLY<br />
WASHERS<br />
STEM<br />
RETAINER<br />
NUT<br />
TEMPERATURE<br />
CONTROL<br />
HANDLE<br />
VOLUME<br />
CONTROL<br />
HANDLE
INSTALLATION INSTRUCTIONS<br />
Trim Kit (Deluxe Handle) <strong>Installation</strong><br />
(Read All <strong>Instructions</strong> Carefully Before Installing)<br />
1. Turn off water supply. Remove the volume and temperature control handles and<br />
the escutcheon.<br />
2. Replace escutcheon and control handles. Turn on water supply.<br />
Tools Needed for <strong>Installation</strong>:<br />
• Screwdriver • Adjustable Wrench<br />
ESCUTCHEON<br />
STEM<br />
ASSEMBLY<br />
WASHERS<br />
STEM<br />
RETAINER<br />
NUT<br />
TEMPERATURE<br />
CONTROL<br />
HANDLE<br />
VOLUME<br />
CONTROL<br />
HANDLE