r35 gt-r gt1000 full turbine kit installation manual - SpeedForSale.com
r35 gt-r gt1000 full turbine kit installation manual - SpeedForSale.com
r35 gt-r gt1000 full turbine kit installation manual - SpeedForSale.com

Create successful ePaper yourself
Turn your PDF publications into a flip-book with our unique Google optimized e-Paper software.
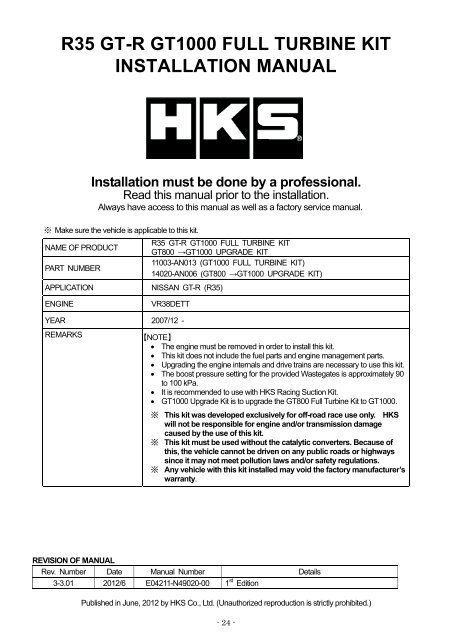
R35 GT-R GT1000 FULL TURBINE KIT<br />
INSTALLATION MANUAL<br />
<br />
<br />
<br />
<br />
Installation must be done by a professional.<br />
Read this <strong>manual</strong> prior to the <strong>installation</strong>.<br />
Always have access to this <strong>manual</strong> as well as a factory service <strong>manual</strong>.<br />
<br />
Make sure the vehicle is applicable to this <strong>kit</strong>.<br />
NAME OF PRODUCT<br />
PART NUMBER<br />
APPLICATION<br />
R35 GT-R GT1000 FULL TURBINE KIT<br />
GT800 GT1000 UPGRADE KIT<br />
11003-AN013 (GT1000 FULL TURBINE KIT)<br />
14020-AN006 (GT800 GT1000 UPGRADE KIT)<br />
NISSAN GT-R (R35)<br />
ENGINE<br />
VR38DETT<br />
<br />
YEAR 2007/12 -<br />
REMARKS<br />
NOTE<br />
The engine must be removed in order to install this <strong>kit</strong>.<br />
This <strong>kit</strong> does not include the fuel parts and engine management parts.<br />
Upgrading the engine internals and drive trains are necessary to use this <strong>kit</strong>.<br />
The boost pressure setting for the provided Wastegates is approximately 90<br />
to 100 kPa.<br />
It is re<strong>com</strong>mended to use with HKS Racing Suction Kit.<br />
GT1000 Upgrade Kit is to upgrade the GT800 Full Turbine Kit to GT1000.<br />
This <strong>kit</strong> was developed exclusively for off-road race use only. HKS<br />
will not be responsible for engine and/or transmission damage<br />
caused by the use of this <strong>kit</strong>.<br />
This <strong>kit</strong> must be used without the catalytic converters. Because of<br />
this, the vehicle cannot be driven on any public roads or highways<br />
since it may not meet pollution laws and/or safety regulations.<br />
Any vehicle with this <strong>kit</strong> installed may void the factory manufacturer’s<br />
warranty.<br />
REVISION OF MANUAL<br />
Rev. Number Date Manual Number Details<br />
3-3.01 2012/6 E04211-N49020-00 1 st Edition<br />
<br />
Published in June, 2012 by HKS Co., Ltd. (Unauthorized reproduction is strictly prohibited.)<br />
- 24 -
INDEX <br />
<br />
NOTICEATTENTION 1<br />
PARTS LIST 2<br />
1. REMOVAL OF FACTORY PARTS 7<br />
2. INSTALLATION OF KIT PARTS 7<br />
3. CONFIRMATION AFTER INSTALLATION 22<br />
<br />
<br />
NOTICE <br />
This <strong>manual</strong> assumes that you have and know how to use the tools and equipment necessary to safely perform service<br />
operations on your vehicle. This <strong>manual</strong> assumes that you are familiar with typical automotive systems and basic service<br />
and repair procedures. Do not attempt to carry out the operations shown in this <strong>manual</strong> unless these assumptions are<br />
correct. Always have access to a factory service <strong>manual</strong>. To avoid injury, follow the safety precautions contained in the<br />
factory service <strong>manual</strong>.<br />
<br />
ATTENTION <br />
This <strong>manual</strong> indicates items you need to pay attention to in order to install this product safely and lists precautions to<br />
avoid any possible damage and/or accidents.<br />
This product is an automobile part. Do not use for any other purposes.<br />
HKS will not be responsible for any damage caused by incorrect <strong>installation</strong> and/or use, or use after modification<br />
and/or dismantling of this product.<br />
This product was designed for <strong>installation</strong> on specific factory vehicles.<br />
The specifications of this product are subject to change without notice.<br />
The instructions are subject to change without notice. Make sure to refer to the most recent instructions.<br />
- 25 -
PARTS LIST<br />
NO. DESCRIPTION QT<br />
(11003-AN013)<br />
QT<br />
(14020-AN006)<br />
IMAGE<br />
REMARKS<br />
1 Exhaust Manifold LH 1 -<br />
2 Exhaust Manifold RH 1 -<br />
3 Turbocharger LH 1 1<br />
4 Turbocharger RH 1 1<br />
5 Wastegate 2 - 50mm<br />
6 Front Pipe LH 1 1<br />
7 Front Pipe RH 1 1<br />
8 Suction Pipe LH 1 -<br />
9 Suction Pipe RH 1 -<br />
10 Suction Pipe 2 2<br />
11 Chamber Pipe No.1 2 2<br />
12 Chamber Pipe No.2 LH 1 1<br />
13 Chamber Pipe No.2 RH 1 1<br />
14 Oil Inlet Pipe LH 1 -<br />
15 Oil Inlet Pipe RH 1 -<br />
16 Oil Out Adapter 2 -<br />
17 Water Pipe IN LH 1 -<br />
18 Water Pipe IN RH 1 -<br />
19 Water Pipe OUT LH 1 -<br />
20 Water Pipe OUT RH 1 -<br />
- 26 -
PARTS LIST<br />
NO. DESCRIPTION QT<br />
(11003-AN013)<br />
QT<br />
(14020-AN006)<br />
IMAGE<br />
REMARKS<br />
21 Turbocharger Bracket LH 1 1<br />
22 Turbocharger Bracket RH 1 1<br />
23 Chamber Pipe Bracket LH 1 1<br />
24 Chamber Pipe Bracket RH 1 1<br />
25 Engine Mount 1 1<br />
26 Exhaust Manifold Gasket 2 -<br />
27 Turbocharger Gasket 2 2 Inlet<br />
28 Turbocharger Gasket 2 2 Outlet<br />
29 Front Pipe Gasket 2 2<br />
30 Oil Out Gasket 4 4<br />
31 Compressor Out Gasket 2 2<br />
32 Silicone Hose 2 - 70mm L70<br />
33 Silicone Hose 2 - 70mm L55<br />
34 Silicone Hose 2 2 60mm L70<br />
35 Hose 1 - 10mm L1000<br />
36 Hose 1 1 10mm L600<br />
37 Hose 1 - 8mm L200<br />
38 Hose 1 - 6mm L4000<br />
39 Corrugated Tube 1 1 15mm L500<br />
40 Thermo Tube 1 - 17mm L500<br />
- 27 -
PARTS LIST<br />
NO. DESCRIPTION QT<br />
(11003-AN013)<br />
QT<br />
(14020-AN006)<br />
IMAGE<br />
REMARKS<br />
41 Banjo Bolt 2 - 12mm Orifice<br />
42 Banjo Bolt 4 - 14mm<br />
43 Plug 4 4 M14<br />
44 Copper Washer 12 12 12mm<br />
45 Copper Washer 12 12 14mm<br />
46 G-cup Ring 2 - 90.8mm<br />
47 G-cup Ring 2 - 58.4mm<br />
48 Hose Clamp 8 - #48 Bead Type<br />
49 Hose Clamp 4 4 #40 Bead Type<br />
50 Thermo Insulation Sheet 3 - 300×300<br />
51 T-fitting 1 - 8mm<br />
52 T-fitting 3 - 6mm<br />
53 Hose Fitting 2 - 10mm<br />
54 Hose Fitting 3 - 6mm<br />
55 Hose Fitting 2 - 6mm L-shape<br />
56 Elbow 2 - PT1/8<br />
57 Power Steering Union 1 1<br />
58 O-ring 1 1<br />
59 Fitting 1 1 90°<br />
60 Joint Pipe 1 1 10mm<br />
- 28 -
PARTS LIST<br />
NO. DESCRIPTION QT<br />
(11003-AN013)<br />
QT<br />
(14020-AN006)<br />
IMAGE<br />
REMARKS<br />
61 Air Cleaner Filter 2 2<br />
62 Hose Clamp 2 2 10mm (155)<br />
63 Hose Clamp 4 - 10mm (138)<br />
64 Hose Clamp 5 - 8mm<br />
65 Hose Clamp 14 - 6mm<br />
66 Spacer 4 4 4mm t1.5<br />
67 Spacer 1 - 6mm-12mm L10<br />
68 Plug 2 - PT1/8<br />
69 Tie Wrap (M) 10 10<br />
70 Bolt 4 4 M4 L10<br />
71 Cap Bolt 3 3<br />
72 Cap Bolt 4 -<br />
M10 L30<br />
Low head<br />
M6 L12<br />
(Small Dia.)<br />
73 Bolt 6 - M6 L10<br />
74 Bolt 1 - M6 L25<br />
75 Bolt 2 2 M8 L15<br />
76 Bolt 3 - M8 L20<br />
77 Bolt 2 2 M8 L25<br />
81 Bolt 2 2 M8 L30<br />
79 Bolt 4 - M10 L40<br />
80 Bolt 2 - M10 L25<br />
- 29 -
PARTS LIST<br />
NO. DESCRIPTION QT<br />
(11003-AN013)<br />
QT<br />
(14020-AN006)<br />
IMAGE<br />
REMARKS<br />
81 Self Lock Nut 12 12 M8<br />
82 Nut 6 - M10<br />
83 Lock Washer 7 - M6<br />
84 Lock Washer 9 6 M8<br />
85 Lock Washer 6 - M10<br />
86 Washer 7 - M6<br />
87 Washer 9 6 M8<br />
88 Washer 14 2 M10<br />
89 Stud Bolt 12 6 M8<br />
90 Emblem 1 1<br />
91 Bracket 1 -<br />
92 Bolt 2 - M4 L12<br />
93 Installation Manual 1 1<br />
94 Instruction Manual 1 1<br />
- 30 -
1. REMOVAL OF FACTORY PARTS<br />
Remove the exhaust system, engine, and turbochargers referring to the factory service <strong>manual</strong>.<br />
<br />
NOTE Keep all removed parts until <strong>installation</strong> process is <strong>com</strong>pleted. Some parts will be reused.<br />
<br />
2. INSTALLATION OF KIT PARTS<br />
2-1. Relocation of Power Steering Line (Only for LHD)<br />
Disconnect the power steering pipe and pipe clamp as shown in Diagram 2-1-1 and 2-1-2.<br />
<br />
<br />
<br />
<br />
Pipe Clamp<br />
<br />
Disconnect<br />
<br />
<br />
<br />
<br />
<br />
<br />
<br />
Dia.2-1-1<br />
Dia.2-1-2<br />
<br />
Install the Joint Pipe to the pipe clamp. Reinstall the pipe clamp to the vehicle. (Dia.2-1-3, 2-1-5)<br />
<br />
<br />
<br />
<br />
<br />
<br />
<br />
<br />
<br />
<br />
<br />
Dia.2-1-3<br />
<br />
<br />
Install the O-ring to the Power Steering Union. Install the Power Steering Union to the vehicle. (Dia. 2-1-4,2-1-5<br />
<br />
Dia.2-1-5<br />
Dia.2-1-4<br />
- 31 -
Install the 90Fitting to the Power Steering Union.<br />
(Dia. 2-1-6)<br />
<br />
Cut the 10mm Hose L=600 to approximately 500mm.<br />
Cut the Corrugated Tube to approximately 430mm.<br />
Cover the cut 10mm Hose with the cut Corrugated<br />
Tube. (Dia. 2-1-6, 2-1-7)<br />
<br />
Connect the 10mm Hose with the Corrugated Tube to<br />
the 90 Fitting and factory power steering pipe.<br />
Secure them using the 10mm (155) Hose Clamp.<br />
Make sure to secure the hose using the Tie Wrap(s) so<br />
it does not <strong>com</strong>e in contact with the drive shaft and/or<br />
any other parts of the vehicle. (Dia.2-1-6, 2-1-7)<br />
<br />
<br />
<br />
<br />
<br />
<br />
<br />
<br />
<br />
<br />
<br />
<br />
<br />
2-2. Installation of Engine Mount<br />
(1) Replace the factory engine mount with the provided<br />
Engine Mount using the following provided parts. (Dia.<br />
2-2-1)<br />
<br />
Cap Bolt M10 L=30 x 3<br />
10mm Washer x 2<br />
<br />
<br />
<br />
<br />
<br />
<br />
<br />
2-3. Installation of Exhaust Manifold<br />
Install the Stud Bolts to the Exhaust Manifold LH and RH.<br />
(Dia.2-3-1)<br />
<br />
Stud Bolt M8 x 6<br />
Cap Bolt<br />
Cap Bolt & 10mm Washer<br />
Dia.2-1-6<br />
Dia.2-1-7<br />
Dia.2-2-1<br />
- 32 -<br />
Dia.2-3-1
Install the Exhaust Manifold LH and RH using the<br />
following provided parts. (Dia.2-3-2)<br />
<br />
Exhaust Manifold Gasket x 2<br />
Factory Nut x 12 (Reuse)<br />
<br />
<br />
<br />
<br />
<br />
<br />
<br />
<br />
Modify the factory heat insulator so it does not <strong>com</strong>e in<br />
contact with the Exhaust Manifold when installing both<br />
parts. (Dia. 2-1-3, 2-1-4)<br />
<br />
NOTE <br />
The modified heat insulator will be installed later.<br />
<br />
<br />
<br />
<br />
<br />
<br />
<br />
<br />
<br />
<br />
<br />
<br />
<br />
<br />
<br />
<br />
<br />
<br />
<br />
<br />
<br />
<br />
<br />
Dia.2-3-2<br />
Dia.2-3-3<br />
Dia.2-3-4<br />
- 33 -
2-4. Installation of Turbocharger<br />
Install the Stud Bolt and Oil Outlet Adapter to the<br />
Turbocharger LH & RH using the following provided parts.<br />
(Dia. 2-4-1, 2-4-2)<br />
Oil Out Gasket x 2<br />
Oil Out Adapter x 2<br />
M6 Cap Bolt x 4<br />
M8 Stud Bolt x 6<br />
<br />
<br />
<br />
<br />
<br />
<br />
<br />
<br />
Dia.2-4-2<br />
<br />
Install the Plug to the position circled in Diagram 2-4-3 and<br />
2-4-4 to the Turbocharger LH and RH using the following<br />
provided parts. (Dia.2-4-3, 2-4-4, 2-4-5)<br />
Plug M14 x 4<br />
Copper Washer 14mm x 4<br />
Tightening Torque: 35±2Nm<br />
<br />
<br />
Dia.2-4-5<br />
<br />
<br />
<br />
<br />
<br />
<br />
<br />
<br />
<br />
<br />
<br />
<br />
<br />
<br />
<br />
<br />
Install the Hose Fitting 6mm to the Compressor Housing LH.<br />
(Dia. 2-4-6)<br />
6mm Hose Fitting x 1<br />
<br />
NOTE <br />
Wrap the threaded portion with Teflon tape.<br />
<br />
<br />
<br />
<br />
Dia.2-4-3<br />
Dia.2-4-4<br />
Dia.2-4-6<br />
Dia.2-4-1<br />
LH<br />
RH<br />
- 34 -
Temporarily install the turbochargers to the exhaust<br />
manifolds. Adjust the angle of the center housing and<br />
<strong>com</strong>pressor housing. (Dia. 2-4-7, 2-4-8)<br />
<br />
NOTE <br />
Adjust the positions of the Chamber Pipe, Oil Pipe,<br />
and Water Pipe here so <strong>installation</strong> of these pipes will<br />
be easier.<br />
Make sure there is sufficient clearance between the<br />
pipes and the vehicle’s body. Adjust the pipe<br />
positions if necessary.<br />
If it is necessary to change the <strong>installation</strong> angle of<br />
the turbocharger(s), follow the procedure (5) and (6) to<br />
change the angle.<br />
<br />
<br />
<br />
<br />
<br />
<br />
<br />
<br />
<br />
<br />
<br />
<br />
Remove the Turbocharger and install the cup ring as follows:<br />
(Dia. 2-4-9, 2-4-10)<br />
1. Tighten to 16 ±1Nm.<br />
2. Lightly hit both sides of the cup ring with a brass bar.<br />
3. Tighten to 16 ±1Nm.<br />
4. Lightly hit both sides of the cup ring.<br />
5. Tighten to 16 ±1Nm.<br />
<br />
<br />
<br />
<br />
<br />
<br />
Dia.2-4-10<br />
<br />
Tighten the bolts on the <strong>com</strong>pressor housing to 13±1Nm.<br />
There are 6 bolts on each side of the <strong>com</strong>pressor housing.<br />
(Dia. 2-4-11)<br />
<br />
<br />
<br />
<br />
<br />
<br />
Dia.2-4-7<br />
Dia.2-4-8<br />
No Contact!<br />
Dia.2-4-9<br />
Dia.2-4-11<br />
- 35 -
Install the Turbocharger LH and RH to each Exhaust<br />
Manifold using the following provided parts. (Dia.2-4-12,<br />
2-4-13<br />
Turbocharger Gasket (Inlet) x 2<br />
Self Lock Nut M8 x 6<br />
<br />
(9) Install the Turbocharger Bracket LH and RH using the<br />
following provided parts. (Dia.2-4-12, 2-4-13<br />
Bolt M8 L=20 x 2<br />
Washer M8 x 2<br />
Lock Washer x 2<br />
<br />
<br />
<br />
<br />
<br />
<br />
<br />
<br />
<br />
<br />
<br />
<br />
<br />
2-5. Installation of Oil Pipe<br />
<br />
NOTE<br />
Reuse the factory banjo bolt on the engine block side.<br />
Make sure to use a correct bolt for water and oil line.<br />
The bolt with smaller center hole diameter.<br />
<br />
<br />
Water Oil<br />
<br />
<br />
<br />
<br />
<br />
Dia. 2-5-2<br />
<br />
<br />
<br />
Install the Oil Inlet Pipe LH using the following provided parts<br />
and removed factory part. (Dia.2-5-3)<br />
Banjo Bolt M12 x 1<br />
Copper Washer x 4<br />
Factory Banjo Bolt M12 x 1 (Reuse)<br />
<br />
NOTE <br />
Blow air to the pipe before <strong>installation</strong> to prevent a foreign<br />
object from entering into the pipe.<br />
Dia.2-4-12<br />
LH<br />
Bracket<br />
Bracket<br />
Dia.2-4-13<br />
RH<br />
Dia.2-5-1<br />
Reuse<br />
Dia.2-5-3<br />
- 36 -
Install the Oil Inlet Pipe RH using the following provided parts<br />
and removed factory part. (Dia.2-5-4)<br />
Banjo Bolt M12 x 1<br />
Copper Washer x 4<br />
Factory Banjo Bolt M12 x 1 (Reuse)<br />
<br />
NOTE <br />
Blow air to the pipe before <strong>installation</strong> to prevent a foreign<br />
object from entering into the pipe.<br />
<br />
<br />
<br />
Reinstall the factory oil out pipe using the following provided<br />
parts. (Dia.2-5-5, 2-5-6)<br />
Oil Out Gasket x 2<br />
Factory Bolt M6 L=12 x 4 (Reuse)<br />
<br />
<br />
NOTE <br />
Blow air to the pipe before <strong>installation</strong> to prevent a foreign<br />
object from entering into the pipe.<br />
<br />
<br />
<br />
<br />
<br />
Bent the factory oil pipe so it does not <strong>com</strong>e in contact with<br />
the drive shaft. (Dia.2-5-6)<br />
<br />
<br />
<br />
<br />
<br />
<br />
<br />
<br />
<br />
<br />
2-6 Installation of Wastegate<br />
<br />
Install the Hose Fitting and Plug to the Wastegate. (Dia.2-6-1)<br />
6mm Hose Fitting x 2<br />
6mm L-shaped Hose Fitting x 2<br />
PT 1/8 Plug x 2<br />
<br />
NOTE<br />
Wrap the threaded portion with Teflon tape.<br />
<br />
<br />
<br />
RH<br />
LH<br />
RH<br />
LH<br />
Dia.2-6-1<br />
Dia.2-5-4<br />
Dia.2-5-5<br />
Bent here<br />
Dia.2-5-6<br />
RH<br />
PT1/8 Plug<br />
- 37 -
(3) Adjust the positions of the Wastegate’s upper case. (Dia.<br />
2-6-2)<br />
<br />
<br />
<br />
<br />
<br />
<br />
<br />
Caution<br />
When adjusting the upper case, use the SST or proper tools.<br />
If the proper tools are not used, the spring may <strong>com</strong>e out and<br />
cause an injury.<br />
Make sure the Wastegates function properly after <strong>installation</strong>.<br />
<br />
<br />
<br />
Dia.2-6-2<br />
LH: 45°<br />
RH: 30°<br />
(4) Install the Wastegates to the Exhaust Manifolds using the<br />
following provided pars. (Diagram 2-6-3)<br />
G-Cup Ring 90.8mm x 2<br />
<br />
<br />
NOTE<br />
Temporarily install the Front Pipe to adjust the angle of the<br />
pipes.<br />
<br />
<br />
<br />
2-7 Modification of Factory Water Pipe<br />
<br />
Modify the factory water pipe so it does not <strong>com</strong>e in contact with<br />
the Wastegate. (Diagram 2-7-1 to 2-7-4)<br />
<br />
(1) Cut the factory water pipe as shown in Diagram 2-7-1.<br />
<br />
<br />
<br />
<br />
<br />
<br />
<br />
<br />
(2) Drill a 7mm hole in the bracket as shown in Diagram 2-7-2.<br />
<br />
<br />
<br />
<br />
<br />
<br />
<br />
<br />
7<br />
Cut off<br />
7<br />
Dia.2-6-3<br />
Dia.2-7-1<br />
Dia.2-7-2<br />
- 38 -
(3) Insert the provided Spacer between the modified bracket<br />
and the engine. Weld the factory water pipe (previously<br />
cut in 2-7-1) and install the pipe using the following provided<br />
parts. Make sure the pipe does not <strong>com</strong>e in contact with<br />
the Wastegate, (Diagram 2-7-3)<br />
Weld here<br />
Spacer<br />
Spacer 6mm-12mm t=10 x 1<br />
Bolt M6 L=25 x 1<br />
Lock Washer M6 x 1<br />
Washer M6 x 1<br />
<br />
<br />
NOTE<br />
If the cut pipes are connected with a joint hose, make sure<br />
the pipes are secure to avoid leaks.<br />
<br />
<br />
(4) Bent the 8mm pipe so it does not <strong>com</strong>e in contact with the<br />
13mm pipe. (Dia.2-7-4)<br />
<br />
<br />
<br />
<br />
<br />
<br />
<br />
<br />
<br />
<br />
2-6 Installation of Turbocharger Water Lines<br />
<br />
NOTE<br />
Reuse the factory 12mm banjo bolts on the engine side.<br />
Make sure to use the correct bolts on each water line.<br />
Dia.2-7-3<br />
<br />
Need adequate clearance<br />
<br />
Dia.2-7-4<br />
Before <strong>installation</strong>, blow off any dust and/or debris inside<br />
the pipes with an air gun. Make sure no foreign<br />
objects enter the Turbocharger Assembly through the<br />
pipes.<br />
<br />
<br />
<br />
<br />
(1) Install the Water Pipe IN LH using the following provided<br />
parts. (Dia.2-8-2)<br />
Banjo Bolt 14mm x 1<br />
Copper Washer 14mm x 2<br />
Factory Banjo Bolt 12mm x 1 (Reuse)<br />
Copper Washer 12mm x 2<br />
<br />
<br />
<br />
<br />
<br />
<br />
- 39 -<br />
Reuse<br />
Dia.2-8-1<br />
Dia.2-8-2
(2) Modify the factory heat shield so it does not <strong>com</strong>e in contact<br />
with the Water Pipe Out LH. Install the modified heat<br />
shield using the following provided parts. (Dia.2-8-3)<br />
<br />
Bolt M6 L=10 x 3<br />
Washer M6 x 3<br />
Lock Washer M6 x 3<br />
<br />
(3) Install the Water Pipe OUT LH using the following provided<br />
parts. (Dia.2-8-3)<br />
Banjo Bolt 14mm x 1<br />
Copper Washer 14mm x 2<br />
<br />
(4) Install the Water Inlet IN RH using the following provided<br />
parts. (Dia.2-8-4)<br />
<br />
Banjo Bolt 14mm x 1<br />
Copper Washer 14mm x 2<br />
Factory Banjo Bolt 12mm x 1 (Reuse)<br />
Copper Washer 12mm x 2<br />
<br />
<br />
<br />
<br />
<br />
<br />
(5) Install the Water Pipe OUT RH using the following provided<br />
parts. (Dia.2-8-5)<br />
<br />
Banjo Bolt 14mm x 1<br />
Copper Washer 14mm x 2<br />
Bolt M8 L=20 x 1<br />
Washer M8 x 1<br />
Lock Washer M8 x 1<br />
<br />
<br />
<br />
<br />
<br />
(6) Modify the factory heat shied on the right side so it does not<br />
<strong>com</strong>e in contact with the <strong>com</strong>pressor housing. Install the<br />
modified heat shield using the following provided parts.<br />
(Dia.2-8-6)<br />
<br />
Bolt M6 L=10 x 3<br />
Washer M6 x 3<br />
Lock Washer M6 x 3<br />
<br />
<br />
<br />
<br />
- 40 -<br />
Modification required <br />
Modification required<br />
Dia.2-8-3<br />
Reuse<br />
Dia.2-8-4<br />
Dia.2-8-5<br />
Dia.2-8-6
(7) Modify the factory hose as shown in Diagram 2-8-7.<br />
Install the modified hose to the factory water pipe.<br />
<br />
<br />
<br />
<br />
<br />
<br />
<br />
<br />
<br />
<br />
<br />
(8) Route the water line as shown in Diagram 2-8-8 and 2-8-9<br />
using the following the provided parts. <br />
<br />
T-fitting 8mm x 1<br />
Hose Clamp 8mm x 4<br />
Hose 8mm (Cut to 40mm in len<strong>gt</strong>h) <br />
<br />
<br />
<br />
<br />
<br />
<br />
<br />
<br />
<br />
<br />
<br />
<br />
<br />
<br />
<br />
<br />
<br />
<br />
<br />
<br />
2-9 Installation of Front Pipe<br />
<br />
Install the factory A/F sensor and O2 sensor to both sides’<br />
Front Pipe; then install the pipes to each Turbocharger<br />
using the following provided parts. (Dia. 2-9-1)<br />
<br />
Turbocharger Gasket (Outlet) x 2<br />
Self Lock Nut x 6<br />
G-cup Ring 58.4mm x 2<br />
<br />
<br />
<br />
<br />
Dia.2-8-7<br />
T-fitting 8mm<br />
Cut this part to 15mm<br />
Hose 8mm (40mm)<br />
Dia.2-8-8<br />
Dia.2-8-9<br />
Dia.2-9-1<br />
- 41 -
Install the Front Pipe Bracket using the following provide<br />
parts. (Dia.2-9-2)<br />
<br />
Bolt M10 L=25 x 2<br />
Nut M10 x 2<br />
Lock Washer x 2<br />
Washer M10 x 4<br />
<br />
NOTE<br />
Install the bracket in the opposite direction of the factory<br />
catalytic converters.<br />
Install the center pipe using the following provided parts.<br />
Dia.2-9-2<br />
Front Pipe Gasket x 2<br />
Bolt M10 L=40 x 4<br />
Nut M10 x 4<br />
Lock Washer M10 x 4<br />
Washer M10 x 8<br />
<br />
2-10 Installation of Chamber Pipe<br />
Install the Camber Pipe No.1 and No.2 using the following<br />
provided parts. (Dia.2-10-1, 2-10-2, 2-10-3)<br />
<br />
Compressor Out Gasket x 1<br />
Bolt M8 L=25 x 1<br />
Bolt M8 L=30 x 1<br />
Lock Washer M8 x 2<br />
Washer M8 x 2<br />
Silicone Hose 60mm L=70 x 1<br />
Hose Clamp #40 x 2<br />
<br />
<br />
<br />
Install the Chamber Pipe Bracket LH using the following<br />
provided parts. (Dia.2-10-3)<br />
<br />
Bolt M8 L=15 x 1<br />
Lock Washer M8 x 1<br />
Washer M8 x 1<br />
<br />
NOTE<br />
Make sure the Chamber Pipe No.1 does not <strong>com</strong>e in<br />
contact with the 90°fitting while the engine vibrates.<br />
<br />
Adjust the position of the Chamber Pipe so it does not <strong>com</strong>e<br />
in contact with the vehicle’s body.<br />
<br />
<br />
<br />
<br />
<br />
Dia.2-10-1<br />
<br />
M8 L25<br />
Reuse<br />
M8 L30<br />
Dia.2-10-2<br />
Dia.2-10-3<br />
- 42 -
Install the Chamber Pipe No.1 and No.2 using the following<br />
provided parts. (Dia.2-10-4)<br />
<br />
Compressor Out Gasket x 1<br />
Bolt M8 L=25 x 1<br />
Bolt M8 L=30 x 1<br />
Lock Washer M8 x 2<br />
Washer M8 x 2<br />
Silicone Hose 60mm L=70 x 1<br />
Hose Clamp #40 x 2<br />
<br />
<br />
<br />
Install the Chamber Pipe Bracket RH using the following<br />
provided parts. (Dia.2-10-5)<br />
<br />
Bolt M8 L=15 x 1<br />
Lock Washer M8 x 1<br />
Washer M8 x 1<br />
<br />
NOTE <br />
Make sure the Chamber Pipe does not <strong>com</strong>e in contact with a<br />
belt and vehicle’s body.<br />
<br />
<br />
<br />
2-11 Connection of Wastegate<br />
<br />
NOTE <br />
This section assumes that an HKS EVC will be installed<br />
on the vehicle.<br />
Refer to the HKS EVC <strong>manual</strong> when connecting the EVC<br />
hoses.<br />
<br />
(1) Connect the Wastegates using the following provided parts.<br />
(Dia. 2-11-1, 2-11-2)<br />
Reuse<br />
Dia.2-10-4<br />
Dia.2-10-5<br />
<br />
Hose 6mm<br />
T-Fitting 6mm x 3<br />
Hose Clamp 6mm x 14<br />
Dia.2-11-1<br />
To EVC Valve<br />
To W/G Lower Case<br />
Dia.2-11-2<br />
- 43 -
2-12 Installation of Thermo Insulation Sheet<br />
<br />
(1) Affix to the vehicle’s body as shown in Diagram 2-12-1 and<br />
2-12-2.<br />
<br />
<br />
<br />
<br />
<br />
<br />
<br />
<br />
<br />
<br />
<br />
<br />
<br />
<br />
<br />
<br />
<br />
<br />
<br />
<br />
<br />
2-13 Installation of Suction Pipe<br />
Install the provided Elbow, Hose Fitting, and Hose to the<br />
Suction Pipe. (Dia.2-13-1, 2-13-2)<br />
<br />
Silicone Hose 70mm L=55 x 2<br />
Hose Clamp #48 x 4<br />
Elbow PT1/8 x 2<br />
Hose Fitting 10mm x 2<br />
Hose Clamp 10mm (138) x 4<br />
Hose 10mm L=1000 (Cut to 300mm x 2)<br />
Thermo Tube (Cut to 250mm x 2)<br />
<br />
<br />
<br />
<br />
<br />
<br />
Dia.2-12-1<br />
Dia.2-12-2<br />
L55<br />
Dia.2-13-1<br />
Dia.2-11-2<br />
- 44 -
Install the 10mm Hose to 10mm hose fitting (blow-by) of the<br />
valve cover. (Both right and left side.) (Dia. 2-13-3)<br />
<br />
NOTE<br />
Make sure the Suction Pipe does not <strong>com</strong>e in contact with the<br />
vehicle’s body when reinstalling the engine.<br />
<br />
<br />
<br />
<br />
<br />
<br />
<br />
<br />
Install the air flow sensor to the Suction Pipe using the<br />
following provided parts. (Dia.2-13-4)<br />
<br />
Spacer x 4<br />
Bolt M4 L=10 x 4<br />
<br />
<br />
<br />
<br />
<br />
<br />
<br />
Install the Suction Pipe using the following provided parts.<br />
(Dia.2-13-4)<br />
<br />
Silicone Hose 70mnm L=70 x 2<br />
Hose Clamp #48 x 4<br />
<br />
NOTE <br />
HKS Racing Suction Kit is required in order to use this <strong>kit</strong>.<br />
Do not use the pipe included in the Racing Suction Kit to<br />
install the airflow sensor. Use the pipe included in this <strong>kit</strong><br />
instead.)<br />
The provided air cleaner filter is for a race use. Do not use it<br />
on public roads.<br />
<br />
Dia.2-13-5<br />
Spacer<br />
Dia.2-13-3<br />
Dia.2-13-4<br />
- 45 -
2-14 Installation of Emblem<br />
The provided Emblem was designed for use with the HKS Superior Finisher (P/N 34005-AN001). <br />
<br />
Install the provided Emblem using the following provided<br />
parts. Put the Emblem and Bracket on each side of the<br />
<br />
Superior Finisher and tighten the bolts. (Dia.2-12-1)<br />
<br />
Emblem x 1<br />
Bracket x 1<br />
Bolt M4 L=12 x 2<br />
<br />
<br />
<br />
Dia.2-14-1<br />
Installation is <strong>com</strong>plete.<br />
Make sure to reinstall all removed factory parts.<br />
<br />
<br />
<br />
<br />
3. CONFIRMATION AFTER INSTALLATION<br />
<br />
(1) After the <strong>installation</strong> process is <strong>com</strong>plete, check all items listed in the “Confirmation after Installation” section of the<br />
Instruction Manual.<br />
<br />
<br />
- 46 -