Model 114EQ-ASTR - Meade
Model 114EQ-ASTR - Meade
Model 114EQ-ASTR - Meade

You also want an ePaper? Increase the reach of your titles
YUMPU automatically turns print PDFs into web optimized ePapers that Google loves.
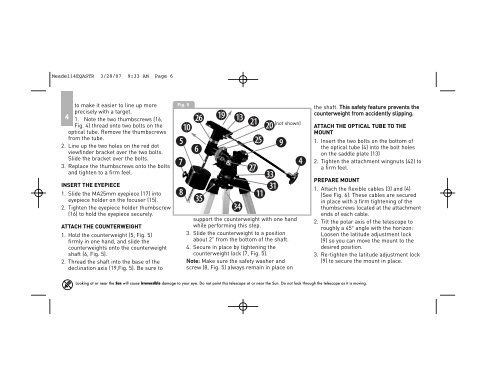
<strong>Meade</strong><strong>114EQ</strong><strong>ASTR</strong> 3/28/07 9:33 AM Page 6<br />
to make it easier to line up more<br />
precisely with a target.<br />
4 1. Note the two thumbscrews (16,<br />
Fig. 4) thread onto two bolts on the<br />
optical tube. Remove the thumbscrews<br />
from the tube.<br />
2. Line up the two holes on the red dot<br />
viewfinder bracket over the two bolts.<br />
Slide the bracket over the bolts.<br />
3. Replace the thumbscrews onto the bolts<br />
and tighten to a firm feel.<br />
INSERT THE EYEPIECE<br />
1. Slide the MA25mm eyepiece (17) into<br />
eyepiece holder on the focuser (15).<br />
2. Tighten the eyepiece holder thumbscrew<br />
(16) to hold the eyepiece securely.<br />
ATTACH THE COUNTERWEIGHT<br />
1. Hold the counterweight (5, Fig. 5)<br />
firmly in one hand, and slide the<br />
counterweights onto the counterweight<br />
shaft (6, Fig. 5).<br />
2. Thread the shaft into the base of the<br />
declination axis (19,Fig. 5). Be sure to<br />
Fig. 5<br />
(not shown)<br />
support the counterweight with one hand<br />
while performing this step.<br />
3. Slide the counterweight to a position<br />
about 2" from the bottom of the shaft.<br />
4. Secure in place by tightening the<br />
counterweight lock (7, Fig. 5).<br />
Note: Make sure the safety washer and<br />
screw (8, Fig. 5) always remain in place on<br />
the shaft. This safety feature prevents the<br />
counterweight from accidently slipping.<br />
ATTACH THE OPTICAL TUBE TO THE<br />
MOUNT<br />
1. Insert the two bolts on the bottom of<br />
the optical tube (4) into the bolt holes<br />
on the saddle plate (13)<br />
2. Tighten the attachment wingnuts (42) to<br />
a firm feel.<br />
PREPARE MOUNT<br />
1. Attach the flexible cables (3) and (4)<br />
(See Fig. 6). These cables are secured<br />
in place with a firm tightening of the<br />
thumbscrews located at the attachment<br />
ends of each cable.<br />
2. Tilt the polar axis of the telescope to<br />
roughly a 45° angle with the horizon:<br />
Loosen the latitude adjustment lock<br />
(9) so you can move the mount to the<br />
desired position.<br />
3. Re-tighten the latitude adjustment lock<br />
(9) to secure the mount in place.<br />
Looking at or near the Sun will cause irreversible damage to your eye. Do not point this telescope at or near the Sun. Do not look through the telescope as it is moving.