

EYE SPLICE DouBLE BRAID CLASS I - SherrillTree.com
EYE SPLICE DouBLE BRAID CLASS I - SherrillTree.com
EYE SPLICE DouBLE BRAID CLASS I - SherrillTree.com

You also want an ePaper? Increase the reach of your titles
YUMPU automatically turns print PDFs into web optimized ePapers that Google loves.
e y e s p l i c e d o u b l e b r a i d C l a s s I<br />
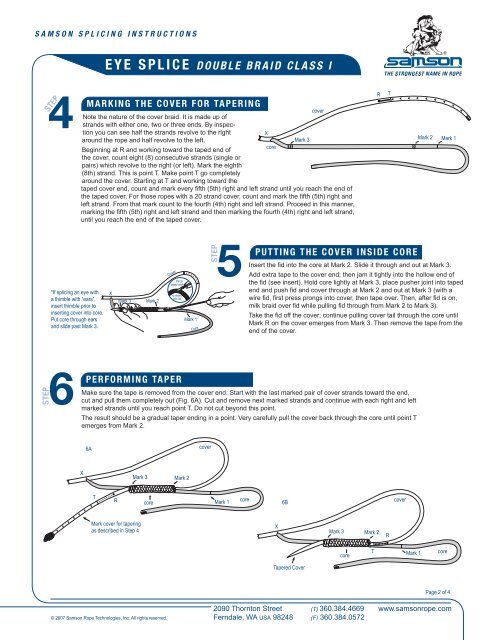
4<br />
Note<br />
step<br />
marking the cover for tapering<br />
cover<br />
the nature of the cover braid. It is made up of<br />
strands with either one, two or three ends. By inspection<br />
you can see half the strands revolve to the right<br />
X<br />
around the rope and half revolve to the left.<br />
Mark 3<br />
core<br />
Beginning at R and working toward the taped end of<br />
the cover, count eight (8) consecutive strands (single or<br />
pairs) which revolve to the right (or left). Mark the eighth<br />
(8th) strand. This is point T. Make point T go <strong>com</strong>pletely<br />
around the cover. Starting at T and working toward the<br />
taped cover end, count and mark every fifth (5th) right and left strand until you reach the end of<br />
the taped cover. For those ropes with a 20 strand cover, count and mark the fifth (5th) right and<br />
left strand. From that mark count to the fourth (4th) right and left strand. Proceed in this manner,<br />
marking the fifth (5th) right and left strand and then marking the fourth (4th) right and left strand,<br />
until you reach the end of the taped cover.<br />
R<br />
T<br />
Mark 2 Mark 1<br />
*If splicing an eye with<br />
a thimble with “ears”,<br />
insert thimble prior to<br />
inserting cover into core.<br />
Put core through ears<br />
and slide past Mark 3.<br />
X<br />
Mark 3 Mark 2<br />
Cover<br />
Pinch<br />
taped end<br />
to insert<br />
into lid.<br />
Mark 1<br />
Core<br />
step<br />
5<br />
Insert<br />
putting the cover inside core<br />
the fid into the core at Mark 2. Slide it through and out at Mark 3.<br />
Add extra tape to the cover end; then jam it tightly into the hollow end of<br />
the fid (see insert). Hold core lightly at Mark 3, place pusher joint into taped<br />
end and push fid and cover through at Mark 2 and out at Mark 3 (with a<br />
wire fid, first press prongs into cover, then tape over. Then, after fid is on,<br />
milk braid over fid while pulling fid through from Mark 2 to Mark 3).<br />
Take the fid off the cover; continue pulling cover tail through the core until<br />
Mark R on the cover emerges from Mark 3. Then remove the tape from the<br />
end of the cover.<br />
step<br />
6<br />
Make<br />
performing taper<br />
sure the tape is removed from the cover end. Start with the last marked pair of cover strands toward the end,<br />
cut and pull them <strong>com</strong>pletely out (Fig. 6A). Cut and remove next marked strands and continue with each right and left<br />
marked strands until you reach point T. Do not cut beyond this point.<br />
The result should be a gradual taper ending in a point. Very carefully pull the cover back through the core until point T<br />
emerges from Mark 2.<br />
6A<br />
cover<br />
X<br />
Mark 3<br />
Mark 2<br />
T<br />
R<br />
core Mark 1<br />
core<br />
6B<br />
cover<br />
Mark cover for tapering<br />
as described in Step 4<br />
X<br />
Mark 3<br />
Mark 2<br />
R<br />
core<br />
T<br />
Mark 1<br />
core<br />
Tapered Cover<br />
Page 2 of 4<br />
© 2007 Samson Rope Technologies, Inc. All rights reserved.<br />
2090 Thornton Street<br />
Ferndale, WA USA 98248<br />
(T) 360.384.4669<br />
(F) 360.384.0572<br />
www.samsonrope.<strong>com</strong>


