

EYE SPLICE DouBLE BRAID CLASS I - SherrillTree.com
EYE SPLICE DouBLE BRAID CLASS I - SherrillTree.com
EYE SPLICE DouBLE BRAID CLASS I - SherrillTree.com

Create successful ePaper yourself
Turn your PDF publications into a flip-book with our unique Google optimized e-Paper software.
e y e s p l i c e d o u b l e b r a i d C l a s s I<br />
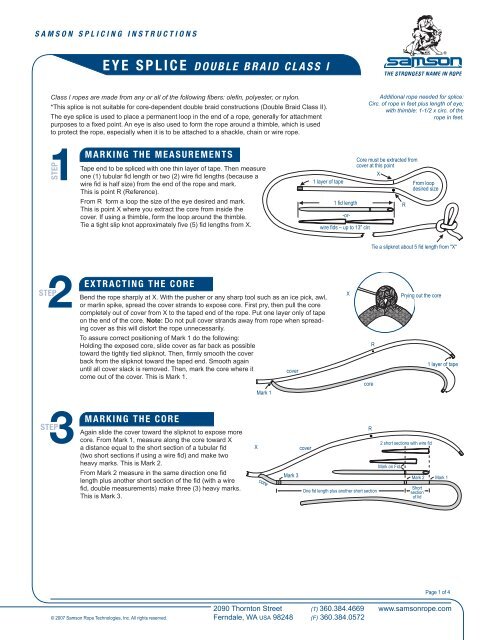
Class I ropes are made from any or all of the following fibers: olefin, polyester, or nylon.<br />
*This splice is not suitable for core-dependent double braid constructions (Double Braid Class II).<br />
The eye splice is used to place a permanent loop in the end of a rope, generally for attachment<br />
purposes to a fixed point. An eye is also used to form the rope around a thimble, which is used<br />
to protect the rope, especially when it is to be attached to a shackle, chain or wire rope.<br />
Additional rope needed for splice:<br />
Circ. of rope in feet plus length of eye;<br />
with thimble: 1-1/2 x circ. of the<br />
rope in feet.<br />
1step<br />
marking the measurements<br />
Tape end to be spliced with one thin layer of tape. Then measure<br />
one (1) tubular fid length or two (2) wire fid lengths (because a<br />
wire fid is half size) from the end of the rope and mark.<br />
This is point R (Reference).<br />
From R form a loop the size of the eye desired and mark.<br />
This is point X where you extract the core from inside the<br />
cover. If using a thimble, form the loop around the thimble.<br />
Tie a tight slip knot approximately five (5) fid lengths from X.<br />
1 layer of tape<br />
1 fid length<br />
-or-<br />
2 wire fids – up to 13" circ.<br />
Core must be extracted from<br />
cover at this point<br />
X<br />
R<br />
From loop<br />
desired size<br />
Tie a slipknot about 5 fid length from "X"<br />
2<br />
Bend<br />
step<br />
extracting the core<br />
the rope sharply at X. With the pusher or any sharp tool such as an ice pick, awl,<br />
or marlin spike, spread the cover strands to expose core. First pry, then pull the core<br />
<strong>com</strong>pletely out of cover from X to the taped end of the rope. Put one layer only of tape<br />
on the end of the core. Note: Do not pull cover strands away from rope when spreading<br />
cover as this will distort the rope unnecessarily.<br />
To assure correct positioning of Mark 1 do the following:<br />
Holding the exposed core, slide cover as far back as possible<br />
toward the tightly tied slipknot. Then, firmly smooth the cover<br />
back from the slipknot toward the taped end. Smooth again<br />
until all cover slack is removed. Then, mark the core where it<br />
<strong>com</strong>e out of the cover. This is Mark 1.<br />
marking the core<br />
Again slide the cover toward the slipknot to expose more<br />
step3 core. From Mark 1, measure along the core toward X<br />
a distance equal to the short section of a tubular fid<br />
(two short sections if using a wire fid) and make two<br />
heavy marks. This is Mark 2.<br />
Mark 1<br />
cover<br />
X<br />
R<br />
core<br />
Prying out the core<br />
1 layer of tape<br />
From Mark 2 measure in the same direction one fid<br />
length plus another short section of the fid (with a wire<br />
fid, double measurements) make three (3) heavy marks.<br />
This is Mark 3.<br />
X<br />
core<br />
Mark 3<br />
cover<br />
One fid length plus another short section<br />
R<br />
2 short sections with wire fid<br />
Mark on Fid<br />
Mark 2 Mark 1<br />
Short<br />
section<br />
of lid<br />
Page 1 of 4<br />
© 2007 Samson Rope Technologies, Inc. All rights reserved.<br />
2090 Thornton Street<br />
Ferndale, WA USA 98248<br />
(T) 360.384.4669<br />
(F) 360.384.0572<br />
www.samsonrope.<strong>com</strong>
e y e s p l i c e d o u b l e b r a i d C l a s s I<br />
4<br />
Note<br />
step<br />
marking the cover for tapering<br />
cover<br />
the nature of the cover braid. It is made up of<br />
strands with either one, two or three ends. By inspection<br />
you can see half the strands revolve to the right<br />
X<br />
around the rope and half revolve to the left.<br />
Mark 3<br />
core<br />
Beginning at R and working toward the taped end of<br />
the cover, count eight (8) consecutive strands (single or<br />
pairs) which revolve to the right (or left). Mark the eighth<br />
(8th) strand. This is point T. Make point T go <strong>com</strong>pletely<br />
around the cover. Starting at T and working toward the<br />
taped cover end, count and mark every fifth (5th) right and left strand until you reach the end of<br />
the taped cover. For those ropes with a 20 strand cover, count and mark the fifth (5th) right and<br />
left strand. From that mark count to the fourth (4th) right and left strand. Proceed in this manner,<br />
marking the fifth (5th) right and left strand and then marking the fourth (4th) right and left strand,<br />
until you reach the end of the taped cover.<br />
R<br />
T<br />
Mark 2 Mark 1<br />
*If splicing an eye with<br />
a thimble with “ears”,<br />
insert thimble prior to<br />
inserting cover into core.<br />
Put core through ears<br />
and slide past Mark 3.<br />
X<br />
Mark 3 Mark 2<br />
Cover<br />
Pinch<br />
taped end<br />
to insert<br />
into lid.<br />
Mark 1<br />
Core<br />
step<br />
5<br />
Insert<br />
putting the cover inside core<br />
the fid into the core at Mark 2. Slide it through and out at Mark 3.<br />
Add extra tape to the cover end; then jam it tightly into the hollow end of<br />
the fid (see insert). Hold core lightly at Mark 3, place pusher joint into taped<br />
end and push fid and cover through at Mark 2 and out at Mark 3 (with a<br />
wire fid, first press prongs into cover, then tape over. Then, after fid is on,<br />
milk braid over fid while pulling fid through from Mark 2 to Mark 3).<br />
Take the fid off the cover; continue pulling cover tail through the core until<br />
Mark R on the cover emerges from Mark 3. Then remove the tape from the<br />
end of the cover.<br />
step<br />
6<br />
Make<br />
performing taper<br />
sure the tape is removed from the cover end. Start with the last marked pair of cover strands toward the end,<br />
cut and pull them <strong>com</strong>pletely out (Fig. 6A). Cut and remove next marked strands and continue with each right and left<br />
marked strands until you reach point T. Do not cut beyond this point.<br />
The result should be a gradual taper ending in a point. Very carefully pull the cover back through the core until point T<br />
emerges from Mark 2.<br />
6A<br />
cover<br />
X<br />
Mark 3<br />
Mark 2<br />
T<br />
R<br />
core Mark 1<br />
core<br />
6B<br />
cover<br />
Mark cover for tapering<br />
as described in Step 4<br />
X<br />
Mark 3<br />
Mark 2<br />
R<br />
core<br />
T<br />
Mark 1<br />
core<br />
Tapered Cover<br />
Page 2 of 4<br />
© 2007 Samson Rope Technologies, Inc. All rights reserved.<br />
2090 Thornton Street<br />
Ferndale, WA USA 98248<br />
(T) 360.384.4669<br />
(F) 360.384.0572<br />
www.samsonrope.<strong>com</strong>
e y e s p l i c e d o u b l e b r a i d C l a s s I<br />
7<br />
reinserting<br />
step<br />
core into cover<br />
From X on the cover, measure approximately one-third (1/3) a tubular fid length<br />
toward the slip knot on the rope and mark this as Z.<br />
You are now ready to put the core back into the cover from T to Z. Insert the fid<br />
at T, jam the taped core end tightly into the end of the fid. With the pusher, push<br />
the fid and core through the cover tunnel, past X and through the cover at Z.<br />
When pushing the fid past X to Z, make sure the fid does not catch any internal<br />
core strands.<br />
note: Depending on the eye size, a fid may<br />
not be long enough to reach from T to Z in one<br />
pass. If not, bring the fid out through the cover,<br />
pull the core through and reinsert the fid into<br />
exactly the same hole it came out of. Do this<br />
as many times as needed to reach Z.<br />
1/3 fid<br />
length<br />
Z<br />
X<br />
Cover tail<br />
Mark 3<br />
Cover<br />
Core<br />
R<br />
Insert core into<br />
cover at point T.<br />
T<br />
Mark 2<br />
Mark 1<br />
Core<br />
Fid and end of core<br />
<strong>com</strong>es out at Z.<br />
step<br />
8<br />
marking reduce volume tail core<br />
Alternately pull on the core tail at Z, then pull on the tapered cover at<br />
Mark 3. The crossover should be tightened until it is approximately equal<br />
to the diameter of the rope.Smooth out the cover of the eye <strong>com</strong>pletely,<br />
from crossover T toward X to get all the slack out of the eye area.<br />
Mark the core tail through the cover at Point X.<br />
Pull the core tail out until the mark just made on the core is exposed at Z.<br />
Reduce the core volume at this point by cutting and removing one strand<br />
at each group, progressing around the circumference<br />
of the rope.<br />
Smooth out<br />
8A<br />
Measure 1/3 fid from start of reduction cuts<br />
(mark) toward end and mark. Cut off remaining<br />
tail at this point. Make cut on a 45º angle to<br />
prevent a blunt end (see insert).<br />
With one hand, hold crossover — MARK T.<br />
Smooth cover section of eye out firmly and<br />
<strong>com</strong>pletely from crossover toward X; reduced<br />
volumn core tail should disappear into cover at Z.<br />
Smooth out core section from crossover towards<br />
Mark 3 and cover taper will disappear into core.<br />
Pull core tail out until<br />
mark of X is exposed<br />
Mark core tail<br />
at X<br />
Cutting and<br />
removing<br />
Point Z<br />
1/3 fid from<br />
Point X<br />
Cover Taper<br />
Mark 3<br />
T<br />
R<br />
Crossover<br />
One half the<br />
ends from<br />
each core<br />
strand.<br />
1/3 Fid<br />
core<br />
Smooth out and cover<br />
taper will disappear<br />
Do this at mark made<br />
on core (through<br />
cover at X).<br />
45º angle cut<br />
Page 3 of 4<br />
© 2007 Samson Rope Technologies, Inc. All rights reserved.<br />
2090 Thornton Street<br />
Ferndale, WA USA 98248<br />
(T) 360.384.4669<br />
(F) 360.384.0572<br />
www.samsonrope.<strong>com</strong>
step<br />
step<br />
e y e s p l i c e d o u b l e b r a i d C l a s s I<br />
9<br />
burying the exposed core<br />
Hold the rope at the slipknot and with the other hand milk the cover toward the splice,<br />
gently at first, them more firmly. The cover will slide over Mark 3, Mark 2 and crossover<br />
T up to R (it may be necessary to occasionally smooth out eye during milking to prevent<br />
reduced volume tail catching in the throat of the splice).<br />
If bunching occurs at the crossover preventing full burying, smooth cover from T to X.<br />
Grasp crossover at T with one hand and then firmly smooth cover slack (female side<br />
of eye) with the other hand toward the throat (X).<br />
Repeat as necessary until bunching disappears.<br />
Continue milking until all cover slack between the<br />
knot and the throat of the eye has been removed.<br />
Beginining at slipknot "milk" cover by<br />
sliding hand toward loop.<br />
Mark 2<br />
R<br />
Cross–over<br />
T<br />
Bury to Mark R<br />
10<br />
TIP: BEFORE burying the core<br />
A. Anchor the loop of the slipknot by tying it to a stationary object before starting to<br />
bury. You can then use both hands and the weight of your body to more easily bury<br />
the cover over the core and crossover (see Figure 1 and Figure 2).<br />
B. Holding the crossover tightly, milk all the excess cover from R to X.<br />
Flex and loosen the rope at the crossover point during the final burying process.<br />
Hammering the cover at X will help loosen the strands.<br />
With larger ropes it is helpful to securely anchor the slipknot, attach a small line<br />
to the braided core at the crossover and mechanically apply tension with either a<br />
block and tackle, capstan, <strong>com</strong>e-a-long, or power winch.<br />
Tension will reduce the diameter of the core and<br />
cross-over<br />
crossover for easier burying (see Figure 2).<br />
In order to prevent no-load opening of<br />
your eye splice, Samson re<strong>com</strong>mends<br />
lock-stitching the eye.<br />
Please download lock stitch instructions<br />
to <strong>com</strong>plete this splice.<br />
Figure 1<br />
Figure 2<br />
mechanical tension<br />
core<br />
small line<br />
cross-over<br />
core<br />
pull<br />
firmly secured<br />
pull<br />
Page 4 of 4<br />
© 2007 Samson Rope Technologies, Inc. All rights reserved.<br />
2090 Thornton Street<br />
Ferndale, WA USA 98248<br />
(T) 360.384.4669<br />
(F) 360.384.0572<br />
www.samsonrope.<strong>com</strong>


