


Create successful ePaper yourself
Turn your PDF publications into a flip-book with our unique Google optimized e-Paper software.
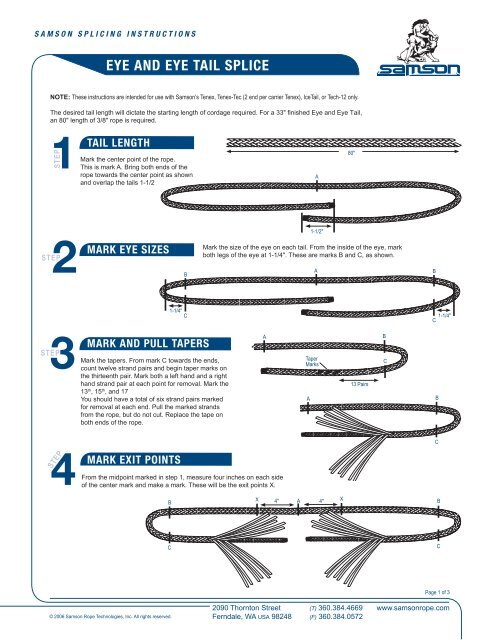
EYE AND EYE TAIL SPLICE<br />
NOTE: These instructions are intended for use with Samson’s Tenex, Tenex-Tec (2 end per carrier Tenex), IceTail, or Tech-12 only.<br />
The desired <strong>tail</strong> length will dictate the starting length of cordage required. For a 33" finished Eye <strong>and</strong> Eye Tail,<br />
an 80" length of 3/8" rope is required.<br />
STEP<br />
TAIL LENGTH<br />
Mark the center point of the rope.<br />
This is mark A. Bring both ends of the<br />
rope towards the center point as shown<br />
1<strong>and</strong> overlap the <strong>tail</strong>s 1-1/2<br />
A<br />
80"<br />
1-1/2"<br />
2<br />
STEP<br />
MARK EYE SIZES<br />
Mark the size of the <strong>eye</strong> on each <strong>tail</strong>. From the inside of the <strong>eye</strong>, mark<br />
both legs of the <strong>eye</strong> at 1-1/4". These are marks B <strong>and</strong> C, as shown.<br />
1-1/4"<br />
C<br />
B<br />
A<br />
B<br />
1-1/4"<br />
C<br />
3<br />
STEP<br />
MARK AND PULL TAPERS<br />
Mark the tapers. From mark C towards the ends,<br />
count twelve str<strong>and</strong> pairs <strong>and</strong> begin taper marks on<br />
the thirteenth pair. Mark both a left h<strong>and</strong> <strong>and</strong> a right<br />
h<strong>and</strong> str<strong>and</strong> pair at each point for removal. Mark the<br />
13 th , 15 th , <strong>and</strong> 17<br />
You should have a total of six str<strong>and</strong> pairs marked<br />
for removal at each end. Pull the marked str<strong>and</strong>s<br />
from the rope, but do not cut. Replace the tape on<br />
both ends of the rope.<br />
A<br />
Taper<br />
Marks<br />
A<br />
13 Pairs<br />
B<br />
C<br />
B<br />
4<br />
From<br />
STEP<br />
MARK EXIT POINTS<br />
the midpoint marked in step 1, measure four inches on each side<br />
of the center mark <strong>and</strong> make a mark. These will be the exit points X.<br />
B<br />
X<br />
4" A 4"<br />
X<br />
C<br />
B<br />
C<br />
C<br />
Page 1 of 3<br />
2090 Thornton Street<br />
Ferndale, WA USA 98248<br />
(T) <strong>36</strong>0.384.4669<br />
(F) <strong>36</strong>0.384.0572<br />
www.samsonrope.com
EYE AND EYE TAIL SPLICE<br />
STEP<br />
5<br />
Form<br />
FORM AND CLOSE BRUMMEL<br />
5A<br />
the locked Brummel on both ends. Pass<br />
the shorter taped end through the center of the<br />
rope at mark B. Do not bury mark C, leave on<br />
the entry side of st<strong>and</strong>ing rope.<br />
5B<br />
Pass the opposite end through the center of<br />
the <strong>tail</strong> approximately two picks from where it<br />
exits the st<strong>and</strong>ing part of the rope. Close up the<br />
Brummel, bringing marks B <strong>and</strong> C together at<br />
the vertex of the <strong>eye</strong>.<br />
B<br />
C<br />
B<br />
C<br />
STEP<br />
BURY TAILS<br />
6Measure 2 picks from the point where the st<strong>and</strong>ing<br />
part passes through the <strong>tail</strong>. This is mark D.<br />
With a fid attached to the taped end of the <strong>tail</strong>,<br />
bury the <strong>tail</strong> from mark D past the midpoint A to<br />
mark X. Just before the pulled taper str<strong>and</strong>s are<br />
buried into the st<strong>and</strong>ing part of the rope, cut them<br />
off. Pull the <strong>tail</strong> out at mark X as far as possible,<br />
<strong>and</strong> repeat steps 5, 6, <strong>and</strong> 7 for the opposite end.<br />
B<br />
B<br />
C<br />
D<br />
D X<br />
A X<br />
STEP<br />
MARK AND CUT ENDS<br />
7Smooth all slack from the rope, working from the Brummels to the center mark. Mark where the tapered ends exit the<br />
rope at both marks X. Pull both tapered ends out from mark X, measure 3-1/2” from previous mark where the tapers<br />
exited at mark X (this is the section of both tapered ends that overlap in the center section), <strong>and</strong> cut off at an angle.<br />
X<br />
A<br />
X<br />
3-1/2"<br />
STEP<br />
FINISH SPICE<br />
8Milk all slack from the Eye <strong>and</strong> Eye Tail. The goal is<br />
to keep the diameter <strong>and</strong> fullness of the rope<br />
consistent tied into a climbing hitch. When all slack<br />
has been removed <strong>and</strong> the diameter is consistent,<br />
lock stitch the <strong>eye</strong>s at both ends.<br />
Page 2 of 3<br />
2090 Thornton Street<br />
Ferndale, WA USA 98248<br />
(T) <strong>36</strong>0.384.4669<br />
(F) <strong>36</strong>0.384.0572<br />
www.samsonrope.com
lock stitching & whipping procedures<br />
L O C K S T I T C H I N G :<br />
B<br />
Twines for Lock Stitching:<br />
S t e p 1<br />
Pass stitching through <strong>splice</strong>d area near throat of <strong>eye</strong><br />
as shown.<br />
S t e p 2<br />
Reinsert as shown pulling snug but not tight.<br />
S t e p 3<br />
Continue to reinsert as shown until you have at least 3<br />
complete stitches.<br />
S t e p 4<br />
After completing Step 3, rotate <strong>splice</strong>d part of rope<br />
90° <strong>and</strong> reinsert end A into <strong>splice</strong>d area in the same<br />
fashion as in Steps 1, 2 <strong>and</strong> 3. The <strong>splice</strong> will now be<br />
stitched on two planes perpendicular to each other.<br />
Make sure you do not pull the stitching too tight.<br />
B<br />
3<br />
B<br />
A<br />
A<br />
2<br />
A<br />
1<br />
In general, braided nylon twine is<br />
preferred for lock stitching. Polyester<br />
twines, or twisted twines in either<br />
polyester or nylon, or a str<strong>and</strong> from the<br />
rope itself (from a discarded or extra<br />
piece) can be substituted.<br />
The twine used should be approximately<br />
the same diameter as a str<strong>and</strong><br />
in the rope. If the rope or the cover of<br />
the rope is made up of pairs of str<strong>and</strong>s<br />
rather than a single str<strong>and</strong>, the twine<br />
should be about the same diameter as<br />
these two str<strong>and</strong>s together.<br />
To check the twine size, lay the twine<br />
over the str<strong>and</strong>s in the rope – if it<br />
covers the width of the str<strong>and</strong>(s),<br />
it is the right size.<br />
S t e p 5<br />
After stitching at least three complete stitches as in<br />
Step 3, extract both ends A <strong>and</strong> B together through<br />
the same opening in the braid. Tie them together with<br />
a square knot <strong>and</strong> reinsert back into braid. For double<br />
braids, re-insert the knot between the cover <strong>and</strong> core.<br />
A<br />
B<br />
3<br />
2<br />
1<br />
Page 3 of 3<br />
2090 Thornton Street<br />
Ferndale, WA USA 98248<br />
(T) <strong>36</strong>0.384.4669<br />
(F) <strong>36</strong>0.384.0572<br />
www.samsonrope.com


