

ROPE TO CHAIN SPLICE 3-strand Class I 1STEP - L-36 Fleet
ROPE TO CHAIN SPLICE 3-strand Class I 1STEP - L-36 Fleet
ROPE TO CHAIN SPLICE 3-strand Class I 1STEP - L-36 Fleet

You also want an ePaper? Increase the reach of your titles
YUMPU automatically turns print PDFs into web optimized ePapers that Google loves.
Rope to chain splice 3-<strong>strand</strong> <strong>Class</strong> I<br />
1step<br />
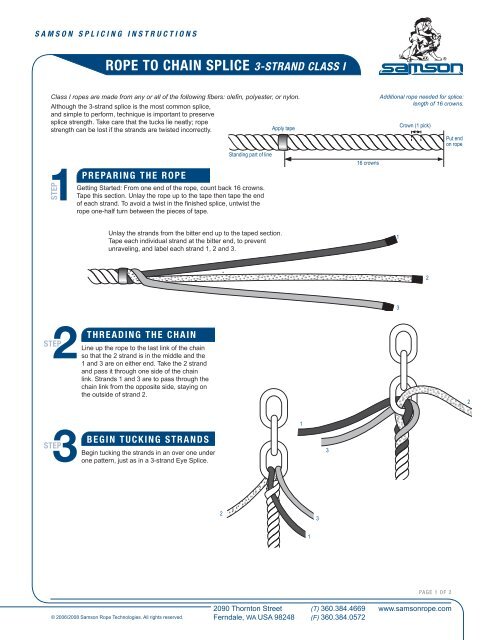
<strong>Class</strong> I ropes are made from any or all of the following fibers: olefin, polyester, or nylon.<br />
Although the 3-<strong>strand</strong> splice is the most common splice,<br />
and simple to perform, technique is important to preserve<br />
splice strength. Take care that the tucks lie neatly; rope<br />
strength can be lost if the <strong>strand</strong>s are twisted incorrectly.<br />
preparing the rope<br />
Standing part of line<br />
Getting Started: From one end of the rope, count back 16 crowns.<br />
Tape this section. Unlay the rope up to the tape then tape the end<br />
of each <strong>strand</strong>. To avoid a twist in the finished splice, untwist the<br />
rope one-half turn between the pieces of tape.<br />
Apply tape<br />
16 crowns<br />
Additional rope needed for splice:<br />
length of 16 crowns.<br />
Crown (1 pick)<br />
Put end<br />
on rope<br />
Unlay the <strong>strand</strong>s from the bitter end up to the taped section.<br />
Tape each individual <strong>strand</strong> at the bitter end, to prevent<br />
unraveling, and label each <strong>strand</strong> 1, 2 and 3.<br />
1<br />
2<br />
3<br />
2<br />
step<br />
threading the chain<br />
Line up the rope to the last link of the chain<br />
so that the 2 <strong>strand</strong> is in the middle and the<br />
1 and 3 are on either end. Take the 2 <strong>strand</strong><br />
and pass it through one side of the chain<br />
link. Strands 1 and 3 are to pass through the<br />
chain link from the opposite side, staying on<br />
the outside of <strong>strand</strong> 2.<br />
2<br />
3<br />
step<br />
begin tucking <strong>strand</strong>s<br />
Begin tucking the <strong>strand</strong>s in an over one under<br />
one pattern, just as in a 3-<strong>strand</strong> Eye Splice.<br />
1<br />
3<br />
2<br />
3<br />
1<br />
Page 1 of 2<br />
© 2006/2008 Samson Rope Technologies. All rights reserved.<br />
2090 Thornton Street<br />
Ferndale, WA USA 98248<br />
(T) <strong>36</strong>0.384.4669<br />
(F) <strong>36</strong>0.384.0572<br />
www.samsonrope.com
Rope to chain splice 3-<strong>strand</strong> <strong>Class</strong> I<br />
4step<br />
tucking the <strong>strand</strong>s<br />
With <strong>strand</strong>s 1 and 3 tucked once, (4A), turn<br />
splice over to tuck <strong>strand</strong> 2 (4B).<br />
4A<br />
4B<br />
2<br />
3<br />
1<br />
3<br />
2<br />
1<br />
step<br />
5<br />
Perform 4 more complete tucks with<br />
all 3 <strong>strand</strong>s. Tighten tucks if necessary.<br />
Front of finished splice.<br />
Back of finished splice.<br />
NOTE:<br />
This method of joining rope and chain is<br />
designed to minimize chafe between rope<br />
and chain, but as a matter of prudent<br />
seamanship, it should be checked regularly<br />
and remade if there is any evidence of wear.<br />
Page 2 of 2<br />
© 2006/2008 Samson Rope Technologies. All rights reserved.<br />
2090 Thornton Street<br />
Ferndale, WA USA 98248<br />
(T) <strong>36</strong>0.384.4669<br />
(F) <strong>36</strong>0.384.0572<br />
www.samsonrope.com


