SB98-0010R - Hoshizaki America, Inc.
SB98-0010R - Hoshizaki America, Inc.
SB98-0010R - Hoshizaki America, Inc.

Create successful ePaper yourself
Turn your PDF publications into a flip-book with our unique Google optimized e-Paper software.
HOSHIZAKI AMERICA, INC.<br />
SERVICE BULLETIN<br />
<strong>SB98</strong>-<strong>0010R</strong><br />
November 30, 1998<br />
Page 1 of 2<br />
Subject: CORRECT PROCEDURES FOR INSTALLING HEADMASTER<br />
CONTROLS.<br />
This service bulletin will cover the correct removal and re-installation of headmaster controls. If a<br />
headmaster is deemed faulty follow these steps.<br />
1. Reclaim the total refrigerant charge from the machine through the schrader ports provided. To<br />
speed this process, recover from more than one port and use a 115 volt pigtail to energize the<br />
liquid line valve solenoid during recovery.<br />
2. Cut the stub on the top of the dome of the headmaster valve. This it will allow the inert gas<br />
charge to release from the dome.<br />
3. Remove the bad valve. Either un-sweat or cut the headmaster as close to the joints as possible.<br />
To replacement follow these steps:<br />
1. Check the application chart to be certain that the correct headmaster is used.<br />
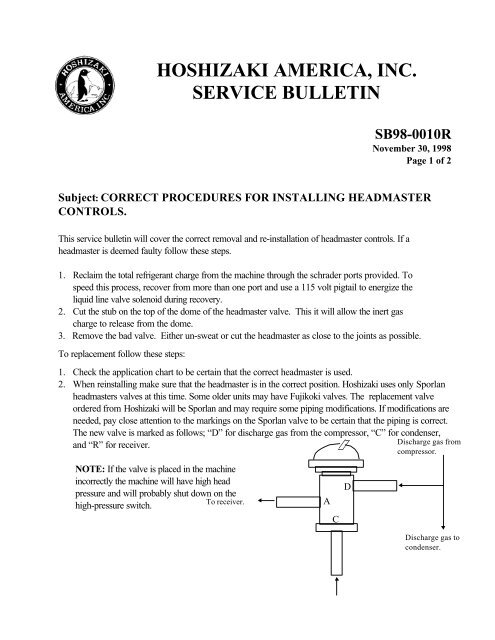
2. When reinstalling make sure that the headmaster is in the correct position. <strong>Hoshizaki</strong> uses only Sporlan<br />
headmasters valves at this time. Some older units may have Fujikoki valves. The replacement valve<br />
ordered from <strong>Hoshizaki</strong> will be Sporlan and may require some piping modifications. If modifications are<br />
needed, pay close attention to the markings on the Sporlan valve to be certain that the piping is correct.<br />
The new valve is marked as follows; “D” for discharge gas from the compressor, “C” for condenser,<br />
and “R” for receiver.<br />
Discharge gas from<br />
compressor.<br />
NOTE: If the valve is placed in the machine<br />
incorrectly the machine will have high head<br />
pressure and will probably shut down on the<br />
high-pressure switch.<br />
To receiver.<br />
A<br />
C<br />
D<br />
Discharge gas to<br />
condenser.
<strong>SB98</strong>-<strong>0010R</strong><br />
November 30, 1998<br />
Page 2 of 2<br />
3. When sweating in the new valve it is important to keep the dome and the body of the new valve<br />
from overheating. Use a heat sink paste or place a wet towel on the dome and valve body while<br />
sweating the joints. There are two reasons for this, the first is for safety, if the dome overheats it<br />
could explode, and second the internal parts could become defective.<br />
4. Next, pressurize the system and check for leaks.<br />
5. The final step is to evacuate the system and recharge to factory specifications with the correct type of<br />
refrigerant. This is best done by WEIGHING the charge back in. The correct charge type and<br />
amount is listed on the unit nameplate.<br />
R-502 & R-22 models:<br />
CONDENSER PART NUMBER MANUFACTURER MFG # / SETTING<br />
MODEL<br />
URC-6E 4A0229-01 Sporlan LAC-4 / 190 lb.<br />
URC-12E 4A0229-01 Sporlan LAC-4 / 190 lb<br />
URC-20E 4A0229-02 Sporlan LAC-4 / 156 lb<br />
KM-2400SRB3 443522-01 Sporlan LAC-5 / 140 lb<br />
Note: The KM-2400SRB3 headmaster is located in the machine not in the condenser. Also note that if<br />
changing a headmaster on a URC-20E the LAC-4 190 lb. headmaster can be used with a small reduction in<br />
production.<br />
R-404A models:<br />
CONDENSER PART NUMBER MANUFACTURER MFG # / SETTING<br />
MODEL<br />
URC-6F 4A0229-03 Sporlan LAC-4 210 lb<br />
URC-12F 4A0229-03 Sporlan LAC-4 210 lb<br />
URC-20F 4A0229-03 Sporlan LAC-4 210 lb<br />
KM-2400SRF3 N/A N/A N/A<br />
NOTE: Due to the higher operating pressures of the R-404A refrigerant, the pressure setting of the<br />
headmaster increased to 210 PSIG.<br />
On machines that will be placed on NON-OEM condensers (multi-pass condenser coils), the Selling dealer<br />
must submit a NON-OEM condenser approval form for approval by the Technical Support Department.<br />
This approval validates the customer’s warranty and provides a record for the warranty status. The<br />
information supplied on the form shows that the rack system or condenser application is compliant to our<br />
specifications. This form contains information such as the correct condenser sizing, adjustment of charge,<br />
and the correct headmaster to use for the application.<br />
Liquid from condenser.
To receive a NON-OEM condenser approval form or if further assistance is needed please contact<br />
Technical Support at 1-800-233-1940.