HTM311A English - UPM Marketing
HTM311A English - UPM Marketing
HTM311A English - UPM Marketing

Create successful ePaper yourself
Turn your PDF publications into a flip-book with our unique Google optimized e-Paper software.
P1<br />
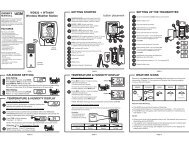
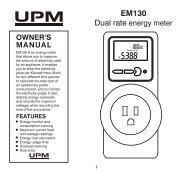
OWNER’S<br />
MANUAL<br />
Read and understand this<br />
manual before installation or<br />
use.<br />
<br />
<br />
<br />
<br />
<br />
<br />
<br />
<br />
<br />
<br />
FEATURES<br />
Ideal for electric baseboards,<br />
convectors and radiant ceiling<br />
heaters<br />
5+1+1 day programming<br />
ECONO mode<br />
12/24 hour clock<br />
Temperature display ( °C or °F)<br />
Usage Monitor - keeps track<br />
of accumulated “ON” time<br />
Simple 2-wire installation<br />
Rating: 240V AC, 60Hz<br />
MAXIMUM LOAD: 15A<br />
- 3600W @ 240V<br />
MINIMUM LOAD: 750W<br />
Programmable Thermostat<br />
<strong>HTM311A</strong><br />
MO<br />
AM<br />
P1<br />
C<br />
C<br />
*<br />
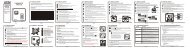
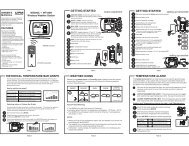
CAUTION!<br />
TO AVOID FIRE, SHOCK, OR DEATH, SHUT OFF POWER SUPPLY AT<br />
THE CIRCUIT BREAKER OR FUSE AND TEST THAT THE POWER IS<br />
OFF BEFORE WIRING.<br />
This product operates at 208/240V AC. Do not install it unless you are<br />
completely familiar and competent with house wiring. Handle with<br />
caution to prevent any risk of electrical shock that could cause serious<br />
injury or death.<br />
DO NOT connect voltage different from device rating. This thermostat<br />
will not operate at 120V AC.<br />
All wiring must comply with applicable codes and regulations.<br />
For wiring, use COPPER conductors only.<br />
Ensure that the heating system is protected by appropriate circuit<br />
breakers or fuses.<br />
Maximum load for this thermostat is 15A, 3600W resistive. DO NOT<br />
exceed this limit; otherwise a potential fire hazard exists.<br />
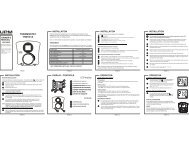
INSTALLATION<br />
*<br />
1<br />
DISCONNECT THE POWER SUPPLY AT THE CIRCUIT BREAKER OR<br />
FUSE BEFORE PROCEEDING WITH THE INSTALLATION.<br />
Remove the old thermostat<br />
carefully and identify the two<br />
wires from the wall box.<br />
Using the wire nuts provided,<br />
2<br />
securely fasten each wire from<br />
the new thermostat to a wire in<br />
the wall box. Refer to the<br />
diagram. NOTE: ENSURE NO<br />
BARE WIRE IS EXPOSED.<br />
Mount the new thermostat into<br />
3<br />
the wall box using the two<br />
screws provided through the<br />
mounting holes. (Remove the<br />
cover if necessary).<br />
4 Reconnect power supply.<br />
*<br />
208/240V AC<br />
Line<br />
Wire Nut<br />
Wire Nut<br />
2-Wire Installation:<br />
Wall Box<br />
208/240V AC<br />
Electric<br />
Line Baseboard<br />
Heater<br />
9<br />
4-Wire Installation:<br />
Wall Box<br />
Electric<br />
Baseboard<br />
Heater<br />
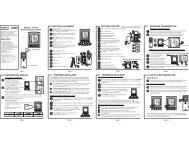
SETTING THE TEMPERATURE DISPLAY ( ° C or ° F)<br />
You will now have 16 seconds to set the temperature display to ° C or ° F by<br />
pressing the UP or DOWN button. (Factory Default = ° C). If necessary,<br />
the RESET button may be pressed after 16 seconds to start over.<br />
1<br />
3<br />
5<br />
7<br />
10<br />
1<br />
2<br />
4<br />
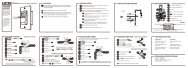
DISPLAY / BUTTONS<br />
MO TU WE TH FR SA SU<br />
AM<br />
PM<br />
USAGE TODAY THIS WEEK<br />
P1 P2<br />
P3 P4<br />
HOLD ECONO<br />
3 5<br />
C<br />
F<br />
C<br />
F<br />
2<br />
4<br />
6<br />
8<br />
11<br />
7<br />
6<br />
8<br />
1<br />
2<br />
3<br />
4<br />
5<br />
6<br />
7<br />
8<br />
9<br />
10<br />
11<br />
1<br />
Days Of The Week<br />
Clock Display; Usage Display<br />
Usage Monitor Function<br />
Temperature Units ( ° Cor°F)<br />
Current Temperature<br />
Heat “ON” Indicator<br />
Program Number<br />
Set Temperature<br />
Power Failure Indicator<br />
HOLD Function<br />
ECONO Mode<br />
LCD Display<br />
Button Placement<br />
RESET - resets programs and clock to<br />
factory settings<br />
2 SET CLOCK<br />
3 ECONO - activates ECONO mode programs<br />
4 PROGRAM - scrolls through program<br />
settings<br />
5 UP/DOWN - sets program temperatures<br />
6 AHEAD/BACK - sets program times<br />
7 HOLD - disables all programs and keeps<br />
temperature constant<br />
8 USAGE - displays the accumulated system<br />
“ON” time<br />
PAGE 1 PAGE 2 PAGE 3 PAGE 4<br />
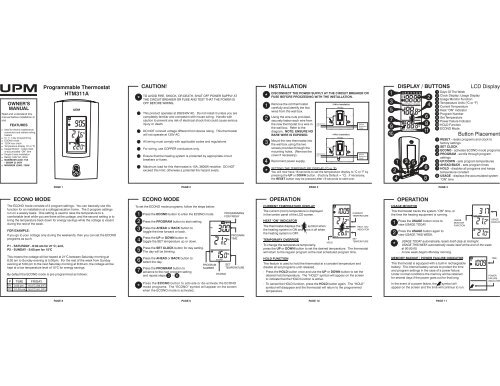
ECONO MODE<br />
The ECONO mode consists of 2 program settings. You can basically use this<br />
function for an installation at a cottage/vacation home. The 2 program settings<br />
run on a weekly basis. One setting is used to raise the temperature to a<br />
comfortable level while you are there at the cottage, and the second setting is to<br />
bring the temperature back down for energy savings while the cottage is vacant<br />
during the rest of the week.<br />
FOR EXAMPLE:<br />
If you go to your cottage only during the weekends, then you can set the ECONO<br />
programs as such:<br />
P1-SATURDAY-8:30amfor21C;and, °<br />
P2-SUNDAY-5:00pmfor15C °<br />
This means the cottage will be heated at 21°<br />
C between Saturday morning at<br />
8:30 am to Sunday evening at 5:00pm. For the rest of the week from Sunday<br />
evening at 5:00 pm to the next Saturday morning at 8:30 am, the cottage will be<br />
kept at a low temperature level of 15°<br />
C for energy savings.<br />
By default the ECONO mode is pre-programmed as follows:<br />
P<br />
P1<br />
P2<br />
TIME<br />
3:00 pm<br />
10:00 pm<br />
FRIDAY<br />
o<br />
o<br />
15.0 C (59.0 F)<br />
o<br />
o<br />
16.0 C (61.0 F)<br />
1 Press the ECONO button to enter the ECONO mode.<br />
2<br />
3<br />
4<br />
5<br />
6<br />
7<br />
*<br />
ECONO MODE<br />
To set the ECONO mode programs, follow the steps below:<br />
Press the PROGRAM button to start setting.<br />
Press the AHEAD or BACK button to<br />
toggle the time forward or back.<br />
Press the UP or DOWN button to<br />
toggle the SET temperature up or down.<br />
Press the SET CLOCK button for day setting.<br />
The day will be blinking.<br />
Press the AHEAD or BACK button to<br />
select the day.<br />
Press the PROGRAM button to<br />
advance to the next program setting<br />
and repeat steps 3 – 6 .<br />
Press the ECONO button to activate or de-activate the ECONO<br />
mode programs. The “ECONO” symbol will appear on the screen<br />
when the ECONO mode is activated.<br />
PM<br />
P1<br />
PROGRAM<br />
NUMBER<br />
ECONO<br />
FR<br />
ECONO<br />
PROGRAMMING<br />
FOR FRIDAY<br />
PROGRAM<br />
C TIME<br />
C<br />
SET<br />
TEMPERATURE<br />
OPERATION<br />
CURRENT TEMPERATURE DISPLAY<br />
The current (room) temperature is displayed<br />
in the center panel of the LCD screen.<br />
HEAT “ON” INDICATOR<br />
The thermostat displays the symbol when<br />
the heating system is ON and turns it off when<br />
the heating system is OFF.<br />
SET<br />
TEMPORARY OVERRIDE<br />
HOLD<br />
TEMPERATURE<br />
To change the temperature temporarily,<br />
press the UP or DOWN button to set the desired temperature. The thermostat<br />
will return to the regular program at the next scheduled program time.<br />
HOLD FUNCTION<br />
CURRENT<br />
TEMPERATURE<br />
HEAT “ON”<br />
INDICATOR<br />
This feature is used to hold the thermostat at a constant temperature and<br />
disable all set programs until released.<br />
- Press the HOLD button once and use the UP or DOWN button to set the<br />
desired hold temperature. The “HOLD” symbol will appear on the screen<br />
to indicate that the HOLD function is active.<br />
- To cancel the HOLD function, press the HOLD button again. The “HOLD”<br />
symbol will disappear and the thermostat will return to the programmed<br />
temperature.<br />
MO<br />
AM<br />
HOLD<br />
C<br />
C<br />
1<br />
2<br />
OPERATION<br />
USAGE MONITOR<br />
This thermostat tracks the system “ON” time, or<br />
the time the heating equipment is running.<br />
Press the USAGE button once to<br />
view USAGE TODAY.<br />
Press the USAGE button again to<br />
view USAGE THIS WEEK.<br />
USAGE<br />
MONITOR<br />
FUNCTION<br />
USAGE TODAY<br />
- USAGE TODAY automatically resets itself daily at midnight.<br />
* - USAGE THIS WEEK automatically resets itself at the end of the week<br />
at 00:00:00.<br />
- A new week begins Monday morning.<br />
MEMORY BACKUP / POWER FAILURE INDICATOR MO<br />
TIME<br />
AM<br />
This thermostat is equipped with a built-in rechargeable<br />
battery. The internal battery serves to protect the time<br />
and program settings in the case of a power failure.<br />
Under normal conditions the memory will be retained<br />
POWER<br />
for several days if the power goes out for that long.<br />
FAILURE<br />
INDICATOR<br />
In the event of a power failure, the symbol will<br />
appear on the screen and the time will continue to run.<br />
C<br />
C<br />
USAGE<br />
DISPLAY<br />
PAGE 8 PAGE 9 PAGE 10 PAGE 11
*<br />
1<br />
2<br />
3<br />
4<br />
5<br />
CLOCK SETTING<br />
To change between the 12 and 24 hour clock format, press the<br />
AHEAD and BACK buttons together simultaneously while in the<br />
clock mode.<br />
To begin, press the SET CLOCK button.<br />
The symbol and time will be blinking.<br />
Press the AHEAD or BACK button to<br />
toggle the time forward or back.<br />
NOTE: You may press and hold the<br />
button down to accelerate the setting.<br />
Press the SET CLOCK button.<br />
The symbol and day will be blinking.<br />
Press the AHEAD or BACK button to<br />
toggle the day forward or back.<br />
Press the SET CLOCK button to complete.<br />
NOTE: If no button is pressed within 16 seconds, the display will<br />
automatically return to the normal clock display.<br />
AM<br />
WE<br />
DAY<br />
C<br />
TIME<br />
PROGRAM SETTING<br />
This thermostat is equipped with 5+1+1 day programming - separate<br />
programming for Weekdays, Saturday and Sunday, with four settings per day.<br />
This thermostat is pre-programmed for your convenience or you can set your<br />
own programs as desired.<br />
o<br />
o<br />
o<br />
The pre-programmed schedule is as follows:<br />
PERIOD P TIME WEEKDAYS SATURDAY SUNDAY<br />
MORNING P1 6:00 am<br />
o<br />
o<br />
21.0 C (70.0 F)<br />
o<br />
o<br />
21.0 C (70.0 F)<br />
o<br />
o<br />
21.0 C (70.0 F)<br />
DAY P2 8:00 am<br />
o<br />
o<br />
16.5 C (61.5 F)<br />
o<br />
o<br />
16.5 C ( 61.5<br />
F)<br />
o<br />
o<br />
16.5 C ( 61.5<br />
F)<br />
EVENING P3 6:00 pm<br />
o<br />
21.0 C (<br />
o<br />
70.0 F)<br />
o<br />
21.0 C (<br />
o<br />
70.0 F)<br />
o<br />
21.0 C (<br />
o<br />
70.0 F)<br />
NIGHT P4 10:00 pm<br />
1.5<br />
o<br />
16.5 C (6 F)<br />
o<br />
16.5 C ( 1.5 6 F)<br />
o<br />
16.5 C ( 1.5 6 F)<br />
*<br />
The program settings are arranged in a circular pattern starting with<br />
P1 for Weekdays:<br />
Cycle through each program setting by pressing the PROGRAM button.<br />
1 Press the PROGRAM button to start.<br />
NOTE: You will begin with P1 for Weekdays.<br />
2<br />
3<br />
4<br />
5<br />
PROGRAM SETTING<br />
To set your own programs, follow the steps below. Remember to set all 12<br />
program settings: 4 for Weekdays, 4 for Saturday and 4 for Sunday.<br />
Press the AHEAD or BACK button to<br />
toggle the time forward or back.<br />
Press the1<br />
UP or DOWN button to<br />
toggle the SET temperature up or down.<br />
Press the PROGRAM button to advance to<br />
the next program setting. (i.e. P2).<br />
MO TU WE TH FR<br />
Repeat steps 2 – 4 until all 12 program<br />
settings have been completed.<br />
PROGRAM<br />
NUMBER<br />
NOTE: If no button is pressed within 16 seconds, the display will<br />
automatically return to the normal display.<br />
AM<br />
P1<br />
PROGRAMMING<br />
FOR WEEKDAYS<br />
PROGRAM<br />
C<br />
TIME<br />
C<br />
SET<br />
TEMPERATURE<br />
PAGE 5 PAGE 6 PAGE 7<br />
TROUBLESHOOTING<br />
PROBLEM<br />
Display shows a blank screen.<br />
Buttons are not responding; or<br />
the display seems frozen or<br />
abnormal.<br />
Display shows the<br />
the screen.<br />
SOLUTION<br />
Make sure that the thermostat is fully installed. Refer to<br />
the INSTALLATION section. Check that the power supply<br />
has been reconnected at the circuit breaker or fuse. If<br />
the heater or heating appliance has a power switch of its<br />
own, check to see that it has been turned ON. Also, you<br />
may try pressing the RESET button.<br />
If the screen remains blank after a reset, it may be that<br />
the internal battery has become completely discharged.<br />
To correct this problem, leave the thermostat installed as<br />
it is for several hours and then press the RESET button<br />
again. This should be ample time for the internal battery<br />
to recharge itself and resume normal LCD screen<br />
operation.<br />
Press the RESET button to reset the thermostat.<br />
symbol on This symbol indicates a POWER FAILURE or that the<br />
power supply is not getting through. Check that the<br />
power supply has been reconnected at the circuit breaker<br />
or fuse. If the heater or heating appliance has a power<br />
switch of its own, check to see that it has been turned ON<br />
(or to the MAX). Also, ensure that the LOAD is at least a<br />
minimum of 750W.<br />
TECHNICAL SPECIFICATIONS<br />
Rating: 240V AC, 60Hz<br />
Maximum Load: 15A resistive; 3600W @ 240V<br />
Minimum Load: 750W<br />
Precision: +/- 0.2°<br />
C<br />
CONTACT US<br />
1<br />
<strong>UPM</strong> <strong>Marketing</strong> Inc.<br />
Unit 10B - 250 Shields Court<br />
Markham, Ontario<br />
L3R 9W7<br />
CANADA<br />
CUSTOMER SUPPORT: 1-888-468-6876<br />
PAGE 12 PAGE 13