Integrator Spring Clip Replacement Instruction Sheet - Christie
Integrator Spring Clip Replacement Instruction Sheet - Christie
Integrator Spring Clip Replacement Instruction Sheet - Christie

You also want an ePaper? Increase the reach of your titles
YUMPU automatically turns print PDFs into web optimized ePapers that Google loves.
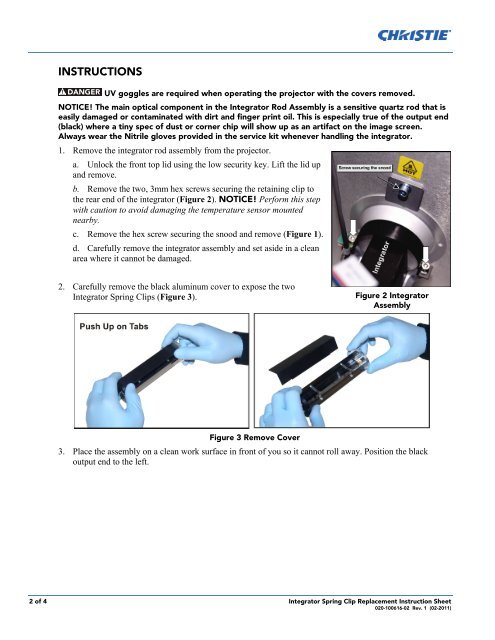
INSTRUCTIONS<br />
UV goggles are required when operating the projector with the covers removed.<br />
NOTICE! The main optical component in the <strong>Integrator</strong> Rod Assembly is a sensitive quartz rod that is<br />
easily damaged or contaminated with dirt and finger print oil. This is especially true of the output end<br />
(black) where a tiny spec of dust or corner chip will show up as an artifact on the image screen.<br />
Always wear the Nitrile gloves provided in the service kit whenever handling the integrator.<br />
1. Remove the integrator rod assembly from the projector.<br />
a. Unlock the front top lid using the low security key. Lift the lid up<br />
and remove.<br />
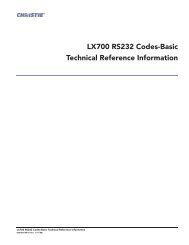
b. Remove the two, 3mm hex screws securing the retaining clip to<br />
the rear end of the integrator (Figure 2). NOTICE! Perform this step<br />
with caution to avoid damaging the temperature sensor mounted<br />
nearby.<br />
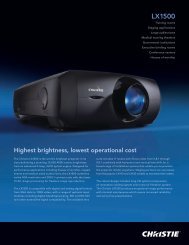
c. Remove the hex screw securing the snood and remove (Figure 1).<br />
d. Carefully remove the integrator assembly and set aside in a clean<br />
area where it cannot be damaged.<br />
2. Carefully remove the black aluminum cover to expose the two<br />
<strong>Integrator</strong> <strong>Spring</strong> <strong>Clip</strong>s (Figure 3).<br />
Figure 2 <strong>Integrator</strong><br />
Assembly<br />
Figure 3 Remove Cover<br />
3. Place the assembly on a clean work surface in front of you so it cannot roll away. Position the black<br />
output end to the left.<br />
2 of 4 <strong>Integrator</strong> <strong>Spring</strong> <strong>Clip</strong> <strong>Replacement</strong> <strong>Instruction</strong> <strong>Sheet</strong><br />
020-100616-02 Rev. 1 (02-2011)