Three-quarter Logs Compression-Fit Saddle Notch - IDEAS-EC
Three-quarter Logs Compression-Fit Saddle Notch - IDEAS-EC
Three-quarter Logs Compression-Fit Saddle Notch - IDEAS-EC

You also want an ePaper? Increase the reach of your titles
YUMPU automatically turns print PDFs into web optimized ePapers that Google loves.
<strong>Three</strong>-<strong>quarter</strong> <strong>Logs</strong><br />
The second logs to be placed are<br />
often referred to as three-<strong>quarter</strong><br />
logs because about a <strong>quarter</strong> of the<br />
log is cut off the bottom to rest<br />
squarely on the foundation or floor.<br />
Slab off the bottom of the three<strong>quarter</strong><br />
logs to provide a flat width<br />
of about six inches, using the same<br />
techniques described for cutting the<br />
half log. The width of the flat<br />
bottom of the three-<strong>quarter</strong> logs<br />
may vary from end to end in order<br />
to leave enough wood over the<br />
notches. Always consider the<br />
height of the log to be crossed and<br />
the diameter of the butt or tip that<br />
will be crossing over the log you<br />
are working on.<br />
Cut a 1 /4-inch deep kerf for<br />
flashing parallel to the centerline of<br />
the log just outside the foundation<br />
or floor line. Place the two three<strong>quarter</strong><br />
logs on top of and at right<br />
angles to the half logs, with the<br />
centerlines lining up with the<br />
centerlines marked on the floor or<br />
foundation.<br />
Check to be sure that the flat<br />
bottoms are exactly parallel to the<br />
floor and shim them to level if<br />
required so that when notched to fit<br />
over the half logs, they will lay flat<br />
on the floor, evenly compressing<br />
the closed-cell seal sill gasket<br />
material under the bottom round.<br />
There are several ways to notch<br />
this first round together. This and a<br />
host of other notches are discussed<br />
in detail by B. Allan Mackie in<br />
Building With <strong>Logs</strong> and <strong>Notch</strong>es of<br />
All Kinds (see bibliography in<br />
Appendix D for these and other<br />
books). All notches should be selfdraining<br />
and should restrict the<br />
flow of heat, air, and moisture in<br />
and out of the structure for the life<br />
of the building.<br />
<strong>Compression</strong>-<strong>Fit</strong><br />
<strong>Saddle</strong> <strong>Notch</strong><br />
The current notch of choice by<br />
professional log builders is the<br />
compression-fit saddle notch. The<br />
shoulders of the log below are<br />
saddle-scarfed off at an angle that<br />
forms, in cross section, the shape of<br />
a domed pyramid with the sides<br />
sloping toward the top, leaving<br />
about a 3-inch domed top. The top<br />
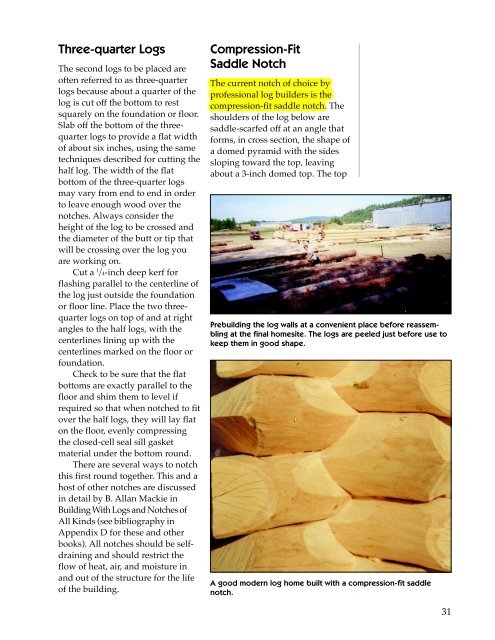
Prebuilding the log walls at a convenient place before reassembling<br />
at the final homesite. The logs are peeled just before use to<br />
keep them in good shape.<br />
A good modern log home built with a compression-fit saddle<br />
notch.<br />
31
A compression fit<br />
saddle notch<br />
should be about the same width as<br />
the lateral groove of the next log.<br />
By cutting the scarfs (see page<br />
34) you remove the sapwood,<br />
which tends to shrink and compress<br />
more than the heartwood<br />
does. You also create a better<br />
locking shape so that the top log<br />
fits over the log below like a huge<br />
pipe wrench, preventing it from<br />
twisting or turning. You have to cut<br />
a relief opening in the top of the<br />
notch so that the sides of the notch<br />
can bear the weight of the logs as<br />
they shrink and settle.<br />
The compression-fit notch<br />
comes to us from Scandinavia via<br />
Canada thanks to the reinvention<br />
of an ancient Norwegian log<br />
building technique by Del<br />
Radomske, a Canadian log home<br />
builder, inventor, teacher, and<br />
author. Radomske noticed that his<br />
once-perfectly fit full-scribed round<br />
notches were opening up after a<br />
few years of shrinking and settling.<br />
After perfecting the saddle notch,<br />
he observed that if there should be<br />
75 percent of the weight of a log<br />
resting on the notch and the remaining<br />
25 percent of the weight<br />
on the long or lateral groove, then<br />
it would make sense to overscribe<br />
the lateral groove so that as the logs<br />
settled and shrunk, the lateral<br />
groove would not hang up and hold<br />
the notch open. He experimented<br />
with first a 1 /8-inch overscribe, then<br />
1<br />
/4-inch, and evolved into an average<br />
of 3 /8-inch larger scribe setting<br />
for the lateral groove than for the<br />
notch. Over-scribing works best<br />
when combined with a saddle<br />
notch. The compression-fit notch,<br />
sometimes called shrink-to-fit, is<br />
designed to get tighter as the logs<br />
settle and shrink. Radomske is still<br />
experimenting with this shrink-tofit<br />
system, as are numerous other<br />
log builders who search for perfection.<br />
Round <strong>Notch</strong><br />
The round notch full-scribe technique<br />
typically uses identical scribe<br />
settings for both the long groove<br />
and the round notches. It would<br />
probably be better to overscribe a<br />
round notch building, but the log<br />
should bear on the top of the notch<br />
and not on the sides. The round<br />
notch will not keep the log below<br />
from twisting. To tie the logs together,<br />
drive hardwood pegs,<br />
dowels, through-bolts, or lag bolts,<br />
or pin them with rebar into predrilled<br />
holes through each round of<br />
logs to the rounds below. Keep track<br />
of the pins with marks on the logs<br />
so that you don’t hit them when<br />
cutting out a window or spline.<br />
Log Scriber<br />
A modern log scriber consists of a<br />
10 or 12-inch divider fitted with a<br />
pencil holder and adjustable level<br />
bubbles. The principle of scribing is<br />
based on parallel lines. The bottom<br />
leg of the scriber rides along the<br />
32